background image

• Arduino’s Tone Reference - This will help us generate the tones that 

emit when a certain key is pressed.

• Installing an Arduino Library - Learn how to install any libraries 

needed for the Gram Piano, such as the CapSense library.

• Arduino’s Capacitive Sense Library - Speaking of…
• Arduino’s Capacitive Sense Library Reference - Learn how the Cap 

Sense Library works.

Required Materials

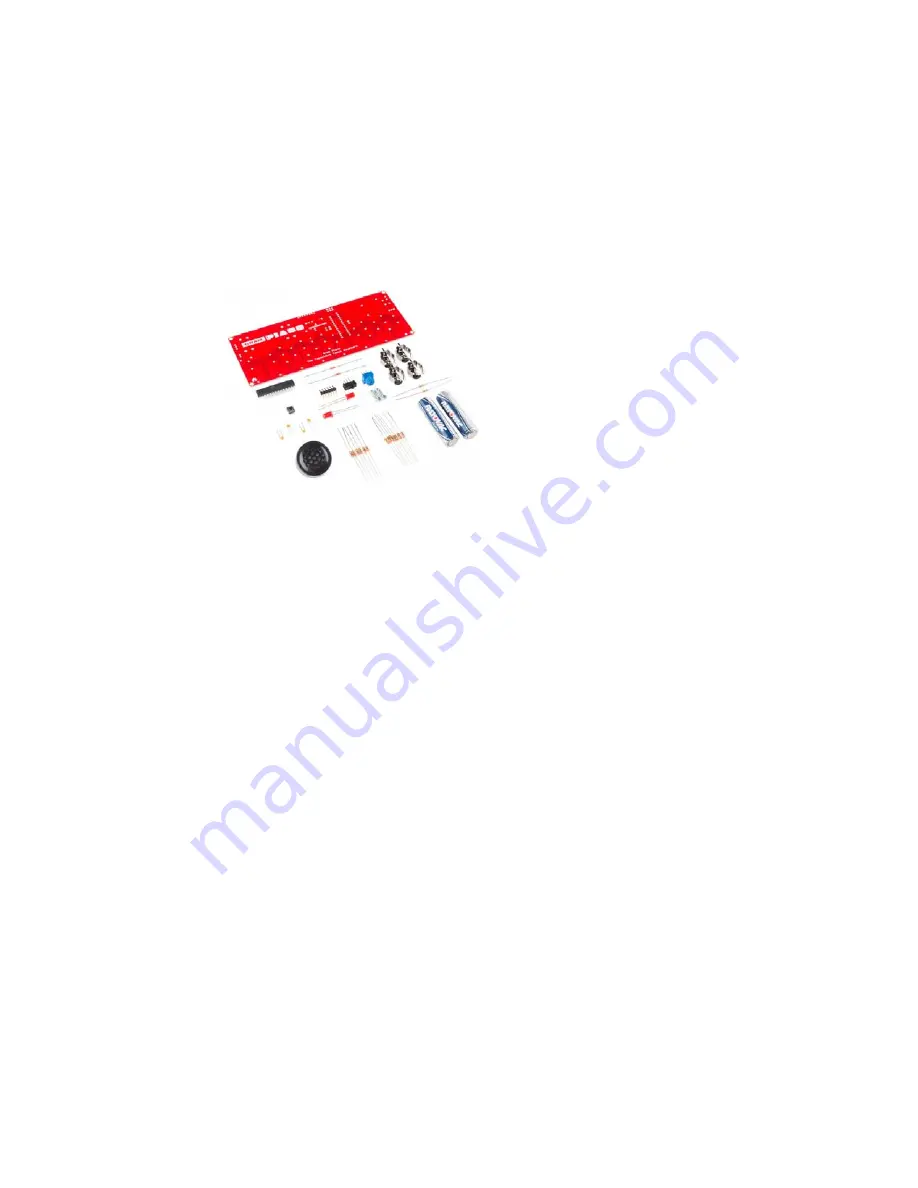
The Gram Piano Kit comes with a printed circuit board and a handful of 
components shown in the photo below.

Full Kit Part List

• x1 Gram Piano PCB
• x1 PCB Speaker
• x2 AA Batteries
• x2 AA Battery Holders
• x1 Atmel AVR 328 Microcontroller
• x1 Mini Power Switch
• x1 Mini Push Button
• x1 10k Ohm Potentiometer
• x2 Red 5mm LED’s
• x4 .1 uF Ceramic Capacitors
• x2 330 Ohm Resistors
• x2 10k Ohm Resistors
• x13 2M Ohm Resistors
• x1 6 Pin Right-angle Male Header
• x4 3/8" 4-40 Nylon Standoffs
• x4 3/8" 4-40 Screws

Extra Tools/Parts You’ll Need (Not included 

with the Gram Piano)

• Soldering Iron
• Solder
• Diagonal Cutters
• Screwdriver
• Pliers
• FTDI  Basic

Now, let’s get to building!

Assembly

The Gram Piano is a through hole soldering kit. If you have never soldered 
before, it is strongly advised that you read through SparkFun’s soldering 
tutorial first.

Page 2 of 8

Содержание Gram Piano Series

Страница 1: ... This guide will explain the assembly process the gram piano s default functionality and will provide an overview of the pre installed software After building and playing with the board s default settings you can customize your board to your liking by diving into the source code Suggested Reading This tutorial assumes you have prior knowledge of the topics mentioned below If you are unfamiliar wit...

Страница 2: ... x1 Gram Piano PCB x1 PCB Speaker x2 AA Batteries x2 AA Battery Holders x1 Atmel AVR 328 Microcontroller x1 Mini Power Switch x1 Mini Push Button x1 10k Ohm Potentiometer x2 Red 5mm LED s x4 1 uF Ceramic Capacitors x2 330 Ohm Resistors x2 10k Ohm Resistors x13 2M Ohm Resistors x1 6 Pin Right angle Male Header x4 3 8 4 40 Nylon Standoffs x4 3 8 4 40 Screws Extra Tools Parts You ll Need Not included...

Страница 3: ... orientation You can use the trick of bending the legs on the under side of the board to hold the capacitors in place while you solder After soldering a component you can cut its legs with some diagonal cutters Now let s solder in the resistors There are three values 2M Ohm 10K Ohm and 330 Ohm Make sure you pay attention to the color rings on the resistors to ensure you put the correct value resis...

Страница 4: ...ewdriver and or pliers to help with this step You can also hand tighten them Make sure the standoffs are on the underside of the board Now that the build is complete make sure the power switch is in the OFF position and then you can plug in the two AA batteries in the correct orientation of course Your kit will look just like the photo below Start playing with your kit now and or read the next sec...

Страница 5: ...e button on the top left of the board is programmed to play a specific sequence of notes you may recognize If the button is pressed again while the notes are still being played the playing will stop Out of the box the Gram Piano can essentially be used as a simple musical keyboard In the next section we will go over the default code running on the Gram Piano so you can learn how it works and give ...

Страница 6: ...ch is set by the potentiometer CapSensors is an array that declares a capacitive touch sensor for each of the keys All the keys use the same send pin but each key s pad is connected to a different pin CapacitiveSensor 2 3 indicates 2 is the send pin while 3 is the pin connected to the key s pad This particular sensor is for the low C key and all the keys are listed in order from lowest to highest ...

Страница 7: ...nt details here In the measureKeys function the most important line to understand is the following keys i CapSensors i capacitiveSensor 5 5 samples per key For each key this takes 5 capacitive touch readings averages them and then stores them in our keys array These values are then used afterward in the playKeyPress function like this if keys 12 threshold tone spkr NOTE_C5 octave 30 Each key is ch...

Страница 8: ...ve learned more about soldering capacitive touch playing tones and coding in Arduino Congratulations From here you can repurpose your board as you see fit You could change the musical scale make keys play melodies you choose or run blocks of code or even simply just leave it as is and enjoy coming up with some simple tunes We hope you enjoy your Gram Piano Feel free to share with us your feedback ...

Отзывы: