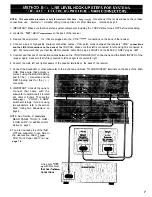
1. IMPORTANT: Make sure that
ALL stereo components including the
THP-CXB are turned OFF before proceeding.
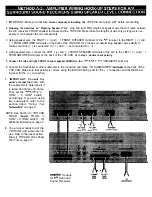
2. Following the directions on “Preparing Speaker
Wires”, strip and twist TWO lengths of speaker wire that will reach between
the A/V receiver’s FRONT speaker terminals and the THP-CXB. Make these two lengths of wire only as long as is nec-
essary to run between the two components.
3. Using speaker wire, the RIGHT ( + ) and ( ) FRONT SPEAKER terminals of the
receiver to the RIGHT ( + ) and
( ) FROM AMPLIFIER terminals on the back of the THP-CXB. Use the tips on determining speaker wire polarity to
make sure that ( + ) is connected to ( + ) and
is
connected to (
4. Using speaker wire, connect the LEFT ( ) and ( ) FRONT SPEAKER terminals of the A/V to the LEFT ( + ) and ( )
FROM AMPLIFIER terminals on the back of the THP-CXB. As
in step 3, double check polarity.
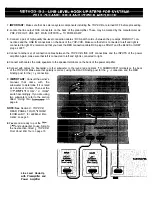
5. Connect the left and right FRONT channel speaker WIRING to the
“TO SPEAKERS” terminal.
6. Connect the Soundolier or other subwoofer to the round red and black “TO SUBWOOFER
on the back of the
THP-CXB. Make sure that polarity is correct, using the BLACK binding post for the ( ) connection and the RED bind-
ing post for the ( + ) connection.
7. IMPORTANT: Consult the
owner’s manual that
came with
the subwoofer to determine if it
is rated at 4 ohms or 8 ohms.
Then set the
‘s “4
OHM 8 OHM” switch
accordingly If you are using
two subwoofers, refer to the
section titled; “Using Two
on page 4.
NOTE: See Section C: THP-CXB
R E A R
TOUR, “4
OHM 8 OHM switch” for
additional information on page 3.
8. You are now ready to put the
THP-CXB and subwoofer to
use. Skip to the next section,
titled: THP-CXB Front Panel
Mini Tour on page 10.
REAR
REAR
Hook-up
for
Surround
Sound Receivers
6

