background image

6

1

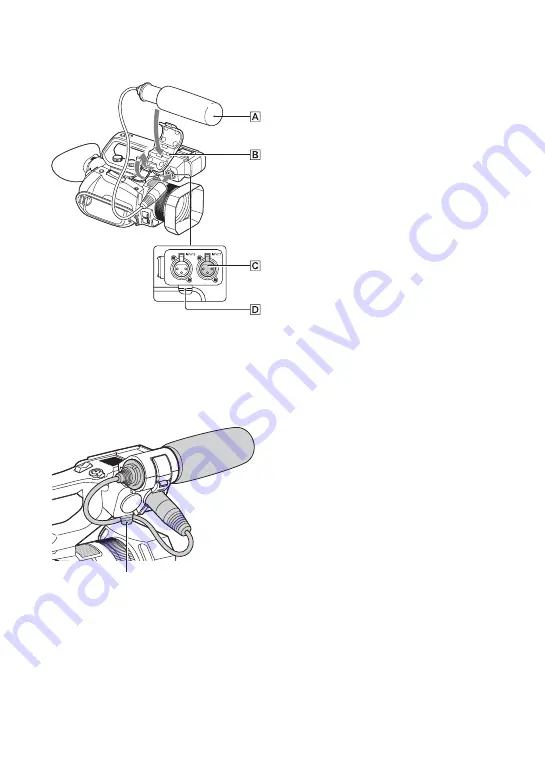
Place the microphone 

A

 into the 

microphone holder 

B

.

2

Connect the plug of the microphone to 
the INPUT 1 jack 

C

.

3

Place the microphone cable into the 
cable holder 

D

.

Put the cable in the outer 
cable holder.

Identifying parts and controls (Continued)

Содержание XDCAM PXW-X70

Страница 1: ...242 11 1 Solid State Memory Camcorder Operating Guide PXW X70 Table of Contents Getting Started Recording Playback Editing Using the Menu Connecting with another device Troubleshooting Additional Information ...

Страница 2: ...e However there may be some tiny black points and or bright points white red blue or green in color that appear constantly on the LCD screen These points are normal results of the manufacturing process and do not affect the recording in any way On sunlight Do not record the sun or leave the camcorder under the sun for a long time The internal parts of the camcorder may be damaged If sunlight is fo...

Страница 3: ...omenon may be notable in displays having high motion resolution Horizontal lines appear on the LCD screen during recording under fluorescent lights sodium lamps or mercury lamps The phenomena can be reduced by adjusting the shutter speed p 40 Save all your recorded image data To prevent your image data from being lost save all your recorded images on PC periodically To handle the recorded images o...

Страница 4: ...led smartphone to the mark to establish a connection with the camcorder Near Field Communication NFC is an international standard for short range wireless communication technology I Remote sensor 101 J Recording lamp 101 K NIGHTSHOT light 48 L Multi Micro USB jack 102 VIDEO OUT jack 73 90 103 M MIC jack PLUG IN POWER N Power zoom lever O Cable clamper P Hook for shoulder strap Q Multi Interface Sh...

Страница 5: ... unit make sure to securely tighten both handle mounting screws If you use the XLR handle unit without securely tightening the mounting screws it may damage the Multi Interface Shoe or cause the camcorder to detach and fall Detaching the XLR handle unit To detach the XLR handle unit perform the attachment procedure in reverse Attaching the microphone sold separately This section explains how to co...

Страница 6: ...e A into the microphone holder B 2 Connect the plug of the microphone to the INPUT 1 jack C 3 Place the microphone cable into the cable holder D Put the cable in the outer cable holder Identifying parts and controls Continued ...

Страница 7: ...8V switch 44 G ATT INPUT2 switch 44 H INPUT2 LINE MIC MIC 48V switch 44 I LOW CUT INPUT1 switch 44 J AUTO MAN CH1 switch 44 K AUDIO LEVEL CH1 dial 44 L AUTO MAN CH2 switch 44 M AUDIO LEVEL CH2 dial 44 N LOW CUT INPUT2 switch 44 O Internal microphone P ZOOM FOCUS switch 34 Q AF MF button 34 R MENU button 81 S MANUAL dial 39 Continued ...

Страница 8: ...he lens hood to those on the camcorder and turn the lens hood in the direction of the arrow 2 until it is locked z Tips If you attach or remove a 62 mm 2 1 2 in PL filter or MC protector remove the lens hood Identifying parts and controls Continued ...

Страница 9: ... 33 H Handle record button 29 I INPUT2 jack 44 J INPUT1 jack 44 K ASSIGN6 D EXTENDER button 64 L POWER CHG lamp 21 M Grip belt N Tripod receptacles 1 4 inch For 1 4 20UNC screws For attaching a tripod with a screw shorter than 5 5 mm sold separately Some tripods may not be designed to attach in the proper direction O BATT release lever 21 Continued ...

Страница 10: ... Eye sensor C Viewfinder 26 D Large eyecup 26 E AUTO MANUAL switch 39 F ND FILTER switch 41 G Battery slot 21 H i headphones jack I SHUTTER SPEED button 40 J GAIN button 40 K IRIS button 39 Identifying parts and controls Continued ...

Страница 11: ... D Memory card slot A Memory card access lamp 27 E Memory card slot B Memory card access lamp 27 F DISPLAY button 71 G ASSIGN3 PICTURE PROFILE button 64 H ASSIGN2 STATUS CHECK button 64 I ASSIGN1 LAST SCENE PREVIEW button 64 J WHT BAL button 42 K on standby button 24 Continued ...

Страница 12: ...ideo device may also operate In that case select a commander mode other than DVD2 for your video device or cover the sensor of your video device with black paper To change the battery of the Wireless Remote Commander 1 While pressing on the tab inset your fingernail into the slit to pull out the battery case 2 Place a new battery with the side facing up 3 Insert the battery case until it clicks in...

Страница 13: ...ing Recording media REC STBY Recording status 29 E Warning 111 N Playback indicator 66 Processing Upper left Upper right Bottom Center Relay recording SDI HDMI REC CONTROL Indicator Meaning 0min Estimated remaining recording time Recording playback media 00 00 00 00 Time code hour minute second frame Indicator Meaning Face detection ON PEAKING 94 ZEBRA 94 STEADY SHOT 88 9 Manual focus 34 Picture p...

Страница 14: ...are not displayed while recording However you can check them by selecting DISPLAY SET t DATA CODE and choosing the data that you want to display or by pressing the ASSIGN button to which the DATA CODE function is assigned during playback p 71 AUTO SLOW SHUTTER AUDIO LEVEL DISPLAY 95 D EXTENDER 87 REC LEVEL MODE NIGHTSHOT SELECTED MIC ND filter 41 Indicator Meaning Screen indicators Continued ...

Страница 15: ...32 Adjusting the zoom 33 Adjusting the focus 34 Using the Focus magnifier 35 Focusing by touching the LCD screen Spot focus 35 Focusing on a detected face Face detection 35 Changing the recording setting 37 Selecting the file format and recording format 37 Setting the DV MODE DV mode 38 Adjusting the brightness 39 Adjusting the iris 39 Adjusting the gain 40 Adjusting the shutter speed 40 Adjusting...

Страница 16: ...C function Android 51 Connecting without using the NFC function iPhone iPad 52 Customizing the picture quality Picture profile 53 Setting time data 60 Recording with the Slow Quick Motion function 61 Reviewing the most recently recorded scene Last Scene Review 63 Assigning the functions to the ASSIGN buttons 64 Playback 66 Playing back movies 66 Playing back still images 69 Changing checking the s...

Страница 17: ...99 Settings for the Wi Fi function CTRL W SMARTPHONE etc OTHERS menu 100 Settings while recording or other basic settings AREA SET BEEP etc Creating a standard definition image quality SD disc with a recorder etc 103 Troubleshooting 104 Warning indicators and messages 111 Recording time of movies 114 Using your camcorder abroad 116 File folder structure on the recording media 117 Maintenance and p...

Страница 18: ...18 Specifications 125 Index 129 Table of Contents Continued ...

Страница 19: ...o lens 1 Accessory shoe kit Accessory shoe 1 Accessory shoe plate 1 screws 4 p 23 XLR handle unit 1 USB cable 1 Rechargeable battery pack NP FV70 1 CD ROM Manuals for Solid State Memory Camcorder 1 Operating Guide 2 Software Downloads When the unit is used with a PC connection download device drivers plug ins and application software where applicable from the Sony Professional products web site So...

Страница 20: ...ough the data regarding recorded materials are stored over multiple files and folders you can easily handle the clips without considering its data and directory structure by using the dedicated application software Step 1 Checking supplied accessories Continued ...

Страница 21: ...n the battery is fully charged Disconnect the AC Adaptor from the DC IN jack z Tips You can check the remaining battery life with the status check function p 72 Charging time Approximate time minute required when you charge a fully discharged battery pack Using an outside power source You can use the AC Adaptor to obtain the AC power While you are using the AC Adaptor the battery pack will not los...

Страница 22: ...e correctly displayed under the following conditions The battery pack is not attached correctly The battery pack is damaged The battery pack is worn out On the AC Adaptor Do not short circuit the DC plug of the AC Adaptor or battery terminal with any metallic objects This may cause a malfunction To store the battery pack If the battery pack is not in use for a while run down the battery and store ...

Страница 23: ...ce the accessory shoe as its protrusions matches recesses of the accessory shoe mount then fix it to the mount with four screws 3 Insert the accessory shoe plate in the direction of the arrow on the plate surface until the end of the plate engages the end of the shoe To remove the accessory shoe Remove the shoe plate in the same way as step 1 of To mount the accessory shoe Loosen the 4 screws and ...

Страница 24: ...the camcorder does not turn off even if the LCD screen is closed and the viewfinder is returned to its original position Set the date and time when you use your camcorder for the first time z Tips If you do not use your camcorder for about 3 months the built in rechargeable battery gets discharged and the date and time settings may be cleared from the memory In that case charge the rechargeable ba...

Страница 25: ...r You can set any year up to the year 2037 Midnight is indicated as 12 00 AM and noon as 12 00 PM when 60i is selected z Tips The date and time are automatically recorded on the selected recording media and can be displayed during playback ASSIGN button to which DATA CODE is assigned p 71 ...

Страница 26: ...ure in the viewfinder is hard to see If you cannot see the picture in the viewfinder clearly under bright circumstances use the supplied large eyecup To attach the large eyecup stretch it slightly and fit it over the groove of the eyecup attached to the camcorder You can attach the large eyecup facing either the right or left side b Notes If the viewfinder is extended while the battery pack NP FV1...

Страница 27: ...t All the data recorded will be lost Open the cover and insert the memory card with the notched edge in the direction as illustrated until it clicks into place If you insert a memory card into the slot in the wrong direction the memory card the memory card slot or image data may be damaged Memory card slot A accepts either Memory Stick PRO Duo media or an SD card Memory card slot B accepts an SD c...

Страница 28: ...creen b Notes You can only select a slot that already has a memory card inserted While movies are being recorded on the memory card you cannot switch the slot even if you press the SLOT SELECT button z Tips When only one slot has a memory card inserted the slot that has the memory card is selected automatically SLOT SELECT button Step 6 Preparing the recording media Continued ...

Страница 29: ... movies on a memory card The factory setting of recording movies is XAVC HD Do the following steps to record movies 1 Press the latches on both sides of the lens cap and remove it Recording movies LCD screen Handle record button START STOP button Continued ...

Страница 30: ... the power off and do not remove the recording media battery pack or the AC Adaptor The image data may be destroyed See page 114 on the recording time of movies If a movie file size exceeds 2 GB while recording in DV or AVCHD format the camcorder automatically divides the file and creates a new one The menu settings picture profile settings and settings made using the AUTO MANUAL switch are saved ...

Страница 31: ... of the memory card being used is less than 1 minute and the other slot has recordable memory card inserted or appears on the camcorder screen The indicator turns off when the memory card is switched If you start recording on a memory card with the remaining recording time of less than 1 minute the camcorder may not be able to relay record To relay record without fail make sure that the memory car...

Страница 32: ...ng of the START STOP button and handle record button REC BUTTON setting Button and recording media REC BUTTON HANDLE REC BUTTON Recording on both the memory card A and the memory card B starts and stops at the same time when either record button is pressed REC BUTTON HANDLE REC BUTTON Recording on the memory card A starts and stops when the START STOP button is pressed and on the memory card B whe...

Страница 33: ... handle zoom switch B to VAR you can zoom in or out at variable speed When you set the handle zoom switch B to FIX you can zoom in or out at fixed speed set in HANDLE ZOOM p 87 2 Press the handle zoom lever A to zoom in or out b Notes You cannot use the handle zoom lever A when the handle zoom switch B is set to OFF You cannot change the zoom speed of the power zoom lever D with the handle zoom sw...

Страница 34: ...turning the manual lens ring ZOOM You can manually adjust the zoom by turning the manual lens ring 9 changes to when the focus cannot be adjusted any farther 9 changes to when the focus cannot be adjusted any closer To restore automatic adjustment Press the AF MF button C to set the focus to automatic 9 disappears and the automatic focus adjustment is restored z Tips The focal length information t...

Страница 35: ...not expanded z Tips You can change the magnification ratio with FOCUS MAG RATIO p 95 You can focus on the point where you touch on the LCD screen 1 Press the MENU button D 2 Select CAMERA SET t SPOT FOCUS with the v V b B EXEC button E 3 Touch the point to be focused on the LCD screen b Notes SPOT FOCUS is available only with manual focus z Tips You can assign this function to an ASSIGN button p 6...

Страница 36: ...on E then press the dial b Notes Faces may not be detected depending on the recording environment the condition of the subject or the settings You may not be able to get the proper effect in some recording environments If this happens set FACE DETECTION to OFF The face detection function is disabled when using digital zoom or NIGHTSHOT z Tips You can assign this function to an ASSIGN button p 64 T...

Страница 37: ...age size 1080 1 920 1 080 720 1 280 720 Frame rate Either 60 50 30 25 or 24 Scanning system i interlace p progressive If you select 1080 60i when 60i is selected or 1080 50i when 50i is selected for example movies are recorded with following format 1080 Effective scanning lines 60 50 Frame rate i Scanning system FX Recording mode Selecting the file format and recording format 60i 50i 1080 60p 50Mb...

Страница 38: ...de is selected the audio format is fixed to LPCM The following items are available only when DV mode is selected REC OUT SET WIDE REC CANCEL DV MODE b Notes When you switch from DV mode to another settings made in DV mode are initialized If a movie file exceeds 2 GB during recording the camcorder divides the recording into separate files by creating a new file s automatically However the divided f...

Страница 39: ... value disappears and the iris value is highlighted 3 Turn the MANUAL dial A to adjust the value The volume of the light increases the more that you open the aperture decreasing F value The volume of the light decreases the more that you close the aperture increasing F value To temporarily adjust the iris automatically 1 Hold the ASSIGN5 IRIS PUSH AUTO button down The iris is adjusted automaticall...

Страница 40: ...r emphasize the movement of a subject by adjusting the shutter speed 1 Set the AUTO MANUAL switch F to MANUAL 2 Press the SHUTTER SPEED button D The or next to the shutter speed value disappears and the shutter speed value is highlighted 3 Turn the MANUAL dial A to adjust the value When 60i is selected You can select from 1 8 to 1 10000 1 6 1 10000 when shooting with 24p When 50i is selected You c...

Страница 41: ... or press EXEC on the SPOT METER or SPOT METER FOCUS screen the exposure is returned to AUTO You can record the subject clearly by using the ND filter E when the recording environment is too bright The ND filters 1 2 and 3 reduce the volume of light to about 1 4 1 16 and 1 64 respectively If flashes during the iris automatic adjustment set the ND filter to 1 If flashes during the iris automatic ad...

Страница 42: ...Turn the MANUAL dial to select PRESET A or B x Setting the A B value Select A or B for recording with the white balance setting stored in memory A or B See page 43 on how to store the adjusted value x To use the PRESET value of white balance Select CAMERA SET t WB PRESET t a desired setting Adjusting the white balance Setting value Example of recording conditions outdoor OUTDOOR When recording a n...

Страница 43: ...lly A or B turns to slow flashing Adjust the subject appropriately and set the shutter speed to auto or around 1 60 when 60i is selected 1 50 when 50i is selected then try adjusting the white balance again To adjust the white balance automatically Press the WHT BAL button A b Notes When you set the AUTO MANUAL switch B to AUTO iris gain shutter speed and white balance are adjusted automatically Yo...

Страница 44: ...io input source Set the INPUT1 INPUT2 LINE MIC MIC 48V switch D or F based on the device connected to INPUT1 jack A INPUT2 jack B b Notes If the switch is set to MIC 48V and you connect a device that is not compatible with 48V power it may damage the connected device Check the switch before connecting the device To prevent unwanted noise when no audio device is connected to the INPUT1 or INPUT2 ja...

Страница 45: ...lugs connect the INPUT1 jack A to the left channel connect the INPUT2 jack B to the right channel and set the REC CH SELECT INPUT1 switch H to CH1 You can record sound in stereo using a Multi Interface Shoe compatible microphone 1 Connect the Multi Interface Shoe compatible microphone sold separately to the Multi Interface Shoe 2 Select MI SHOE MIC in the MIC SELECT menu You can record sound in st...

Страница 46: ...UT2 jacks You can adjust the audio level for the sound that is input from the internal microphone or an external microphone PLUG IN POWER 1 Select MANUAL in the REC LEVEL MODE menu in AUDIO REC LEVEL 2 During recording or standby adjust the microphone volume in the MANUAL REC LEVEL menu in AUDIO REC LEVEL This enables you to apply the same audio level setting to the CH1 CH2 channels To restore aut...

Страница 47: ...O Face detection Portrait Baby Scene detection Backlight Landscape Night Scene Spotlight Low Brightness Macro Camera shake detection Walk Tripod To use SCENE SELECTION 1 Press the MENU button press the v V b B EXEC button and select CAMERASET t SCENE SELECTION SET then press the button again 2 Press the v V b B EXEC button select the desired setting then press the button again Selecting the suitab...

Страница 48: ...hone as a remote control for the camcorder you need to install the dedicated application Content Browser Mobile on your smartphone If Content Browser Mobile is already installed on your smartphone update it to the latest version as necessary Fireworks FIREWORKS Shoots fireworks with optimal exposure Landscape LANDSCAPE Shoots distant subjects clearly This setting also prevents your camcorder from ...

Страница 49: ... detailed in this manual is not guaranteed for all smartphones or tablet computers Operations and screen displays of the application may be subject to change without notice by future upgrades 1 Select Settings on the smartphone then select More and place a checkmark next to NFC 2 Set the camcorder to the shooting mode You can use the NFC function only when N Mark is displayed on the screen 3 Touch...

Страница 50: ...camcorder using the information that appears on the screen when the camcorder is ready to be connected The connection method will depend on the type of smartphone Android See page 51 iPhone iPad See page 52 4 Operate the camcorder by the smartphone b Notes Live view images may not be displayed smoothly depending on the smartphone performance and or transmission conditions Movies cannot be recorded...

Страница 51: ... operations during touch focus 1 Select Settings on your smartphone then select Wi Fi and the SSID displayed on the camcorder 2 Input the password displayed on the camcorder first time only 3 Confirm connection to the SSID displayed on the camcorder z Tips The next time that you want to connect to the camcorder select the camcorder in the device list in the Connect menu and select Connect Connecti...

Страница 52: ...ser Mobile 1 Select Settings on the iPhone or iPad then select Wi Fi and the SSID displayed on the camcorder 2 Input the password displayed on the camcorder first time only 3 Confirm connection to the SSID displayed on the camcorder 4 Return to the Home screen then start Content Browser Mobile Connecting without using the NFC function iPhone iPad Useful functions Continued ...

Страница 53: ...on A p 64 b Notes PP4 is set for the picture profile by default 1 Press the ASSIGN3 button A during standby 2 Press the v V b B EXEC button B select the picture profile number then press the button again You can record with the settings of the selected picture profile 3 Press the v V b B EXEC button B select OK then press the button again Customizing the picture quality Picture profile Picture pro...

Страница 54: ...ton again 3 Press the v V b B EXEC button B select SETTING then press the button again 4 Press the v V b B EXEC button B select the item that you want to adjust then press the button again 5 Press the v V b B EXEC button B adjust the picture quality then press the button again 6 Repeat steps 4 and 5 to adjust other items 7 Press the v V b B EXEC button B select RETURN then press the button again 8...

Страница 55: ...tings STANDARD Standard gamma curve STILL Gamma curve to create the tone of a still image CINEMATONE1 Gamma curve 1 for producing tone of film camera images CINEMATONE2 Gamma curve 2 for producing tone of film camera images ITU709 Gamma curve that corresponds to ITU 709 Gain in low intensity area 4 5 Item Description and settings RANGE Selects a correcting range HIGH MIDDLE LOW LEVEL Sets the corr...

Страница 56: ...utomatic mode MAX POINT Sets the maximum point 90 to 100 SENSITIVITY Sets the sensitivity HIGH MIDDLE LOW MANUAL SET Sets the knee point and slope manually POINT Sets the knee point 75 to 105 SLOPE Sets the knee slope 5 gentle to 5 steep KNEE is set to off when you set to 5 Item Description and settings STANDARD Suitable colors when GAMMA is set to STANDARD STILL Suitable colors when GAMMA is set ...

Страница 57: ... R 7 light red to 7 deep red G 7 light green to 7 deep green B 7 light blue to 7 deep blue C 7 light cyan to 7 deep cyan M 7 light magenta to 7 deep magenta Y 7 light yellow to 7 deep yellow Item Description and settings TYPE Selects color correction type OFF Not correct colors COLOR REVISION Corrects colors stored in memory Colors not stored in memory displayed in black and white when COLOR EXTRA...

Страница 58: ...st differ depending on the filter type MEMORY1 COLOR Sets colors stored in Memory 1 PHASE Sets color phase 0 purple t 8 red t 16 yellow t 24 green t 31 blue PHASE RANGE Sets color phase range 0 no color selection 1 narrow to select only a single color to 31 wide to select multiple colors in similar color phase SATURATION Sets saturation 0 to select from light colors to dark colors to 31 to select ...

Страница 59: ... to ON to enable the manual detail adjustment automatic optimization will not be performed V H BALANCE Sets the vertical V and horizontal H balance of DETAIL 2 off to the vertical V side to 2 off to the horizontal H side B W BALANCE Selects the balance of the lower DETAIL B and the upper DETAIL W TYPE1 off to the lower DETAIL B side to TYPE5 off to the upper DETAIL W side LIMIT Sets the limit leve...

Страница 60: ...C PRESET then press the button again 2 Press the v V b B EXEC button select PRESET then press the button again 3 Press the v V b B EXEC button select the first two digits then press the button again You can set the time code within the following range When 60i is selected 00 00 00 00 23 59 59 29 When setting 24p you can set the last 2 time code digits of the frames in multiples of 4 between 0 and ...

Страница 61: ...tion recording function your camcorder may continue recording for some time approximately 30 seconds at most after you press the button to stop recording Do not operate your camcorder while the REC indicator is flashing on the screen and wait till it turns to STBY After you press the button to stop recording your camcorder continues recording till it completes writing of the minimum unit of data 0...

Страница 62: ...ASSIGN button 2 Press the START STOP button B Recording starts To stop Slow Quick Motion recording Press the START STOP button B again Preparation 60i 50i 1080 60p 50Mbps 1080 50p 50Mbps 1080 60p 35Mbps 1080 50p 35Mbps 1080 30p 50Mbps 1080 25p 50Mbps 1080 30p 35Mbps 1080 25p 35Mbps 1080 24p 50Mbps 1080 24p 35Mbps 60i 50i 1080 60p PS 1080 50p PS 1080 30p FX 1080 25p FX 1080 30p FH 1080 25p FH 1080 ...

Страница 63: ... Slow Quick Motion mode is automatically canceled when the camcorder is turned off but the frame rate setting is retained You cannot record sound during Slow Quick Motion recording You cannot use the Slow Quick Motion function for the simultaneous recording You cannot use the Slow Quick Motion function with DV You can review the most recently recorded scene on the LCD screen LAST SCENE REVIEW is a...

Страница 64: ...ASSIGN buttons no function FOCUS MAGNIFIER p 35 LAST SCENE REVIEW p 63 WHT BAL p 42 WB PRESET p 86 WB SET p 87 AE SHIFT p 87 D EXTENDER p 87 STEADY SHOT p 88 S Q MOTION p 61 AUTO MODE SET p 88 SCENE SELECTION SET p 88 NIGHTSHOT p 48 IRIS PUSH AUTO p 39 SPOT METER FOCUS p 88 SPOT METER p 88 SPOT FOCUS p 88 FACE DETECTION p 88 COLOR BAR p 89 PICTURE PROFILE p 53 VOLUME p 92 HISTOGRAM p 93 ZEBRA p 94...

Страница 65: ...ess the v V b B EXEC button B select the ASSIGN button that you want to set then press the button again 4 Press the v V b B EXEC button B select the function that you want to assign then press the button again 5 Press the v V b B EXEC button B select OK then press the button again ...

Страница 66: ...66 Playback Playback 1 Open the LCD panel Playing back movies THUMBNAIL button ...

Страница 67: ...ing the EXEC button Memory card A Memory card B 2 Touch the playback mode and select the desired image quality of movies 3 Touch twice the thumbnail of the movie you want to play back You can also select the movie to be played back by pressing v V b B buttons followed by pressing the EXEC button The first touch of the thumbnail will show the information on the movie at the lower part of the LCD sc...

Страница 68: ...yed back when the camcorder is set to DV mode z Tips When playback from the selected movie reaches the last movie the screen returns to the THUMBNAIL screen Touch during pause to play back movies slowly The playback speed increases based on the number of times that you touch In DV mode SCAN SLOW buttons are disabled In DV mode fast forward and fast reverse during playback are 5 times faster than n...

Страница 69: ... played on A V devices of other manufacturers 1 Touch the recording media you want to view on the THUMBNAIL screen Memory card A Memory card B 2 Touch the playback mode then select still image 3 Touch twice the thumbnail of the still image you want to view The first touch of the thumbnail will show the information on the still image at the lower part of the LCD screen ADate and time of recording B...

Страница 70: ...er zoom lever When you touch the enlarged image the touched point will be displayed at the center of the screen Notes on playing back still images The camcorder is not able to record still images but it can play back still images that were recorded on another device The camcorder may not be able to play back some still images Previous Next Playback Continued ...

Страница 71: ...ing recording on the screen during playback Select DISPLAY SET t DATA CODE and choose the data that you want to display or press the ASSIGN button to which the DATA CODE function is assigned during playback or pause The screen changes in the order date and time display t camera data display t no display with each press of the button A White balance will appear during the playback of still images o...

Страница 72: ...utton setup p 32 You can check the record button setting Recording media information You can check the estimated used and free spaces Battery Info You can check the remaining capacity of the attached battery 1 Press the ASSIGN2 button B 2 Press the v V b B EXEC button C to display the items AUDIO t OUTPUT t ASSIGN t CAMERA t REC BUTTON SET t MEDIA INFO t BATTERY INFO Setup items are displayed acco...

Страница 73: ...of monitor or TV or the jacks used to make the connection 1 Press the MENU button SDI Cable sold separately HDMI Cable sold separately Monitor TV Signal flow To HDMI input jack To SDI jack AV cable sold separately Monitor TV Signal flow To audio input jack To video input jack Continued ...

Страница 74: ...0i Output resolution The output resolution varies depending on the recording mode and SDI HDMI setting When 60i is selected When 50i is selected HD DV SDI HDMI setting Output resolution SDI OUT HDMI OUT VIDEO OUT HD 1080p 480i 1080p 1080p 480i 720p 480i 720p 720p 480i 1080i 480i 1080i 1080i 480i 480p No output 480p 480i 480i 480i 480i 480i DV 1080p 480i 480i 480i 480i 720p 480i 480i 480i 480i 1080...

Страница 75: ...ted or 25p when 50i is selected the output signal is converted to interlace or progressive through pull down conversion If you display the edit screen while outputting signals to a monitor or TV the menu may not be displayed correctly This camcorder is not compatible with BRAVIA sync z Tips HDMI High Definition Multimedia Interface is an interface for transferring uncompressed digital audio and vi...

Страница 76: ...ect DV images Dividing a movie You can divide a movie at a designated point 1 Press the MENU button while playing back movies 2 Press the v V b B EXEC button then select EDIT t DIVIDE 3 Touch X at the point where you want to divide 4 Touch t b Notes You cannot restore movies once they are divided Do not remove the battery pack the AC Adaptor or the recording media that contains the movies from you...

Страница 77: ...ry to delete them p 76 Save important movies and still images in advance z Tips To delete all data recorded on the recording media and recover all the recordable space of the media format the media p 78 1 Press the MENU button when the THUMBNAIL screen is displayed 2 Press the v V b B EXEC button then select EDIT t DELETE 3 Touch the movies or still images to be deleted is displayed on the selecte...

Страница 78: ...mages you should save them before formatting the recording media Protected movies and still images are also deleted 1 Press the MENU button 2 Press the v V b B EXEC button then select OTHERS t MEDIA FORMAT 3 Select the recording media to be formatted 4 Touch t b Notes While Executing is displayed do not turn off the camcorder do not operate any buttons on the camcorder disconnect the AC Adaptor or...

Страница 79: ...amcorder during this operation 1 Connect your camcorder to the wall outlet wall socket using the AC Adaptor AC L200D supplied p 21 2 Press the MENU button 3 Press the v V b B EXEC button then select OTHERS t MEDIA FORMAT 4 Select the recording media to be formatted The format screen appears 5 Touch Empty t b Notes It may take from several minutes to several hours to empty recording media depending...

Страница 80: ...er from running out of power during the operation 1 Press the MENU button 2 Turn the v V b B EXEC button to select OTHERS t REPAIR IMAGE DB FILE 3 Select the recording media you want to check the database file 4 Touch The database file check starts Touch and quit the database file check if no inconsistency is found 5 Touch t b Notes If you stop the operation while Repairing the image database file...

Страница 81: ... button The menu screen appears 2 Press the v V b B EXEC button select the desired menu icon then press the button again CAMERA SET p 86 REC OUT SET p 90 AUDIO SET p 92 DISPLAY SET p 93 TC UB SET p 97 NETWORK SET p 99 OTHERS p 100 EDIT p 86 3 Press the v V b B EXEC button select the item that you want to set then press the button again MENU button v V b B EXEC button Continued ...

Страница 82: ...he MENU button to hide the menu screen To return to the previous screen select RETURN b Notes The available menu items vary depending on the context of your camcorder during recording or playback Items and setting values not available due to other settings are grayed out Operating the menu Continued ...

Страница 83: ...0p 50Mbps 1080 60p 35Mbps 1080 30p 50Mbps 1080 30p 35Mbps B1080 24p 50Mbps 1080 24p 35Mbps When 50i is selected 1080 50p 50Mbps 1080 50p 35Mbps B1080 25p 50Mbps 1080 25p 35Mbps FRAME RATE 1 60fps B60fps AVCHD REC FORMAT When 60i is selected 1080 60p PS 1080 30p FX 1080 30p FH B1080 24p FX 1080 24p FH When 50i is selected 1080 50p PS B1080 25p FX 1080 25p FH FRAME RATE 1 60fps B60fps AUTO MODE SET ...

Страница 84: ...FH 1080 24p FX 1080 24p FH 720 60p FX 720 60p FH 720 60p HQ When 50i is selected 1080 50p PS B1080 50i FX 1080 50i FH 1080 25p FX 1080 25p FH 720 50p FX 720 50p FH 720 50p HQ SIMUL RELAY REC BOFF SIMULTANEOUS REC RELAY REC REC BUTTON SETTING BREC BUTTON HANDLE REC BUTTON REC BUTTON HANDLE REC BUTTON REC BUTTON HANDLE REC BUTTON DV MODE WIDE REC BOFF ON CANCEL DV MODE VIDEO OUT OUTPUT SELECT SDI BH...

Страница 85: ...9 1 66 1 1 85 1 2 35 1 SAFETY ZONE BOFF 80 90 GUIDEFRAME BOFF ON FOCUS MAG RATIO 4 0 8 0 B 4 0 8 0 CAMERA DATA DISPLAY OFF BON AUDIO LEVEL DISPLAY BON OFF ZOOM DISPLAY BBAR NUMBER FOCUS DISPLAY BMETER FEET SHUTTER DISPLAY BSECOND DEGREE DATA CODE BOFF DATE TIME CAMERA DATA LCD BRIGHT BNORMAL BRIGHT VF BRIGHT BNORMAL BRIGHT VF COLOR TEMP DISPLAY OUTPUT BLCD PANEL ALL OUTPUT z Tips You can display D...

Страница 86: ...ULTI SINGLE OPERATION TIME VERSION DISPLAY CALIBRATION INITIALIZE EDIT PROTECT DIVIDE DELETE CAMERA SET menu Settings to adjust your camcorder to the recording conditions STEADY SHOT etc The default settings are marked with B See page 81 for details on selecting menu items You can select the upper limit for the Auto Gain Control AGC BOFF 24dB 9dB 3dB increments b Notes This function is not effecti...

Страница 87: ... optical zoom You can zoom up to 12 ON CLEAR IMAGE ZOOM You can use the clear image zoom in addition to the optical zoom You can zoom up to 24 which includes 12 optical zoom ON DIGITAL ZOOM You can use the digital zoom in addition to the optical zoom and clear image zoom You can zoom up to 192 but the image quality deteriorates within the range where is displayed z Tips Clear image zoom maintains ...

Страница 88: ...to AUTO You can adjust the brightness for the selected subject automatically z Tips Automatic brightness adjustment can be canceled by setting the AUTO MANUAL switch to AUTO See page 35 You can set the shutter speed to slow down automatically up to 1 30 up to 1 24 when shooting in 24p when 60i is selected or up to 1 25 when 50i is selected when recording in a dark place B OFF Does not use the AUTO...

Страница 89: ...d outputs audio tone signals This function helps you to adjust colors when you view movies recorded with your camcorder on a TV or a monitor b Notes This function is automatically set to OFF when you switch the format perform the function by the MENU button or turn off the camcorder You cannot change the setting during recording or the Focus Magnifier operation x TONE B OFF Does not output audio t...

Страница 90: ...LECT You can select the jack to use for video output SDI Outputs from SDI jack Press the MENU button t select REC OUT SET with the v V b B EXEC button REC SET VIDEO OUT B HDMI Outputs from HDMI jack VIDEO Outputs from VIDEO jack x SDI HDMI You can select the resolution of the output signal from the HDMI SDI jacks When 60i is selected 1080p 480i 720p 480i B 1080i 480i 480p 480i When 50i is selected...

Страница 91: ... 3 TV images may appear horizontally compressed while maintaining its original height In such a case select LETTER BOX 16 9 or EDGE CROP If you change the setting from SQUEEZE to another option or from another option to SQUEEZE the screen will go out momentarily and the image and sound will be intermitted x HDMI TC OUTPUT You can set whether to output time code to other professional use devices us...

Страница 92: ...a shoe microphone the setting is NORMAL x MANUAL REC LEVEL You can set the recording sensitivity when the recording mode is MANUAL B 1 31 B21 You can diminish low tone in input sound with the internal microphone and reduce wind noise B OFF Disables wind noise reduction ON Enables wind noise reduction You can select the microphone to use for recording audio B AUTO The microphone used for recording ...

Страница 93: ...T TIMING DISPLAY SET menu Display settings MARKER DISPLAY OUTPUT etc The default settings are marked with B See page 81 for details on selecting menu items The histogram displays the luminance distribution that shows how many pixels of a particular brightness exist in the image B OFF Does not display the histogram ON Displays a histogram A line appears at the 100 position and the color of the zone...

Страница 94: ...sensitivity HIGH BMIDDLE LOW b Notes The enhanced outlines will not be recorded on the recording media z Tips You can focus more easily using this function in combination with the expanded focus function p 35 You can assign ON OFF to an ASSIGN button p 64 x ON OFF B OFF Does not display markers ON Displays markers Markers are not recorded on the recording media x CENTER B ON Displays a marker at t...

Страница 95: ... 0 8 0 The setting changes in the order 4 0 t 8 0 t OFF with each press of the ASSIGN4 button FOCUS MAGNIFIER button OFF Does not display the iris gain and shutter speed settings B ON Constantly displays the iris gain and shutter speed settings on the LCD screen z Tips The settings appear on the LCD screen during the manual adjustment regardless of the settings of this function indicates that the ...

Страница 96: ... 1 24 the shutter angle is 360 degrees When 50i is selected With a frame rate of 50 selected in REC FORMAT when the shutter speed is 1 50 the shutter angle is 360 degrees With a frame rate of 25 selected in REC FORMAT when the shutter speed is 1 25 the shutter angle is 360 degrees See page 37 for details on REC FORMAT setting b Notes When you press the ASSIGN button to which DATA CODE is assigned ...

Страница 97: ... DISPLAY OUTPUT TC UB SET menu Time code settings TC PRESET UB PRESET TC FORMAT etc The default settings are marked with B See page 81 for details on selecting menu items You can select whether to display the time code or the user bit code B TC Displays the time code U BIT Displays the user bit code z Tips You can assign this function to an ASSIGN button See page 60 See page 60 You can select the ...

Страница 98: ...UN Advances the time code regardless of operation of your camcorder b Notes Even if the time code advances in the REC RUN mode the time code may not be recorded sequentially in the following cases When the recording format is changed When the recording media is removed BPRESET Records the newly set time code on the recording media REGENERATE Reads the last time code of the previous recording from ...

Страница 99: ...Characters switch between alphabetical letters numerals and symbols 2 Keyboard Characters are displayed in the order they are touched To cancel character input midway press You can display the camcorder s MAC address The connection information that you registered in order to use CTRL W SMARTPHONE can be reset b Notes If the connection information has been reset it will be necessary to set up the s...

Страница 100: ...ofile to be loaded with the v V b B EXEC button 2 Select YES on the confirmation screen The camcorder restarts and the loaded camera profile becomes effective Press the MENU button t select OTHERS with the v V b B EXEC button STATUS CHECK CAMERA PROFILE b Notes A camera profile saved on a camcorder with different model name or edited on a computer cannot be loaded x SAVE You can save the camera pr...

Страница 101: ...ON Enables the supplied Wireless Remote Commander p 12 OFF Disables the supplied Wireless Remote Commander to prevent misoperation by the remote control of another device You can select the frame rate depending on the regional video signal format used by your camcorder The camcorder automatically restarts if you change the setting 60i Select for NTSC video format 50i Select for PAL video format Th...

Страница 102: ...connect using the MULTI setting Displays the total hours of operation in 10 hour increments Displays the current version of your camcorder Be sure to check for firmware updates b Notes To perform an update use the AC Adaptor See page 123 You can reset all settings including the clock setting to their default values b Notes The picture profile settings are not reset REPAIR IMAGE DB FILE USB CONNECT...

Страница 103: ...yback on your camcorder and record it on the recording device For details refer to the instruction manuals supplied with the device to be connected 5 When copy is finished stop the recording device and then your camcorder b Notes Since copying is performed via analog data transfer the image quality may deteriorate You cannot copy images to recorders connected with an HDMI cable When you do not wan...

Страница 104: ...r may get warmer while you use it This is not a malfunction The remaining battery indicator does not indicate the correct figure Ambient temperature is too high or too low or the battery pack has not been charged enough This is not a malfunction Fully charge the battery again If the problem persists the battery may be worn out Replace it with a new one p 21 120 The indicated figure may not be corr...

Страница 105: ...y not function properly Insert a fresh battery in the compartment with its terminals matching those of the compartment p 12 Another video device malfunctions when you use the supplied Wireless Remote Commander Select a commander mode other than DVD2 for your video device Cover the sensor of your video device with black paper The touch panel is open but the LCD screen is not displayed The LCD scree...

Страница 106: ...op recording of all recording media and repair the database file The handle zoom does not work Set the handle zoom switch to VAR or FIX p 33 The access lamp remains lit even after recording was stopped Your camcorder is recording the scene you have just shot on the memory card The imaging field looks different The imaging field may look different depending on the condition of your camcorder This i...

Страница 107: ...nworkable combinations of functions and menu items Iris gain shutter speed or white balance cannot be adjusted manually Set the AUTO MANUAL switch to MANUAL Tiny spots in white red blue or green appear on the LCD screen This phenomenon appears when using a slow shutter speed p 40 This is not a malfunction The subjects passing by the frame very fast appear crooked This is called the focal plane phe...

Страница 108: ... want to play back on the THUMBNAIL screen p 66 Image data cannot be played back if you have modified file names or folders or have edited the data on a computer When viewing still images the file name flashes This is not a malfunction Images recorded on other devices may not be played back or displayed in incorrect size This is not a malfunction Display the THUMBNAIL screen touch twice on the thu...

Страница 109: ...sound on the TV projector or AV amplifier connected with the HDMI cable try disconnecting and connecting the HDMI cable or turn on your camcorder again The image appears distorted on the 4 3 TV This happens when viewing a movie recorded in the 16 9 wide mode on a 4 3 TV Select REC OUT SET t VIDEO OUT t DOWN CONVERT TYPE t the appropriate down conversion type p 91 Black zone appears at top and bott...

Страница 110: ...er Disconnect the cable from the computer then connect it again securely Disconnect the cable from your computer and camcorder Reboot your computer and connect your computer and camcorder following the steps in the correct order Movies cannot be viewed or copied to the computer Disconnect the cable from the computer then connect it again You need to install the Content Browser to copy movies from ...

Страница 111: ...ing on the operation environment or battery conditions E may flash even if around 10 is displayed as the battery remaining figure Warning indicator pertaining to battery pack temperature The battery pack is too hot Replace the battery pack or remove the battery pack and put it in a cool place Warning indicator pertaining to memory cards Slow flashing Free spaces for recording images are running ou...

Страница 112: ...y backing up a movie The backed up movies cannot be recognized If you connect to a computer that has been installed with the software Content Browser you can copy the backed up movies Buffer overflow Writing to the media was not completed in time You have performed recording and erasing operations repeatedly or a memory card that has been formatted by other device is used Copy and take data backup...

Страница 113: ...er p 27 This memory card may not be able to record or play images correctly Use a memory card recommended for your camcorder p 27 Contact your Sony dealer Do not eject the memory card during writing Data may be damaged Reinsert the memory card and follow the instructions on the LCD screen Other Maximum number of images already selected You can select only 100 images at one time for Deleting movies...

Страница 114: ... F to 86 F The recording and playback time will be shorter depending on the conditions under which you use your camcorder Playing time unit minute XAVC HD unit minute AVCHD x When AVCHD AUDIO FORMAT is set to LINEAR PCM unit minute x When AVCHD AUDIO FORMAT is set to DOLBY DIGITAL unit minute Estimated time of recording and playback with each battery pack Battery pack Continuous recording time Typ...

Страница 115: ...ovies containing quickly moving and complex images are recorded at a higher bit rate and this reduces the overall recording time Bit rate movie audio etc number of pixels and aspect ratio of each recording mode of movies are as follows XAVC HD AVCHD PS max 28 Mbps 1 920 1 080 16 9 FX max 24 Mbps 1 920 1 080 16 9 1 280 720 16 9 FH approx 17 Mbps ave 1 920 1 080 16 9 1 280 720 16 9 HQ approx 9 Mbps ...

Страница 116: ... Bolivia Canada Central America Chile Colombia Ecuador Guyana Jamaica Japan Korea Mexico Peru Surinam Taiwan the Philippines the U S A Venezuela etc Countries regions that require 50i on 60i 50i SEL Argentina Australia Austria Belgium Brazil Bulgaria China Czech Republic Denmark Finland France Germany Guiana Holland Hong Kong Hungary Iran Iraq Italy Kuwait Malaysia Monaco New Zealand Norway Paragu...

Страница 117: ...f AVCHD movies Do not try to open this folder or access the contents of this folder from a computer Doing so might damage image files or prevent image files from being played back C XAVC HD movie management information folder This folder contains recording data of XAVC HD movie files The file numbers go up automatically D DV movie management information folder This folder contains recording data o...

Страница 118: ...format the recording media in the camcorder using a computer The camcorder may not operate correctly Do not copy the files on the recording media from a computer Operation is not guaranteed Use the application software Content Browser to import data from the recording media to a computer File folder structure on the recording media Continued ...

Страница 119: ...y card formatted by a computer Windows OS Mac OS does not have guaranteed compatibility with your camcorder Data read write speed may vary depending on the combination of the memory card and memory card compliant product you use Damaged or lost image data will not be compensated for and may occur in the following cases If you eject the memory card turn the power off on your camcorder or remove the...

Страница 120: ...your camcorder and a supplied AC Adaptor The InfoLITHIUM battery pack displays the remaining battery time in according to the operating situations of your camcorder To charge the battery pack Be sure to charge the battery pack before you start using your camcorder We recommend charging the battery pack in an ambient temperature of from 10 C to 30 C 50 F to 86 F until the charge lamp of the camcord...

Страница 121: ...ck Use the AC Adaptor supplied to charge the designated batteries only If you charge other types of batteries those batteries may leak heat up burst or give an electric shock resulting in burns or injury Remove the charged battery from the AC Adaptor The CHARGE lamp of the supplied AC Adaptor flashes in 2 patterns as follows Fast flashing Turns on and off rapidly at about 0 15 second intervals Slo...

Страница 122: ...ou are not using your camcorder Do not wrap your camcorder with a towel for example and operate it Doing so might cause heat to build up inside When disconnecting the power cord mains lead pull it by the plug and not the lead Do not damage the power cord mains lead such as by placing anything heavy on it Keep metal contacts clean Keep the Wireless Remote Commander and button type battery out of ch...

Страница 123: ...er to the wall outlet wall socket using the supplied AC Adaptor during the operation 1 Press the MENU button t select OTHERS t CALIBRATION with the v V b B EXEC button 2 Touch displayed on the LCD screen with the corner of memory card or the like 3 times b Notes If you did not press the right spot try the calibration again Do not use a sharp pointed object for calibration Doing so may damage the L...

Страница 124: ... pre installed rechargeable battery is not charged the camcorder operation will not be affected as long as you are not recording the date x Procedures Connect your camcorder to a wall outlet wall socket using the supplied AC Adaptor and leave it with the power turned off for more than 24 hours Note on disposal transfer of the memory card Even if you delete data in the memory card or format the mem...

Страница 125: ... on 35 mm lens 16 9 equivalent to f 35 5 426 0mm on 35mm lens 4 3 Iris F2 8 F4 5 auto manual selectable Focus AF MF selectable 10 mm to Wide 1000 mm to Tele Image Stabilizer ON OFF selectable shift lens Filter Diameter M62 mm Color temperature Preset Indoor 3200K Outdoor 5600K 7 steps Color temperature set range 2300 15000K Onepush A B Auto selectable Minimum illumination 60i 3lux 1 60 Shutter Spe...

Страница 126: ...t attached Mass approx 945 g 2 lb 1 oz with accessories lens hood and large eyecup 1400 g 3 lb 1 oz with accessories lens hood large eyecup battery NP FV70 and XLR handle unit Rechargeable battery pack NP FV70 Maximum output voltage DC 8 4 V Output voltage DC 6 8 V Capacity Typical 14 0 Wh 2 060 mAh Minimum 13 3 Wh 1 960 mAh Type Li ion AC Adaptor AC L200D Power requirements AC 100 V 240 V 50 Hz 6...

Страница 127: ...d iPad are trademarks of Apple Inc registered in the U S and other countries iOS is a registered trademark or trademark of Cisco Systems Inc and or its affiliates in the United States and certain other countries The terms HDMI and HDMI High Definition Multimedia Interface and the HDMI Logo are trademarks or registered trademarks of HDMI Licensing LLC in the United States and other countries Intel ...

Страница 128: ...copyright owners Based on requests by the owners of copyright of these software applications we have an obligation to inform you of the following Licenses in English are recorded in the internal memory of your camera Establish a Mass Storage connection between the camera and a computer to read licenses in the PMHOME LICENSE folder On GNU GPL LGPL applied software The software that is eligible for ...

Страница 129: ... and time 14 25 DATE REC 101 DELETE 77 DETAIL 59 DISP MAC ADDRESS 99 DISPLAY OUTPUT 97 DISPLAY SET menu 93 DIVIDE 76 DOWN CONVERT TYPE 91 DV MODE 38 DV WIDE CONVERT 91 DV WIDE REC 90 E EDIT DEVICE NAME 99 F FACE DETECTION 35 Focus 34 FOCUS DISPLAY 96 FOCUS MAG RATIO 95 Focus Magnifier 35 FREE RUN 98 G Gain 40 GAMMA 55 GUIDEFRAME 95 H Handle record button 32 Handle zoom 33 Handle zoom lever 33 Hand...

Страница 130: ...SDI OUT 73 Self diagnosis display 111 SHUTTER DISPLAY 96 Shutter speed 40 SIMUL RELAY REC 31 Simultaneous recording 31 Slow Quick Motion 61 Specifications 125 SPOT FOCUS 35 SPOT METER 88 SPOT METER FOCUS 88 SSID PW RESET 99 STATUS CHECK 72 100 STEADY SHOT 88 SUMMERTIME 101 Supplied accessories 19 T TC FORMAT 97 TC MAKE 98 TC PRESET 60 107 TC RUN 98 TC UB DISPLAY 97 TC UB SET menu 97 Telephoto 33 T...

Страница 131: ......

Страница 132: ...http www sony net Printed in China 2014 Sony Corporation ...

Отзывы: