background image

206

Preparación de la impresora

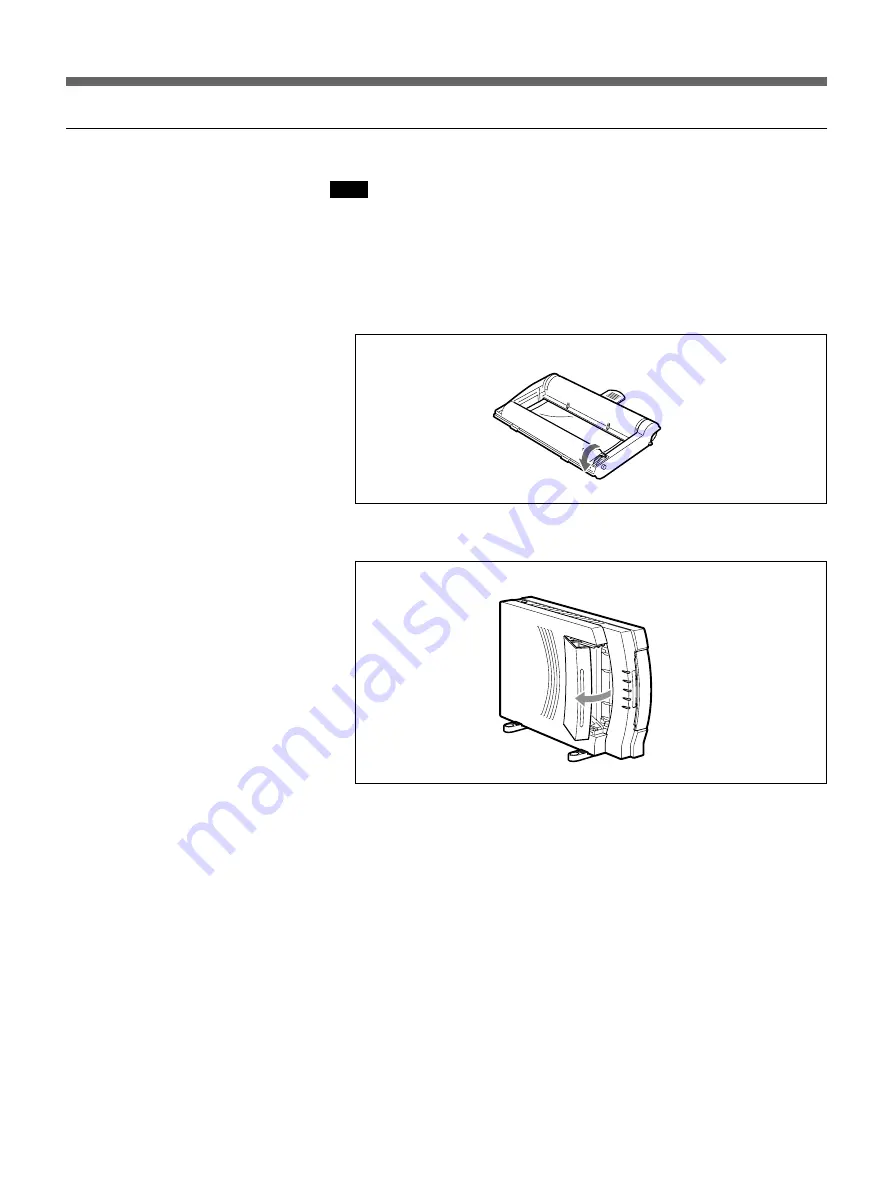
Carga del cartucho de cinta entintada

Nota

No toque la cinta entintada. Las huellas dactilares en la cinta entintada
pueden estropear la calidad de la imagen.

1

Tense la cinta entintada si está floja girando en el sentido indicado por
la flecha.
La cinta entintada podría estropearse si la cargara estando floja.

2

Abra la cubierta de la cinta entintada.

ADVERTENCIA

Los componentes situados detrás de la puerta del cartucho de cinta
entintada se calientan mucho. Para evitar quemarse, no meta nunca su
mano en el interior de la abertura.

Содержание UPX-DP10

Страница 1: ...Ver 4 0 UPX DP10GFE 3 206 372 11 1 Digital Printing System UPX DP10 2001 Sony Corporation 3 206 372 11 1 UPX DP10 Operating Instructions page 2 Mode d emploi page 88 Manual de instrucciones página 178 ES GB FR ...

Страница 2: ... Still Camera CAUTION Danger of explosion if the battery is incorrectly replaced Replace only with the same or equivalent type recommended by the manufacturer Dispose of used batteries according to the manufacturer s instructions Voor de Klanten in Nederland Gooi de batterij niet weg maar lever deze in als klein chemisch afval KCA For the UP DP10 Printer WARNING THIS APPARATUS MUST BE EARTHED Engl...

Страница 3: ... 23 Setting the Clock Frame and Power Save 24 Attaching to a Tripod 28 Preparation of the Printer 29 Preparing a Print Pack 29 Attaching the Stands to the Printer 35 Connections 36 Power Connections 36 Connection of the Station and the Printer 38 Connection of the Camera to the Station 39 Operation 41 Taking a Picture 41 Viewing a Picture 47 Picture Erasure 49 Protecting a Picture 52 Printing 54 S...

Страница 4: ...tions 68 Downloading Pictures 68 Image Processing 68 Printer Output 68 Picture Quality Adjustment 69 Adjusting Picture Quality 69 Color Guide Function 72 Lock Function 76 Split Function 77 Selecting a Split Type 77 Print Size in Each SPLIT Mode 78 Parameter Values Recommended in Each SPLIT Mode 80 Appendixes 81 Specifications 81 Troubleshooting 83 Table of Contents ...

Страница 5: ...ll color 16 700 000 colors System Configuration Case 1 Case 2 Station Camera Printer Station Printer Camera B W COL POWER BUSY MENU BA TTERY CHARGE CAMERA RELERASE BW COLOR MULTI PICTURE EXEC PRINT UPX C21 16 9 8 4 2 1 S O N Y ZOOM LENS OPTICAL 1 3x F 12 15 6 m m 1 4 0 4 7 H S POWER PLAY CAMERA LCD M OMITOR ON OFF W MODE SET T H S POWER ON OFF B W COL POWER BUSY MENU BA TTERY CHARGE CAMERA RELERAS...

Страница 6: ... made Note Depending on the number of split images on a printout the ratio between the height and width of an image may differ System Overview Printout of Printout of Printout of six reduced images nine reduced images 16 reduced images Printout of Printout of Printout of a full sized image two reduced images four reduced images ...

Страница 7: ...s of the AC power adaptor clean Do not apply mechanical shock or drop the unit Do not disassemble or convert the unit Do not remove the cover There is a danger of electric shock from the internal parts Be careful not to spill water or other liquids on the unit or to allow combustible or metallic material to enter the cabinet If used with foreign matter in the cabinet the unit is liable to fail or ...

Страница 8: ...er In such cases the printer will probably not work properly and may even develop a fault if you persist in using it If condensation forms turn off the power and leave the printer to stand for at least one hour If the printing pack is subjected to wide and sudden changes in temperature condensation may form on the ink ribbon or paper This will cause the printer to malfunction Also if the printing ...

Страница 9: ...nter turn the power of the printer off and unplug the power cord Clean the cabinet panel and controls with a soft dry cloth or a soft cloth lightly moistened with a mild detergent solution Do not use any type of solvent such as alcohol or benzine which may damage the finish Use a blower to remove dust from the lens Battery Pack Be sure to observe followings To prevent accident from a short circuit...

Страница 10: ...ll not be restored if it is used in high temperatures for a long time or left in a fully charged state or the battery pack is frequently used Regard the remaining battery time indication as the approximate shooting time How to store the battery pack If the battery pack is not to be used for a long time do the following procedure once per year to maintain proper function 1 Fully charge the battery ...

Страница 11: ...o focus function may not work properly in any of the situations below The subject lacks enough contrast The subject includes an extremely bright object The subject has no horizontal line 2 Strobe shoe 59 Attach an external strobe When an external clip on strobe is attached the strobe will light synchronized with shutter operation except in mode 3 Strobe 60 Lights according to the selection made wi...

Страница 12: ...e release 7 RS 232C jack minijack 40 To use the camera far from the station connect to the CAMERA jack of the station using the supplied connecting cable 8 DC8 4V IN jack 37 Connect the supplied AC power adaptor for the AC power operation of the camera 9 Lens f 12 to 15 6 mm f 4 to f 4 7 Auto focus lens with optical zoom 0 Viewfinder 45 You can see the subject through the viewfinder and can shoot ...

Страница 13: ...n external strobe in addition to the built in strobe For instance when you use an external strobe behind the subject to clear shadows E The built in strobe does not light The shutter speed is fixed at 1 250 seconds Use this mode when you use an external strobe as the main strobe The built in strobe does not light The optimum shutter speed is selected according to the automatic photometry performed...

Страница 14: ...ed to the station no picture is displayed during communication between the camera and station When you press MODE of the mode button the mode screen appears For details on the mode screen see Mode button 8 LCD MONITOR switch 41 45 For turning the LCD ON or OFF when the PLAY CAMERA switch is set to CAMERA It is recommended that you set this switch to ON when you do not use a viewfinder 9 Battery co...

Страница 15: ...em with a cotton swab etc qs Tripod screw hole 28 Used to attach the camera to the tripod A quick shoe can be also attached qd Standby lamp 41 The lamp is lit or flashing to indicate the following conditions when the PLAY CAMERA switch is set to CAMERA Flashing in red Preparing for recording charging the flash storing the data recording is disabled Lit in red Memory full Flashing in green Manual s...

Страница 16: ...n 54 Select B W black and white or COL color for a printout A cursor indicates the current selection on the LCD The selection is retained in memory even after the power is turned off 7 Liquid crystal display LCD 55 Displays adjustment items in the menu operation and settings of the B W COL and SPLIT buttons 8 BATTERY CHARGE button 21 Press to charge the large battery installed in the camera with t...

Страница 17: ...ain to return to the normal display qs CAMERA RELEASE lever 39 Slide to the left to detach the camera qd CAMERA connector minijack 40 To use the camera far from the station connect to the RS 232C connector of the camera qf PRINTER connector D sub 25 pin 38 Connect to the PARALLEL DATA connector of the printer qg DC IN connector 37 To supply DC power to the station connect the AC power adaptor supp...

Страница 18: ...data PAPER lamp Lights when a problem for paper occurs RIBBON lamp Lights when a problem for the ink ribbon cartridge occurs ERROR lamp Lights in case of paper jamming or occurrence of any other problem 4 Paper supply eject tray cover 33 Open the cover to load the printing paper 5 USB connector This connector is not used 6 PARALLEL DATA connector 38 Connect the interface cable of the station 7 AC ...

Страница 19: ...battery NP F550 and a button battery CR 2025 Insert both of them as described below 1 Open the battery compartment lid on the bottom of the camera by pushing the PUSH button and sliding the lid in the direction of the arrow 2 Pull out the button battery case PUSH CR2025 PUSH Continue to next page ...

Страница 20: ...20 Preparation of the Camera 3 Install the button battery in its case 4 Reinsert the case 5 Insert the large lithium ion battery 6 Close the lid CR2025 PUSH PUSH PUSH CR2025 CR2025 CR2025 CR2025 ...

Страница 21: ...on on the station Charging will begin and CHARGING appears on the liquid crystal display of the station When finished charging The battery will be almost fully charged in half a day The message NOW CHARGING may remain on the LCD of the station but it is not a problem Disconnect the camera from the station by sliding the CAMERA RELEASE lever to the left PLAY CAMERA LCD M OMITOR ON OFF W MODE SET T ...

Страница 22: ...sary Indicator Meaning Remarks 1 4 or more power remains The battery should last for a while but charging is recommended The remaining power is 1 4 Charge the battery or less Charging is recommended The remaining power is The camera cannot below 4 communicate with the station Charge the battery or other equipment Charge or replace the battery The battery has run out Charge or replace the battery T...

Страница 23: ...ttery frequently AC power adaptor drive Using an AC power adaptor the user need not worry about the remaining battery power 1 Tips To maximize the service life of the button battery it is recommended that you keep the NP F550 set in the camera even during operation on an AC power supply Role of the button battery The camera needs power to keep the following settings in memory flash mode H S mode z...

Страница 24: ...era Displaying the SET UP display 1 Set the POWER switch to ON 2 Set the PLAY CAMERA switch to PLAY 3 Press MODE of the mode until SET UP appears on the LCD of the camera 03 Hi 1 SET UP 4 Press SET of the mode button The SET UP display appears and the select mark points to CLOCK SETUP CLOCK FRAME POWER SAVE H S PLAY CAMERA LCD MONITOR ON OFF W MODE SET T POWER OFF ON 1 2 3 4 ...

Страница 25: ...mode button 4 Press bor B of the mode button to set the year then press SET of the mode button 5 Press bor B of the mode button to set the month then press SET of the mode button 6 Press bor B of the mode button to set the day then press SET of the mode button 7 Press bor B of the mode button to set the hour then press SET of the mode button CLOCK SET DISP OFF 2000 01 01 00 00 Y M D 8 Press bor B ...

Страница 26: ...FRAME 2 Press bor Bof the mode button to select ON then press SET of the mode button The FRAME select display appears FRAME 1 2 3 4 3 Press bor B of the mode button to select frame mode 1 2 3 or 4 then press SET of the mode button The selected guideline appears on the LCD For details on the guideline see Optimum distance between the subject and lens page 43 To make the guideline disappear Select O...

Страница 27: ...n To restore the camera from power save mode In CAMERA mode Press the shutter button halfway or turn off and on the POWER switch In PLAY mode Turn off and on the POWER switch 1 Tips When the camera is in power save mode a print attempt from the station results in either of the following messages on the station LCD SET CAMERA or REPRINT OK EXEC CANCEL MENU The former message is shown when no pictur...

Страница 28: ...ch the camera Size of the quick shoe that can be used H S H S VIDEO OUT FLASH RELEASE RS 232C DC8 4V IN O F F P O W E R O N S O N Y ZOOMLENS OPTICAL 1 3x F 12 1 5 6 m m 1 4 0 4 7 VIDEO OUT FLASH RELEASE RS 232C DC8 4V IN O F F P O W E R O N S O N Y ZOOMLENS OPTICAL 1 3x F 12 1 5 6 m m 1 4 0 4 7 Quick shoe 32 mm or less 26 mm or less 50 mm or less Thickness 14 mm or less Lens side Preparation of th...

Страница 29: ... more paper while printing is in progress do not turn off the printer If you turn off the printer the image that is stored in the printer s memory will be lost Ink ribbon cartridges cannot be re used If a paper jam occurs do not just pull the paper out Remove the paper by following the procedure described in If the Paper Jams page 86 Notes on storing ink ribbon cartridges and paper Do not keep par...

Страница 30: ...mage quality 1 Take up any slack in the ink ribbon by turning in the direction indicated by the arrow The ink ribbon could become damaged if you load the ribbon while it is slack 2 Open the ribbon cartridge cover WARNING Components located behind the ribbon cartridge door become very hot To avoid burns never put your hand inside the opening ...

Страница 31: ...gn the protuberances on the cartridge with the grooves in the printer and slide the cartridge in as far as it will go 4 Close the ribbon cartridge cover and then make sure that the RIBBON lamp has turned off To remove the ink ribbon cartridge 1 Open the ribbon cartridge cover 2 Grasp the handle and pull the cartridge out ...

Страница 32: ...y side facing up place the paper in the paper supply eject tray making sure that the paper is under the tabs at the end of the tray Notes Do not place more than 25 sheets in the tray at one time When loading printing paper in the tray make sure that all of the paper is completely inside of the tray Do not use paper that is significantly curled When outputting multiple sheets of paper to the eject ...

Страница 33: ...ll go and then make sure that the PAPER lamp has turned off Notes Do not allow more than 10 sheets of paper to accumulate on the eject surface of the paper supply eject tray To prevent dust contamination attach the provided tray cover to the paper supply eject tray when you take the tray out of the printer The printer is now ready to print Stopper ...

Страница 34: ...ration of the Printer To remove the printing paper 1 Pull the paper supply eject tray out of the printer 2 Lift the metal plate at the bottom of the paper supply eject tray and then pull out the printing paper ...

Страница 35: ...he Printer The stands can be attached by screws The mounting of the stands depends on whether the printer is going to be used in the vertical position or the horizontal position For vertical orientation For horizontal orientation ...

Страница 36: ...rd Connecting the station to a wall outlet Power is supplied to the station from wall outlet via the PCS AC80 AC power adaptor supplied The station has no power switch so that supplying power immediately begins when you connect the AC power adaptor to the station and wall outlet 1 Attach the ferrite filter supplied to the DC cord of the AC power adaptor Release the lock of the ferrite filter with ...

Страница 37: ...on AC power connect the DC cord of the PCS AC80 AC power adaptor supplied to the DC 8 4V IN connector on the camera Then connect the AC power adaptor to wall outlet Now you can use the camera on AC power Note Use the AC power adaptor near the wall outlet If some trouble occurs during operation immediately disconnect the AC power adaptor from the wall outlet to cut power supply POWER BUSY CAMERA RE...

Страница 38: ...ns Connection of the Station and the Printer Connect the station and printer using the supplied interface cable PRINTER DC IN PRINTER PRINTER Station Printer to PARALLEL DATA Interface cable supplied to wall outlet ...

Страница 39: ... station Slide the CAMERA RELEASE lever to the left and the camera pops up PLAY CAMERA LCD M OMITOR ON OFF W MODE SET T H S POWER ON OFF B W COL POWER BUSY MENU BA TTERY CHARGE CAMERA RELERASE BW COLOR MULTI PICTURE EXEC PRINT UPX C21 16 9 8 4 2 1 CAMERA RELEASE lever B W COL POWER BUSY MENU BATTERY CH ARGE BW CO LOR MULTI PICTURE EXEC PRINT UPX C21 16 9 8 4 2 1 CAM ERA RELERASE PLAY CAMERA LCD M ...

Страница 40: ... not be mounted to the station with the connecting cable connected Attaching the ferrite filters Release the lock of the ferrite filter with a screwdriver or a similar tool and attach it to the plug B W COL POWER BUSY MENU BATTERY CHARGE BW COLOR MULTI PICTURE EXEC PRINT U P X C 2 1 16 9 8 4 2 1 CAMERA CAMERA RELERASE VIDEO OUT FLASH RELEASE RS 232C DC8 4V IN O F F P O W E R O N S O N Y ZOOMLENS O...

Страница 41: ...ommended The built in strobe flashes synchronized with your pressing the release button 5 Press the H S button to select the resolution mode 6 Point the camera at the subject and adjust the frame by monitoring the LCD of the camera Zooming is available by pressing the zoom lever 7 Press the release button on the camera The standby lamp starts flashing in red Once the picture is stored in memory fl...

Страница 42: ...ease button and press it halfway again 1 Tips The auto focus function is activated whenever you press the release button halfway or fully 1 Tips In CAMERA mode pressing the release button halfway restores the camera from power save mode About automatic operation This camera is designed to produce the best possible picture when used in AUTO mode AUTO MAN mode selection is set to AUTO In AUTO mode t...

Страница 43: ...de is set to E or E or AUTO MAN mode selection is set to MAN or an external strobe is used appropriate white balance selection is required A lower value makes the picture more bluish while a higher value makes it more yellowish For details see Shooting Examples Optimum distance between the subject and lens When you take a picture using a guideline displayed on the LCD the optimum distance between ...

Страница 44: ...zoom position guideline and printout FRAME 1 Wide 1 m Telephoto 1 3 m FRAME 2 Wide 1 05 m Telephoto 1 35 m FRAME 3 Wide 1 m Telephoto 1 25 m FRAME 4 Wide 1 3 m Telephoto 1 65 m FRAME 1 2 3 4 FRAME 1 2 3 4 FRAME 1 2 3 4 27 mm 28 5 mm 34 mm FRAME 1 2 3 4 22 mm ...

Страница 45: ...attery power Set the LCD MONITOR switch to OFF look through the viewfinder and adjust the frame Note The picture seen through the viewfinder does not reflect the framing correctly The correct framing is the picture on the LCD H S PLAY CAMERA LCD MONITOR ON OFF W MODE SET T P O W E R O F F O N Viewfinder LCD MONITOR switch ...

Страница 46: ...46 Operation Adjusting the angle of the grip The block with the LCD is rotated by 90 degrees to adjust the angle for easy monitoring of a picture on the LCD PLAY CAMERA LCD MONITOR ON OFF W MODE SET T ...

Страница 47: ...to display the picture before or after the one currently displayed Automatic playback Hold b or B of the mode button pressed for several seconds The pictures stored in memory are played back in sequence at the intervals of about four seconds Stopping automatic playback Press MODE or SET of the mode button After playback Set the POWER switch to OFF H S PLAY CAMERA LCD MONITOR ON OFF W MODE SET T PO...

Страница 48: ...PLAY CAMERA switch to PLAY A picture in memory appears on the LCD 3 Press MODE of the mode button once The MULTI mark appears on the LCD Hi 1 03 MULTI 4 Press SET of the mode button A nine picture multiple display appears To display a picture on a whole screen 1 Press b or B of the mode button on the multiple display until the select mark points the picture to be displayed 2 Press SET of the mode ...

Страница 49: ...OWER switch to ON 2 Set the PLAY CAMERA switch to PLAY A picture in memory appears on the LCD 3 Press MODE of the mode button three times The ERASE mark appears on the LCD Hi 1 03 ERASE 4 Press b or B of the mode button to select a picture to be erased H S PLAY CAMERA LCD MONITOR ON OFF W MODE SET T POWER OFF ON 1 2 3 4 5 6 Continue to next page ...

Страница 50: ... To stop erasing Press MODE of the mode button repeatedly in step 4 or 5 until the ERASE mark disappears Erasing all pictures simultaneously 1 Set the POWER switch to ON 2 Set the PLAY CAMERA switch to PLAY A picture in memory appears on the LCD 3 Press MODE of the mode button three times The ERASE mark appears on the LCD 4 Press SET of the mode button The ONE ALL appears on the screen 5 Press b o...

Страница 51: ...protected are erased If all pictures are erased the screen becomes blue If some picture is protected that picture and the ERASE mark will appear on the screen To temporarily stop erasing Press MODE of the mode button repeatedly in steps 4 through 6 until the ERASE mark disappears To finish erasing Press MODE of the mode button repeatedly until the ERASE mark disappears ...

Страница 52: ...e POWER switch to ON 2 Set the PLAY CAMERA switch to PLAY A picture in memory appears on the LCD 3 Press MODE of the mode button twice The PROTECT mark appears on the LCD Hi 1 02 PROTECT 4 Press b or B of the mode button to select a picture to be protected H S PLAY CAMERA LCD MONITOR ON OFF W MODE SET T POWER OFF ON 1 2 3 4 5 ...

Страница 53: ...dental erasure Hi 1 02 PROTECT Repeat steps 4 and 5 to protect the other pictures To finish setting the protection Press MODE of the mode button To erase a protected picture If you wish to erase a protected picture select the picture and repeat steps 4 and 5 to make the protect mark disappear upon which the protection is released ...

Страница 54: ...ssage DIGITAL PRINTING SYSTEM UPX DP10 is displayed for about 8 seconds on the LCD of the station then disappears For details see Power Connections 3 Press the B W COL button on the station to select black and white B W or color COL for a printout 4 Press the SPLIT button on the station to select a full size or split reduced image for a printout For details on a split reduced image see Split Funct...

Страница 55: ...from the station while this message is displayed After the image data are transferred from the camera to the station the POWER BUSY lamp of the station lights in red and the message PROCESSING IMAGE is displayed The printing will be completed in about two and a half minutes When finished printing Set the POWER switch on the camera to OFF to save battery power To turn the station and printer off 1 ...

Страница 56: ... When you press the PRINT button printing begins After printing the set number of sheet the setting is returned to 1 Selecting the lamination type The lamination type can be selected from among glossy mat or textured 1 Press the MENU button on the station LAMINATION appears on the LCD of the station 2 Press the G or g key to select the lamination type GLOSSY MATTE or TEXTURE 3 Press the EXEC butto...

Страница 57: ...llowish Print summary function With the print summary function the LCD shows the total number of printouts from the station and subtotals from a certain point The subtotals are useful in daily sales management and media management 1 Press the MENU button to select LAMINATION 2 Press the F button to select PRINT INFO TOTAL The value in the bottom row is the total number of printouts from the statio...

Страница 58: ... assistance of an external strobe Using a shadow clearing strobe results in a more natural picture Place a background sheet about 1 m from the subject and place the shadow clearing strobe immediately behind the subject The shadow clearing strobe not only clears the shadows but also gives an appropriate amount of light to the background sheet to improve the S N ratio in the background of the photog...

Страница 59: ... sheet and a weak overhead strobe Do not use the built in strobe In reference to the front strobe the appropriate power of the diagonal front strobe is about 1 to 0 5 Use the back strobe to compensate for the distance between the background sheet and the subject which is about 1 m The overhead strobe makes the hair look vivid turn it off when the subject has a small amount of hair H S mode Select ...

Страница 60: ...graphs the subject Manual intervention The user can manually change the exposure by two steps towards the under and over sides 2 EV The center value is the optimal exposure calculated according to the automatic photometry For WHITE BALANCE select one of the following values 4000K 4400K 4800K 5200K 5600K and 6000K In AUTO mode WHITE BALANCE is automatically set according to the automatic photometry...

Страница 61: ...derate power and the camera detects the overall lighting conditions Therefore when using an external shadow clearing strobe connect it to the camera with a synchronization cord A slave type shadow clearing strobe which reacts to the light from the main strobe cannot be used To use a slave type shadow clearing strobe use the forced external flash mode E explained next Forced external flash mode E A...

Страница 62: ...o 1 250 The camera has an exposure compensation feature and you can manually lower the EXPOSURE value to 0 5 EV However it is recommended that you adjust the external strobe to obtain the best exposure while keeping the EXPOSURE value at the center Use the EXPOSURE function only as a method to finely adjust exposure for different subjects under the same lighting conditions No flash mode Applicatio...

Страница 63: ...E BALANCE on the camera 1 Tips For a subject more than 1 8 m away set the flash mode to A In mode A the shutter speed is adjusted automatically What is Color Temperature A red light makes a white object look reddish This mechanism applies to photographs When the subject is under a reddish light the subject looks reddish on the picture Color temperature is a way to represent the colors of light as ...

Страница 64: ...hotometry before photographing the subject Necessary adjustments including exposure and white balance are done automatically Out of the entire range to be photographed VGA S 640 480 pixels SXGA Hi 1 Hi 2 1280 960 pixels the area subject to the photometry is shown in gray Shooting Examples ...

Страница 65: ... The photographed picture is processed to fit the SXGA resolution and undergoes JPEG compression This resolution is suitable for two reduced or larger prints When either of these modes is selected the LCD of the camera displays Hi 2 or Hi 1 Compared to S mode it takes longer for the camera to respond to the user s operations or to communicate with the station H S mode CAMERA t PLAY Camera t statio...

Страница 66: ...et zooming to the neutral position at the beginning and use Tele or Wide according to the size of the subject 1 Tips By factory default zooming is set to the neutral position The zooming position changed by the operator is saved in internal memory and kept even after the camera is turned off However if the camera is turned off and the button battery is not installed the zooming position is reset t...

Страница 67: ...PLIT mode on the station is set to 4 or 6 the distance between the head and chin lines is 22 mm H S mode FRAME 1 FRAME 2 FRAME 3 FRAME 4 S mode 1 2 3 4 330 130 480 640 1 2 3 4 480 130 316 640 235 1 2 3 4 115 345 480 640 1 2 3 4 480 130 270 640 VGA Hi 1 mode 1 2 3 4 660 260 960 1280 1 2 3 4 960 260 630 1280 470 1 2 3 4 230 690 960 1280 1 2 3 4 960 260 540 1280 Hi 2 mode SXGA You may choose to view ...

Страница 68: ...U message if you press the PRINT button while the camera is not connected to the station The SET CAMERA message is shown when no picture data has been sent to the station The latter message is shown when a picture data remains in the station The latter message may also be shown when the setting of the PLAY CAMERA switch is changed In that case press the MENU button to select CANCEL and press the P...

Страница 69: ...ss the PRINT button the picture will be printed according to the values stored in the retrieved memory Menu items LOAD SETTING The adjusted values stored in memory are loaded CYN RED This item is enabled when COL is selected with the B W COL button Pressing the G key gives the picture more cyan while pressing the g key gives it more reddish MAG GRN This item is enabled when COL is selected with th...

Страница 70: ... by a green light The maximum brightness is 255 it is the point of saturation For instance a white part where the brightness is saturated remains white no matter how much the value is increased to the side Press the G key to change the parameter in the direction i e 1 2 3 7 The green elements of the picture are moderated as shown in the figure The green elements are attenuated linearly towards the...

Страница 71: ...exposed Press the G key to darken the bright side of each of the RGB elements The resultant picture should look somewhat underexposed SHARPNESS adjustment Adjust the sharpness of the picture The default is LOW There are four options NONE LOW MIDDLE and HIGH LOW is recommended when the printout is to have many split sections GAMMA adjustment Gm parameter Adjust the gamma value The default is 0 Pres...

Страница 72: ... 1 which means a guide for changing the RGB parameters To print this color guide press the EXEC button at this point Pressing the g key once again changes the indication to COLOR GUIDE 2 which means a guide for changing the DLGm parameters To print this color guide press the EXEC button at this point The figure below gives examples of the color guides D 3 3 0 0 L 3 0 3 0 Gm 3 0 0 3 now 0 0 0 D 3 3...

Страница 73: ...e becomes darker and the cyan becomes strong The GREEN parameter is changed by 3 from the current value The saturated white part does not change The picture becomes brighter and greenish The GREEN parameter is changed by 3 from the current value The picture becomes darker and the magenta becomes strong Picture of the current RED GREEN and BLUE parameter values The RED parameter is changed by 3 fro...

Страница 74: ...urrent value The dark part increases its darkness The DARK parameter is changed by 3 from the current value The dark part decreases its darkness and the picture looks like taken in a bright place The GAMMA parameter is changed by 3 from the current value The half tone part becomes darker Picture of the current DARK LIGHT and GAMMA parameter values The GAMMA parameter is changed by 3 from the curre...

Страница 75: ...R parameter to 3 for instance means strengthening the RED element of light Therefore the picture looks reddish overall In addition the picture becomes brighter because the total amount of light increases However some portions remain unchanged These are the portions that totally lack the RED element for instance pure green pure cyan pure blue neutral tints in between or total black and the portions...

Страница 76: ...er The LCD shows LOCK To release the lock function hold down the EXEC button for three seconds or longer again The following functions are locked Picture quality adjustment LOAD SETTING function SAVE SETTING function CYN RED color adjustment function MAG GRN color adjustment function YEL BLU color adjustment function DARK tone adjustment function LIGHT tone adjustment function GAMMA tone adjustmen...

Страница 77: ... Connections 2 Release the SPLIT button when SPLIT1 TYPE 1 appears on the LCD Split Function 3 1 5 1 2 4 B W COL POWER BUSY MENU BA TTERY CHARGE CAMERA RELERASE BW COLOR SPLIT EXEC PRINT UPX C21 16 9 8 4 2 1 3 Press the g key to select the type for SPLIT1 4 Press the f key to select SPLIT2 Repeat steps 3 and 4 until necessary settings for SPLIT1 SPLIT2 SPLIT4 SPLIT6 and SPLIT9 have been done 5 Whe...

Страница 78: ...5 30 0 4 52 39 mm Head Line c 10 5 10 5 10 5 9 5 10 5 Face Size d 27 0 26 0 19 0 28 0 22 0 4C 48 33 mm Head Line c 9 5 9 5 9 5 8 5 9 5 Face Size d 25 0 24 0 17 5 26 0 20 5 4 47 35 mm Head Line c 8 0 8 0 8 0 6 5 8 0 Face Size d 27 0 26 0 19 0 28 0 22 0 SPLIT6 6 4 52 39 mm Head Line c 10 5 10 5 10 5 9 5 10 5 4 MINI Face Size d 27 0 26 0 19 0 28 0 22 0 4R 47 37 mm Head Line c 6 0 6 0 6 0 5 0 6 0 Face...

Страница 79: ... 1 Picture on the camera Valid range after SXGA magnification change 974 1462 960 1280 Sample printout 84 mm 126mm 4 US PASSPORT 2U 2 Picture on the Valid range after camera SXGA magnification change 608 811 960 1280 Sample printout 70 mm 52 mm ...

Страница 80: ...The SHARPNESS function emphasizes the edges of a picture it does not increase the resolution This function merely changes the sharpness of the pictures as seen by human eyes SHARPNESS is used as a parameter for manipulating the picture quality Sharpness that is too high hampers the naturalness of the picture Basically the default value of LOW is recommended For large pictures however MIDDLE improv...

Страница 81: ...riority shutter range programmed exposure Fixed shutter iris priority programmed exposure E E Fixed shutter speed Shutter speed A 1 30 to 1 750 second E E 1 250 second 1 2 to 1 750 second Appendixes Photographic sensitivity A E Equivalent to ISO 100 E Equivalent to ISO 130 LCD monitor 1 8 inch cold polisilicone TFT color LCD viewfinder 110 000 pixel Lens f 12 to 15 6 mm f 4 to f 4 7 equivalent to ...

Страница 82: ...ts AC IN power inlet Thermal head 11 6 dots mm AC power adaptor Power requirements 100 240 V AC 50 60 Hz Power consumption 23 W Output voltage DC OUT 8 4 V 1 5 A in operating mode Operating temperature 5 C to 35 C Storage temperature 20 C to 60 C Dimensions w h d Approx 125 39 62 mm including projecting parts Mass Approx 230 g Supplied accessories Paper supply eject tray 1 Stands 2 Tray case 1 AC ...

Страница 83: ...h does not light The PLAY CAMERA switch is not to set to CAMERA t Set the switch to CAMERA The camera is getting ready to take a picture the standby lamp is flashing t Wait until the standby lamp lights in green The memory is full the standby lamp is flashing in red t Check the displayed remaining number of shots that can be taken If zero erase any picture that is not necessary The flash button is...

Страница 84: ...on cartridge gear engaged t Turn the printer s POWER switch back on then remove the ink ribbon cartridge after the sound of operation stops Check whether you have loaded more than 25 sheets of paper in the paper supply eject tray t Load no more than 25 sheets of paper in the paper supply eject tray at a time Check whether more than 10 sheets of paper have accumulated on the eject surface of the pa...

Страница 85: ...aper pages 30 through 32 REMOVE PRINTS The maximum number of printouts has accumulated on the paper cover t Remove the printouts from the paper cover REMOVE PAPER The paper jams around the paper tray as it is being fed into the ribbon area t Remove the jammed paper page 86 CLOSE COVER The top cover opens t Close the top cover Status Indications on the printer The printer status is indicated by the...

Страница 86: ...t Turn off the camera and the printer then turn them on again If the paper jams If the paper jams while the printer is printing the ERROR lamp will light Press the Operation switch to turn the printer off and then press the Operation switch to turn the printer on again The paper inside the printer will be ejected automatically If this procedure does not clear the paper jam and the ERROR lamp remai...

Страница 87: ...ection indicated by the arrow Notes If you cannot remove the jammed paper contact your Sony dealer or the nearest Sony service facility Do not attempt to print again on the jammed paper that you removed WARNING Never touch components inside the unit Injury can result from sharp edges inside the unit Burns can result from touching hot internal components 7 Replace the bottom cover the paper supply ...

Страница 88: ...eil qu à un personnel qualifié Pour l appareil photo numérique DKC C21 ATTENTION Il y a danger d explosion s il y a remplacement incorrect de la batterie Remplacer uniquement avec une batterie du même type ou d un type équivalent recommandé par le constructeur Mettre au rebut les batteries usagées conformément aux instructions du fabricant Pour l imprimante UP DP10 AVERTISSEMENT CET APPAREIL DOIT ...

Страница 89: ... Réglage de l horloge du cadrage et de l économie d énergie 111 Installation sur un trépied 115 Préparation de l imprimante 116 Préparation d un kit d impression 116 Fixation des supports à l imprimante 122 Raccordements 123 Raccordement de l alimentation 123 Raccordement de la station et de l imprimante 125 Raccordement de l appareil photo à la station 126 Fonctionnement 128 Prise de vues 128 Vis...

Страница 90: ...156 Téléchargement des images 156 Traitement des images 156 Sortie de l imprimante 156 Réglage de la qualité d image 157 Fonctions de réglage de la qualité d image 157 Guide des couleurs 161 Fonction de verrouillage 165 Choix du nombre d images par tirage SPLIT 166 Sélection du type de tirage 166 Format d impression dans chaque mode SPLIT 167 Valeurs de paramètres conseillées dans chaque mode SPLI...

Страница 91: ...ir et blanc ou 16 7 millions de couleurs Configuration du système B W COL POWER BUSY MENU BA TTERY CHARGE CAMERA RELERASE BW COLOR MULTI PICTURE EXEC PRINT UPX C21 16 9 8 4 2 1 S O N Y ZOOM LENS OPTICAL 1 3x F 12 15 6 m m 1 4 0 4 7 H S POWER PLAY CAMERA LCD M OMITOR ON OFF W MODE SET T H S POWER ON OFF B W COL POWER BUSY MENU BA TTERY CHARGE CAMERA RELERASE BW COLOR MULTI PICTURE EXEC PRINT UPX C2...

Страница 92: ...n de neuf images réduites Impression de seize images réduites Présentation du système Tirages pouvant être effectués avec le système Impression d images multiples Avec ce système les types de tirages suivants peuvent être effectués Remarque Le rapport longueur largeur d une image peut varier en fonction du nombre d images réduites présentes sur un tirage ...

Страница 93: ...appareil à des chocs mécaniques et ne le laissez pas tomber Ne démontez pas l appareil et ne le modifiez pas N enlevez pas le couvercle Vous courez le risque d être électrocuté par un contact avec les composants internes Veillez à ne pas répandre d eau ou un autre liquide sur l appareil prévenez toute pénétration éventuelle de matériaux combustibles ou métalliques dans le châssis En cas de pénétra...

Страница 94: ...densation peut se former à l intérieur de l imprimante Cette condensation risque d entraîner un dysfonctionnement de l imprimante voire de provoquer une panne si vous persistez à l utiliser Si de la condensation se forme mettez l imprimante hors tension et laissez la sécher pendant au moins une heure Si le kit d impression est soumis à des variations de température importantes et brutales de la co...

Страница 95: ...e des photos destinées à l usage personnel avec cet appareil photo numérique Néanmoins prendre en photo des objets protégés par les lois sur la propriété artistique est interdit sans l autorisation du détenteur des droits d auteur N oubliez pas cela lorsque vous prendrez des photos pendant un concert un spectacle ou dans une salle d exposition etc une grande partie des objets exposés étant protégé...

Страница 96: ... Pour utiliser plus longtemps la batterie il est conseillé de Mettre la batterie dans une poche pour la maintenir au chaud et de l insérer seulement avant de filmer Emportez toujours quelques batteries de rechange pour disposer d un temps d enregistrement suffisant deux à trois fois le temps prévu et pour pouvoir faire des essais avant l enregistrement proprement dit Si le camescope s éteint bien ...

Страница 97: ...ice d une batterie dépend des conditions d utilisation de rangement et de l environnement Garantie concernant les enregistrements Aucune compensation ne peut être garantie s il n a pas été possible d effectuer l enregistrement ou la lecture en raison du mauvais fonctionnement de la batterie etc Vous n avez pas à décharger la batterie avant de la charger La charge de la batterie alors qu elle n est...

Страница 98: ...marque L autofocus risque de ne pas fonctionner correctement dans une des situations ci dessous Le sujet n est pas assez contrasté Le sujet est trop lumineux Le sujet ne présente pas de ligne horizontale 2 Sabot contact 147 Pour le branchement d un flash extérieur Quand un flash extérieur avec sabot de fixation est attaché le flash s allume en synchronisation avec le fonctionnement de l obturateur...

Страница 99: ... 127 Pour utiliser l appareil photo loin de la station raccordez cette prise à la prise CAMERA de la station avec le câble de liaison fourni 8 Prise DC 8 4V IN 124 Raccordez l adaptateur d alimentation secteur fourni pour alimenter l appareil photo 9 Objectif f 12 à 15 6 mm f 4 à f 4 7 Objectif autofocus avec zoom optique 0 Viseur 132 Vous pouvez voir le sujet dans le viseur et prendre une photo s...

Страница 100: ...égré seulement E Le flash intégré se déclenche toujours La vitesse d obturation est fixée à 1 250e de seconde et l exposition optimale est contrôlée automatiquement pour une distance de 1 2 mètre entre le sujet et l objectif Ce mode est conseillé quand vous utilisez un flash extérieur en plus du flash intégré Par exemple quand vous utilisez un flash extérieur derrière le sujet pour éliminer les om...

Страница 101: ...ice versa CAMERA Réglez le commutateur sur cette position pour photographier un sujet Le témoin de veille s allume ou clignote en vert PLAY Réglez le commutateur sur cette position pour regarder les images capturées Le temps nécessaire pour passer du mode CAMERA au mode PLAY et vice versa dépend de la condition H S S Hi 2 Hi 1 des images enregistrées 7 Afficheur à cristaux liquides écran LCD Quand...

Страница 102: ... t APERTURE t WHITE BALANCE Pour annuler une sélection effectuée par une pression sur b ou B ou pour annuler l opération en cours appuyez sur ce côté SET Un paramètre sélectionné par une pression sur MODE b ou B de la touche de mode est réglé b B Une image à afficher à effacer ou à protéger est sélectionnée Appuyez aussi sur ces sections pour sélectionner des articles dans la fenêtre MODE qa Conta...

Страница 103: ...électionner le type de tirage Une image grand format ou un tirage avec plusieurs images réduites Les spécifications varient en fonction des marchés visés Un curseur indique le choix actuel sur l écran LCD Le choix est conservé en mémoire même après la mise hors tension de la station 6 Commutateur B W COL 141 Sert à sélectionner B W noir et blanc ou COL couleur pour un tirage Un curseur indique le ...

Страница 104: ...enfoncée pendant trois secondes ou plus 0 Touches de curseur 142 157 Utilisez ces touches pendant l affichage du menu des opérations qa Touche MENU 142 157 Appuyez sur cette touche pour afficher le menu des opérations comprenant la lamination enduit le nombre de tirages le réglage de la couleur et le nombre total de tirages Appuyez de nouveau sur cette touche pour revenir à l affichage normal qs L...

Страница 105: ... des données d image Témoin PAPER S allume quand un problème en rapport avec le papier survient Témoin RIBBON S allume quand un problème en rapport avec la cartouche ruban d encre survient Témoin ERROR S allume en cas de bourrage de papier ou pour tout autre problème 4 Plateau d alimentation éjection du papier 120 Ouvrez le couvercle pour charger le papier d impression 5 Connecteur USB Ce connecte...

Страница 106: ...F550 et une pile bouton lithium ion CR 2025 sont fournies Insérez les de la façon décrite ci dessous 1 Ouvrez le couvercle du logement de batterie au bas de l appareil photo en appuyant sur le bouton PUSH et en faisant glisser le couvercle dans le sens de la flèche 2 Tirez sur le logement de la pile bouton PUSH CR2025 PUSH ...

Страница 107: ...Insérez la pile bouton dans son logement 4 Réinsérez le logement dans l appareil photo 5 Insérez la batterie rechargeable lithium ion 6 Refermez le couvercle PUSH PUSH CR2025 CR2025 CR2025 CR2025 CR2025 PUSH ...

Страница 108: ...e BATTERY CHARGE de la station Le chargement commence et CHARGING apparaît sur l afficheur LCD de la station Quand le chargement est terminé La batterie sera presque complètement chargée après une demi journée Le message NOW CHARGING en cours de chargement restera peut être affiché sur l écran LCD de la station mais ce n est pas un problème Détachez l appareil photo de la station en faisant glisse...

Страница 109: ...1 4 ou plus de l énergie est La batterie devrait fonctionner disponible encore un moment mais il est conseillé de la recharger 1 4 ou moins de l énergie est Chargez la batterie disponible Chargez la batterie La capacité restante est L appareil photo ne peut pas inférieure à 4 communiquer avec la station Chargez la batterie ou un autre appareil Chargez ou remplacez la batterie La Batterie est épuis...

Страница 110: ... charger fréquemment la batterie Alimentation par l adaptateur secteur L utilisation d un adaptateur secteur libère l utilisateur de tout soucis quant à la capacité restante de la batterie 1 Conseils Pour maximiser la durée de vie utile de la pile bouton il est conseillé de laisser la NP F550 en place dans l appareil photo même pendant l utilisation sur le secteur Rôle de la pile bouton L appareil...

Страница 111: ...on de l affichage SET UP 1 Réglez le commutateur POWER sur ON 2 Réglez le commutateur PLAY CAMERA sur PLAY 3 Appuyez sur MODE de la touche de mode jusqu à ce que SET UP apparaisse sur l écran LCD de l appareil photo 03 Hi 1 SET UP 4 Appuyez sur SET de la touche de mode L affichage SET UP apparaît et le repère de sélection indique CLOCK SETUP CLOCK FRAME POWER SAVE H S PLAY CAMERA LCD MONITOR ON OF...

Страница 112: ...touche de mode 4 Appuyez sur bou B de la touche de mode pour régler l année puis appuyez sur SET de la touche de mode 5 Appuyez sur bou B de la touche de mode pour régler le mois puis appuyez sur SET de la touche de mode 6 Appuyez sur bou B de la touche de mode pour régler le jour puis appuyez sur SET de la touche de mode 7 Appuyez sur bou B de la touche de mode pour régler l heure puis appuyez su...

Страница 113: ...r sélectionner ON puis appuyez sur SET de la touche de mode L affichage de sélection de cadre FRAME apparaît FRAME 1 2 3 4 3 Appuyez sur bou B de la touche de mode pour sélectionner le mode de cadrage 1 2 3 ou 4 puis appuyez sur SET de la touche de mode Les repères de cadrage sélectionnés apparaissent sur l écran LCD Pour des détails sur les repères de cadrage voir Distance optimale entre le sujet...

Страница 114: ...de CAMERA Appuyez sur le déclencheur à mi course ou mettez l appareil photo hors tension puis sous tension à l aide du commutateur POWER En mode PLAY Mettez l appareil photo hors tension puis sous tension à l aide du commutateur POWER 1 Conseils Quand l appareil photo est en mode d économie d énergie un essai d impression par la station entraînera l affichage d un des messages suivants sur l écran...

Страница 115: ...rez facilement attacher détacher l appareil photo Taille du sabot de fixation rapide pouvant être utilisé H S H S VIDEO OUT FLASH RELEASE RS 232C DC8 4V IN O F F P O W E R O N S O N Y ZOOMLENS OPTICAL 1 3x F 12 1 5 6 m m 1 4 0 4 7 VIDEO OUT FLASH RELEASE RS 232C DC8 4V IN O F F P O W E R O N S O N Y ZOOMLENS OPTICAL 1 3x F 12 1 5 6 m m 1 4 0 4 7 Sabot de fixation rapide Côté objectif 32 mm ou moin...

Страница 116: ...ettez pas l imprimante hors tension Si l imprimante est mise hors tension l image enregistrée dans la mémoire sera perdue Les cartouches ruban d encre ne sont pas réutilisables En cas de bourrage de papier ne tirez pas seulement sur le papier coincé Retirez le papier en suivant les instructions de la procédure En cas de bourrage de papier page 176 Remarques sur le rangement des cartouches ruban d ...

Страница 117: ...ez le ruban d encre en tournant dans le sens de la flèche Le ruban d encre risque d être endommagé s il est chargé alors qu il est détendu 2 Ouvrez le couvercle de la cartouche ruban AVERTISSEMENT Les composants situés derrière le couvercle de la cartouche ruban deviennent très chaud Pour éviter tout risque de brûlure n introduisez pas vos doigts dans la fente Voir page suivante ...

Страница 118: ...artouche avec les rainures sur l imprimante et insérez entièrement la cartouche aussi profondément que possible 4 Fermez le couvercle de la cartouche ruban et assurez vous que le témoin RIBBON est éteint Retrait de la cartouche ruban d encre 1 Ouvrez le couvercle de la cartouche ruban d encre 2 Tenez la languette et tirez la cartouche vers l extérieur ...

Страница 119: ...teau d alimentation éjection du papier en vous assurant que le papier se trouve sous les onglets au fond du plateau Remarques Ne mettez pas plus de 25 feuilles à la fois sur le plateau Lors du chargement du papier d alimentation dans le plateau vérifiez que tout le papier se trouve entièrement dans le plateau N utilisez pas de papier très gondolé Pour sortir plusieurs feuilles de papier sur la sur...

Страница 120: ...lus profondément possible et vérifiez que le témoin PAPER est éteint Remarques Ne laissez pas plus de 10 feuilles s accumuler sur le plateau d alimentation éjection du papier Pour éviter toute contamination par la poussière fixez le couvercle du plateau au plateau d alimentation éjection du papier lorsque le plateau est retiré de l imprimante L imprimante est maintenant prête pour l impression Cal...

Страница 121: ...it du papier d impression 1 Retirez le plateau d alimentation éjection du papier de l imprimante 2 Soulevez la plaque métallique sous le plateau d alimentation éjection du papier et sortez le papier d impression ...

Страница 122: ...ts peuvent être fixés par des vis Le montage des supports dépend de la position d utilisation de l imprimante verticale ou horizontale reportez vous à l illustration Pour l orientation verticale Pour l orientation horizontale Préparation de l imprimante ...

Страница 123: ... prise murale L alimentation est fournie à la station depuis une prise murale via l adaptateur secteur PCS AC80 AC fourni La station n est pas munie de commutateur de mise sous hors tension aussi l alimentation commence immédiatement lorsque vous raccordez l adaptateur secteur à la station et à la prise murale 1 Mettez le filtre à ferrite fourni en place sur le cordon CC de l adaptateur d alimenta...

Страница 124: ... appareil photo sur secteur branchez le cordon CC de l adaptateur secteur PCS AC80 AC fourni sur la prise DC 8 4V IN de l appareil photo Puis branchez l adaptateur secteur sur une prise murale Remarque Utilisez l adaptateur secteur près de la prise murale En cas de problème pendant le fonctionnement débranchez immédiatement l adaptateur secteur de la prise murale pour couper l alimentation POWER B...

Страница 125: ...tation et de l imprimante Raccordez la station à l imprimante en utilisant le câble d interface fourni PRINTER DC IN PRINTER PRINTER Station Imprimante vers PARALLEL DATA Câble d interface fourni vers une prise murale Station ...

Страница 126: ... libérer l appareil photo de la station Faites glisser le levier CAMERA RELEASE vers la gauche et l appareil photo sortira vers le haut PLAY CAMERA LCD M OMITOR ON OFF W MODE SET T H S POWER ON OFF B W COL POWER BUSY MENU BA TTERY CHARGE CAMERA RELERASE BW COLOR MULTI PICTURE EXEC PRINT UPX C21 16 9 8 4 2 1 Levier CAMERA RELEASE B W COL POWER BUSY MENU BATTERY CH ARGE BW CO LOR MULTI PICTURE EXEC ...

Страница 127: ...s être monté sur la station en laissant le câble de liaison branché Mise en place des filtres à ferrite Débloquez le filtre à ferrite avec un tournevis ou un outil similaire et mettez le en place sur la fiche B W COL P O W E R B U S Y M E N U B A T T E R Y C H A R G E B W C O L O R M U L T I P I C T U R E E X E C P R I N T U P X C 2 1 1 6 9 8 4 2 1 CAMERA C A M E R A R E L E R A S E VIDEO OUT FLAS...

Страница 128: ...he H S pour sélectionner le mode de résolution 6 Dirigez l appareil photo vers le sujet et réglez le cadrage en regardant l écran LCD de l appareil photo Le zooming est aussi possible en appuyant sur le levier de zoom 7 Appuyez sur le déclencheur de l appareil photo Le témoin de veille se met à clignoter en rouge Quand l image est enregistrée dans la mémoire le clignotement s arrête et le témoin d...

Страница 129: ...nouveau dessus à mi course 1Conseils L autofocus est activé chaque fois que vous appuyez sur le déclencheur à mi course ou complètement 1Conseils En mode CAMERA une pression à mi course sur le déclencheur fait sortir l appareil photo du mode d économie d énergie A propos du mode de fonctionnement automatique Cet appareil photo est conçu pour produire les meilleures images possibles quand il est ut...

Страница 130: ...ancs Si le mode de flash est réglé sur E ou E AUTO MAN est réglé sur MAN ou un flash extérieur est utilisé une sélection appropriée de la balance des blancs est nécessaire Une valeur plus faible rend l image bleuâtre tandis qu une valeur plus élevée la rend jaunâtre Pour les détails voir Exemples de prise de vue Distance optimale entre le sujet et l objectif Quand vous prenez une photo en utilisan...

Страница 131: ...rage et tirage FRAME 1 Grand angle 1 m Téléobjectif 1 3 m FRAME 2 Grand angle 1 05 m Téléobjectif 1 35 m FRAME 3 Grand angle 1 m Téléobjectif 1 25 m FRAME 4 Grand angle 1 3 m Téléobjectif 1 65 m FRAME 1 2 3 4 FRAME 1 2 3 4 FRAME 1 2 3 4 27 mm 28 5 mm 34 mm FRAME 1 2 3 4 22 mm ...

Страница 132: ...énergie de la batterie rechargeable et de la pile Réglez le commutateur LCD MONITOR sur OFF regardez dans le viseur et cadrez Remarque L image vue dans le viseur ne reflète pas le cadrage de façon correcte Le cadrage correct est représenté par l image de l écran LCD H S PLAY CAMERA LCD MONITOR ON OFF W MODE SET T P O W E R O F F O N Viseur Commutateur LCD MONITOR ...

Страница 133: ...de l angle de la poignée Le bloc comportant l écran LCD peut pivoter sur 90 degrés pour le choix d un angle permettant un visionnement facile d une image sur l écran LCD PLAY CAMERA LCD MONITOR ON OFF W MODE SET T ...

Страница 134: ...la touche de mode pour afficher l image avant ou après l image actuelle Visionnement automatique Maintenez la touche bou B enfoncée pendant plus de deux secondes Les images stockées dans la mémoire seront visionnées dans l ordre à des intervalles d environ quatre secondes Arrêt du visionnement automatique Appuyez sur MODE ou SET de la touche de mode Après le visionnement Réglez le commutateur POWE...

Страница 135: ...mutateur PLAY CAMERA sur PLAY Une image enregistrée apparaît sur l écran LCD 3 Appuyez une fois sur MODE de la touche de mode L indicateur MULTI apparaît sur l écran LCD Hi 1 03 MULTI 4 Appuyez sur SET de la touche de mode Un affichage multiple de neuf images apparaît Pour afficher une image sur toute la surface de l écran 1 Appuyez sur bou B de la touche de mode pour sélectionner l image à affich...

Страница 136: ... Réglez le commutateur POWER sur ON 2 Réglez le commutateur PLAY CAMERA sur PLAY Une image enregistrée apparaît sur l écran LCD 3 Appuyez sur MODE de la touche de mode trois fois L indicateur ERASE apparaît sur l écran LCD Hi 1 03 ERASE 4 Appuyez sur bou B de la touche de mode pour sélectionner une image à effacer H S PLAY CAMERA LCD MONITOR ON OFF W MODE SET T POWER OFF ON 1 2 3 4 5 6 ...

Страница 137: ...touche de mode à plusieurs reprises à l étape 4 ou 5 jusqu à ce que l indicateur ERASE disparaisse Effacement simultané de toutes les images 1 Réglez le commutateur POWER sur ON 2 Réglez le commutateur PLAY CAMERA sur PLAY Une image enregistrée apparaît sur l écran LCD 3 Appuyez sur MODE de la touche de mode trois fois L indicateur ERASE apparaît sur l écran LCD 4 Appuyez sur SET de la touche de m...

Страница 138: ...s Si toutes les images sont effacées l écran devient bleu Si une image est protégée cette image et l indicateur ERASE apparaîtront sur l écran Pour interrompre l effacement Appuyez sur MODE de la touche de mode à plusieurs reprises aux étapes 4 à 6 jusqu à ce que l indicateur ERASE disparaisse Pour arrêter l effacement Appuyez sur MODE de la touche de mode à plusieurs reprises jusqu à ce que l ind...

Страница 139: ...églez le commutateur PLAY CAMERA sur PLAY Une image enregistrée apparaît sur l écran LCD 3 Appuyez sur MODE de la touche de mode deux fois L indicateur PROTECT apparaît sur l écran LCD Hi 1 02 PROTECT 4 Appuyez sur bou B de la touche de mode pour sélectionner une image à protéger H S PLAY CAMERA LCD MONITOR ON OFF W MODE SET T POWER OFF ON 1 2 3 4 5 Voir page suivante ...

Страница 140: ...cidentel Hi 1 02 PROTECT Répétez les étapes 4 et 5 pour protéger d autres images Pour terminer le réglage de la protection Appuyez sur MODE de la touche de mode Pour effacer une image protégée Si vous souhaitez effacer une image protégée sélectionnez l image et répétez les étapes 4 et 5 de telle façon que l indicateur de protection disparaisse L image ne sera plus protégée ...

Страница 141: ...lle 2 Raccordez la station à une prise murale L alimentation est fournie à la station Le message DIGITAL PRINTING SYSTEM UPX DP10 est affiché pendant 8 secondes environ sur l écran LCD de la station puis disparaît Pour les détails voir Raccordement de l alimentation 3 Appuyez sur le commutateur B W COL de la station pour sélectionner noir et blanc B W ou couleur COL pour un tirage PLAY CAMERA LCD ...

Страница 142: ... terminé il s allume de nouveau automatiquement Veillez à ne pas débrancher l appareil photo de la station pendant que ce message est affiché Après la fin du transfert des données d image de l appareil photo à la station le témoin POWER BUSY de la station s allume en rouge et le message PROCESSING IMAGE est affiché L impression sera terminée en deux minutes et demie environ Quand l impression est ...

Страница 143: ...INT QTY apparaisse sur l afficheur LCD de la station 3 Appuyez sur la touche G or g pour sélectionner le nombre de feuilles à imprimer 4 Appuyez sur la touche EXEC Le nombre sélectionné est validé et le nombre sélectionné apparaît en bas et à gauche de l écran LCD sous la forme Q6 Quand vous appuyez sur la touche PRINT l impression commence Après l impression du nombre de feuilles sélectionné le r...

Страница 144: ...es poussières excessives et au rayonnement direct du soleil N apposez pas de bande adhésive sur un tirage De même évitez de laisser une gomme en plastique sur un tirage ou de mettre un tirage directement en contact avec des matériaux contenant des plastifiants sous un sous main par exemple Veillez à ce que les tirages ne soient jamais en contact avec de l alcool ou d autres solvants organiques vol...

Страница 145: ...l pouvant être réinitialisé Appuyez sur la touche g et sélectionnez PRINT INFO TALLY Réinitialisation d un sous total Appuyez sur la touche g sélectionnez PRINT TALLY TO RESET puis appuyez sur la touche EXEC Remarque PRINT INFO TOTAL peut ne pas être 0 à l achat du produit Ce phénomène est dû à un test d impression effectué lors du processus de production il ne s agit pas d une erreur Réglage de l...

Страница 146: ...nt été prises avec l assistance d un flash extérieur L utilisation d un flash pour éliminer les ombres produit une image plus naturelle Disposez une feuille à l arrière plan à environ 1 m du sujet et disposez le flash pour éliminer les ombres immédiatement derrière le sujet Le flash pour éliminer les ombres élimine non seulement les ombres mais distribue aussi une quantité de lumière appropriée su...

Страница 147: ...ère plan et un flash faible pour éclairage de dessus N utilisez pas le flash intégré Le rapport d intensité approprié du flash pour éclairage avant en biais au flash avant doit être d environ 1 à 0 5 Utilisez le flash arrière pour compenser la distance entre la feuille à l arrière plan et le sujet qui est d environ 1 m Le flash pour éclairage de dessus rend les cheveux plus brillants éteignez le q...

Страница 148: ... automatiquement les paramètres à leurs valeurs optimales y compris l exposition et la balance des blancs puis enregistre le sujet Intervention manuelle L utilisateur peut changer manuellement l exposition de deux valeurs vers les côtés sous exposition ou surexposition 2 EV La valeur centrale est l exposition optimale calculée par photométrie automatique Pour WHITE BALANCE sélectionnez une des val...

Страница 149: ...expérience et de l intuition et son utilisation par un amateur non averti n est pas conseillée Pour APERTURE sélectionnez OPEN PROG ou CLOSE Utilisez PROG autant que possible Dans le mode PROG l appareil photo sélectionne automatiquement OPEN F4 à F4 7 ou CLOSE F11 4 à F13 5 en fonction de la luminosité du sujet 1 Conseils Ce mode est conçu pour faciliter la création de portraits en intérieur et d...

Страница 150: ... est nécessaire d ajuster la puissance du flash extérieur Description Dans ce mode la vitesse d obturation est fixée à 1 250e de seconde Le flash intégré ne se déclenche pas La valeur est équivalente à la sensibilité 130 ISO avec exposition réglée au centre Intervention manuelle L utilisateur peut changer manuellement l exposition d une demie valeur vers les côtés sous exposition ou surexposition ...

Страница 151: ...lenche plus de dix fois pendant une courte période pour provoquer une contraction des pupilles La quantité de lumière pénétrant dans les pupilles est ainsi réduite avec pour effet la diminution des réflexions rouges Seul ce processus spécial de déclenchement du flash différencie ce mode du mode de flash automatique Spécifications du flash intégré Le flash intégré est conçu de façon optimale pour l...

Страница 152: ...les à une chute de la température de couleur après une utilisation continue Pour supporter des flashes de températures de couleur différentes cet appareil photo autorise un réglage de la température de couleur entre 4000K et 7000K par intervalles d environ 400K à 500K en mode MANUAL Par exemple quand la température de couleur a été réglée sur 5600K et la photographie est bleuâtre réglez la tempéra...

Страница 153: ...70 Ko Hi 2 SXGA Faible Environ 220 Ko 1 280 960 pixels Hi 1 SXGA Extrêmement Environ 440 Ko 1 280 960 pixels faible a La taille du fichier dépend de l image à enregistrer Mode S L image est traitée pour correspondre à la résolution VGA et subit une compression JEPG Cette résolution est convenable pour l impression de tirages avec quatre images réduites ou l impression d images plus petites Quand c...

Страница 154: ...aille du sujet 1 Conseils Le zoom est réglé par défaut sur la position neutre la position du zoom modifiée par l opérateur est sauvegardée dans la mémoire interne et conservée même après la mise hors tension de l appareil photo Néanmoins si l appareil photo est mis hors tension et la pile bouton n est pas en place dans l appareil photo la position du zoom sera réinitialisée à la position neutre la...

Страница 155: ...de H S FRAME 1 FRAME 2 FRAME 3 FRAME 4 Mode S 1 2 3 4 330 130 480 640 1 2 3 4 480 130 316 640 235 1 2 3 4 115 345 480 640 1 2 3 4 480 130 270 640 VGA Mode Hi 1 1 2 3 4 660 260 960 1280 1 2 3 4 960 260 630 1280 470 1 2 3 4 230 690 960 1280 1 2 3 4 960 260 540 1280 Mode Hi 2 SXGA FRAME 4 Quand le mode SPLIT de la station est réglé sur 4 ou 6 la distance entre la ligne du sommet de la tête et la lign...

Страница 156: ...r la touche PRINT alors que l appareil photo n est pas raccordé à la station Le message SET CAMERA est affiché quand aucune donnée d image n a été envoyée à la station Le deuxième message est affiché quand des données d image sont présentes dans la station Ce message peut aussi être affiché quand le réglage du commutateur PLAY CAMERA est modifié Dans ce cas appuyez sur la touche MENU pour sélectio...

Страница 157: ...n LCD à l étape 9 Le guide des couleurs sera désactivé Pour rappeler une valeur enregistrée 1 Appuyez sur la touche MENU 2 Appuyez sur la touche f et maintenez la pression jusqu à ce que LOAD SETTING apparaisse 3 Appuyez sur la touche G ou g pour sélectionner la mémoire qui contient les réglages à rappeler 4 Appuyez sur la touche EXEC Quand vous appuyez sur la touche PRINT l image est imprimée en ...

Страница 158: ...g pour changer le réglage dans le sens c est à dire 1 2 3 7 Les éléments rouges de l image s intensifient linéairement vers le côté clair et l image résultante devient rougeâtre comme si elle était éclairée par une lumière rouge La luminosité maximale est 255 il s agit du point de saturation Par exemple une partie blanche saturée reste blanche quel que soit le déplacement de la valeur vers le côté...

Страница 159: ...ire du vert se renforce relativement Par conséquent les parties blanches sont teintées par le magenta Réglage de YEL BLU paramètre B Utilisez ce paramètre pour régler les éléments jaunes et bleus La valeur par défaut est 0 Ce paramètre est désactivé en mode B W sauf dans certains modèles spéciaux Appuyez sur la touche g pour changer le réglage dans le sens c est à dire 1 2 3 7 Comme indiqué dans l...

Страница 160: ...chacun des éléments RGB est amplifié linéairement donnant à l image résultante un aspect surexposé Appuyez sur la touche G pour assombrir le côté clair de chacun des éléments RGB L image résultante devrait paraître sous exposée Réglage de SHARPNESS Utilisez ce paramètre pour régler la netteté de l image Le réglage par défaut est LOW Il y a quatre options NONE LOW MIDDLE et HIGH LOW est conseillé q...

Страница 161: ... 3 R 3 3 0 0 R 3 3 0 0 D 3 3 0 0 L 3 0 3 0 Gm 3 0 0 3 now 0 0 0 D 3 3 0 0 L 3 0 3 0 Gm 3 0 0 3 UPX DP10 Adjustment of DARK LIGHT GAMMA RED CYN 0 GRN MAG 0 BLU YLW 0 COLOR GUIDE 2 Guide des couleurs pour le réglage des paramètres RGB Guide des couleurs pour le réglage des paramètres DLGm Dans le menu pour le réglage de la qualité de l image appuyez sur la touche EXEC pour appeler le guide des coule...

Страница 162: ... image devient plus sombre et le cyan plus fort La valeur actuelle du paramètre GREEN augmente de 3 La partie blanche saturée ne change pas L image devient plus claire et verdâtre La valeur actuelle du paramètre GREEN diminue de 3 L image devient plus sombre et le magenta plus fort Image avec les valeurs actuelles des paramètres RED GREEN et BLUE La valeur actuelle du paramètre RED augmente de 3 L...

Страница 163: ...assombrit La valeur actuelle du paramètre DARK diminue de 3 La partie sombre s éclaircit et l image semble avoir été capturée dans un endroit lumineux La valeur actuelle du paramètre GAMMA augmente de 3 La partie en demi teintes devient plus sombre Image avec les valeurs actuelles des paramètres DARK LIGHT et GAMMA La valeur actuelle du paramètre GAMMA diminue de 3 Une image sous exposée est obten...

Страница 164: ...ente vers le côté 1 Conseils Régler le paramètre R sur 3 par exemple signifie renforcer l élément de lumière RED Par conséquent l image prend un aspect d ensemble rougeâtre De plus l image devient plus claire car la quantité de lumière totale augmente Néanmoins certaines parties restent inchangées Ce sont les parties n ayant aucun élément RED ainsi par exemple le vert pur le cyan pur le bleu pur l...

Страница 165: ...LCD affiche LOCK Pour désactiver la fonction de verrouillage maintenez de nouveau la touche EXEC enfoncée pendant trois secondes ou plus Les fonctions suivantes sont verrouillées Réglage de la qualité de l image Fonction LOAD SETTING Fonction SAVE SETTING Fonction de réglage de la couleur CYN RED Fonction de réglage de la couleur MAG GRN Fonction de réglage de la couleur YEL BLU Fonction de réglag...

Страница 166: ... Relâchez la touche SPLIT quand SPLIT1 TYPE 1 apparaît sur l écran LCD Choix du nombre d images par tirage SPLIT 3 Appuyez sur la touche g pour sélectionner le type d impression pour SPLIT1 4 Appuyez sur la touche f pour sélectionner SPLIT2 Répétez les étapes 3 et 4 jusqu à ce que les réglages nécessaires pour SPLIT1 SPLIT2 SPLIT4 SPLIT6 et SPLIT9 aient été effectués 5 Quand les réglages sont term...

Страница 167: ...9 mm Sommet de la tête c 10 5 10 5 10 5 9 5 10 5 Taille du visage d 27 0 26 0 19 0 28 0 22 0 4C 48 33 mm Sommet de la tête c 9 5 9 5 9 5 8 5 9 5 Taille du visage d 25 0 24 0 17 5 26 0 20 5 4 47 35 mm Sommet de la tête c 8 0 8 0 8 0 6 5 8 0 Taille du visage d 27 0 26 0 19 0 28 0 22 0 SPLIT6 6 4 52 39 mm Sommet de la tête c 10 5 10 5 10 5 9 5 10 5 4 MINI Taille du visage d 27 0 26 0 19 0 28 0 22 0 4...

Страница 168: ...AIT 1 Image sur Plage valide après l appareil photo changement du taux SXGA d agrandissement 974 1462 960 1280 Exemple de tirage 84 mm 126mm 4 PASSEPORT U S 2U 2 Image sur Plage valide après l appareil photo changement du taux SXGA d agrandissement 608 811 960 1280 Exemple de tirage 70 mm 52 mm ...

Страница 169: ...ion et nombre d images par tirage SHARPNESS est contrôlé avec l écran de menu de la station La fonction SHARPNESS accentue les contours d une image elle n augmente pas la résolution Cette fonction change seulement la netteté de l image telle qu elle est vue par l oeil humain SHARPNESS est utilisé comme paramètre pour la manipulation de la qualité de l image Une netteté trop élevée va à l encontre ...

Страница 170: ...mm de dia minijack Port série RS 232C 230 4 kbps max DC8 4V IN 8 4 V CC RELEASE 3 5 mm de dia minijack Spécifications Appareil photo Généralités Alimentation Fournie par une batterie lithium ion NP F550 Sony ou par un adaptateur d alimentation secteur 8 4 V DC Température de fonctionnement 5 C à 35 C Température d entreposage 20 C à 60 C Humidité de fonctionnement 20 à 80 sans condensation Dimensi...

Страница 171: ...Dimensions 208 44 188 mm l h p Poids 560 g Imprimante Alimentation 220 V à 240 V CA 50 60 Hz Consommation 0 5 A max Température de fonctionnement 5 C à 35 C Température d entreposage transport 20 C à 60 C Humidité de fonctionnement 20 à 80 Dimensions maximales 208 303 71 mm l h p Poids Env 2 7 kg appareil principal seulement Méthode d impression Processus de transfert thermique par sublimation séq...

Страница 172: ... sur A ou E Le cordon du flash extérieur n est pas branché sur l appareil photo t Branchez le cordon du flash sur la prise FLASH de l appareil photo La batterie est épuisée t Rechargez la batterie ou remplacez la par une neuve t Le flash a peut être dépassé sa durée de vie Contactez un centre de service après vente Sony Afficheur à cristaux liquides de l appareil photo Symptômes Causes possibles M...

Страница 173: ...5 feuilles de papier dans le plateau d alimentation éjection du papier Vérifiez si plus de 10 feuilles se sont accumulées sur la surface d éjection du plateau d alimentation éjection du papier t Ne laissez pas plus de 10 feuilles s accumuler sur le plateau Vérifiez si le papier est froissé ou gondolé t Retirez tout papier froissé ou gondolé Qualité de l image Symptômes Causes possibles Mesures à p...

Страница 174: ...diqué par les témoins Allumé Clignotant Etat de l imprimante et action POWER PRINT PRINT PAPER RIBBON ERROR Tous les témoins L imprimante est sous tension Impression en cours L imprimante est en cours de réception de données L imprimante manque de papier t Chargez plus de papier dans le plateau d alimentation éjection page 119 Il y a trop de papier éjecté accumulé sur le plateau d alimentation éje...

Страница 175: ... papier n est pas installé t Installez le plateau page 119 INSERT RIBBON La cartouche ruban d encre et le SET PAPER papier ne sont pas installés t Mettez la cartouche ruban d encre et le papier en place pages 117 à 119 REMOVE PRINTS Le nombre maximal de tirages s est accumulé sur la surface d éjection t Enlevez les tirages de la surface d éjection Message sur l écran Causes possibles Mesures LCD d...

Страница 176: ... le plateau 3 Ouvrez le couvercle de la cartouche ruban et retirez cette dernière Remarque S il n est pas possible de retirer la cartouche ruban d encre contactez le revendeur ou le service après vente Sony le plus proche 4 Retirez le papier coincé S il n est pas possible de retirer le papier coincé ou s il n est pas visible suivez la procédure décrite ci dessous Si tout le papier coincé a été ret...

Страница 177: ... si vous touchez les composants internes chauds 7 Remettez en place le couvercle inférieur le plateau d alimentation éjection du papier et la cartouche ruban d encre 8 Remettez en place le cordon d alimentation puis mettez l imprimante sous tension Remarque Toute image se trouvant auparavant dans la mémoire de l imprimante a été perdue Effectuez de nouveau l opération d impression ...

Страница 178: ...te el servicio de personal cualificado únicamente Para la cámara digital DKC C21 PRECAUCIÓN Si reemplaza incorrectamente la batería es posible que explote Reemplácela solamente por otra del mismo tipo u otro equivalente recomendada por el fabricante Tire las pilas de acuerdo con las instrucciones del fabricante Para la impresora UP DP10 ADVERTENCIA ESTE APARATO DEBERÁ CONECTARSE A TIERRA Español ...

Страница 179: ...n de la impresora 205 Preparación de un paquete de impresión 205 Colocación de los soportes en la impresora 211 Conexiones 212 Conexiones de alimentación 212 Conexión de la estación y la impresora 214 Conexión de la cámara a la estación 215 Operación 217 Fotografía 217 Contemplación de fotografías 223 Borrado de fotografías 225 Protección de una fotografía 228 Impresión 230 Ejemplos de fotografiad...

Страница 180: ... imágenes 245 Salida de la impresora 245 Ajuste de la calidad de la imagen 246 Ajuste de la calidad de la imagen 246 Función de la guía de colores 250 Función de bloqueo 254 Función de división 255 Selección de un tipo de división 255 Tamaño de impresión en cada modo SPLIT 256 Valores de parámetros recomen dados en cada modo SPLIT 258 Apéndice 259 Especificaciones 259 Solución de problemas 261 Índ...

Страница 181: ...egro o a todo color 16 700 000 colores Configuración del sistema B W COL POWER BUSY MENU BA TTERY CHARGE CAMERA RELERASE BW COLOR MULTI PICTURE EXEC PRINT UPX C21 16 9 8 4 2 1 S O N Y ZOOM LENS OPTICAL 1 3x F 12 15 6 m m 1 4 0 4 7 H S POWER PLAY CAMERA LCD M OMITOR ON OFF W MODE SET T H S POWER ON OFF B W COL POWER BUSY MENU BA TTERY CHARGE CAMERA RELERASE BW COLOR MULTI PICTURE EXEC PRINT UPX C21...

Страница 182: ...grafías reducidas Impresión de dieciséis fotografías reducidas Descripción general del sistema Impresiones que podrán realizarse con este sistema Impresión de fotografías divididas Con este sistema podrán realizarse los tipos de impresiones siguientes Nota Dependiendo del número de imágenes divididas en una impresión la relación entre la altura y la anchura de una imagen puede diferir ...

Страница 183: ...Mantenga siempre limpios los contactos metálicos del adaptador de alimentación de CA No golpee ni deje caer la unidad No desarme ni modifique la unidad No quite la cubierta Existiría el peligro de descargas eléctricas al tocar las partes internas Tenga cuidado de no salpicar con agua ni otros líquidos la unidad y no permita que dentro de la misma entren combustibles ni objetos metálicos Si la util...

Страница 184: ...e se averíe si continúa utilizándola Si se ha condensado humedad desconecte la alimentación y deje así la impresora durante una hora por lo menos Si el paquete de impresión se somete a cambios amplios y repentinos de temperatura es posible que en la cinta entintadora o en el papel se condense humedad Por lo tanto evite guardar el paquete de impresión en lugares sometidos a cambios amplios y repent...

Страница 185: ...a de detergente No utilice ningún tipo de disolvente como alcohol o bencina ya que podría dañar el acabado Utilice un cepillo soplador para eliminar el polvo del objetivo Batería Tenga en cuenta lo siguiente Para evitar accidentes causados por cortocircuitos evite que objetos metálicós como un collar entren en contacto con los terminales de la batería Mantenga la batería alejada del fuego No expon...

Страница 186: ...ecuencia Tome el tiempo de batería restante como el tiempo aproximado de videofilmación Almacenamiento de la batería Cuando no vaya a utilizar la batería durante mucho tiempo realice el procedimiento siguiente una vez al año para mantener la función apropiada 1 Cargue completamente la batería 2 Descárguela en su equipo electrónico 3 Extraiga la batería de su equipo electrónico y guárdela en un lug...

Страница 187: ... esté en CAMERA Nota La función de enfoque automático puede no trabajar adecuadamente en las situaciones siguientes Si el motivo carece de suficiente contraste Si el motivo incluye un objeto extremadamente brillante Si el motivo no posee línea horizontal 2 Zapata para flash 236 Fíjele un flash externo Cuando haya conectado un flash externo éste destellará en sincronización con la operación del obt...

Страница 188: ...pcional 7 Toma RS 232C minitoma 216 Para utilizar la cámara alejada de la estación conéctela a la toma CAMERA de la estación utilizando el cable conector suministrado 8 Toma de entrada de CC DC8 4V IN 213 Conéctele el adaptador de alimentación de CA suministrado para la operación de la cámara con CA 9 Objetivo f 12 a 15 6 mm f4 a f4 7 Objetivo de enfoque automático con zoom óptico 0 Visor 221 Uste...

Страница 189: ...grafiar en interiores utilizando solamente el flash incorporado E El flash incorporado destellará siempre La velocidad de obturación queda fijada a 1 250 segundos y la exposición se controla para que sea óptima con un sujeto situado a 1 2 m del objetivo Este modo se recomienda cuando se utilice un flash externo además del incorporado Por ejemplo cuando utilice un flash externo detrás del motivo pa...

Страница 190: ...n CAMERA Ponga el selector en esta posición para fotografiar un motivo La lámpara de espera se encenderá o parpadeará en verde PLAY Ponga el selector en esta posición para contemplar las imágenes fotografiadas El tiempo requerido para cambiar del modo CAMERA al modo PLAY dependerá de la condición H S S Hi 2 Hi 1 de las imágenes grabadas 7 Visualizador de cristal líquido LCD Cuando ponga el interru...

Страница 191: ...EXPOSURE t APERTURE t WHITE BALANCE Para cancelar una selección realizada presionando b o B o para cancelar la operación que esté realizando presione este lado SET El elemento seleccionado al presionar MODE b o B del botón de modo se registrará b B Para seleccionar la imagen que desee visualizar borrar o proteger Además presione estas secciones para seleccionar elementos de la pantalla MODE qa Con...

Страница 192: ...esión de imagen de tamaño completo o reducida dividida Las especificaciones de división varían con los mercados de destino Un cursor indicará la selección actual en el visualizador de cristal líquido La selección se conservará en la memoria incluso aunque desconecte la alimentación 6 Botón de blanco y negro color B W COL 230 Seleccione B W blanco y negro o COL color para impresión Un cursor indica...

Страница 193: ...ás 0 Teclas del cursor 232 246 Se utilizan para la operación del menú qa Botón de menú MENU 232 246 Presiónelo para entrar en las operaciones del menú incluyendo laminación superposición de capas número de impresiones ajuste del color y número total de impresiones Presiónelo de nuevo para volver a la visualización normal qs Palanca de liberación de la cámara CAMERA RELEASE 215 Deslícelo hacia la i...

Страница 194: ...ando ocurra un problema relacionado con el papel Lámpara de cinta RIBBON Se encenderá cuando ocurra un problema relacionado con el cartucho de cinta entintadora Lámpara de error ERROR Se encenderá en el caso de atascamiento del papel o cuando ocurra cualquier otro problema 4 Cubierta de la bandeja de suministro expulsión del papel 209 Abra la cubierta para cargar el papel de impresión 5 Conector U...

Страница 195: ...550 y una pila de botón CR 2025 Insértelas como se describe a continuación 1 Abra la tapa del compartimiento de la batería pila de la parte inferior de la cámara empujando el botón PUSH y deslizándola en el sentido de la flecha 2 Extraiga la caja de la pila de botón PUSH CR2025 PUSH Continúa en la página siguiente ...

Страница 196: ...196 Preparación de la cámara 3 Instale la pila de botón en la caja 4 Reinserte la caja 5 Inserte la batería grande de iones de litio 6 Cierre la tapa PUSH PUSH CR2025 CR2025 CR2025 CR2025 CR2025 PUSH ...

Страница 197: ... estación Se iniciará la carga y en el visualizador de cristal líquido de la estación aparecerá CHARGING Cuando finalice la carga La batería se cargará más o menos completamente en medio día El mensaje NOW CHARGING permanecerá en el visualizador de cristal líquido de la estación pero esto no significa problema alguno Desconecte la cámara de la estación deslizando la palanca CAMERA RELEASE hacia la...

Страница 198: ...a necesario Indicador Significado Observaciones Queda 1 4 o más de energía La batería durará cierto tiempo pero se recomienda cargarla La energía restante es de 1 4 Cargue la batería o menos Se recomienda cargar la batería La energía restante es inferior La cámara no podrá comunicarse al 4 con la estación ni con otros Cargue la batería equipos Cargue o reemplace la batería La batería se ha agotado...

Страница 199: ...alimentación de CA Utilizando un adaptador de alimentación de CA el usuario no tendrá que preocuparse por la energía restante de la batería 1 Sugerencia Para prolongar la duración de la pila de botón le recomendamos que deje la NP F550 colocada en la cámara incluso durante la operación con una fuente de alimentación de CA Papel de la pila de botón La cámara necesita alimentación para conservar los...

Страница 200: ...cámara Visualización de SET UP 1 Ponga el interruptor POWER en ON 2 Ponga el selector PLAY CAMERA en PLAY 3 Presione MODE del botón de modo hasta que en el visualizador de cristal líquido de la cámara hasta que aparezca SET UP 03 Hi 1 SET UP 4 Presione SET del botón de modo Aparecerá la visualización de SET UP y la marca de selección señalará CLOCK SETUP CLOCK FRAME POWER SAVE H S PLAY CAMERA LCD ...

Страница 201: ...o botón 4 Presione b o B del botón de modo para ajustar el año y después presione SET de dicho botón 5 Presione b o B del botón de modo para ajustar el mes y después presione SET de dicho botón 6 Presione b o B del botón de modo para ajustar el día y después presione SET de dicho botón 7 Presione b o B del botón de modo para ajustar la hora y después presione SET de dicho botón CLOCK SET DISP OFF ...

Страница 202: ...n de modo para elegir ON y después presione SET de dicho botón Aparecerá la visualización de selección de FRAME FRAME 1 2 3 4 3 Presione b o B del botón de modo para elegir el modo de encuadre 1 2 3 o 4 y después presione SET de dicho botón En el visualizador de cristal líquido aparecerá la guía seleccionada Con respecto a los detalles sobre la guía consulte Distancia óptima entre el motivo y el o...

Страница 203: ...do Para restablecer la cámara desde el modo de ahorro de energía En el modo CAMERA Presione el botón disparador hasta la mitad de su recorrido y ponga el interruptor POWER en OFF y después en ON En el modo PLAY Ponga el interruptor POWER en OFF y después en ON 1 Sugerencia Cuando la cámara esté en el modo de ahorro de energía si intenta imprimir desde la estación en el visualizador de cristal líqu...

Страница 204: ...nte la cámara Tamaño de la zapata rápida que podrá utilizarse H S H S VIDEO OUT FLASH RELEASE RS 232C DC8 4V IN O F F P O W E R O N S O N Y ZOOMLENS OPTICAL 1 3x F 12 1 5 6 m m 1 4 0 4 7 VIDEO OUT FLASH RELEASE RS 232C DC8 4V IN O F F P O W E R O N S O N Y ZOOMLENS OPTICAL 1 3x F 12 1 5 6 m m 1 4 0 4 7 Zapata rápida 32 mm o menos 26 mm o menos 50 mm o menos Grosor 14 mm o menos Lado del objetivo T...

Страница 205: ...papel mientras se realiza la impresión no apague la impresora Si apaga la impresora la imagen almacenada en su memoria se perderá Los cartuchos de cinta entintada no pueden reutilizarse Si se produce un atasco de papel no lo saque tirando de él hacia fuera Retire el papel atascado siguiendo el procedimiento descrito en Si se atasca el papel página 265 Notas para guardar los cartuchos de cinta enti...

Страница 206: ...a imagen 1 Tense la cinta entintada si está floja girando en el sentido indicado por la flecha La cinta entintada podría estropearse si la cargara estando floja 2 Abra la cubierta de la cinta entintada ADVERTENCIA Los componentes situados detrás de la puerta del cartucho de cinta entintada se calientan mucho Para evitar quemarse no meta nunca su mano en el interior de la abertura ...

Страница 207: ... los salientes del cartucho con las ranuras de la impresora deslice el cartucho hacia adentro todo lo posible 4 Cierre la cubierta del cartucho de cinta entintada y luego asegúrese de que la lámpara RIBBON esté apagada Extracción del cartucho de cinta entintada 1 Abra la cubierta del cartucho de cinta entintada 2 Sujete el asidero y saque el cartucho ...

Страница 208: ...ada hacia arriba ponga el papel en la bandeja de suministro expulsión de papel asegurándose de que el papel quede debajo de las lengüetas del extremo de la bandeja Notas No ponga más de 25 hojas en la bandeja al mismo tiempo Cuando cargue el papel de impresión en la bandeja asegúrese de que todo el papel esté completamente metido en la bandeja No utilice papel que esté muy curvado Levante el reten...

Страница 209: ...ego asegúrese de que la lámpara PAPER esté apagada Notas No permita que más de 10 hojas de papel se acumulen en la superficie de la bandeja de suministro expulsión de papel Para impedir la contaminación con polvo coloque la tapa de bandeja suministrada en la bandeja de suministro expulsión de papel cuando saque la bandeja de la impresora La impresora está ahora lista para imprimir Retenedor ...

Страница 210: ...Extracción del papel de impresión 1 Saque la bandeja de suministro expulsión de papel de la impresora 2 Levante la placa metálica de la parte inferior de la bandeja de suministro expulsión de papel y luego saque el papel de impresión ...

Страница 211: ...n la impresora Los soportes pueden colocarse mediante tornillos El montaje de los soportes depende de si la impresora va a utilizarse en posición vertical o en posición horizontal Para orientación vertical Para orientación horizontal ...

Страница 212: ...inistrará a la estación desde un tomacorriente de la red a través del adaptador de alimentación de CA PCS AC80 suministrado La estación no posee interruptor de alimentación por lo que el suministro de alimentación se iniciará inmediatamente cuando conecte el adaptador de alimentación de CA a la estación y a un tomacorriente de la red 1 Fije el filtro de ferrita suministrado al cable de CC del adap...

Страница 213: ...te el cable de CC del adaptador de alimentación de CA PCS AC80 suministrado al conector DC 8 4V IN de la cámara Después conecte el adaptador de alimentación de CA a un tomacorriente de la red Nota Utilice el adaptador de alimentación de CA cerca del tomacorriente de la red Si ocurre algún problema durante la operación desconecte inmediatamente el adaptador de alimentación de CA del tomacorriente d...

Страница 214: ...la estación y la impresora Conecte la estación y la impresora utilizando el cable de interfaz suministrado PRINTER DC IN PRINTER PRINTER Estación Impresora PARALLEL DATA Cable de interfaz suministrado a un tomacorriente de la red ...

Страница 215: ...ción Deslice la palanca CAMERA RELEASE hacia la izquierda y la cámara saldrá hacia arriba PLAY CAMERA LCD M OMITOR ON OFF W MODE SET T H S POWER ON OFF B W COL POWER BUSY MENU BA TTERY CHARGE CAMERA RELERASE BW COLOR MULTI PICTURE EXEC PRINT UPX C21 16 9 8 4 2 1 Palanca CAMERA RELEASE B W COL POWER BUSY MENU BATTERY CH ARGE BW CO LOR MULTI PICTURE EXEC PRINT UPX C21 16 9 8 4 2 1 CAM ERA RELERASE P...

Страница 216: ...La cámara no deberá montarse en la estación con el cable conector conectado Fijación de los filtros de ferrita Suelte los enganches del filtro de ferrita con un destornillador u otra herramienta similar y fíjelo a la clavija B W COL POWER BUSY MENU BATTERY CHARGE BW COLOR MULTI PICTURE EXEC PRINT U P X C 2 1 16 9 8 4 2 1 CAMERA CAMERA RELERASE VIDEO OUT FLASH RELEASE RS 232C DC8 4V IN O F F P O W ...

Страница 217: ...odo de resolución 6 Apunte con la cámara hacia el motivo y encuádrelo observando el visualizador de cristal líquido de la cámara Usted podrá utilizar el zoom presionando la palanca del mismo 7 Presione el botón de disparador de la cámara La lámpara indicadora de espera comenzará a parpadear en rojo Después de que la fotografía se haya almacenado en la memoria el parpadeo cesará y la lámpara se enc...

Страница 218: ...lva a presionarlo hasta la mitad de su recorrido 1 Sugerencia La función de enfoque automático se activará cuando presione el botón del disparador ya sea hasta la mitad de su recorrido o a fondo 1 Sugerencia En el modo CAMERA si presiona el botón del disparador hasta la mitad de su recorrido la cámara se restablecerá del modo de ahorro de energía Acerca de la operación automática Esta cámara ha si...

Страница 219: ...está ajustado a MAN o utiliza un flash externo tendrá que seleccionar apropiadamente el equilibrio del blanco Un valor más bajo hará que la fotografía resulte más azulada mientras que un valor más alto hará que la fotografía resulte más amarillenta Con respecto a los detalles consulte Ejemplos de fotografiado Distancia óptima entre el motivo y el objetivo Cuando tome una fotografía utilizando la g...

Страница 220: ... del zoom e impresión FRAME 1 Gran angular 1 m Telefoto 1 3 m FRAME 2 Gran angular 1 05 m Telefoto 1 35 m FRAME 3 Gran angular 1 m Telefoto 1 25 m FRAME 4 Gran angular 1 3 m Telefoto 1 65 m FRAME 1 2 3 4 FRAME 1 2 3 4 FRAME 1 2 3 4 27 mm 28 5 mm 34 mm FRAME 1 2 3 4 22 mm ...

Страница 221: ...gía de la batería Ponga el interruptor LCD MONITOR en OFF observe a través del visor y encuadre Nota La fotografía vista a través del visor no reflejará correctamente el encuadre El encuadre correcto será el de la imagen del visualizador de cristal líquido H S PLAY CAMERA LCD MONITOR ON OFF W MODE SET T P O W E R O F F O N Visor Interruptor LCD MONITOR ...

Страница 222: ...ste del ángulo de la empuñadura El bloque con el visualizador de cristal líquido podrá girarse 90 grados para ajustar el ángulo a fin de ver claramente fotografías en el mismo PLAY CAMERA LCD MONITOR ON OFF W MODE SET T ...

Страница 223: ... B del botón de modo y aparecerá la fotografía anterior o la siguiente Reproducción automática Mantenga presionado bo B del botón de modo durante unos dos segundos Las fotografías almacenadas en la memoria se reproducirán secuencialmente a intervalos de unos cuatro segundos Parada de la reproducción automática Presione MODE o SET del botón de modo Después de la reproducción Ponga el interruptor PO...

Страница 224: ... el visualizador de cristal líquido aparecerá una imagen de la memoria 3 Presione una vez MODE del botón de modo En el visualizador de cristal líquido aparecerá la marca MULTI Hi 1 03 MULTI 4 Presione SET del botón de modo Aparecerá una visualización múltiple de nueve imágenes Para hacer que se visualice una imagen en toda la pantalla 1 Presione bo B del botón de modo en la visualización múltiple ...

Страница 225: ...selector PLAY CAMERA en PLAY En el visualizador de cristal líquido aparecerá una fotografía de la memoria 3 Presione tres veces MODE del botón de modo En el visualizador de cristal líquido aparecerá la marca ERASE Hi 1 03 ERASE 4 Presione bo B del botón de modo para seleccionar la fotografía que desee borrar H S PLAY CAMERA LCD MONITOR ON OFF W MODE SET T POWER OFF ON 1 2 3 4 5 6 Continúa en la pá...

Страница 226: ...etidamente MODE del botón de modo en los pasos 4 y 5 hasta que desaparezca la marca ERASE Borrado simultáneo de todas las fotografías 1 Ponga el interruptor POWER en ON 2 Ponga el selector PLAY CAMERA en PLAY En el visualizador de cristal líquido aparecerá una fotografía de la memoria 3 Presione tres veces MODE del botón de modo En el visualizador de cristal líquido aparecerá la marca ERASE 4 Pres...

Страница 227: ...borrarán Si borra todas las fotografías el visualizador de cristal líquido se volverá azul Si hay alguna fotografía protegida en el visualizador de cristal líquido aparecerán tal fotografía y la marca ERASE Para detener temporalmente el borrado Presione repetidamente MODE del botón de modo en los pasos 4 a 6 hasta que desaparezca la marca ERASE Para finalizar el borrado Presione repetidamente MODE...

Страница 228: ...el selector PLAY CAMERA en PLAY En el visualizador de cristal líquido aparecerá una fotografía de la memoria 3 Presione dos veces MODE del botón de modo En el visualizador de cristal líquido aparecerá la marca PROTECT Hi 1 02 PROTECT 4 Presione bo B del botón de modo para seleccionar la fotografía que desee proteger H S PLAY CAMERA LCD MONITOR ON OFF W MODE SET T POWER OFF ON 1 2 3 4 5 ...

Страница 229: ... accidental Hi 1 02 PROTECT Para proteger otras fotografías repita los pasos 4 y 5 Para finalizar el ajuste de protección Presione MODE del botón de modo Para borrar una fotografía protegida Si desea borrar una fotografía protegida selecciónela repitiendo los pasos 4 y 5 para hacer que desaparezca la marca de protección con lo que la protección se desactivará ...

Страница 230: ... visualizador de cristal líquido aparecerá el mensaje DIGITAL PRINTING SYSTEM UPX DP10 y después desaparecerá Con respecto a los detalles consulte Conexiones de alimentación 3 Presione el botón B W COL de la estación para seleccionar la impresión en blanco y negro B W o en color COL 4 Presione el botón SPLIT de la estación para seleccionar fotografía de tamaño completo o dividida o reducida para i...

Страница 231: ...ras esté visualizándose este mensaje Después de que los datos de la fotografía se hayan transferido de la cámara a la estación la lámpara POWER BUSY de la estación se encenderá en rojo y se visualizará el mensaje PROCESSING IMAGE La impresión se completará en unos dos minutos y medio Cuando finalice la impresión Ponga el interruptor POWER de la cámara en OFF para ahorrar energía de la batería Para...

Страница 232: ...tal líquido de la estación aparezca PRINT QTY 3 Presione el botón G o g para seleccionar el número de hojas que desee imprimir 4 Presione el botón EXEC Se establecerá el número seleccionado y el número establecido aparecerá en la parte inferior izquierda del visualizador de cristal líquido por ejemplo Q6 Cuando presione el botón PRINT se iniciará la impresión Después de la impresión del número est...

Страница 233: ...presas en un lugar sometido a altas temperaturas a gran humedad a polvo excesivo y a la luz solar directa No pegue cintas en las copias impresas Además evite dejar borradores de plástico sobre las copias impresas y dejar éstas en contacto con materiales que puedan contener plastificantes debajo de una esterilla para mesa por ejemplo No permita que alcohol u otros disolventes orgánicos entren en co...

Страница 234: ...puede ponerse a cero Presione el botón g y seleccione PRINT INFO TALLY Puesta a cero de un subtotal Presione el botón PRINT TALLY TO RESET y presione el botón EXEC Nota PRINT INFO TOTAL puede no estar a 0 en el momento de la adquisición del producto Esto se debe a una comprobación de muestreo en el proceso de producción no es un error Ajuste de la calidad de impresión La calidad de las fotografías...

Страница 235: ...h de eliminación de sombras resultará en imágenes más naturales Coloque una lámina de fondo a aproximadamente 1 m del sujeto y coloque el flash de eliminación de sombras inmediatamente detrás del sujeto El flash de eliminación de sombras no solamente eliminará las sombras sino que también ofrecerá la cantidad apropiada de luz a la lámina de fondo para mejorar la relación señal ruido en el fondo de...

Страница 236: ...la lámina de fondo y flash débil sobre la cabeza No utilice el flash incorporado Con referencia al flash frontal la potencia apropiada del flash frontal diagonal deberá ser de 1 a 0 5 Utilice el flash posterior para compensar la distancia entre la lámina de fondo y el sujeto que es de aproximadamente 1 m El flash débil sobre la cabeza hará que el cabello resulte más vívido desactívelo cuando el su...

Страница 237: ...ión La cámara realizará el ajuste a los valores óptimos incluyendo la exposición y el equilibrio del blanco y después fotografiará el sujeto Intervención manual El usuario podrá cambiar manualmente la exposición en dos pasos por debajo y por encima 2 EV El valor central será la exposición óptima calculada de acuerdo con la fotometría automática Para WHITE BALANCE seleccione uno de los valores sigu...

Страница 238: ...ón y no se recomienda para uso en general Para APERTURE seleccione OPEN PROG o CLOSE Utilice PROG siempre que sea posible En el modo PROG la cámara seleccionará automáticamente OPEN F4 a F4 7 o CLOSE F11 4 a F13 5 de acuerdo con el brillo del sujeto 1 Sugerencia Este modo ha sido diseñado para facilitar la toma de retratos y retratos de identificación en interiores Antes de que trabaje el obturado...

Страница 239: ...suario podrá cambiar manualmente la exposición en dos pasos por debajo y por encima 0 5 EV Para WHITE BALANCE seleccione uno de los valores siguientes 4000K 4400K 4800K 5200K 5600K 6000K 6500K y 7000K El ajuste predeterminado en la fábrica es 5600K Cambie manualmente el ajuste del equilibrio del blanco de acuerdo con las condiciones de operación Para APERTURE seleccione OPEN o CLOSE Utilice OPEN F...

Страница 240: ...as moderando las reflexiones del rojo Aparte de este patrón especial de destellos la operación es igual que en el modo de flash automático Especificaciones del flash incorporado El flash incorporado ha sido óptimamente diseñado para fotografiar personas Por ejemplo el tratamiento de la superficie del cuerpo luminoso dispersa la luz La potencia luminosa del flash es aproximadamente el número guía G...

Страница 241: ... la caída de la temperatura de color después de su utilización prolongada Para soportar flashes de diferentes temperaturas de color esta cámara permite el ajuste de la temperatura de color entre 4000K y 7000K en pasos de aproximadamente 400K a 500K en el modo MANUAL Por ejemplo cuando haya ajustado la temperatura de color a 5600K y la imagen fotografiada resulte azulada ajuste la temperatura de co...

Страница 242: ... imagen fotografiada se procesa con la resolución SXGA y se somete a la compresión JPEG Esta resolución es idónea para impresiones reducidas por dos o mayores Cuando seleccione cualquiera de estos modos el visualizador de cristal líquido de esta cámara mostrará Hi 2 o Hi 1 En comparación con el modo S la cámara tardará más en responder a las operaciones del usuario y en comunicarse con la estación...

Страница 243: ...ce telefoto Tele o gran angular Wide de acuerdo con el tamaño del sujeto 1 Sugerencia El ajuste predeterminado en la fábrica es la posición neutral La posición de zoom cambiada por el usuario se conservará en la memoria interna incluso aunque se desconecte la alimentación de la cámara Sin embargo si desconecta la alimentación de la cámara y no está instalada la pila de botón la posición de zoom se...

Страница 244: ...el modo SPLIT de la estación esté ajustado a 4 o 6 la distancia entre las líneas de la coronilla y la barbilla será de 1 pulgada y 1 3 8 pulgadas FRAME 3 Cuando el modo SPLIT de la estación esté ajustado a 4 o 6 la distancia entre las líneas de la coronilla y la barbilla será de 28 5 mm Vista de líneas de encuadre Modo H S FRAME 1 FRAME 2 FRAME 3 FRAME 4 Modo S 1 2 3 4 330 130 480 640 1 2 3 4 480 ...

Страница 245: ...istal líquido mostrará el mensaje SET CAMERA o REPRINT OK EXEC CANCEL MENU El primer mensaje aparecerá cuando no haya transmitido datos de imágenes a la estación El último mensaje aparecerá cuando queden datos de imágenes en la estación El último mensaje aparecerá también cuando cambie el selector PLAY CAMERA En este caso presione el botón MENU para seleccionar CANCEL y vuelva a presionar el botón...

Страница 246: ...en el paso 9 La función de guía de colores se inhabilitará Para recuperar el valores almacenados 1 Presione el botón MENU 2 Mantenga presionado f hasta que aparezca LOAD SETTING 3 Presione el botón G o g para seleccionar la celda de memoria que contenga los ajustes que desee recuperar 4 Presione el botón EXEC Cuando presione el botón PRINT la imagen se imprimirá de acuerdo con los valores almacena...

Страница 247: ...speciales Presione el botón g para cambiar el parámetro en el sentido de es decir 1 2 3 7 Los componentes del rojo de la imagen se intensifican como se muestra en la figura Los componentes del rojo se amplifican linealmente hacia el lado claro y la imagen resultante se volverá rojiza cuando se irradie suavemente con una luz roja El brillo máximo es de 255 que es el punto de saturación Por ejemplo ...

Страница 248: ...or complementario del verde pasará a ser relativamente intenso Por lo tanto las partes blancas parecerán estar teñidas con magenta Ajuste de YEL BLU Amarillo azul Parámetro B Ajuste los componentes del amarillo y el azul El ajuste predeterminado es 0 Este elemento estará inhabilitado en el modo B W excepto en algunos modelos especiales Presione el botón g para cambiar el parámetro en el sentido de...

Страница 249: ...otón G para obscurecer el lado claro de cada uno de los elementos RGB La imagen resultará algo subexpuesta 192 128 64 0 0 64 128 192 7 7 Claro Obscuro Después del cambio Sujeto Claro Ajuste de SHARPNESS Nitidez Ajuste la nitidez de la imagen El ajuste predeterminado es LOW Existen cuatro opciones NONE LOW MIDDLE y HIGH Cuando la impresión tenga muchas secciones divididas se recomienda utilizar LOW...

Страница 250: ...ón cambiará a COLOR GUIDE 1 que es la guía para cambiar los parámetros RGB Para imprimir esta guía de colores presione EXEC en este punto Si presiona otra vez el botón g la indicación cambiará a COLOR GUIDE 2 que es la guía para cambiar los parámetros DLGm Para imprimir esta guía de colores presione EXEC en este punto En la figura siguiente se ofrecen ejemplos de las guías de colores B 3 0 0 3 UPX...

Страница 251: ...r actual La imagen se volvió más obscura y el azul verdoso más intenso El parámetro GREEN se ha cambiado 3 del valor actual La parte blanca saturada no cambió La imagen se volvió más brillante y verdosa El parámetro RED se ha cambiado 3 del valor actual La imagen se volvió más obscura y el magenta más intenso Imagen con los valores actuales de los parámetros RED GREEN y BLUE El parámetro RED se ha...

Страница 252: ...cambiado 3 del valor actual La parte obscura se obscureció más El parámetro DARK se ha cambiado 3 del valor actual La parte obscura se volvió menos obscura y la imagen parece que se tomó en un lugar brillante El parámetro GAMMA se ha cambiado 3 del valor actual La parte blanca saturada no cambió La parte de semitono se volvió más obscura Imagen de los valores actuales de los parámetros DARK LIGHT ...

Страница 253: ...a intensificación del componente RED de la luz Por lo tanto la imagen tendrá aspecto rojiza en total Además la imagen se volverá más brillante porque la cantidad total de luz aumenta Sin embargo algunos puntos permanecerán invariables Éstas son las partes que carecen en absoluto de componente del rojo por ejemplo verde puro azul verdoso puro azul puro tintes neutrales en medio o negro total y las ...

Страница 254: ...r de cristal líquido mostrará LOCK Para desactivar la función de bloqueo vuelva a mantener presionado el botón EXEC durante tres segundos o más Se bloquearán las funciones siguientes Ajuste de la calidad de la imagen Función LOAD SETTING Función SAVE SETING Función de ajuste de color CYN RED Función de ajuste de color MAG GRN Función de ajuste de color YEL BLU Función de ajuste de tono DARK Funció...

Страница 255: ...ntación consulte Conexiones de alimentación 2 Suelte el botón SPLIT cuando aparezca SPLIT1 TYPE 1 en el visualizador de cristal líquido 3 Presione el botón g para seleccionar el tipo para SPLIT1 4 Presione el botón f para seleccionar SPLIT2 Repita los pasos 3 y 4 hasta finalizar los ajustes necesarios para SPLIT1 SPLIT2 SPLIT4 SPLIT6 y SPLIT9 5 Cuando haya finalizado los ajustes desconecte la alim...

Страница 256: ...0 38 5 30 0 4 52 39 mm Línea de cabeza c 10 5 10 5 10 5 9 5 10 5 Línea de cara d 27 0 26 0 19 0 28 0 22 0 4C 48 33 mm Línea de cabeza c 9 5 9 5 9 5 8 5 9 5 Línea de cara d 25 0 24 0 17 5 26 0 20 5 4 47 35 mm Línea de cabeza c 8 0 8 0 8 0 6 5 8 0 Línea de cara d 27 0 26 0 19 0 28 0 22 0 SPLIT6 6 4 52 39 mm Línea de cabeza c 10 5 10 5 10 5 9 5 10 5 4 MINI Línea de cara d 27 0 26 0 19 0 28 0 22 0 4R ...

Страница 257: ...gen en la Margen válido después cámara SXGA del cambio de ampliación 974 1462 960 1280 Impresión de muestra 84 mm 126mm 4 US PASSPORT 2U 2 Imagen en la Margen válido después cámara SXGA del cambio de ampliación 608 811 960 1280 Impresión de muestra 70 mm 52 mm ...

Страница 258: ...HARPNESS enfatiza los bordes de una imagen no aumenta la resolución Esta función cambia simplemente la nitidez de las imágenes según las ve el ojo humano SHARPNESS se utiliza como parámetro para manipular la calidad de la imagen Si la nitidez es demasiado alta obstaculizará la naturalidad de la imagen Básicamente se recomienda el valor predeterminado de LOW Sin embargo para imágenes grandes MIDDLE...

Страница 259: ...00K E E 4000K 4400K 4800K 5200K 5600K 6000K 6500K 7000K Apéndice Sistema fotométrico A Sistema de medición equilibrada en el centro Tipo de control de exposición A Exposición programada con el margen del obturador y prioridad del iris Exposición programada con prioridad del iris E E Velocidad de obturación fija Velocidad de obturación A 1 30 a 1 750 segundos E E 1 250 segundos 1 2 a 1 750 segundos...

Страница 260: ...ima de la bandeja de suministro de papel 25 hojas Método de expulsión del papel Expulsión delantera Las hojas son expulsadas en orden en la parte superior de la bandeja de suministro de papel Cartucho de cinta entintada Puede imprimir 25 hojas Entradas AC IN entrada de alimentación Cabezal térmico 11 6 puntos mm Adaptadmor de alimentación de CA Alimentación 100 a 240 V CA 50 60 Hz Consumo 23 W Ten...

Страница 261: ...sh no está conectado a la cámara t Conéctelo a la toma FLASH de la cámara La batería del flash está descargada t Cárguela o reemplácela por otra nueva t La duración útil del flash puede haberse acabado Póngase en contacto con un centro de reparaciones Sony Visualizador de cristal líquido de la cámara Síntoma Causas posibles solución Al tomar una imagen ésta no aparece en el visualizador de cristal...

Страница 262: ...estén bloqueando el objetivo Impresora Síntoma Causas posibles solución La alimentación no se conecta La impresora no imprime No se puede retirar el cartucho de cinta entintada Compruebe que el cable de alimentación de la impresora esté enchufado correctamente t Conecte correctamente el cable de alimentación como se explica en Conexiones de alimentación página 212 Compruebe que el cartucho de la c...

Страница 263: ... la impresora se indica mediante el encendido o el parpadeo de las lámparas POWER PRINT PAPER RIBBON y ALARM Si la condición de la impresora no es normal tome la medida que sea necesaria según indican las lámparas Encendi Parpade Estado de la impresora y da ando medida correctiva POWER PRINT PRINT PAPER RIBBON ERROR Todos las lámparas La alimentación está conectada Está realizándose la impresión L...

Страница 264: ...e cristal líquido de la estación aparecerá un mensaje de error indicando el problema Mensaje del Causas posibles solución visualizador de cristal líquido de la estación CHECK RIBBON El cartucho de cinta entintadora está defectuoso t Reemplácelo por otro nuevo Ha insertado un cartucho de cinta entintadora que no puede utilizarse con esta impresora t nserte el cartucho de cinta entintadora correcto ...

Страница 265: ... en la bandeja de suministro expulsión de papel quite esas hojas y luego retire la bandeja 3 Abra la cubierta del cartucho de cinta entintada y retire el cartucho de cinta entintada Nota Si no puede retirar el cartucho de cinta entintada póngase en contacto con su concesionario o centro de servicio Sony más cercano 4 Retire el papel atascado Si no puede retirar el papel atascado o si no puede verl...

Страница 266: ...dad Las aristas afiladas del interior de la unidad pueden causar lesiones Tocar los componentes interiores calientes puede causar quemaduras 7 Vuelva a poner la cubierta inferior la bandeja de suministro expulsión de papel y el cartucho de cinta entintada 8 Vuelva a enchufar el cable de alimentación y luego encienda la impresora Nota Las imágenes que se encontraban en la memoria de la impresora se...

Страница 267: ......

Страница 268: ...Printed in Japan Printed on recycled paper ...

Отзывы: