


5-10
SEL1224G
5-2-2. Optical Axis Check
Checking Procedure
1. Adjust the optical axis while observing the microscope until the
chart image can be seen in the center.
2. Perform steps (1) to (6) and check that the AS and CB values are
within specifications.
AS
(Astigmatism):
The phenomenon where the flare on the ring chart appears in a
cruciform shape with the ring chart in the sharpest focus. (Fig. a)
(1) Turn the focusing knob until the flare becomes minimum
between two approximately opposite points on the ring
chart edge (as shown with the arrows in Fig. b), and then
read the dial gauge value. <A>
(2) Turn the focusing knob until the
fl
are becomes minimum
between two points with the phase of the
fl
are rotated by 90
degrees from the above step (1) condition (as shown with
two arrows in Fig. c), and then read the dial gauge value.
<B>
(3) Calculate the AS value (absolute difference between <A>
and <B>) and check that it is within the speci
fi
cation.
AS value = <A>
−
<B>
(1)
(1)
(2)
(2)
AS
(Fig. a)
(Fig. b)
(Fig. c)
CB (Center Blur):
The phenomenon where the flare on the ring chart trails in one
direction with the ring chart in the sharpest focus. (Fig. d)
(4) Turn the focusing knob until the ring chart edge in the direc-
tion of the maximum
fl
are is in the sharpest focus (as shown
with the arrow in Fig. e), and then read the dial gauge value.
<C>
(5) Turn the focusing knob until the ring chart edge, opposite
180 degrees from the above step (4) condition (as shown
with the arrow in Fig. f) is in focus, and then read the dial
gauge value. <D>
(6) Calculate the CB value (absolute difference between <C>
and <D>) and check that it is within the speci
fi
cation.
CB value = <C>
−
<D>
(5)
(4)
(Fig. d)
(Fig. e)
(Fig. f)
CB
Speci
fi
cation (Reference):
AS (Astigmatism)
0.09 mm or less
CB (Center Blur)
0.13 mm or less
3. If the specifications of AS and CB are not satisfied, perform the
“5-2-3. Optical Axis Adjustment”.
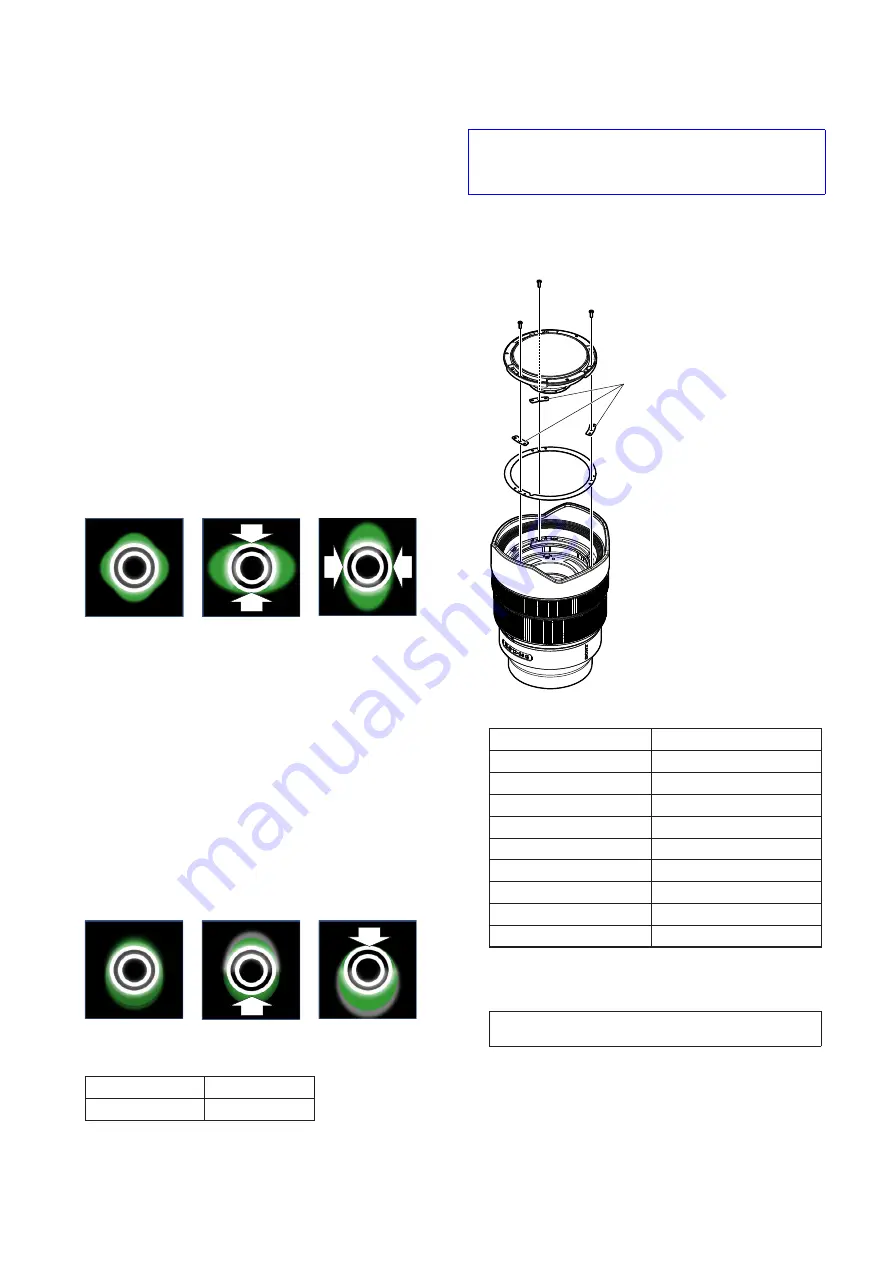
5-2-3. Optical Axis Adjustment
Optical Axis Adjustment is done by increasing or decreasing the
thickness of the washer.
Refer to “2-2. DISASSEMBLY”, disassemble the lens, and
change the thickness of the washer.
Adjusting Procedure
1. Increase or decrease the thickness of the 1 group tilt washer to
adjust the optical axis.
1 group tilt washer
1 GROUP TILT WASHER
Part No.
Thickness t (mm)
4-696-666-01
0.02
4-696-666-11
0.03
4-696-666-21
0.05
4-696-666-31
0.09
4-696-666-41
0.12
4-696-666-51
0.15
4-696-666-61
0.20
4-696-666-71
0.25
4-696-666-81
0.30
2. Perform the check and adjustment repeatedly until the specifica-
tions of optical axis is satisfied.
Note:
If the speci
fi
cations of optical axis is not satis
fi
ed even af-
ter the adjustment, replace the 1 group frame service assy.