background image

51

SONY MHC-V909AV (E) 3-860-316-11

Actual page number:

Sound Adjustment

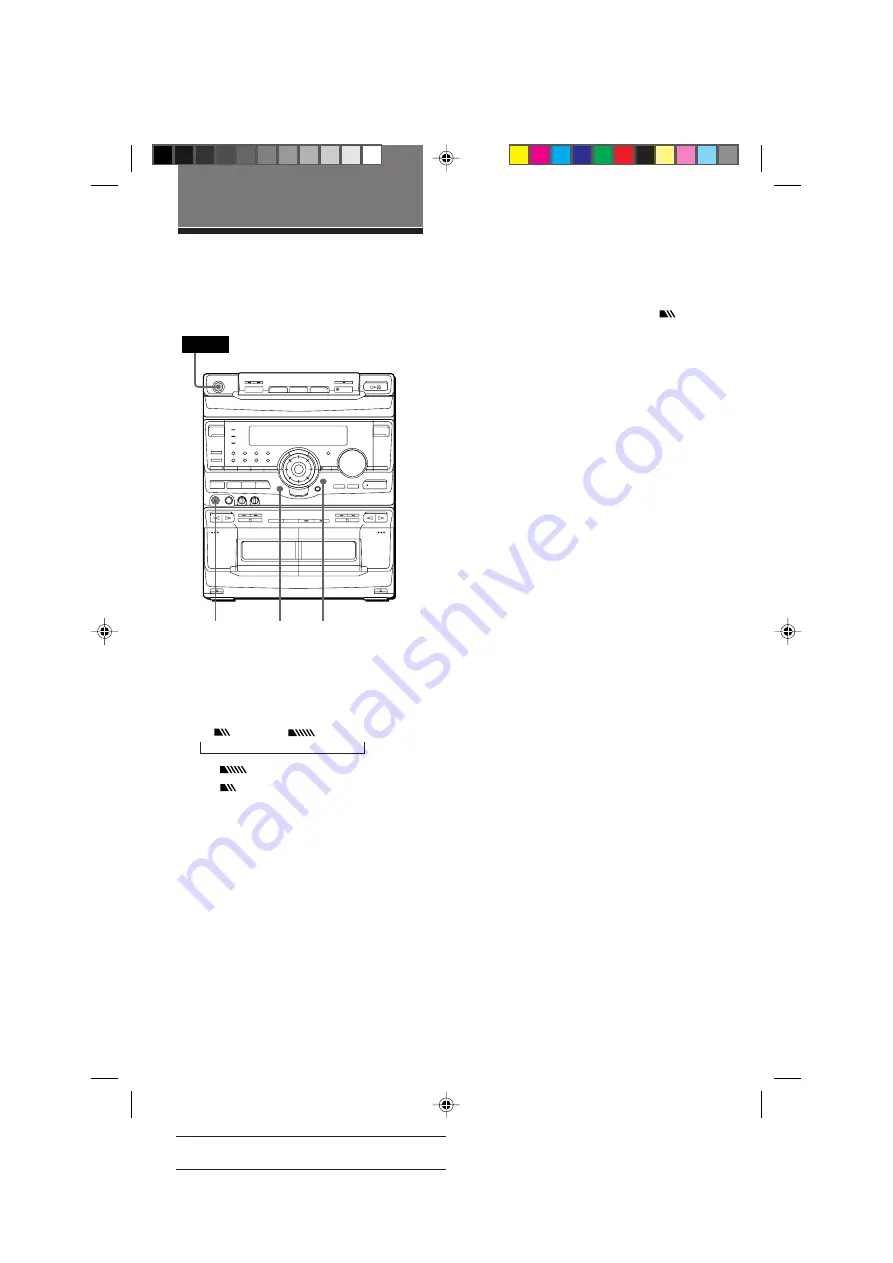
Adjusting the sound

To reinforce bass (DBFB)

Press DBFB*.

Every time you press the button, the display
changes as follows:

DBFB 


n

 DBFB 


n

 display off

“DBFB 

” is more effective than

“DBFB 

” .

* DBFB = Dynamic Bass Feedback

For a powerful sound (GROOVE)

Press GROOVE. The volume switches to
power mode, DBFB is automatically set to full
strength, the equalizer curve changes, and the
“GROOVE” button lights up. Press GROOVE
again to return to the previous volume.

PHONES

GROOVE DBFB

You can reinforce the bass, create more
powerful sound, and listen with headphones.

n

POWER

Notes

• With some songs, the music will sound distorted

when you use the DBFB system with the graphic
equalizer if the bass is too strong. Adjust the bass
slowly while listening to music so that you can
monitor the effect of the adjustment.

• Cancelling GROOVE sets DBFB to “DBFB 

and flattens the equalizer curve. To cancel the
DBFB level, press DBFB until the indication
disappears. Adjust the equalization to obtain the
effect you want.

To listen through the headphones

Connect the headphones to PHONES jack. No
sound will come from the speakers.

Note

If you have connected a super woofer, please note
that sound comes from the super woofer even when
the headphones are connected. Turn off the power
of the super woofer when using headphones.

09/51-56_MHC-V909AV.11E

98.11.9, 11:48 AM

51

Содержание MHC-V909AV

Страница 1: ...SONY MHC V909AV E 3 860 316 11 1 Actual page number Mini Hi Fi Component System 3 860 316 11 1 MHC V909AV 1997 by Sony Corporation Operating Instructions 01 00 01_MHC V909AV 11E 98 11 9 11 44 AM 1 ...

Страница 2: ... 20 min Note on VIDEO CDs This system conforms to VIDEO CDs without PBC functions Ver 1 1 and VIDEO CDs with PBC functions Ver 2 0 of VIDEO CD standards You can enjoy two kinds of playback according to the disc type Disc type You can VIDEO CDs without Enjoy video playback PBC functions moving pictures as Ver 1 1 discs well as audio CDs VIDEO CDs with Play interactive PBC functions software using m...

Страница 3: ... of the picture with advanced DNR 40 Setting the sharpness 41 Adding trails to moving pictures 41 Playing CD tracks repeatedly 42 Playing CD tracks in random order 43 Programming CD tracks 44 Playing CDs without interruption 45 The Tape Deck Recording on a tape manually 46 Recording a CD by specifying track order 47 DJ Effects Looping part of a CD 49 Flashing part of a CD 49 Waving the equalizer 5...

Страница 4: ...e system Do the following procedure 1 to 9 to hook up your system using the supplied cords and accessories Left front speaker Right front speaker Right surround speaker Left surround speaker Center surround speaker FM lead antenna AM loop antenna 03 04 11_MHC V909AV 11E 98 11 9 11 45 AM 4 ...

Страница 5: ...eakers Connect the speaker cords to the SURROUND SPEAKER jacks of the same color Keep the speaker cords away from the antennas to prevent noise Black Red Insert only the stripped portion R L 3 Connect the center speaker Connect the speaker cords to the CENTER SURROUND SPEAKER jacks of the same color Keep the speaker cords away from the antennas to prevent noise 4 Connect the FM AM antennas Set up ...

Страница 6: ... to the VIDEO OUT jack with the supplied video connecting cable When using a TV Turn on the TV and select the video input so you can view the pictures from this system Tip For even higher quality video images you can use an optional S VIDEO cord to connect the S VIDEO input jack on your TV to the S VIDEO OUT jack 6 Set SYSTEM SELECT color system to the appropriate position PAL or NTSC according to...

Страница 7: ...wo size AA R6 batteries into the remote To attach the center speaker pads Attach the supplied center speaker pads to the bottom of the center speaker to stabilize the speakers and prevent them from slipping To attach the front speaker pads Attach the supplied front speaker pads to the bottom of the front speakers to stabilize the speakers and prevent them from slipping Tip You can reinforce the ba...

Страница 8: ...ont speaker R Center speaker 45 Rear speaker L Rear speaker R Positioning the speakers Before you connect them determine the best location for your speakers 1 Place the front speakers at an angle of 45 degrees from your listening position Connecting the supplied rear and center speakers enables you to fully enjoy Dolby Pro Logic Surround sound Dolby Pro Logic Surround is a decoding system standard...

Страница 9: ... TONE ON OFF on the remote The test tone is heard from the speakers in the following order Adjust the volume of the test tone Front left n Center n Front right 3 From your listening position press CENTER LEVEL and REAR LEVEL on the remote to adjust the volume The volume levels from each speaker must become the same 4 Press T TONE ON OFF when you are done adjusting The test tone is turned off Tip I...

Страница 10: ...The clock starts working Step 3 Setting the time You must set the time before using the timer functions 1 3 5 2 4 Tips If you ve made a mistake start over from step 1 Setting the time deactivates the demo mode If you want to display the demo mode press DISPLAY DEMO when the power is off Note When setting the time set the equalizer display to anything other than Spectrum analyzer pattern 3 See To c...

Страница 11: ...4 Press TUNER MEMORY A preset number appears in the display 5 Turn the jog dial to select the preset number you want 6 Press ENTER NEXT The station is stored 7 Repeat steps 1 to 6 to store other stations To tune in a station with a weak signal Press TUNING MODE repeatedly to select MANUAL in step 2 then turn the jog dial to tune in the station To change the preset number Start over from step 1 To ...

Страница 12: ...e sure to match the color of the plugs and the connectors To listen to the sound of the connected MD deck press FUNCTION repeatedly until MD appears Note If you cannot select MD by pressing FUNCTION press POWER while pressing FUNCTION when the power is turned off VIDEO will be switched to MD To return to VIDEO do the same procedure Tip If you connect a turntable with an MM cartridge connect it to ...

Страница 13: ...EO MD AUDIO OUT jacks and VIDEO OUT or S VIDEO OUT jack using the supplied video connecting cable or an optional S VIDEO connecting cable you can record the audio and video signals from a VIDEO CD onto video tape Note If the sound is distorted when selecting VIDEO switch to MD see Note on page 12 Connecting a super woofer speaker You can connect an optional super woofer speaker To the audio output...

Страница 14: ...20 to 50 feet insulated wire to the AM antenna terminal Leave the supplied AM loop antenna connected Important If you connect an outdoor antenna ground from y terminal with the screw clamp To prevent a gas explosion do not connect the ground wire to a gas pipe FM75 AM y 75 ohm coaxial cable not supplied Screw clamp Ground wire not supplied FM75 AM y Screw clamp Ground wire not supplied Insulated w...

Страница 15: ...s and playback starts If you press or SELECT CD on the remote when the disc tray is closed playback starts from the CD whose button is lit green Playing a VIDEO CD You can play both VIDEO CDs without PBC functions Ver 1 1 and VIDEO CDs with PBC functions Ver 2 0 You can enjoy two kinds of playback according to the disc type jog dial With the label side up When you play a VIDEO CD single place it o...

Страница 16: ...S repeatedly CDs 3 until ALL DISCS appears Remove or Press OPEN CLOSE change the VIDEO CDs Adjust the Turn VOLUME or press volume VOL on the remote 1 There may be some disturbance in the video image 2 Only for VIDEO CDs without PBC functions Ver 1 1 3 This function cannot be used during menu playback of a VIDEO CD with the PBC functions Ver 2 0 Tips Pressing when the power is off automatically tur...

Страница 17: ...ns The disc tray closes and playback starts If you press or SELECT CD on the remote when the disc tray is closed playback starts from the CD loaded on the tray whose button is lit green You can play up to three CDs in a row With the label side up When you play a single CD place it on the inner circle of the tray π 0 2 1 Disc tray number Playing time Track number VOLUME ALL 1DISCS p jog dial DISC S...

Страница 18: ...the respective tray lights green To Do this Stop playback Press p Pause Press or P on the remote Press again to resume play Select a track During playback or pause turn the jog dial clockwise to go forward or counterclockwise to go back and release it when you reach the desired track Or press to go forward or to go back on the remote Find a point in Press and hold down or a track 0 during playback...

Страница 19: ...tarts With the label side up When you play a single CD place it on the inner circle of the tray π 0 º π ª With the side you want to record facing forward To stop recording Press π on deck B or p on the CD player Tips If you want to record from the reverse side press ª so that ª for reverse side lights up When you record on both sides be sure to start from the front side If you start from the rever...

Страница 20: ...d changes as follows 2 band model FM AM 3 band model FM n MW n SW 2 Press TUNING MODE repeatedly so PRESET appears in the display MANUAL n AUTO n PRESET 3 Turn the jog dial or press or on the remote to tune in the desired preset station To Do this Turn off the radio Press POWER Adjust the volume Turn VOLUME or press VOL on the remote STEREO MONO VOLUME VOL TUNER BAND Turn counterclockwise or press...

Страница 21: ...lly turns the power on and tunes to the last received station One Touch Play You can switch from another source to the radio just by pressing TUNER BAND Automatic Source Selection If an FM program is noisy press STEREO MONO so that MONO appears in the display There will be no stereo effect but the reception will improve Press the button again to restore the stereo effect To improve broadcast recep...

Страница 22: ... in a preset station With the side you want to record facing forward Recording from the radio You can record the radio program on a tape by calling up a preset station You can use TYPE I normal or TYPE II CrO2 tapes 2 1 3 6 5 7 4 π DOLBY NR TUNER BAND 4 Press and insert a blank tape into deck B 5 Press r REC Deck B stands by for recording 6 Press DIRECTION repeatedly to select A to record on one s...

Страница 23: ...start from the reverse side recording stops at the end of the reverse side To record non preset stations select MANUAL in step 2 then turn the jog dial to tune in the desired station When you want to reduce the hiss noise in low level high frequency signals press DOLBY NR on the remote so that DOLBY NR B appears after pressing r REC If noise is heard while recording from the radio move the respect...

Страница 24: ... tape starts playing The deck stops automatically after repeating the sequence five times Relay play always follows the following sequence Deck A front side Deck A reverse side Deck B front side Deck B reverse side To Do this Stop play Press π or p on the remote Pause Deck B only Press PAUSE or P on the remote Press again to resume play Fast forward Press while playing the front side or º while pl...

Страница 25: ...One Touch Play You can switch from another source to the tape deck just by pressing or ª Automatic Source Selection When you want to reduce the hiss noise in low level high frequency signals press DOLBY NR on the remote so that DOLBY NR B appears When dubbing tapes originally recorded with Dolby NR B the dubbed tape is automatically played with Dolby NR B 05 15 28_MHC V909AV 11E 98 11 9 11 46 AM 2...

Страница 26: ...ormal or TYPE II CrO2 tapes 1 1 π π 2 4 3 POWER 4 Press PAUSE Dubbing starts To stop dubbing Press π on deck A or B Tips When you dub on both sides start recording from the front side If you record from the reverse side recording stops at the end of the reverse side If you set DIRECTION to a when the tapes you use have different lengths the tape in each deck reverses independently If you select RE...

Страница 27: ...appropriate video input Refer to the operating instructions supplied with your TV for details When you are done Turn MIC LEVEL to 0 and disconnect the microphone from MIX MIC then press KARAOKE PON MPX repeatedly so that h disappears Select KARAOKE PON MPX R MPX L Singing along Karaoke You can sing along with any stereo CD or tape by turning down the singer s voice You need to connect an optional ...

Страница 28: ...ophone echo Turn ECHO LEVEL to adjust the echo effect To cancel the echoing Turn ECHO LEVEL to 0 KEY CONTROL n ECHO LEVEL Adjusting the key Press KEY CONTROL n You can adjust the key higher or lower in 13 halftone steps 3 0 n 3 0 05 15 28_MHC V909AV 11E 98 11 9 11 46 AM 28 ...

Страница 29: ...elect a number from the menu then press SELECT 3 Continue according to the instructions on the menus to enjoy interactive playback To Do this Stop play Press p See the rest of a menu Pres NEXT or NEXT on the remote Go back to the top of Press PREV or PREV a menu on the remote Go back to a previous Press RETURN or menu ˆ RETURN on the remote PBC OFF ON DISC SKIP EX CHANGE p Playing a VIDEO CD with ...

Страница 30: ...e 10 0 button Tips When appears on the TV screen you have pressed an invalid button Press a button indicated by the instructions on the menu screen When you press NEXT or NEXT on the remote during menu playback or while playing moving pictures the next scene on the disc appears Also refer to the instructions supplied with the disc Notes During menu playback you cannot go to the next disc even if y...

Страница 31: ...audio CD or a VIDEO CD without PBC function Ver 1 1 the current track number and playing time of the current track appear n n Checking the remaining time You can check information about the current CD using the front panel display DISPLAY DEMO Press DISPLAY DEMO during normal playback Each time you press this button the display changes as follows nElapsed time of the current track Remaining time o...

Страница 32: ... 3 2 DISC 2 4 3 DISC 1 5 2 STOP NTSC 1 TOTAL 10 04 COMET 3 4 5 DNR NORMAL STOP COMET DNR NORMAL 0 04 You can check the current operating status and disc information of VIDEO CDs or audio CDs during playback or in stop mode by superimposing a display on top of the images on your TV screen Press ON SCREEN Each time you press this button the on screen display changes as follows n ON SCREEN 1 n ON SCR...

Страница 33: ...corded on the video tape SCENE 1 0 55 1 2 CONTINUE DISC 1 DISC 2 DISC 3 1 15 1 8 TRK TRK Video Audio 1 7 NTSC ALL DISCS STOP DISC 3 DNR NORMAL COMET Audio 47 55 5 6 2 3 4 ON SCREEN 3 display During playback this screen displays the operating status During stop mode it displays information about the CD s on the disc tray In Normal or Shuffle Play 1 Play mode 2 Advanced DNR status 3 ALL DISCS or 1 D...

Страница 34: ...ENE and the total number of scenes appear on the TV screen 4 Press the numerical buttons 1 10 0 on the remote to select the scene you want To enter scene number 103 Press 1 m 10 0 m 3 The selected scene number appears on the TV screen Total number of scenes Selected scene number SCENE 1 312 SCENE 103 1 312 Numerical buttons 10 ON SCREEN SPECIAL MENU PREV NEXT SELECT CD p This player has 5 differen...

Страница 35: ...t the index you want The selected index number appears on the TV screen 5 Press SELECT CD Playback starts from the selected index To stop playback Press p Selected index number V index 2 continued To stop playback Press p To check the scene number during playback Press ON SCREEN repeatedly to select the ON SCREEN 3 display mode The scene number appears on the TV screen See Using the On Screen Disp...

Страница 36: ...he section you want To enter 10 minutes Press 1 m 10 0 The selected elapsed time appears on the TV screen 4 Press SELECT CD Playback starts from the selected time To stop playback Press p To use time search with VIDEO CDs with PBC functions Ver 2 0 Stop playback and press PBC OFF ON on the remote repeatedly until the AUTO PBC indicator goes off before step 1 To use index search with VIDEO CDs with...

Страница 37: ...e first frame is displayed by pressing SELECT CD Notes Video images will not be shown for audio CDs The play mode automatically switches to normal mode if you start disc digest during Shuffle or Program Play Locating the track you want Disc Digest You can select the track you want by viewing the first frame of each track Up to 9 different tracks can be displayed on the TV screen at one time This f...

Страница 38: ...ing a section within a track Track Digest You can have the CD player divide a VIDEO CD track into 9 different sections and display the first scene of each section on the TV screen This might be useful when playing discs with few track divisions such as movies This function cannot be used during menu playback of VIDEO CDs with PBC functions Ver 2 0 1 Start playing the VIDEO CD track you want 2 Pres...

Страница 39: ...ˆ RETURN on the remote again while RESUME is flashing Notes Resume Play does not work with audio CDs If RESUME does not flash Resume Play cannot be used Resume Play does not work during Shuffle or Program Play Depending on where you stop playback Resume Play may not resume from the exact same point or may not work The following operations will clear the resume memory Removing the disc Pressing DIS...

Страница 40: ...ck noise more effectively select DNR HIGH To cancel advanced DNR Press DNR repeatedly until DNR OFF appears DNR DNR NORMAL DNR HIGH DNR OFF Notes When you choose DNR HIGH parts of the picture may be out of focus When you use the DNR function parts of the menu on screen display may be out of focus When you connect the AC power cord of the player to a wall outlet DNR NORMAL is selected automatically...

Страница 41: ...otes When you turn the system off EFFECT OFF is selected automatically ACTIVE COMET Adding trails to moving pictures COMET You can set the unit to add trails to moving pictures COMET The COMET function gives atmosphere to the picture Press ACTIVE COMET to select COMET Each time you press this button the display changes as follows See Setting the sharpness To cancel COMET Press ACTIVE COMET repeate...

Страница 42: ... current CD All the tracks on all CDs Only one track Press 1 ALL DISCS repeatedly until 1 DISC appears in the display 1 ALL DISCS repeatedly until ALL DISCS appears in the display REPEAT repeatedly until REPEAT 1 appears in the display while playing the track you want to repeat Playing CD tracks repeatedly Repeat Play REPEAT 1 ALL DISCS This function lets you repeat a single CD or all CDs in Norma...

Страница 43: ...epeatedly to select SHUFFLE To skip a track turn the jog dial clockwise or press on the remote 1 Press FUNCTION repeatedly until CD appears in the display 2 Press PLAY MODE repeatedly until SHUFFLE appears in the display 3 Press 1 ALL DISCS to select 1 DISC or ALL DISCS ALL DISCS shuffles all the CDs in the player 1 DISC shuffles the CD whose DISC indicator is green 4 Press J appears then all the ...

Страница 44: ...ng order appear followed by the total playing time 6 To program additional tracks repeat steps 3 through 5 Skip step 3 to select tracks from the same disc 7 Press or SELECT CD on the remote All the tracks play in the order you selected To cancel Program Play Press PLAY MODE repeatedly until PROGRAM or SHUFFLE disappears from the display Programming CD tracks Program Play 1 5 7 2 3 4 D SKIP CHECK C...

Страница 45: ...ights up then press CLEAR Add a track to the 1 Select the disc with the program DISC 1 3 buttons 2 Select the track by turning the jog dial 3 Press ENTER NEXT Clear the entire p once in stop mode or program twice while playing Tips To program tracks using the remote press the numerical buttons for the tracks you want to play in the order you want in step 4 then skip step 5 To program tracks number...

Страница 46: ...LBY NR You can record from CD tape or radio as you like For example you can record just the songs you want or record from the middle of the tape 5 Press PAUSE on deck B Recording starts 6 Start playing the source to be recorded To Press Stop recording π on deck B Pause recording PAUSE on deck B Tips If you want to record from the reverse side press ª on deck B so that ª for reverse side lights up ...

Страница 47: ...rs in the display 6 Press ENTER NEXT The track is programmed STEP and the programmed playing order appear followed by the total playing time 7 To program additional tracks to be recorded on side A repeat steps 4 to 6 Skip step 4 to select tracks from the same disc 8 Press P on the remote to insert a pause at the end of side A P appears in the display and the total playing time resets to 0 00 in th...

Страница 48: ...isplay Tip When you want to reduce the hiss noise in low level high frequency signals press DOLBY NR on the remote so that DOLBY NR B appears after pressing CD SYNCHRO Selecting tape length automatically Tape Select Edit You can check the most suitable tape length for recording a CD Note that you cannot use Tape Select Edit for discs containing more than 20 tracks This function cannot be used duri...

Страница 49: ... Effects Press and hold CD LOOP during playback at the point you want to start the Loop function and release to resume normal play To adjust the loop length Turn the jog dial while holding CD LOOP or press MUSIC MENU or while holding LOOP on the remote to select different loop lengths LOOP 1 20 Press and hold CD FLASH during playback at the point you want to start the Flash function and release to...

Страница 50: ... listening To adjust the wave length Turn the jog dial while holding WAVE to select a different wave length WAVE 1 10 WAVE jog dial To use LOOP and FLASH together Press and hold both CD LOOP and CD FLASH at the same time Notes The loop and flash length cannot be adjusted during this operation Adjust the loop and flash lengths independently beforehand if necessary To record the flash effect use the...

Страница 51: ...h headphones n POWER Notes With some songs the music will sound distorted when you use the DBFB system with the graphic equalizer if the bass is too strong Adjust the bass slowly while listening to music so that you can monitor the effect of the adjustment Cancelling GROOVE sets DBFB to DBFB and flattens the equalizer curve To cancel the DBFB level press DBFB until the indication disappears Adjust...

Страница 52: ...e 5 DSP LEVEL DSP MODE Press DSP or DSP MODE on the remote repeatedly to select a DSP mode OFF Turns off the DSP mode HALL Reproduces the acoustics of a concert hall THEATER Reproduces the acoustics of a movie theater To adjust the presence of the surround effect Press DSP LEVEL on the remote repeatedly to choose the level you want Every time you press the button the indication changes as follows ...

Страница 53: ...tes You can t use both the Dolby Pro Logic Surround sound and the surround menu function at the same time When recording the sound be sure to turn the Dolby Pro Logic Surround sound off Selecting the audio emphasis MUSIC MENU ON OFF 1 2 3 EFFECT ON OFF The audio emphasis menu lets you select the sound characteristic according to the sound you are listening to The personal file function see Making ...

Страница 54: ...ic menu options below appears in the display 2 Use the jog dial or press MUSIC MENU on the remote repeatedly to select the preset you want The preset name appears in the display 3 Press ENTER NEXT You don t need to press ENTER NEXT when you use the remote Use P FILE to call up the personal file s you create see page 56 If you use the remote to select the menu you cannot use the jog dial To use the...

Страница 55: ... VOLUME 1 Select the audio emphasis you want for your basic sound see Selecting the audio emphasis 2 Press HIGH FREQUENCY or LOW FREQUENCY repeatedly to select a frequency band VOLUME 3 Turn the jog dial to adjust level 4 Repeat steps 2 and 3 5 Press ENTER NEXT when finished Note If you choose another menu audio emphasis other than EFFECT OFF the adjusted sound effect is lost To retain the adjuste...

Страница 56: ...ly selected personal file name appears in the display 2 Use the jog dial or press MUSIC MENU on the remote repeatedly to select the personal file you want 3 Press ENTER NEXT You don t need to press ENTER NEXT when you use the remote If you use the remote to call up the personal file you cannot use the jog dial To use the jog dial first press P FILE Making a personal audio emphasis file Personal Fi...

Страница 57: ...he direction of the microphone If you want to record your voice through the microphone only you can do so by selecting the CD function and not playing a CD Notes If you press EFFECT ON OFF or recall a sound effect the Karaoke mode is cancelled The instrumental sound may be reduced as well as the singer s voice when the sound is recorded in monaural The singer s voice may not be reduced when only a...

Страница 58: ...t the system turn off at the preset time so you can sleep to the music You can preset the time to be turned off by 10 minutes Falling asleep to music Sleep Timer You can wake up to music at a preset time every day Make sure you have set the clock see Step 3 Setting the time 3 4 5 8 2 TIMER SELECT 4 5 7 1 Prepare the music source you want to play CD Insert a CD To start from a specific track make a...

Страница 59: ...llows TUNER CD PLAY TAPE PLAY 8 Press ENTER NEXT The start time followed by the stop time and the music source appears then the original display appears 9 Turn off the power To check the setting Press TIMER SELECT and turn the jog dial to select the respective mode DAILY 1 or DAILY 2 then press ENTER NEXT To change the setting start over from step 1 To cancel the timer operation Press TIMER SELECT...

Страница 60: ...EXT To change the setting start over from step 1 To cancel the timer operation Press TIMER SELECT and turn the jog dial to select OFF then press ENTER NEXT Notes When setting the timer recording set the equalizer display to anything other than Spectrum analyzer pattern 3 See To change the equalizer display on page 54 If the power is on at the preset time the recording will not be made Timer record...

Страница 61: ...at the operating voltage of your system is identical with the voltage of your local power supply On safety The unit is not disconnected from the AC power source mains as long as it is connected to the wall outlet even if the unit itself has been turned off Unplug the system from the wall outlet mains if it is not to be used for an extended period of time To disconnect the cord mains lead pull it o...

Страница 62: ...mer recording radio programs 12 00 AM flashes in the display A power interruption occurred Set the clock and timer settings again There is no sound Rotate VOLUME clockwise The headphones are connected Insert only the stripped portion of the speaker cord into the SPEAKER jack Inserting the vinyl portion of the speaker cord will obstruct the speaker connections There is severe hum or noise A TV or V...

Страница 63: ...al Press PRO LOGIC and turn off the Pro Logic mode There is no sound from the center speaker Set the CENTER LEVEL to the appropriate level Video CD CD Player There is no picture Check that the unit is connected securely Make sure you operate the TV correctly Make sure you set the SYSTEM SELECT correctly according to your TV color system Press FUNCTION repeatedly until CD is displayed Parts of the ...

Страница 64: ...There is excessive wow or flutter or the sound drops out The capstans or pinch rollers are dirty Clean them see Cleaning the tape heads on page 61 Noise increases or the high frequencies are erased The record playback heads are magnetized Demagnetize them see Demagnetizing the tape heads on page 61 Tuner Severe hum or noise TUNED or STEREO flashes in the display Adjust the antenna The signal stren...

Страница 65: ...OUND SPEAKER accepts impedance of 8 ohms CENTER SURROUND SPEAKER accepts impedance of 8 ohms SUPER WOOFER voltage 1 V impedance 1 kilohms Video CD CD player section System Compact disc digital audio and video system Laser Semiconductor laser λ 780nm Emission duration continuous Laser output Max 44 6 µW This output is the value measured at a distance of 200 mm from the objective lens surface on the...

Страница 66: ... 8 ohms Dimensions w h d Approx 220 330 315 mm Mass Approx 5 kg net per speaker Rear speaker SS SR909 Speaker system Full range bass reflex type Speaker units Full range 8 cm dia cone type Nominal impedance 16 ohms Dimensions w h d Approx 205 95 240 mm Mass Approx 1 1 kg net per speaker Center speaker SS CN909 Speaker system Full range bass reflex type magnetically shielded Speaker units Full rang...

Страница 67: ...of a picture or a music piece on disc Each track is assigned a track number to help you locate the track you want VIDEO CD A compact disc which contains moving pictures VIDEO CDs contain compact picture information using the MPEG 1 format one of the world wide standards of digital compact technology The picture information is compressed about 120 times Consequently a 12 cm VIDEO CD can contain up ...

Страница 68: ...s 61 Searching Index Search 35 Scene Search 34 Time Search 36 Selecting the audio emphasis 53 the color system 6 Setting the time 10 Shuffle Play 43 Sleep Timer 58 Sound adjustment 51 Speakers 5 8 13 Special menu 34 T U Timer falling asleep to music 58 timer recording 60 waking up to music 58 Troubleshooting 62 Tuner 11 20 Tuning interval 11 66 V VIDEO CD CD player 15 17 29 W X Y Z Wake up timer 5...

Отзывы:

Похожие инструкции для MHC-V909AV