14
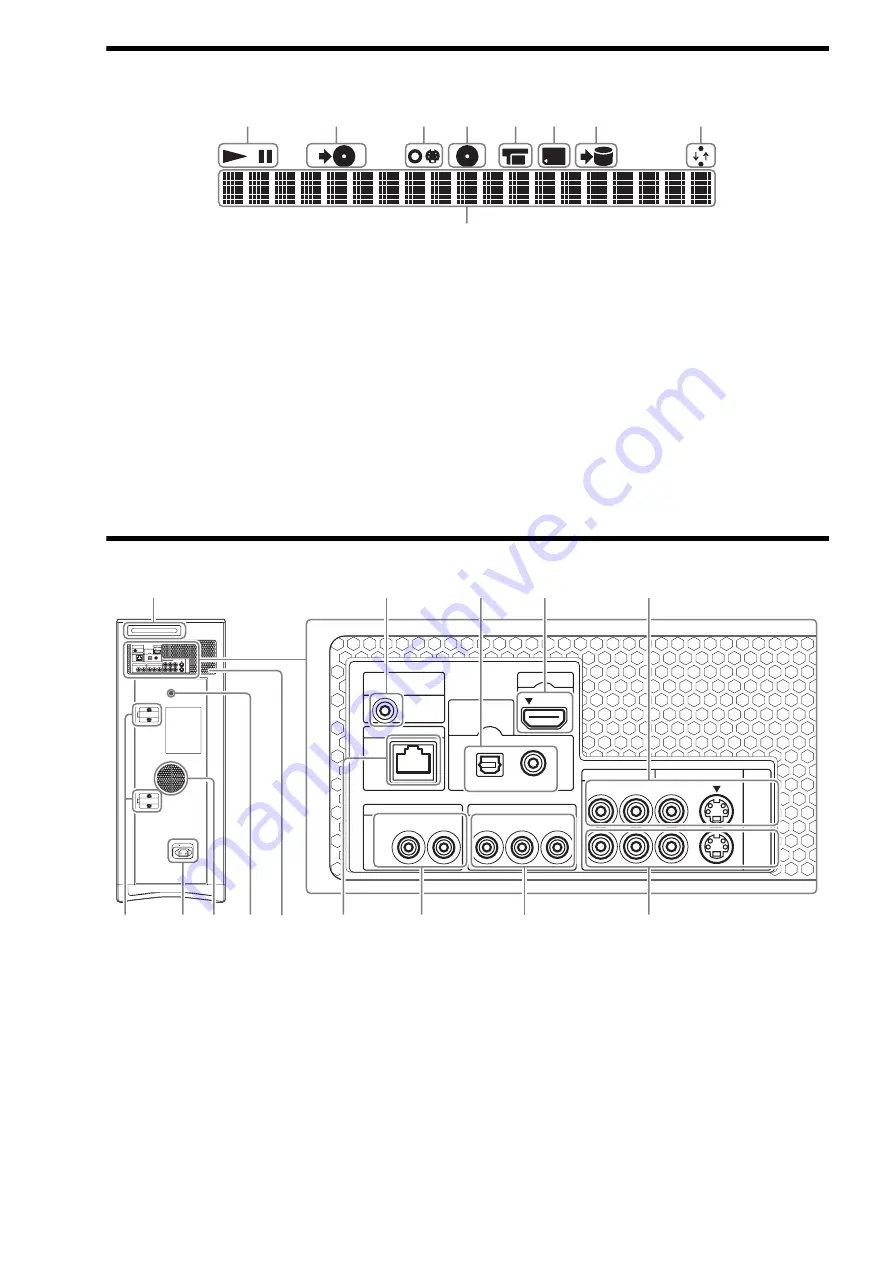
Top panel display/front panel display
The top and front panel displays are identical and show the same contents.
A
Playback status (Play/Pause)
B
Copy indicator
– Lights up while copying to a
disc.
C
Line
– Lights up when the source is
the input from the LINE IN
jacks.
D
Disc
– Lights up when the source is
a disc.
E
HDV/DV
– Lights up when the source is
the input from the HDV/DV
IN jack.
F
Memory card
– Lights up when the source is
a memory card.
G
Import indicator
– Lights up while importing to
the HDD.
H
Network connection indicator
– Lights up when network
communication is occurring.
I
Main display
– Displays the following
information:
Title/track number
Elapsed playback time/
remaining time
Current time
and other messages.
z
Hint
You can change the brightness of the front
panel display by pressing DIMMER or by
using the [Brightness of Front Panel] in
[System Settings] (
.
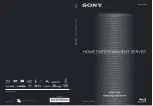
Rear panel
A
PUSH/OPEN button for the LINE
IN 2 jacks and the display
operation buttons (operable
from the top — see “Top panel”)
B
CONTROL S IN/IR IN jack
C
DIGITAL OUT (OPTICAL/
COAXIAL) jacks
(106)
D
HDMI OUT jack
E
LINE IN 1 (AUDIO L/R, VIDEO, S
VIDEO) jacks
(40)
F
Cable clamps
– Be sure to run the connecting
cables through the cable
clamps. Also, after running
the cables, check that the
cables are not loose and that
the ventilation hole is not
blocked.
G
AC IN terminal
H
Ventilation holes
– Do not block the ventilation
holes, which will cause a
malfunction.
I
Screw bolt for tip-over
prevention
J
LAN terminal
(26)
K
AUDIO OUT (L/R) jacks
L
COMPONENT VIDEO OUT (Y, P
B
,
P
R
) jacks
(103)
M
LINE OUT (AUDIO L/R, VIDEO, S
VIDEO) jacks
1
2
3
4
7
6
5
8
9
PUSH/OPEN
AC IN
CONTROL S IN/
IR IN
HDMI OUT
COMPONENT VIDEO OUT
AUDIO OUT
R
R-AUDIO-L
VIDEO
LINE
IN 1
OUT
S VIDEO
Y
P
B
P
R
LAN(10/100)
OPTICAL COAXIAL
DIGITAL OUT
PCM/DTS/
DOLBY DIGITAL
L
CONTROL S IN/
IR IN
HDMI OUT
COMPONENT VIDEO OUT
AUDIO OUT
R
R-AUDIO-L
VIDEO
LINE
IN 1
OUT
S VIDEO
Y
P
B
P
R
LAN(10/100)
OPTICAL COAXIAL
DIGITAL OUT
PCM/DTS/
DOLBY DIGITAL
L
1
6
7 8
8
9
0
qa
qs
qd
3
2
4
5
Содержание HES-V1000 - Home Entertainment Server
Страница 17: ...17 ...
Страница 31: ...31 Getting Started ...
Страница 37: ...37 Inserting Removing Discs and Memory Cards ...
Страница 107: ...107 Various Connections ...
Страница 125: ...125 Changing the Server Settings ...


