9
e
PROMPTER OUT connector (BNC type)
Outputs a prompter 1 signal when connected to a camera
control unit.
When a camera control unit having two prompter inputs is
connected, the signal of input 1 is output from this connector.
f
USB connector (for connecting a USB drive)
Connect a USB drive to save or load the settings data file.
For details, see “Using a USB Drive” (page 46).
g
CAMERA POWER switch and indicator
Turns the power ON/OFF.
ON:
Set the switch to the
?
side. The indicator lights green.
OFF:
Set the switch to the
1
side.
h
CONDITION indicators
Displays the status of the IN connector optical power level.
i
IN/OUT connectors (ST connectors for single-mode
fiber cables)
Connect to an HDCU4300 Camera Control Unit or BPU4000/
4500 Baseband Processor Unit via an HKCU-SM100 CCU
Extension Adapter. Connect the IN/OUT connectors of the
camera to the OUT/IN connectors of the HKCU-SM100 CCU
Extension Adapter using single-mode fiber cables (ST
connector, 1 pair).
Always connect cables between the unit and the HDCU4300
Camera Control Unit or BPU4000/4500 Baseband Processor
Unit with the devices turned off. Do not disconnect and then
reconnect cables while devices are turned on.
j
DC IN (DC power supply input) connector (XLR 4-pin)
Used for connection to the AC-DN10 AC Adapter to supply
power to the camera.
k
NETWORK TRUNK connector (RJ-45 8-pin)
Connects a device connected to the CCU’s NETWORK
TRUNK connector to the network.
l
SDI 1 (serial digital interface) connector and SDI 2
connector (BNC type)
The SDI 1 connector outputs the display selected using the
DISPLAY/MENU switch as an HD-SDI signal. Various output
signals can also be selected in the menu.
The SDI 2 connector outputs various output signals that can
be selected in the menu as a 3G-SDI signal or HD-SDI signal,
and can also be used as a HD-Trunk signal input.
For details about output signal settings, see “Setting Camera
Input/Outputs” (page 12).
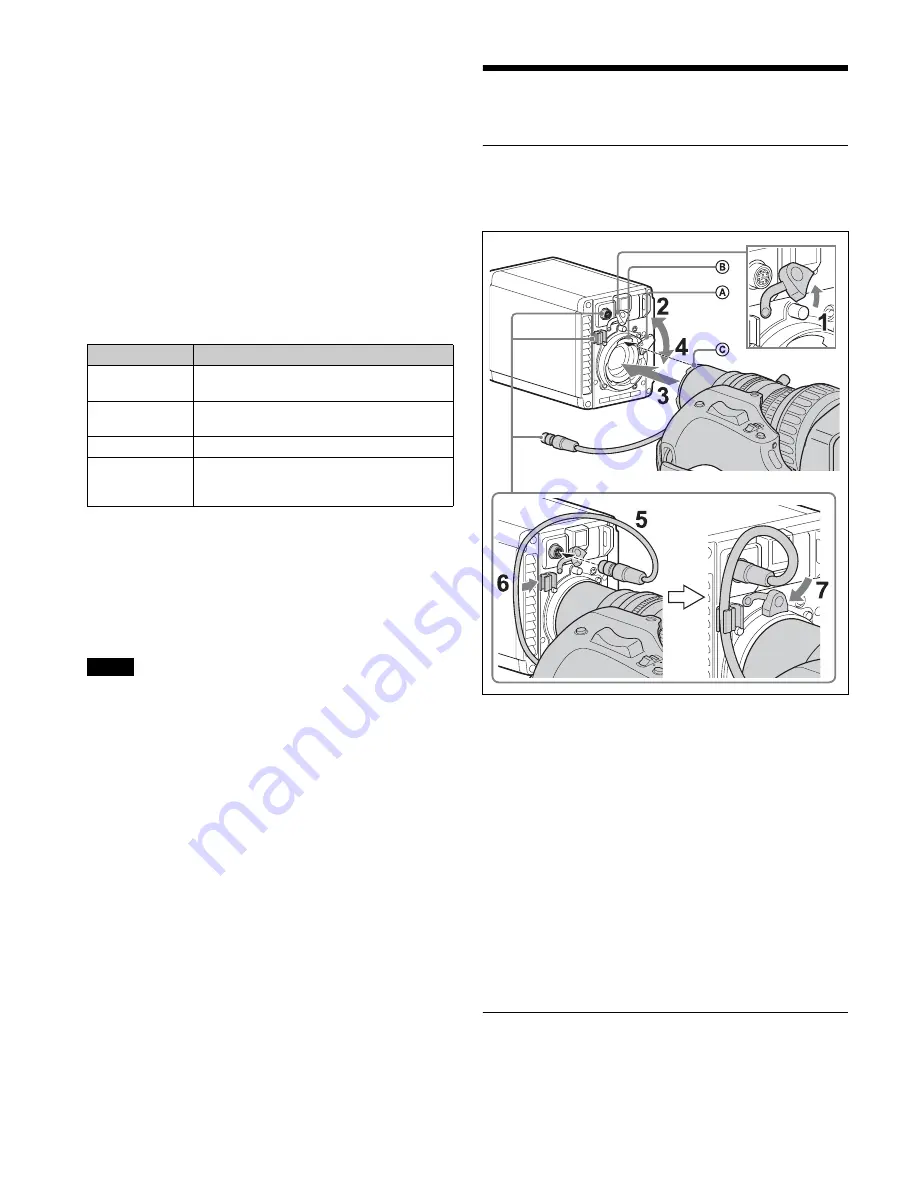
Preparations
Attaching a Lens
For information about handling lenses, refer to the operation
manual for the lens.
1
Remove the lens mount stopper rubber.
2
Push the lens fixing lever
A
upwards and remove the
lens mount cap from the lens mount.
3
Align the lens alignment pin
C
with the notch
B
in
the upper part of the lens mount and insert the lens
into the mount.
4
While supporting the lens, push the lens fixing lever
A
downwards to secure the lens.
5
Connect the lens cable to the LENS connector.
6
Secure the lens cable with the cable clamp.
7
Reattach the lens mount stopper rubber.
Adjusting the Flange Focal Length
Adjustment of the flange focal length (the distance between
the lens mount attachment plane and the imaging plane) is
necessary in the following situations:
Indication
Meaning
Both top and
bottom lit green
State is very good.
Only bottom lit
green
State is fairly good.
Only top lit yellow
State has deteriorated
Only bottom lit red State is extremely poor (the connection
between the camera and CCU (or BPU) needs
to be checked).
Note


