


1-6
DSR-25
Chapter 2
Playback and Recording
27
(GB)
Chapter 2 Playback and Recording
Checking the tape for slack
Using a paper clip or a similar object, turn the reel
gently in the direction shown by the arrow. If the reel
does not move, there is no slack.
Inserting/Ejecting Cassettes
To insert a cassette
Notes
• Do not insert the cassette forcibly. The unit may be
damaged.
• Do not eject/load the cassette in a place subject to
light. The internal sensor of the unit may operate
incorrectly if too much light falls on the unit.
1
With the unit powered on, press the EJECT button.
The cassette compartment opens.
2
After checking the tape for slack, hold the cassette
so that the tape window is facing upward, then
insert it into the unit.
Notes
• When inserting a cassette, hold the back edge of
the cassette in the center and push it until the
cassette is inserted deep into the unit. If you hold
the ends, the cassette may not be loaded properly.
• If the cassette does not load or is loaded only
halfway, eject it once, then insert it again. In such
a case, if you insert the cassette forcibly, the
cassette may not be loaded properly or
malfunctions may occur.
• It takes a few seconds for the unit to recognize
the cassette and find the proper location on the
tape being loaded.
Paper clip, etc.
Reel
The cassette is automatically loaded into the unit
and the cassette compartment closes.
To eject the cassette
1
With the unit powered on, press the EJECT button.
The cassette is unloaded and ejected.
2
Remove the cassette from the unit. Press the
EJECT button to close the cassette compartment.
Mini cassette
(Insert the mini cassette
into the center of the
cassette compartment.)
Standard
cassette
Tape window facing upward
26
(GB)
Chapter 2
Playback and Recording
Chapter 2 Playback and Recording
Notes on Video Cassettes
Chapter
2
Playback and
Recording
Notes on Video Cassettes
Usable cassettes
Use Standard-DVCAM cassettes or Mini-DVCAM
cassettes with this unit. The PDV-184 can record
programs for 184 minutes and the PDVM-40 can
record for 40 minutes (DVCAM format).
You can get the highest quality pictures with this
digital videocassette recorder using DVCAM cassettes.
Using other cassettes does not ensure sufficient
reliability. We recommend using DVCAM cassettes so
that you can record your one-time events in the highest
quality.
DVCAM cassette
Mini DVCAM cassette
Cassette memory
Cassette memory is an optional feature that is mounted
on some Standard DVCAM cassettes and Mini
DVCAM cassettes. When you record a program, the
recording date and time, and the programs’ position on
the tape are stored in the cassette memory so that you
can quickly locate the program later on.
on a
cassette indicates that you can use the cassettes to store
up to 16 kbits of data. On this unit, you can use
cassettes on which up to 16 kbits of data can be stored.
To save a recording
To prevent accidental erasure of a recording, slide in
the REC/SAVE switch on the cassette so that the red
portion becomes visible. To record on a tape, slide out
the switch so that the red portion is hidden.
REC
SAVE
REC/SAVE switch
Set to SAVE.
28
(GB)
Chapter 2
Playback and Recording
Chapter 2 Playback and Recording
Notes on Video Cassettes
Notes on Playback/Recording
No compensation for contents of the
recording
Contents of the recording cannot be compensated for if
recording or playback is not successful due to a
malfunction of the unit, video tape, etc.
Copyright precautions
On recording
You cannot record any software having copyright
protection signals on this unit. If you start recording
protected video and audio signals, a warning appears
on the monitor screen and the unit stops recording.
During recording, if you change the INPUT SELECT
selector setting, the unit may mistakenly recognize that
a copyright protected signal has been input.
On playback
When you play back software having copyright
protected signals on this unit, you may not be able to
copy it onto other equipment.
Limitations caused by differences in format
The unit can record and play back tapes recorded in
DVCAM format. It can also record and play back
tapes recorded in DV format (SP mode).
However, due to differences in format, you may not be
able to play back or edit some tapes affected by
recording conditions of the tape (e.g., a tape originally
recorded in DV format is dubbed in DVCAM format).
For details, see “Compatibility of DVCAM and DV Format”
on page 76 (GB).
If a tape has both a portion recorded in the DVCAM
format and one recorded in the DV format (SP mode),
the following limitations are applied when you play
back the tape with this unit:
• The image may be distorted and noise may occur at
the point where the recording format changes on the
tape.
• The tape transport control buttons may be disabled
until the tape speed is stabilized.
Chapter 2
Playback and Recording
29
(GB)
Chapter 2 Playback and Recording
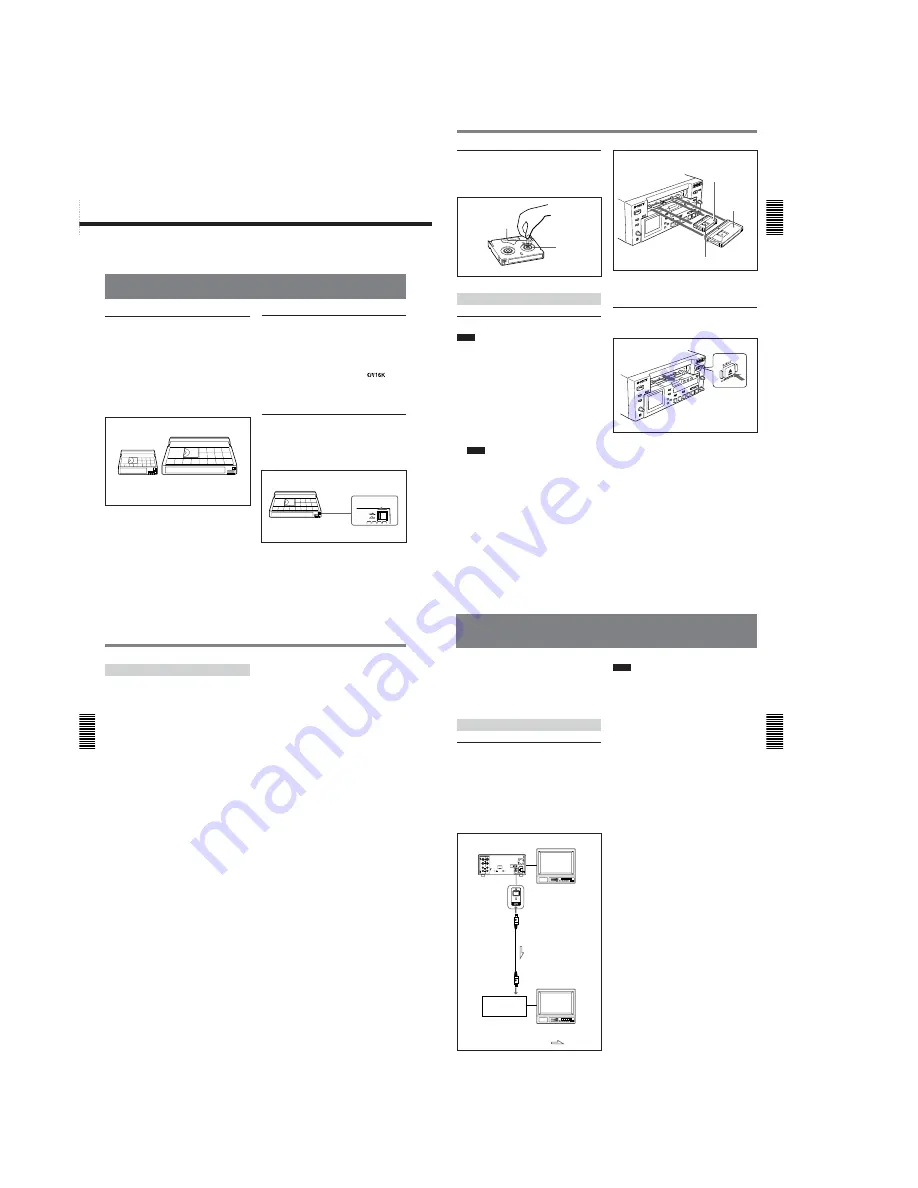
This section describes the connections, settings and
operations necessary to perform playback on this unit.
The same settings and operations apply whether you
are using the unit for dubbing or as a stand-alone
videocassette player.
Connections for Playback
To digital video equipment with a DV jack
The video and audio signals are sent with hardly any
degradation, enabling high-quality recording. The
signal flow is automatically detected so you do not
need to make separate connections for input and
output. Also, connecting the unit to an editing
controller via DV jacks, you can configure a digital
non-linear editing system.
For connections of the editing controller and this unit, refer
to the editing controller instruction manual.
Notes
• With the DV connection, data codes (recording date/
time, camera data) recorded on the source tape are
transmitted to the recorder. As a result, when you
play back a recorded tape on this unit and press the
DATA CODE button on the Remote Commander, the
same data codes as those recorded on the source tape
are displayed on the monitor screen.
• If no picture appears via the DV jack, disconnect the
i.LINK cable (DV cable), then reinsert it straight.
• For connection of the editing controller and its
peripheral devices, refer to the instruction manual of
the editing controller and that of the editing software
you use.
• Edit functions are specified by the editing software.
For details on the editing methods, refer to the
instruction manual of the editing software.
• When connecting a device that has a 6-pin DV jack to
this unit, first, connect the plug of the cable to the 6-
pin DV jack.
• If the unit is connected to a device equipped with a 6-
pin DV jack, when you intend to disconnect or
reconnect the DV cable, turn off the device and pull
out the plug of its power cord from the AC outlet
beforehand. If you connect or disconnect the DV
cable while the device is connected to the AC outlet,
high-voltage current (8 to 40 V) is output from the
DV jack of the device to this unit, which may cause a
malfunction.
• If you connect the input connectors of this unit to the
output connectors of a recorder or that of a monitor, a
humming noise may be generated or the image may
be distorted. If these phenomena occur, perform one
of the following:
– Set DV EE OUT on the VTR SET menu to OFF.
– Set the INPUT SELECT selector to a position
where a signal is not currently being input.
– Disconnect the cables.
Playback
DSR-25 (rear panel)
Monitor
i.LINK cable
(DV cable)
(not supplied)
DV jack
Digital video
equipment with a
DV jack
Monitor
: Signal flow
Содержание DVCAM DSR-25
Страница 93: ...DSR 25 2 1 4 97 4 98 RP 234 ...
Страница 99: ...DSR 25 4 109 4 110 CM 59 49 48 33 32 17 16 1 2 22 ...
Страница 106: ...DSR 25 4 123 4 124 JK 216 JK 216 VIDEO AUDIO IN OUT ...
Страница 115: ...4 138 DSR 25 JC 21 BOARD 5 5 6 MHz IC7007 7 REC PB 2 0 Vp p ra ...
Страница 122: ...4 145 DSR 25 PD 170 BOARD 2 2 qa IC901 ej REC PB 2 8 Vp p H ...
Страница 236: ... 316 Sony EMCS Co 9 929 942 11 2003E0500 1 2003 5 Published by DI Customer Center DSR 25 ...


