background image

7

DE

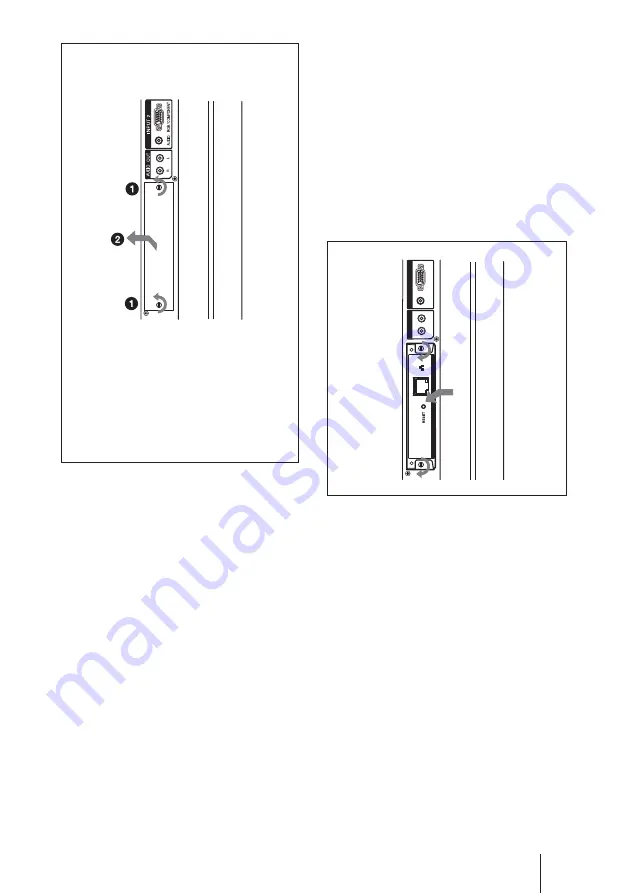
Vorbereitungen zum Arbeiten mit der Netzwerkfunktion

INPUT

 2

RGB / COMPONENT

AUDIO

L

R

AUDIO

OUT

NETWORK MANAGEMENT

1

2

2

2

Achten Sie darauf, welches die Ober-
und welches die Unterseite dieses
Geräts ist, und setzen Sie es dann
richtig herum in den Flachbildschirm
ein. Achten Sie darauf, dass der
Anschluss im Bildschirm fest
eingesteckt ist.

Ziehen Sie mit einem
Schlitzschraubenzieher die beiden
Schrauben dieses Geräts an. Schließen
Sie gegebenenfalls das LAN-Kabel an.

Vorsicht

Berühren Sie nicht die Anschlüsse im
Bildschirm.
Andernfalls besteht Verletzungsgefahr und
es kann zu Fehlfunktionen an diesem Gerät
kommen.

Wenn sich der Erweiterungssteckplatz an
der linken Seite des Bildschirms befindet*

* Die Lage des Erweiterungssteckplatzes

hängt vom Bildschirmmodell ab. Wenn Ihr
Bildschirm über mehrere
Erweiterungssteckplätze verfügt,
installieren Sie das Gerät in einem COM-
Anschluss (Steckplatz für
Netzwerkfunktionen). Schlagen Sie bitte
auch in der Bedienungsanleitung zum
jeweiligen Modell der Serie FWD nach.

Содержание BKM-FW32

Страница 1: ...ones Istruzioni per l uso BKM FW32 Network Management Adaptor 2 560 787 01 1 GB JP FR DE ES IT CS お買い上げいただきありがとうございます 電気製品は安全のための注意事項を守らないと 火 災や人身事故になることがあります この取扱説明書には 事故を防ぐための重要な注意事項と製品の 取り扱いかたを示してあります この取扱説明書をよくお読みの うえ 製品を安全にお使いください お読みになったあとは い つでも見られるところに必ず保管してください Network Management Adaptor BKM FW32 ...

Страница 2: ... スプレイ の電源を 切る 2 ディ スプレイ の電源 コー ドや接続コー ドを 抜く 3 お買い上げ店または ソニーのサービス窓 口に連絡する この装置は 情報処理装置等電波障害自主規制協議会 VCCI の基準に基づく クラスB情報技術装置です この装 置は 家庭環境で使用する こ とを目的と していますが この 装置がラジオやテレビジ ョ ン受信機に近接して使用される と 受信障害を引き起こすこ とがあ り ます 取扱説明書に従って 正しい取り扱いをしてく ださい 警告表示の意味 取扱説明書および製品で は 次のよう な表示をして います 表示の内容をよ く理解してから本文をお 読みく ださい この表示の注意事項を守 らないと 健康を害する おそれがあ り ます この表示の注意事項を守 らないと 感電やその他 の事故によ り けがを したり 周辺の物品に損害を与え たりする こ とがあ...

Страница 3: ...3JP JP 目次 注意 4 JP 使用上のご注意 5 JP このマニュアルについて 5 JP 各部の名称と働き 6 JP ネッ トワーク機能を使う 準備をする 7 JP 本機を取り付ける 7 JP システム構成 8 JP コンピューターで操作する 10 JP ディ スプレイ をコン ト ロールする 10 JP トラブル時の対処 13 JP 仕様 14 JP ...

Страница 4: ...の原因となる こ とがあ り ます お手入れの際は 電源を切って電源プラグを抜く 電源を接続したままお手入れをする と 感電の原因となる こ とがあ り ます 内部を開けない 改造しない 内部には電圧の高い部分があ り キャ ビネ ッ トや裏ぶたを開けたり改造したり する と 火災や感電の原因となる こ とがあ り ます 内部の調整や設定 点検 修理はお買い上げ店またはソニーのサービス窓口にご依頼く ださい コネクター部には 手を触れない ディ スプレイ 内部のコネク ター部には手を触れないでく ださい けがをしたり故障の原因となる こ とがあ り ます 基板の取り付けは注意深く この説明書で説明しているアダプター 拡張ボー ド をフラ ッ トパネルディ スプ レイ のスロ ッ ト に取り付ける と きは 部品や基板などの角で 手や指にけがをし ないよう に注意深く 作業してく ださい ...

Страница 5: ...説明書の画面と一部異なる場合があ り ま す 安全の為に該当ポー ト には過電圧が加わ る恐れのないネ ッ ト ワークに接続してく ださ い このマニュアル について このマニュアルでは Flat Panel Display FWDシ リ ーズに本機を取り付け ネ ッ ト ワー ク を介してご使用になる場合の操作につい て説明しています ディ スプレイ の通常の操作については FWDシリ ーズの取扱説明書をご覧く ださ い MicrosoftおよびWindowsは 米国Microsoft Corporationの米国およびその他の国における登録 商標です その他記載された商品名 会社名などは 各社の商標または登録商標です ...

Страница 6: ...JP 6 各部の名称と働き 各部の名称と働き RESETボタン 3秒以上押したままにする と 各種設定値 を初期化します ネットワーク端子 10BASE T 100BASE TX 本 機を 10BASE T 100BASE TXの LAN ケーブルでネ ッ ト ワーク と接続します ネットワーク端子 RESETボタン ...

Страница 7: ...けられているオプション アダプターの上下にあるネジ 2本 をマイナスドライバーを使って反時計 方向回りにゆるめ オプションアダプ ターをゆっくりとディスプレイ本体か ら引き出す 2 本機の上下を確かめて ディスプレイ 本体に押し込む ディ スプレイ 内部のコネク ター部を確実に 接続してく ださい 上下のネジ 2本 をマ イ ナス ドライ バーで締めて 必要な配線を してく ださい コネクター部には手を触れない ディ スプレイ 内部のコネク ター部には手を触 れないでく ださい けがを したり故障の原因 となる こ とがあ り ます INPUT 2 RGB COMPONENT AUDIO L R AUDIO OUT VIDEO S VIDEO IN OUT IN OUT R L AUDIO IN VIDEO INPUT ADAPTOR 1 2 1 オプションス ロットがディ スプレイの左 ...

Страница 8: ...ワークに接続する コンピューター コンピューター コンピューター LANケーブル LANケーブル LAN ケーブル ハブ ルーターへ LANケーブル ネット ワーク 端子 ディスプレイ 本機 LANに接続して使用するときは IPア ドレ スの設定が必要です IPア ドレスの自動取 得の環境 DHCP環境 下でご使用く ださ い 設定されたIPア ドレスの情報は ディ スプレ イ のメニューから イ ンフ ォメーシ ョ ンまたは ステータスのページで確認する こ とができ ま す ...

Страница 9: ...接続する 2 コンピューターを IP Addressを自 動的に取得する に設定する 3 本機を取り付けたディスプレイの電 源を入れる 4 約30秒後 ディスプレイのメニュー 画面で本機のIPアドレスを確認す る 5 確認したIPアドレスをコンピュー ターのブラウザーでアクセスする ご注意 アクセスできない場合には ブラウザーでProxyを使わないよう に設 定してく ださい コンピューターのIPが169 254 xxx xxx Subnet Maskが 255 255 0 0でない場 合 手動でそれぞれを設定してく ださい 6 11 JP ページの手順に従い 本機 のIPアドレスをマニュアルで設定す る 7 クロスタイプのLANケーブルをはず し 通常のストレートタイプのLAN ケーブルで接続させたいネットワー ク 固定IPを使っているネットワー ク へ接続する ご注意 設定に不具合があ...

Страница 10: ...plorer 6 0以上 を起動する 2 アドレスに http xxx xxx xxx xxx 本機のIPアドレス と入力し キー ボードのEnterキーを押す 本機の IPアドレスは ディスプレイの Information メニューで確認できます 3 画面上部の機能タブをクリックして表 示したい画面を選ぶ Information画面 Model Name モデル名 やSerial No シ リアル番号 等のディ スプレイの情報や POWER 電源 やINPUT 入力信号 な どのディ スプレイの現在の状態などを表示 します この画面は確認のみで 設定の変更はで きません Configuration画面 Timer タイマー タイ マーを設定します 設定後Applyをク リ ッ ク します Screen Saver スクリーンセーバー スク リ ーンセーバーを設定します 設定後Applyを...

Страница 11: ...Phase 色あい ボタン 色あいを調整します Set up画面 Network Password ネッ ト ワークパスワー ド の入力画面が表示されます お買い上 げ時は Name ユーザー名 root に設 定されています パスワー ドはなし 各画面で入力した情報 変更した設定など は 各画面下方の Apply をク リ ッ クする と 反映されます 特殊文字は使用できません Owner Information Owner 所有者 所有者の情報を入力します Display Location ディスプレイ設置場 所 ディ スプレイ のLocation 設置場所 を入力 します Memo メモ メモを入力しておく こ とができます Time Time 時刻 時刻と曜日を入力します 曜日については FWD 50PX1 50PX1Nには 対応していません Network Internet Pr...

Страница 12: ...ore SMTP メール送信にPOP認証が必要 SMTPサーバーに接続する際にPOP認 証を行う必要がある場合 チェ ックボック スをチェ ック してく ださい Ingoing Mail Server POP3 受信 メールサーバー POP before SMTP でのPOP認証に使 用するPOP3サーバーのア ドレスを入力し ます Account Name アカウン ト名 メールアカウン ト を入力します Password パスワー ド メールパスワー ドを入力します Send Test Mail テス ト メール送信 指定したア ド レスにメ ールが送信されるか どうか テス ト メールを送信する こ とができ ます チェックボックスをチェックして Apply をク リ ッ クする と送信されます ご注意 以下の項目が設定されていないか 設定 が正しく ない場合には エラーメ ッセージ...

Страница 13: ...機がディ スプレイ に正しく 取り付けられていない t 本機を奥までしっかり差し込み 固定ネジを締めてく ださい ネ ッ ト ワーク端子にケーブルが正しく 接続されていない t ケーブルを奥までしっかり差し込んでく ださい ネ ッ ト ワークの設定が正しく ない t コンピューターのWebブラウザから操作している場合 コン ピューターのネ ッ ト ワーク設定を確認してく ださい 本機のRESETボタ ンを3秒以上押したままにして初期設定 状態に戻し あらためて設定しなおしてく ださい ケーブルの種類が適切でない t ス ト レー ト ケーブルまたはクロスケーブルをネ ッ ト ワーク環境に 合わせてご使用く ださい トラブル時の対処 ...

Страница 14: ...E TX ネ ッ ト ワークの使 用環境によ り 接続速 度に差が生じる こ とが あ り ます その他 最大外形寸法 135 30 90 mm 幅 高さ 奥行き 質量 約120 g 消費電力 約1 0 W 動作温度 0 35 本機を装着し たディ スプレイ の環境 保存温度 10 40 LED Link 緑 Act オレンジ ケーブル長 100 m以内 カテゴリ ー 5 本機の仕様および外観は改良のため予告 なく 変更する ことがあ り ますが ご了承く だ さい 仕様 ...

Страница 15: ......

Страница 16: ...ed and found to comply with the limits for a Class B digital device pursuant to Part 15 of the FCC Rules These limits are designed to provide reasonable protection against harmful interference in a residential installation This equipment generates uses and can radiate radio frequency energy and if not installed and used in accordance with the instructions may cause harmful interference to radio co...

Страница 17: ...ion and Function of Parts and Controls 5 GB Preparations for Using the Networking Function 6 GB Installing this device 6 GB System Configuration 8 GB Operations from a Computer 10 GB Controlling the Display from a Computer 10 GB Troubleshooting 13 GB Specifications 14 GB ...

Страница 18: ...limit of the Ethernet connector About This Manual This manual explains networking operations when this device is installed in the FWD series Flat Panel Display Refer to the Operating Instructions for the FWD series for operations other than networking Microsoft and Windows are the registered trademarks of Microsoft Corporation in the United States and or other countries regions All other product a...

Страница 19: ...nction of Parts and Controls RESET button Press and hold the button for more than 3 seconds to clear the settings you made Network connector 10BASE T 100BASE TX Connect this device to the network with the LAN cable 10BASE T 100BASE TX Network connector RESET button ...

Страница 20: ...en you install this device make sure that the flat panel display is locked and stable Follow the steps below to install this device to the FWD series Flat Panel Display 1 Remove the installed option adaptor or the panel cover Refer to either of the following illustrations that applies to your Display unit INPUT 2 RGB COMPONENT AUDIO L R AUDIO OUT VIDEO S VIDEO IN OUT IN OUT R L AUDIO IN VIDEO INPU...

Страница 21: ...o the Operating Instructions for the FWD series as well 2 Check the direction top bottom of this device and insert it into the flat panel display Make sure that the connector inside the Display is firmly connected Using a slot screwdriver tighten the two screws of this device Connect the LAN cable as needed Caution Do not touch the connector inside the Display Doing so may result in injury to your...

Страница 22: ...nfiguration Connecting to the network using LAN cables When you use this device connected to a LAN you must set an IP address Use this device in a DHCP environment in which an IP address is automatically obtained You can confirm information such as the IP address assigned to this device using the Information page or the Unit Status page selected from the menus of the Display unit ...

Страница 23: ...power of the Display unit in which this device is installed 4 After about 30 seconds confirm the IP address assigned to this device using the menu screen of the Display unit 5 Access the IP address confirmed in Step 4 using your browser NOTE When you cannot access the network Set the browser of the computer to access the Internet without using a proxy server If the IP address of the computer is no...

Страница 24: ...t selector Switches the input signal PICTURE MODE picture mode Switches the picture mode ASPECT aspect Switches the width of the screen display Operations from a Computer Controlling the Display from a Computer You can perform various adjustments and settings of the Display on a computer s display Check that this device is firmly installed in the Display and that this device the personal computer ...

Страница 25: ...CP IP Under normal circumstances set this item to Obtain an IP address automatically DHCP Enter the required value address if you set it to Specify an IP address Password Names and Passwords can be set individually for the Administrator and each User The Name for the Administrator is permanently set to root Mail Report If an error occurs inside the Display unit the system immediately reports the e...

Страница 26: ...r message appears and the test e mail message cannot be sent Destination addresses The Mail Address of the Mail Account and the address of the SMTP server Advanced Advanced settings Sets the advanced settings required to use various application software on the network Refer to the setting requirements of the application software you want to use as well RESET button Press and hold this button using...

Страница 27: ...it is firmly seated and tighten the two screws The cable is not properly connected to the Network connector t Insert the plug of the cable to the connector firmly The network environment is not properly set up t When you use the computer s web browser check the network settings on the computer Press and hold the RESET button for more than 3 seconds to clear the settings and then configure the netw...

Страница 28: ... 3 16 3 5 8 inches w h d Mass Approx 120 g 4 oz Power consumption Approx 1 0 W Operating temperature 0 C to 35 C 32 F to 95 F The ambient temperature at which you use the display unit with this device installed Storage temperature 10 C to 40 C 14 F to 104 F LED Link Green Act Orange Cable length limit Within 100 m Category 5 Design and specifications are subject to change without notice ...

Страница 29: ......

Страница 30: ...osez pas cet appareil à la pluie ou à l humidité Afin d éviter tout risque d électrocution n ouvrez pas le châssis Confiez l entretien uniquement à un personnel qualifié Pour les utilisateurs au Canada Cet appareil unmérique de la classe B est conforme à la norme NMB 003 du Canada ...

Страница 31: ... des pièces et des commandes 5 FR Préparation à l utilisation de la fonction de gestion de réseaux 6 FR Installation de l appareil 6 FR Configuration système 8 FR Opérations à partir d un ordinateur 10 FR Contrôle de l écran à partir d un ordinateur 10 FR Guide de dépannage 13 FR Spécifications 14 FR ...

Страница 32: ...e du connecteur Ethernet A propos de ce manuel Ce manuel explique les opérations de gestion de réseaux lorsque l appareil est raccordé à un moniteur à écran plat de la série FWD Reportez vous au mode d emploi de la série FWD pour les opérations autres que la gestion de réseaux Microsoft et Windows sont des marques déposées de Microsoft Corporation aux Etats Unis et ou dans d autres pays régions To...

Страница 33: ...des pièces et des commandes Touche RESET Appuyez sur la touche et maintenez la enfoncée pendant plus de 3 secondes pour effacer les réglages effectués Connecteur réseau 10BASE T 100BASE TX Raccordez cet appareil au réseau à l aide du câble LAN 10BASE T 100BASE TX Connecteur réseau Touche RESET ...

Страница 34: ...tion de la prise murale Lorsque vous installez cet appareil veillez bien à ce que le moniteur à écran plat soit verrouillé et stable Suivez les étapes ci dessous pour installer cet appareil sur le moniteur à écran plat de la série FWD 1 Retirez l adaptateur en option déjà installé ou le couvercle du panneau Reportez vous aux deux illustrations suivantes concernant votre moniteur INPUT 2 RGB COMPON...

Страница 35: ...ion Ne touchez pas les connecteurs situés à l intérieur du moniteur Vous risqueriez de vous blesser ou d endommager l appareil La place de l emplacement optionnel varie selon le modèle du moniteur Si votre moniteur possède plusieurs emplacements optionnels installez le périphérique sur un port COM réservé aux communications en réseau Reportez vous également au mode d emploi de la série FWD INPUT 2...

Страница 36: ...e des câbles LAN Lorsque vous utilisez cet appareil alors qu il est raccordé à un réseau local vous devez définir une adresse IP Utilisez cet appareil dans un environnement DHCP dans lequel vous obtenez immédiatement une adresse IP Vous pouvez vérifier les informations telles que l adresse IP définie pour cet appareil à la page Information Informations ou à la page Unit Status Statut de l appareil...

Страница 37: ...pareil est installé sous tension 4 Après environ 30 secondes vérifiez l adresse IP attribuée à cet appareil à l aide de l écran de menu du moniteur 5 Accédez à l adresse IP validée à l étape 4 à l aide de votre navigateur REMARQUE Si vous ne parvenez pas à accéder au réseau Configurez le navigateur de l ordinateur de façon à pouvoir accéder à Internet sans utiliser de serveur proxy Si l adresse IP...

Страница 38: ...terrupteur Met le moniteur sous ou hors tension INPUT Sélecteur d entrée Commute le signal d entrée PICTURE MODE Mode d image Commute le mode d image Opérations à partir d un ordinateur Contrôle de l écran à partir d un ordinateur Vous pouvez exécuter divers réglages et paramétrages de l écran sur un écran d ordinateur Vérifiez que cet appareil est correctement installé dans le moniteur et que cet...

Страница 39: ...étaire Permet de saisir les informations relatives au propriétaire Display Location Emplacement du moniteur Permet de saisir l emplacement du moniteur Memo Mémo Permet d écrire des commentaires ou des notes Time Heure Time Heure Spécifiez l heure actuelle et le jour de la semaine Pour le FWD 50PX1 50PX1N spécifiez l heure actelle seulement Network Réseau Internet Protocol Protocole Internet TCP IP...

Страница 40: ...Nom du compte Saisissez le nom du compte e mail Password Mot de passe Saisissez le mot de passe du compte e mail Send Test Mail Envoyer courrier test Un e mail test peut être envoyé aux destinations spécifiées Cochez cette case à cocher et cliquez sur Apply afin d envoyer un e mail test REMARQUE Si les éléments suivants ne sont pas définis ou si les réglages sont incorrects un message d erreur app...

Страница 41: ...qu il soit correctement installé et serrez les deux vis Le câble n est pas correctement raccordé au connecteur réseau t Insérez fermement la fiche du câble dans le connecteur L environnement réseau n est pas configuré correctement t Si vous utilisez le navigateur Web de l ordinateur vérifiez les réglages réseau de ce dernier Appuyez sur la touche RESET et maintenez la enfoncée pendant plus de 3 se...

Страница 42: ...Poids Environ 120 g 4 onces Consommation Environ 1 0 W Température de fonctionnement 0 C à 35 C 32 F à 95 F Température ambiante à laquelle vous utilisez le moniteur sur lequel cet appareil est installé Température de stockage 10 C à 40 C 14 F à 104 F Voyant à DEL Link vert Act orange Limite de la longueur du câble 100 m maximum catégorie 5 La conception et les spécifications sont sujettes à modif...

Страница 43: ......

Страница 44: ...eines elektrischen Schlags zu vermeiden setzen Sie das Gerät weder Regen noch sonstiger Feuchtigkeit aus Um einen elektrischen Schlag zu vermeiden öffnen Sie das Gehäuse nicht Überlassen Sie Wartungsarbeiten stets nur qualifiziertem Fachpersonal ...

Страница 45: ...nktion der Teile und Bedienelemente 5 DE Vorbereitungen zum Arbeiten mit der Netzwerkfunktion 6 DE Installieren des Geräts 6 DE Systemkonfiguration 8 DE Betrieb von einem Computer aus 10 DE Steuern des Bildschirms von einem Computer aus 10 DE Störungsbehebung 13 DE Technische Daten 14 DE ...

Страница 46: ...sses nicht überschreitet Zu dieser Bedienungsanleitung In dieser Anleitung werden die Netzwerkfunktionen erläutert die zur Verfügung stehen wenn dieses Gerät in einem Flachbildschirm der Serie FWD installiert ist Andere Funktionen als die Netzwerkfunktionen sind in der Bedienungsanleitung zu den einzelnen Modellen der Serie FWD erläutert Microsoft und Windows sind eingetragene Warenzeichen der Mic...

Страница 47: ... als 3 Sekunden gedrückt halten werden die von Ihnen vorgenommenen Einstellungen gelöscht Netzwerkanschluss 10BASE T 100BASE TX Schließen Sie dieses Gerät über ein LAN Kabel 10BASE T 100BASE TX an das Netzwerk an Netzwerkanschluss Taste RESET Lage und Funktion der Teile und Bedienelemente ...

Страница 48: ...h beim Installieren dieses Geräts dass der Flachbildschirm sicher und stabil steht Gehen Sie wie unten erläutert vor um dieses Gerät im Flachbildschirm der Serie FWD zu installieren 1 Entfernen Sie den bereits installierten Zusatzadapter bzw die Anschlussfeldabdeckung Sehen Sie dazu in derjenigen der folgenden zwei Abbildungen nach die Ihrem Bildschirm entspricht INPUT 2 RGB COMPONENT AUDIO L R AU...

Страница 49: ... Schrauben dieses Geräts an Schließen Sie gegebenenfalls das LAN Kabel an Vorsicht Berühren Sie nicht die Anschlüsse im Bildschirm Andernfalls besteht Verletzungsgefahr und es kann zu Fehlfunktionen an diesem Gerät kommen Wenn sich der Erweiterungssteckplatz an der linken Seite des Bildschirms befindet Die Lage des Erweiterungssteckplatzes hängt vom Bildschirmmodell ab Wenn Ihr Bildschirm über meh...

Страница 50: ...ießen an ein Netzwerk über LAN Kabel Wenn Sie dieses Gerät an ein LAN anschließen müssen Sie eine IP Adresse einstellen Verwenden Sie dieses Gerät in einer DHCP Umgebung in der die IP Adresse automatisch zugewiesen wird Informationen wie die für dieses Gerät eingestellte IP Adresse werden auf der Seite Informationen oder der Seite Gerätestatus angezeigt die Sie über das Menü des Bildschirms aufruf...

Страница 51: ...es Gerät installiert ist ein 4 Überprüfen Sie nach etwa 30 Sekunden die diesem Gerät zugewiesene IP Adresse über das Menü des Bildschirms 5 Rufen Sie die in Schritt 4 ermittelte IP Adresse mit einem Browser auf HINWEIS Wenn der Netzwerkzugriff nicht möglich ist Stellen Sie den Browser des Computers so ein dass er ohne Proxy Server auf das Internet zugreift Wenn die IP Adresse des Computers nicht 1...

Страница 52: ...werden einige Funktionen nicht unterstützt Fenster Control Steuerung POWER Netzschalter Zum Ein und Ausschalten des Bildschirms INPUT Eingangswählschalter Zum Auswählen des Eingangssignals Betrieb von einem Computer aus Steuern des Bildschirms von einem Computer aus Sie können verschiedene Einstellungen am Bildschirm von einem Computerbildschirm aus vornehmen Vergewissern Sie sich dass dieses Gerä...

Страница 53: ... Owner Besitzer Geben Sie Informationen zum Eigentümer ein Display Location Display Platzierung Geben Sie den Standort des Bildschirms ein Memo Notiz Hier können Sie Kommentare oder Notizen eingeben Time Zeit Time Zeit Geben Sie die aktuelle Uhrzeit und den Wochentag ein Beim FWD 50PX1 50PX1N geben Sie nur die aktuelle Uhrzeit ein Network Netzwerk Internet Protocol Internet Protokoll TCP IP Normal...

Страница 54: ...os ein Password Passwort Geben Sie das Kennwort für das E Mail Konto ein Send Test Mail Test Mail senden Sie können eine Test E Mail an angegebene Ziele schicken Aktivieren Sie dieses Kontrollkästchen und klicken Sie auf Apply um eine Test E Mail zu senden HINWEIS Wenn die folgenden Optionen nicht oder nicht richtig eingestellt sind wird eine Fehlermeldung angezeigt und die Test E Mail wird nicht ...

Страница 55: ...est sitzt und ziehen Sie die beiden Schrauben an Das Kabel ist nicht richtig an den Netzwerkanschluss angeschlossen t Stecken Sie den Stecker des Kabels fest in den Anschluss Die Netzwerkumgebung ist nicht korrekt konfiguriert t Überprüfen Sie im Webbrowser des Computers die Netzwerkeinstellungen des Computers Halten Sie die Taste RESET zum Löschen der Einstellungen länger als 3 Sekunden gedrückt ...

Страница 56: ...bmessungen 135 30 90 mm B H T Gewicht ca 120 g Leistungsaufnahme ca 1 0 W Betriebstemperatur 0 C bis 35 C die Umgebungstemperatur bei der Sie den Bildschirm verwenden können wenn dieses Gerät installiert ist Lagertemperatur 10 C bis 40 C LED Verbindung grün Aktiv orange Max Kabellänge 100 m Kategorie 5 Änderungen die dem technischen Fortschritt dienen bleiben vorbehalten ...

Страница 57: ......

Страница 58: ...ara evitar el riesgo de incendio o electrocución no exponga la unidad a la lluvia ni a la humedad Para evitar recibir descargas eléctricas no abra el aparato Contrate exclusivamente los servicios de personal sualificado ...

Страница 59: ...componentes y controles 5 ES Preparativos para la utilización de la función de red 6 ES Instalación del dispositivo 6 ES Configuración del sistema 8 ES Operaciones desde un ordenador 10 ES Control del monitor desde un ordenador 10 ES Solución de problemas 13 ES Especificaciones 14 ES ...

Страница 60: ... Acerca de este manual Este manual describe las operaciones de red cuando el dispositivo está colocado en un monitor de panel plano de la serie FWD Consulte el manual de instrucciones de la serie FWD para obtener información sobre operaciones distintas de aquellas realizadas en red Microsoft y Windows son marcas comerciales registradas de Microsoft Corporation en los Estados Unidos y u otros paíse...

Страница 61: ...n de componentes y controles Conector de red Botón RESET Mantenga pulsado el botón durante más de 3 segundos para borrar los ajustes que ha realizado Conector de red 10BASE T 100BASE TX Conecte el dispositivo a la red mediante el cable LAN 10BASE T 100BASE TX Botón RESET ...

Страница 62: ...ando instale el dispositivo asegúrese de que el monitor de panel plano esté bloqueado y estable Para instalar este dispositivo en el monitor de panel plano de la serie FWD realice los pasos siguientes 1 Extraiga el adaptador opcional instalado o la cubierta del panel Consulte las dos ilustraciones siguientes que hacen referencia al monitor INPUT 2 RGB COMPONENT AUDIO L R AUDIO OUT VIDEO S VIDEO IN...

Страница 63: ... para apretar los dos tornillos del dispositivo Conecte el cable LAN según sea necesario Precaución No toque los conectores de la pantalla De lo contrario podría ocasionar daños personales o provocar que el dispositivo no funcione bien La situación de la ranura de opción varía dependiendo del modelo de monitor Si el monitor dispone de más de una ranura opcional instale el dispositivo en un puerto ...

Страница 64: ...a Conexión a la red mediante los cables LAN Cuando utilice este dispositivo conectado a una LAN debe ajustar la dirección IP Utilice el dispositivo en un entorno DHCP en el que la dirección IP se obtenga de forma automática Puede confirmar información como la dirección IP configurada para este dispositivo en la página Información o en la página ESTADO UNIDAD a las que se accede mediante el menú de...

Страница 65: ...en el que está instalado el dispositivo 4 Transcurridos unos 30 segundos confirme la dirección IP asignada a este dispositivo mediante la pantalla de menú del monitor 5 Acceda a la dirección IP confirmada en el paso 4 a través de su navegador NOTA Si no es posible tener acceso a la red Ajuste el navegador del ordenador para que acceda a Internet sin utilizar un servidor proxy Si la dirección IP de...

Страница 66: ...imentación Enciende o apaga el Monitor INPUT Selector de entrada Cambia la señal de entrada PICTURE MODE Modo de imagen Cambia el modo de imagen Operaciones desde un ordenador Control del monitor desde un ordenador Puede realizar varios ajustes y configuraciones en el Monitor desde la pantalla de un ordenador Compruebe que el dispositivo está firmemente instalado en el Monitor y que el dispositivo...

Страница 67: ... Display Location Ubicación del Monitor Introduzca la ubicación del monitor Memo Notas Utilice este campo para escribir comentarios o notas Time Hora Time Hora Introduzca la hora y el día de la semana actuales Para el FWD 50PX1 50PX1N introduzca sólo la hora actual Network Red Internet Protocol Protocolo de Internet TCP IP En circunstancias normales ajuste este elemento en Obtain an IP address aut...

Страница 68: ...a el nombre de la cuenta de correo electrónico Password Contraseña Introduzca la contraseña para la cuenta de correo electrónico Send Test Mail Enviar correo de prueba Puede enviarse un mensaje de correo electrónico de prueba a destinos especificados Marque esta casilla de verificación y haga clic en Apply Aplicar para enviar un mensaje de correo electrónico de prueba NOTA Si no se ajustan los ele...

Страница 69: ...ajustado firmemente y apriételo con los dos tornillos El cable no está adecuadamente conectado al conector de red t Inserte firmemente el enchufe del cable al conector El entorno de red no está configurado adecuadamente t Cuando utilice el navegador Web del ordenador compruebe la configuración de la red en el ordenador Mantenga pulsado el botón RESET durante más de 3 segundos para borrar los ajust...

Страница 70: ... pr Peso Aprox 120 g 4 oz Consumo de energía Aprox 1 0 W Temperatura de funcionamiento 0 C a 35 C 32 F a 95 F la temperatura ambiente a la que utiliza el monitor con el dispositivo instalado Temperatura de almacenamiento 10 C a 40 C 14 F a 104 F LED Conexión verde Funcionamiento Naranja Longitud máxima del cable Hasta un máximo de 100 m Categoría 5 El diseño y las especificaciones están sujetos a ...

Страница 71: ......

Страница 72: ...VVERTENZA Per evitare il pericolo di incendi o scosse elettriche non esporre l apparecchio alla pioggia o all umidità e non aprirlo Per eventuali riparazioni rivolgersi esclusivamente a personale qualificato ...

Страница 73: ...dei comandi 5 IT Preparazioni per l utilizzo della funzione di networking 6 IT Installazione del dispositivo 6 IT Configurazione di sistema 8 IT Operazioni eseguibili mediante un computer 10 IT Controllo del display da un computer 10 IT Guida alla soluzione dei problemi 13 IT Caratteristiche tecniche 14 IT ...

Страница 74: ... dispositivo è collegato al display a pannello piatto serie FWD Per le operazioni diverse da quelle di networking consultare le Istruzioni per l uso del modello serie FWD Microsoft e Windows sono marchi di fabbrica registrati di Microsoft Corporation negli Stati Uniti e o in altri paesi regioni Tutti gli altri nomi di prodotti o aziende citati nel presente manuale sono marchi di fabbrica o marchi ...

Страница 75: ...lle parti e dei comandi Tasto RESET Tenere premuto il tasto per oltre 3 secondi per annullare le impostazioni effettuate Connettore di rete Tasto RESET Connettore di rete 10BASE T 100BASE TX Collegare il presente dispositivo alla rete mediante il cavo LAN 10BASE T 100BASE TX ...

Страница 76: ...sa di rete Durante l installazione del presente dispositivo assicurarsi che il display a pannello piatto sia saldamente bloccato e in una posizione stabile Per installare il presente dispositivo sul display a pannello piatto serie FWD seguire la procedura descritta di seguito 1 Rimuovere l adattatore opzionale precedentemente installato o il coperchio del pannello fare riferimento alle due illustr...

Страница 77: ...le due viti del dispositivo utilizzando un cacciavite Collegare il cavo LAN se necessario Attenzione Non toccare i connettori del display onde evitare di ferirsi o di causare problemi di funzionamento del presente dispositivo Se lo slot opzionale è situato sul lato sinistro del display La posizione dello slot opzionale varia in base al modello di display Se il display dispone di piu slot opzionali...

Страница 78: ...cavi LAN Se il dispositivo viene utilizzato mentre è collegato a una rete LAN è necessario impostare un indirizzo IP Utilizzare il dispositivo in un ambiente DHCP in cui è possibile ottenere un indirizzo IP in modo automatico È possibile confermare le informazioni quali l indirizzo IP impostato per il dispositivo nella pagina Informazioni o nella pagina Stato apparecchio a cui accedere mediante il...

Страница 79: ...e un indirizzo IP sul computer 3 Accendere il display in cui è installato il presente dispositivo 4 Dopo circa 30 secondi confermare l indirizzo IP assegnato al dispositivo utilizzando la schermata del menu del display 5 Accedere all indirizzo IP confermato al punto 4 utilizzando il browser NOTA Se non è possibile accedere alla rete Impostare il browser del computer in modo da accedere a Internet ...

Страница 80: ...attivare o disattivare l alimentazione del display INPUT selettore di ingresso Consente di attivare il segnale di ingresso PICTURE MODE modo immagine Consente di attivare il modo immagine Operazioni eseguibili mediante un computer Controllo del display da un computer È possibile effettuare varie regolazioni e impostazioni del display mediante le schermate di un computer Verificare che il presente ...

Страница 81: ...mation Informazioni sull utente Owner Utente Immettere le informazioni relative all utente Display Location Posizione display Immettere la posizione del display Memo Promemoria In questo campo è possibile digitare commenti o note Time Ora Time Ora Inserire l ora attuale e il giorno della settimana Per il modello FWD 50PX1 50PX1N inserire solamente l ora attuale Network Rete Internet Protocol TCP I...

Страница 82: ...lettronica Password Password Immettere la password dell account di posta elettronica Send Test Mail Invia messaggio di prova È possibile inviare un messaggio di posta elettronica di prova a destinazioni specifiche Per inviare un messaggio di posta elettronica di prova selezionare questa casella di controllo quindi fare clic su Apply Operazioni eseguibili mediante un computer NOTA Se le voci riport...

Страница 83: ...è installato in modo saldo quindi stringere le due viti Il cavo non è collegato correttamente al connettore di rete t Inserire la spina del cavo nel connettore in modo saldo L ambiente di rete non è configurato correttamente t Se viene utilizzato il browser Web del computer controllare le impostazioni di rete del computer stesso Tenere premuto il tasto RESET per oltre 3 secondi per annullare le im...

Страница 84: ...l a p Peso Circa 120 g Consumo energetico Circa 1 0 W Temperatura di utilizzo Da 0 C a 35 C temperatura ambiente in cui il display viene utilizzato con il presente dispositivo installato Temperatura di deposito Da 10 C a 40 C Spia Collegamento verde Funzionamento arancione Limite di lunghezza del cavo Massimo 100 m categoria 5 Il design e le caratteristiche tecniche sono soggetti a modifiche senza...

Страница 85: ......

Страница 86: ...CS 2 警告 为避免引发意外的火灾或遭受雷击的危 险 请勿将本机置于雨点所及或者潮湿的地 方 不可打开本机机壳 以免遭受电击 除 非是本公司指定的合格技术员 请勿进行维 修 ...

Страница 87: ...3CS 目录 使用前须知 4 CS 关于本手册 4 CS 部件和控制器的位置和功能 5 CS 使用网络功能的准备 6 CS 安装本装置 6 CS 系统结构 8 CS 从电脑操作 10 CS 从电脑控制显示器 10 CS 故障排除 13 CS 规格 14 CS CS ...

Страница 88: ...前须知 请注意 软件规格若有变更 恕不另 行通知 本手册中的某些插图可能与实际的应 用软件不同 为确保安全 连接的Ethernet网络不 能超出Ethernet连接器的电压限制 关于本手册 本手册说明本装置连接到FWD系列 平面显示器时的网络操作 有关网络以外的操作 请参阅FWD系 列的使用说明书 Microsoft和Windows是微软公司在美国和 或其他国家 地区的注册商标 本手册中所提到的其他产品和公司名是其相应公司的商标或注册商标 ...

Страница 89: ...5CS 部件和控制器的位置和功能 部件和控制器的位置和功能 RESET键 按住该键3秒钟以上 清除所做的 设定 网络连接器 10BASE T 100BASE TX 使用局域网电缆 10BASE T 100BASE TX 将本装置连接至网络 网络连接器 RESET键 ...

Страница 90: ...关闭显示器的电 源 请按 1 开关以使显示器改变为待 机状态 然后从墙上插座拔下电源 线 安装时 请确认平面显示器稳定牢 固 按以下步骤将本装置安装到FWD系 列平面显示器上 1 取下已安装的可选适配器或面板 盖 参见下图中适用于您的显示 器的图示 INPUT 2 RGB COMPONENT AUDIO L R AUDIO OUT VIDEO S VIDEO IN OUT IN OUT R L AUDIO IN VIDEO INPUT ADAPTOR 1 2 1 当选项插槽位于显示器的左侧时 显示器不同 选项插槽的位置也不同 如 果显示器有一个以上的选项插槽 请将本 装置安装在用于网络连接的COM端口的 插槽上 有关信息请参阅FWD系列的使 用说明书 ...

Страница 91: ... 器在显示器内部连接牢固 用一字螺丝刀拧紧2颗螺钉 按需要 连接局域网电缆 小心 请勿触摸显示器的连接器 否则 会导致您本人受伤或本装置故障 INPUT 2 RGB COMPONENT AUDIO L R AUDIO OUT N E T W O R K M A N AG E M E N T 1 2 2 当选项插槽位于显示器的左侧时 显示器不同 选项插槽的位置也不同 如 果显示器有一个以上的选项插槽 请将本 装置安装在用于网络连接的COM端口的 插槽上 有关信息请参阅FWD系列的使 用说明书 ...

Страница 92: ...CS 8 使用网络功能的准备 局域网电缆 局域网电缆 局域网电缆 局域网电缆 电脑 电脑 电脑 至网络集线 器 路由器 网络连接器 显示器 本装置 系统结构 使用局域网电缆连接至网络 当您使用连接到局域网的本装置 时 必须设定IP地址 在自动获得IP地 址的DHCP环境下使用本装置 您可以进入显示器菜单的 Information或Unit Status页面来确认 IP地址等信息 ...

Страница 93: ...用交叉局域网电缆将本装置 连接到电脑上 2 在电脑上选择 Obtain an IP address automatically 自动获 得IP地址 3 打开安装了本装置的显示器电源 4 约30秒钟后 使用显示器菜单屏幕 确认指定给本装置的IP地址 5 使用浏览器访问在步骤4中确认的 IP地址 注意 当您无法访问网络时 将电脑浏览器设定为不使用代理服务 器访问互联网 如果电脑的IP地址不是 169 254 xxx xxx或子网掩码不是 255 255 0 0 将设定值改变为这些地 址值 6 按照第11页 CS 中的步骤手动设 定IP地址 7 断开交叉局域网电缆 然后使用直 通局域网电缆将本装置连接到使用 固定IP地址的网络上 注意 如果连接配置错误 按住RESET键3秒 钟以上 清除设定 然后从步骤1开始 重复设定 ...

Страница 94: ...功能的详情 请参阅FWD系列 的使用说明书 由于显示器型号的原因 有些功能 可能不被支持 Control 控制 视窗 POWER 电源开关 打开或关闭显示器电源 INPUT 输入选择器 切换输入信号 PICTURE MODE 图像模式 切换图像模式 ASPECT 宽高比 切换屏幕显示的宽度 从电脑操作 从电脑控制显示器 您可以从电脑显示器上对本显示器 进行各种调节和设定 检查本装置在显 示器上安装牢固 个人电脑 路由器或 集线器已通过局域网电缆连接好 然后 打开显示器 电脑和路由器或集线器 四个控制视窗可以使用 Information Configuration Control和Setup 每 个视窗功能各不相同 有关各个键功能的详情 请参阅FWD 系列使用说明书 1 启动电脑浏览器 Internet Explorer6 0或以上版本 2 输入 http xxx xxx xxx xxx 本...

Страница 95: ... 通常情况下 此项设为 Obtain an IP address automatically DHCP 自动获得IP地址 DHCP 如果此 项设为 Specify an IP address 指定 IP地址 则输入所需的值 地址 Password 口令 名称和口令可由管理员和每个用户 单独设定 管理员的名称被永久性地设 为 root Mail Report 邮件报告 如果显示器发生错误 系统立即通 过发送电子邮件 错误报告 报告错 误 FWD 50PX1 50PX1N除外 Address 目的地 在每个文本框内输入电子邮件地 址 错误报告可以同时发送到四个目的 地 每个电子邮件地址最多可输入64个 字符 Mail Account 邮件帐户 Mail Address 邮件地址 输入本装置指定地电子邮件地址 每个地址最多可输入64个字符 Outgoing Mail Server SMTP 发送...

Страница 96: ...est Mail 发送测试邮件 测试电子邮件消息会被发送到指定 目的地 勾选该复选框并单击Apply 应 用 发送测试电子邮件 注意 如果未设定下列项目或设定不正 确 会出现错误消息且不能发送测试电 子邮件消息 目的地地址 Mail Account 邮件帐户 的Mail Address 邮件地址 以及SMTP服 务器的地址 Advanced 高级 高级设定 进行高级设定需要各种网络应用软 件 请参阅您想使用的应用软件的设定 要求 RESET 重设 键 使用细棒按住此键3秒钟以上 清 除所有在Setup窗口中所做的设定 从电脑操作 ...

Страница 97: ...南试作诊断并解决问题 如果问题仍不能解 决 请向有资格的Sony专业人员咨询 症状 未建立至网络的连接 原因和对策 本装置未被正确安装 t 将本装置推入插槽直至其接合牢固并拧 紧2颗螺钉 电缆未正确连接到网络连接器上 t 将电缆插头牢固地插入转接器 网络环境设定不正确 t 当您使用电脑的网络浏览器时 检查电 脑的网络设定 按住RESET键3秒钟以上 清除设定 然后重新配置网络环境 用来将本装置连接至网络的电缆不正确 t 使用适合您的网络环境的直通或交叉电 缆 ...

Страница 98: ... 网络 10BASE T 100BASE TX 不 同的网络环境下 网 络连接速度也不同 一般 尺寸 135 30 90 mm 5 3 8 1 3 16 3 5 8 inches 宽 高 深 重量 约 120 g 功耗 约 1 0 W 工作温度 0 C 至 35 C 安装本装置的显示 器的环境温度 保存温度 10 C 至 40 C LED 连接 绿色 工作 橙色 电缆长度限制 100 m以内 5类 设计与规格若有变更 恕不另行通 知 ...

Страница 99: ......

Страница 100: ...Sony Corporation Printed in Japan Printed on 100 recycled paper この説明書は100 古紙再生紙を使用しています ...

Отзывы: