


1-7
BKM-B30NW
12
(GB)
Setting up a wireless LAN environment
When you are using a wireless LAN PC card, it is also
necessary to set up the Network Adaptor following the
steps below.
Using a wireless LAN access point
Set up the access point you are connecting to as
follows.
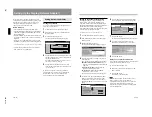
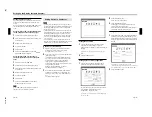
1
Click Desktop View in the Start up window.
2
From the Start menu, click Control Panel in the
Desktop window.
3
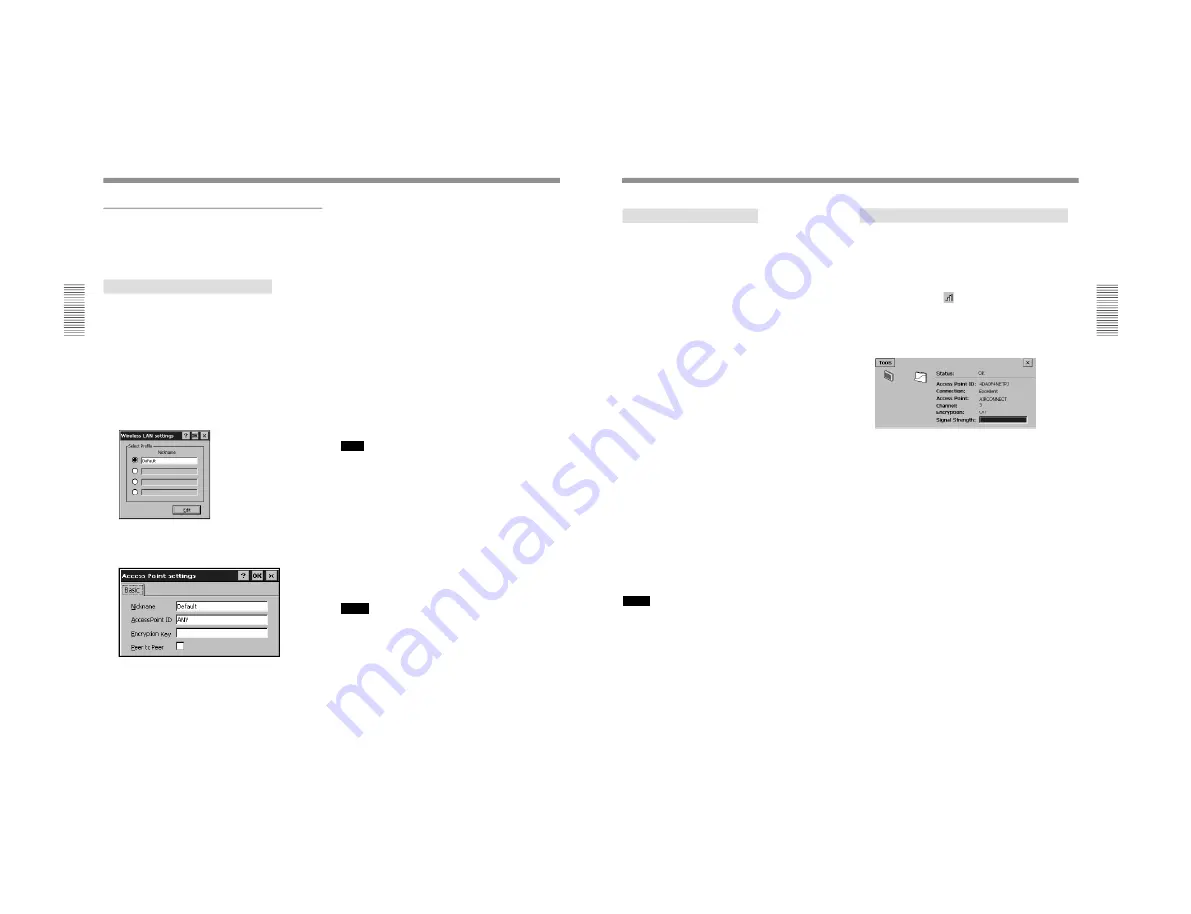
Double-click the Wireless LAN icon.
The Wireless LAN settings dialog box appears.
4
Click the Edit button.
The Access Point settings dialog box appears.
5
Enter a Nickname.
The Nickname identifies the access point. Enter up
to 32 characters for the Nickname using
alphanumeric characters and symbols (ASCII
characters). If multiple access points exist, make
sure to assign a different name to each one.
6
Enter the Access Point ID.
Type the ID specified for the access point you are
connecting to.
7
Enter the Encryption Key.
Type the encryption key, if it is set and is active on
the access point.
8
Click the OK button.
The Wireless LAN settings dialog box reappears.
9
Click the radio button of the Nickname you want
to use, and click the OK button.
Connection is made to the selected access point.
To connect to an access point which is
already configured
If multiple access points exist, you can assign up to
four Nicknames for them. If you want to connect to an
access point which is already configured, select a radio
button next to the relevant Nickname then click the
OK button in the Wireless LAN settings window.
Connection is made to the selected access point.
Note
When the manufacturer of the wireless LAN card
inserted into the Display (Network Adaptor) and that
of the wireless LAN access point are not the same,
how to enter the encryption key may differ. If the
encryption key appears in hexadecimal values, enter
the hexadecimal values for Encryption Key.
When no communication is taking place
between the access point and the Display
(Network Adaptor)
If the channel for the access point is set to 12–14, set it
to any channel between 1 and 11.
Notes
• Contact qualified Sony personnel if any trouble
occurs when you are using the specified/
recommended Sony wireless LAN PC card.
• If the manufacturer of the wireless LAN card and
that of the wireless LAN access point are not the
same, communication by enabled encryption does not
take place correctly.
Setting Up the Display (Network Adaptor)
13
(GB)
Peer to Peer (Ad-hoc) mode
To connect to a wireless LAN between the Display
(Network Adaptor) and computers without using the
wireless LAN access point, follow the steps below on
the Display (Network Adaptor) only.
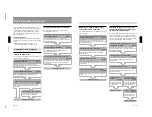
1
Follow steps
1
to
5
in “Using the wireless LAN
access point.” In the Access Point settings dialog
box, set the Nickname of this mode.
2
Click the checkbox next to Peer to Peer.
3
Enter an optional Access Point ID.
You can type up to 32 alphanumeric characters for
the ID.
4
Enter the Encryption Key if you want to make it
active.
5
Click the OK button.
The Wireless LAN settings dialog box reappears.
6
Click the radio button of the Nickname you entered
in step
1
.
The Peer to Peer mode takes effect.
For connected computers, it is necessary to enter the
same Access Point ID, Encryption Key and Nickname
as those entered in the procedure above. For details,
refer to the Operating Instructions of the wireless LAN
PC card inserted into the computers.
Notes
• Use wireless LAN PC cards of the same
manufacturer both for the Display (Network Adaptor)
and the computer.
• If Peer to Peer (Ad-hoc) is configured on one of the
connected computers, perform step
1
, then steps
3
to
6
above to enter the same Access Point ID and
Encryption Key as those of the computer and an
optional Nickname on the Display (Network
Adaptor).
• Select Peer to Peer (Ad-hoc) only for one of the
Display (Network Adaptor) and computers on the
same LAN.
• When you use Peer to Peer (Ad-hoc) mode, you need
to set a dedicated IP address and Subnet Mask for this
mode on the Display (Network Adaptor) and the
computer.
Checking connection with the access point
You can check if the Display (Network Adaptor) is
correctly connected to the access point.
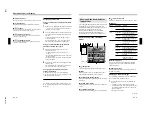
1
Click Desktop View in the Start up window.
2
Double-click the
(reception level indicator) icon
on the task bar of the Desktop window.
The window that indicates the connection status
between the Display (Network Adaptor) and the
access point appears.
3
Check the following.
• Status: Shows OK if the Display (Network
Adaptor) has a correct recognition of the wireless
LAN PC card.
• Access Point ID
• Connection: Connection status with the access
point
• Access Point: Information about the connected
access point
• Channel: Assigned channel
• Encryption Key: Encryption enabled or disabled
on the connected access point
• Signal Strength: Signal level for communication
between the Display (Network Adaptor) and the
access point
When Access Point ID shows “searching”
Verify if the Nickname, Access Point ID and
Encryption Key are correct. Selecting Edit wireless
Profiles... from the Tools menu opens the Wireless
LAN settings window. If any of the items is not
correct, correct it following steps
4
through
9
on page
12 (GB).
Содержание BKM-B30NW
Страница 1: ... SERVICE MANUAL NETWORK ADAPTOR BKM B30NW US CND AEP E MODEL DEST CHASSIS NO MODEL DEST CHASSIS NO ...
Страница 6: ......
Страница 31: ...2 1 BKM B30NW Section 2 Service Informations 2 1 Board Layout QN PC card assembly ...
Страница 36: ......
Страница 44: ......
Страница 46: ...Sony Corporation B P Company 9 870 310 01 English 01GY22 1 Printed in Japan 2001 7 ...


