background image

87

U

si

n

g

 a 
Co
m

p

ut

er

• Do not connect your camcorder to the computer 

at this point.

• The computer may not recognize the camcorder 

if you connect them with the USB cable before 
turning on your camcorder.

• See page 89 for the recommended connection.

1

Turn on the computer.

Close down all applications running on 
the computer.

For Windows 2000/Windows XP

Log on as an Administrator.

2

Insert a “Memory Stick Duo” into 
your camcorder.

3

Prepare the power source for 
your camcorder.

Use the supplied AC Adaptor to obtain 
AC power (p. 18).

4

Set the POWER switch to VCR.

5

Press the MENU button.
The menu index screen is 
displayed.

6

Select  

(OTHERS) 

t

 [USB 

SELECT] 

[


Memory Stick] 

with the SEL/PUSH EXEC dial 
(p. 74).

7

Connect the USB cable to the   
(USB) jacks on your camcorder 
and your computer.

It may take a while until your computer 
recognizes your camcorder for the first 
time.

For Windows users

Double-click the [Removable Disk] icon 
displayed in [My Computer]. Then, drag 
and drop a picture in the folder onto the 
hard disk drive of your computer.

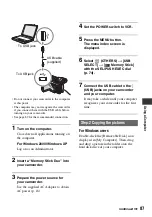
To USB jack

USB cable 
(supplied)

To USB jack

Step:2 Copying the pictures

Continued 

,

Содержание 1080i

Страница 1: ...nformation on this product and answers to frequently asked questions can be found at our Customer Support Website US Digital HD Video Camera Recorder Operating Guide HDR FX7 Enjoying pictures with high definition quality 12 Getting Started 16 Recording Playback 28 Using the Menu 56 Dubbing Editing 76 Using a Computer 86 Troubleshooting 92 Additional Information 104 Quick Reference 119 ...

Страница 2: ...esence of uninsulated dangerous voltage within the product s enclosure that may be of sufficient magnitude to constitute a risk of electric shock to persons This symbol is intended to alert the user to the presence of important operating and maintenance servicing instructions in the literature accompanying the appliance WARNING ...

Страница 3: ...Never spill liquid of any kind on the set Attachments Do not use attachments not recommended by the manufacturer as they may cause hazards Cleaning Unplug the set from the wall outlet before cleaning or polishing it Do not use liquid cleaners or aerosol cleaners Use a cloth lightly dampened with water for cleaning the exterior of the set Water and Moisture Do not use power line operated sets near ...

Страница 4: ...fied in the operating instructions Improper adjustment of other controls may result in damage and will often require extensive work by a qualified technician to restore the set to normal operation When the set exhibits a distinct change in performance this indicates a need for service Servicing Do not attempt to service the set yourself as opening or removing covers may expose you to dangerous vol...

Страница 5: ...id your authority to operate this equipment Note This equipment has been tested and found to comply with the limits for a Class B digital device pursuant to Part 15 of the FCC Rules These limits are designed to provide reasonable protection against harmful interference in a residential installation This equipment generates uses and can radiate radio frequency energy and if not installed and used i...

Страница 6: ...emory are incompatible p 105 Types of Memory Stick you can use in your camcorder There are two sizes of Memory Stick You can use Memory Stick Duo marked with or p 106 Memory Stick Duo This size can be used with your camcorder Memory Stick You cannot use it in your camcorder b Note You cannot use any type of memory card except Memory Stick Duo Memory Stick PRO and Memory Stick PRO Duo can be used o...

Страница 7: ...un Doing so might cause your camcorder to malfunction Take pictures of the sun only in low light conditions such as at dusk On recording Before starting to record test the recording function to make sure the picture and sound are recorded without any problems Compensation for the contents of recordings cannot be provided even if recording or playback is not possible due to a malfunction of the cam...

Страница 8: ... media and other accessories are subject to change without notice About the Carl Zeiss lens Your camcorder is equipped with a Carl Zeiss lens which was developed jointly by Carl Zeiss in Germany and Sony Corporation and produces superior images It adopts the MTF measurement system for video cameras and offers a quality typical of a Carl Zeiss lens Also the lens for your camcorder is T coated to su...

Страница 9: ...Duo 26 Recording 28 Playback 31 Changing the settings of your camcorder recordings 33 Adjusting the zoom 33 Adjusting the focus manually 34 Adjusting the EXPOSURE IRIS 35 Adjusting to Natural Color White balance 38 Customizing the picture quality Picture profile 39 Assigning the functions to the ASSIGN buttons 42 Focusing on a distant subject Focus infinity 43 Recording an index signal 44 Reviewin...

Страница 10: ...ET menu 65 Display settings of the display and the viewfinder MARKER VF B LIGHT DATA CODE etc IN OUT REC menu 69 Recording settings input and output settings VCR HDV DV DV REC MODE DV WIDE REC TV TYPE etc MEMORY SET menu 71 Settings for the Memory Stick Duo QUALITY ALL ERASE etc OTHERS menu 73 Settings while recording on a tape or other basic settings USB SELECT QUICK REC BEEP etc Dubbing to VCR D...

Страница 11: ... recording playback 105 About the Memory Stick 106 About the InfoLITHIUM battery pack 108 About i LINK 110 Maintenance and precautions 111 Specifications 115 Identifying parts and controls 119 Indicators for the LCD screen and viewfinder 124 Index 127 Troubleshooting Additional Information Quick Reference ...

Страница 12: ...bit rate of about 25 Mbps These operating instructions refer to the HDV1080i specification as HDV format unless there is a need to specify Why shoot in the HDV format By moving to digital video like the rest of the world you will be able to capture important moments in your life in high quality digital HDV format allowing you to relive them Your camcorder s down convert function converts pictures ...

Страница 13: ...lled The Carl Zeiss Vario Sonnar T 20 optical zoom lens lets you zoom in on distant objects and record in high definition quality 3 Realistic sound recording with built in high performance microphone The high performance stereo microphone built into this camcorder enables highly realistic sound recording 4 Detailed manual settings for serious filming Extensive manual setting functions allow you to...

Страница 14: ...es including brightness color etc can be saved in your camcorder This enables you to use saved settings data to quickly reproduce suitable shooting settings You can adjust the brightness using the EXPOSURE IRIS dial The EXPOSURE IRIS dial can be used to adjust EXPOSURE IRIS or AE SHIFT Still image Dual Rec p 30 Smooth slow recording p 59 Saving Camera profile p 73 EXPOSURE IRIS dial p 35 ...

Страница 15: ...l i LINK cable allows you to copy pictures in HD high definition quality x Connecting to HDV1080i non compliant specification Use your camcorder to convert HDV format video to SD standard definition quality to enable copying x Copying Memory Stick Duo still images to a computer x Copying movie from tape to a computer You can copy movie to a computer and save to DVD from copying movie The computer ...

Страница 16: ... are not included See page 26 105 and 106 for compatible cassettes and Memory Stick Duo for your camcorder AC Adaptor 1 p 18 Power cord 1 p 18 Wireless Remote Commander 1 p 123 A button type lithium battery is already installed A V connecting cable 1 p 51 76 Component video cable 1 p 51 USB cable 1 p 86 Large eyecup 1 p 23 Rechargeable battery pack NP F570 1 p 18 108 Lens hood with lens cover 1 p ...

Страница 17: ...ns hood fixing screw and turn the lens hood in the opposite direction of the arrow in the illustration above z Tip If you attach remove or adjust an 62mm 2 1 2in PL filter or MC protector remove the lens hood To open the shutter of the Lens hood with lens cover Move the lens cover lever up and down to open or close the lens cover 1 2 Lens hood fixing screw Move the lens cover lever to OPEN to open...

Страница 18: ...ies p 108 1 Press the battery pack and slide it down 2 With the B mark on the DC plug facing the cassette compartment connect the AC Adaptor to the DC IN jack on your camcorder 3 Connect the power cord to the AC Adaptor 4 Connect the power cord to the wall outlet 5 Set the POWER switch to OFF CHG The CHARGE lamp lights up and charging starts DC IN jack DC plug AC Adaptor Power cord To the wall out...

Страница 19: ... format Recording in the DV format Top When the LCD backlight turns on Middle When the LCD backlight turns off Bottom Recording time when recording with the viewfinder while the LCD panel is closed Typical recording time shows the time when you repeat recording start stop turning the power on off and zooming Battery pack Charging time NP F570 supplied 260 NP F770 370 NP F970 485 BATT RELEASE batte...

Страница 20: ...temperatures The recording and playback time will be shorter depending on the conditions under which you use your camcorder You can use the AC Adaptor to obtain AC While you are using the AC Adaptor the battery pack will not lose its charge even when it is attached to your camcorder Connect your camcorder as shown in Step3 Charging the battery pack p 18 On the AC Adaptor Use the nearby wall outlet...

Страница 21: ... or edit pictures b Note After you have set the date and time CLOCK SET p 24 the next time you turn on the power of your camcorder the current date and time will be displayed on the LCD screen for a few seconds 2 Hold the camcorder properly 3 Ensure a good grip then fasten the grip belt To turn off the power Slide the POWER switch to OFF CHG b Note If warning messages appear on the screen follow t...

Страница 22: ... button for a few seconds until appears This setting is practical when you use your camcorder in bright conditions or where you want to save battery power The recorded picture will not be affected by the setting To turn on the LCD backlight press and hold the DISPLAY BATT INFO button for a few seconds until disappears z Tip See LCD BRIGHT p 67 to adjust the brightness of the LCD screen You can vie...

Страница 23: ... bright circumstances use the supplied large eyecup To attach the large eyecup stretch it slightly and align it with the eyecup groove in the viewfinder You can attach the large eyecup facing either the right or left side b Note Do not remove the pre attached eyecup Large eyecup supplied Attach with the protruding part at the top ...

Страница 24: ... 1 Press the MENU button 2 Select OTHERS by turning the SEL PUSH EXEC dial then press the dial 3 Select CLOCK SET by turning the SEL PUSH EXEC dial then press the dial 4 Set Y year by turning the SEL PUSH EXEC dial then press the dial You can set any year up to the year 2079 5 Set M month D day hour and minute then press the dial The clock starts For midnight set it to 12 00 AM For midday set it t...

Страница 25: ...g recording but they are automatically recorded on the tape and can be displayed during playback DATA CODE p 67 You can change the on screen displays to show messages in a specified language Select the screen language in LANGUAGE p 74 Changing the language setting ...

Страница 26: ...ically slides back in b Note Do not push the portion marked while it is sliding in It may cause a malfunction 3 Close the lid z Tip The recordable time varies depending on DV REC MODE p 69 To eject the cassette Open the lid following the same procedure as described in step 1 and remove the cassette You can use only a Memory Stick Duo marked with or p 106 1 Open the jack cover Cassette tape OPEN EJ...

Страница 27: ...mage data may be damaged To eject a Memory Stick Duo Lightly push the Memory Stick Duo once b Notes When the access lamp is lit or flashing your camcorder is reading writing data Do not shake or knock your camcorder turn the power off eject the Memory Stick Duo or remove the battery pack Otherwise image data may be damaged When inserting or ejecting the Memory Stick Duo be careful with the Memory ...

Страница 28: ...ovies in either HDV or DV format The factory setting is HDV format REC FORMAT p 69 1 Open the shutter of the lens hood 2 While pressing the green button set the POWER switch to CAMERA Lens food REC START STOP button B POWER switch REC START STOP button A Rec lamp PHOTO EXPANDED FOCUS button Rec lamp If the POWER switch is set to OFF CHG slide it while pressing the green button ...

Страница 29: ... WIDE REC p 70 You can change the screen display during recording p 47 Indicators displayed on the screen during recording are shown on page 124 The recording lamp can be set to stay off REC LAMP p 75 You cannot record the movie on a Memory Stick Duo To record in mirror mode Open the LCD panel 90 degrees to the camcorder 1 then rotate it 180 degrees toward the lens 2 z Tip A mirror image of the su...

Страница 30: ...he shutter click The still image size is as follows When recording in HDV or DV 16 9 format 1 2M 1 440 810 dots When recording in DV 4 3 format 0 9M 1 080 810 dots You can change the image quality and number of recordable images QUALITY p 71 Indicators displayed on the screen during shooting are shown on page 124 You can set the PHOTO EXPANDED FOCUS button to start the expanded focus function as y...

Страница 31: ...laying back a tape recorded in the HDV and DV formats and the signal switches between HDV and DV the picture and sound disappear temporarily You cannot play back the tape recorded in the HDV format on video cameras of the DV format or mini DV players z Tips Indicators displayed on the screen during playback are shown on page 125 You can change the screen display during playback p 47 To play back t...

Страница 32: ...e the POWER switch to VCR 2 Press the MEMORY PLAY button 3 Select still image that you want to look using the VOLUME MEMORY button To stop viewing still images press the MEMORY PLAY button once more To display the list of still photos index screen 1 Slide the POWER switch to VCR 2 Press the MEMORY INDEX button 3 Select a picture by pressing the VOLUME MEMORY button To display a single image move B...

Страница 33: ...zoom lever may also be recorded 1 Set the handle zoom switch B to H high or L low z Tip You can set the zoom speed of the handle zoom lever in HANDLE ZOOM p 61 2 Press the handle zoom lever A to zoom in or out b Notes You cannot adjust the zoom speed by pressing the handle zoom lever You cannot use the handle zoom lever when the handle zoom switch is set to OFF You cannot change the zoom speed of ...

Страница 34: ... to OFF CHG for more than 12 hours z Tips For focusing manually It is easier to focus on the subject when you use the zoom function Move the power zoom lever towards T telephoto to adjust the focus and then towards W wide angle to adjust the zoom for recording When you want to record a close up image of a subject move the power zoom lever towards W wide angle to fully magnify the image then adjust...

Страница 35: ...OSURE IRIS dial G from the menu p 59 z Tips Even if you open the aperture more than F2 8 i e make the iris value smaller such as F1 6 during camera EXPOSURE IRIS setting changing the zoom from wide to telephoto will change the iris to F2 8 When the EXPOSURE IRIS dial is set to EXPOSURE appears next to the values that can be set with the EXPOSURE IRIS dial x EXPOSURE the default setting You can adj...

Страница 36: ...turning the EXPOSURE IRIS dial G z Tip If you set the AUTO LOCK switch A to HOLD after manual adjustment the manually adjusted items are saved To restore automatic adjustment Press the EXPOSURE IRIS button H or set the AUTO LOCK switch A to AUTO LOCK b Notes If you set the AUTO LOCK switch A to AUTO LOCK other manually adjusted items gain shutter speed white balance also become temporarily automat...

Страница 37: ...pattern Set the ZEBRA switch E to OFF b Note The zebra pattern is not recorded on the tape z Tip This is convenient for adjusting the brightness while a histogram p 65 is displayed You can adjust the gain manually when shooting blackish or dark objects if you do not want the AGC auto gain control to be activated 1 During recording or standby set the AUTO LOCK switch A to the center position to rel...

Страница 38: ...than 12 hours z Tips It is difficult to focus automatically at a lower shutter speed Manual focusing with your camcorder attached to a tripod is recommended The picture may flicker or change colors under fluorescent lamps sodium lamps or mercury lamps You can adjust the white balance according to the light of the recording environment You can set two sets of white balance adjustment data separatel...

Страница 39: ...tomatic The setting returns to automatic adjustment when you set the POWER switch to OFF CHG for more than 12 hours You can customize the picture quality by adjusting COLOR LEVEL SHARPNESS etc You can set 6 different picture quality settings depending on the recording time of day the weather or the camera person and store them in the memory Connect your camcorder to a TV or monitor and adjust the ...

Страница 40: ...hen press the dial Picture profile number setting name Recording condition PP1 PORTRAIT Appropriate setting to record people PP2 CINEMA Appropriate setting to record film like pictures PP3 SUNSET Appropriate setting to record sunset PP4 MONOTONE Appropriate setting to record monotone pictures PP5 You can assign your own setting PP6 You can assign your own setting Item Adjustment COLOR LEVEL 7 low ...

Страница 41: ...C dial A then press the dial Repeat this operation until a complete name is entered z Tips Each name can be up to 12 characters long Characters that can be used in profile names A Z 0 9 _ 5 Select OK by turning the SEL PUSH EXEC dial A then press the dial The profile name is changed 6 Select RETURN t OK by the SEL PUSH EXEC dial A To copy the picture profile setting to other picture profiles 1 Pre...

Страница 42: ...SSIGN buttons You can assign a single function to each the ASSIGN button 1 to 6 Functions you can assign to the ASSIGN buttons MARKER p 66 D EXTENDER p 63 FOCUS INFNTY p 43 REC REVIEW p 44 END SEARCH p 44 INDEX MARK p 44 PEAKING p 65 STEADYSHOT p 60 COLOR BAR p 60 SPOTLIGHT p 63 BACK LIGHT p 62 FADER p 63 DISPLAY p 47 Picture profile p 39 SHOT TRANS p 45 b Note The ASSIGN buttons 4 to 6 are exclus...

Страница 43: ... dial 6 Press the MENU button A to hide the menu z Tips Shot transition is assigned to the ASSIGN buttons 1 2 and 3 p 45 Cancel the shot transition assignment to return to the pre setting assignment To cancel the shot transition select SHOT TRANS t YES in step 3 b Note FOCUS INFNTY is only available during the manual focus It is not available during the auto focus 1 Assign FOCUS INFNTY to one of t...

Страница 44: ...RK again b Note You cannot record an index signal on a recorded tape afterward You can view about 2 seconds of the scene recorded just before you stopped the tape This is convenient during playback of the latest scene check 1 Assign REC REVIEW to one of the ASSIGN buttons in advance p 42 2 Press the ASSIGN button assigned to REC REVIEW during standby mode The last 2 seconds approx of the most rece...

Страница 45: ...op scenes under different recording conditions smoothly If you register the manual adjustment function of the white balance the scenes will develop smoothly between objects indoor and those outdoor Use a tripod to avoid camera shake You can set the transition curve and duration using SHOT TRANS p 62 1 Assign SHOT TRANS to the ASSIGN buttons p 42 z Tip Shot transition is assigned to ASSIGN buttons ...

Страница 46: ... Shot transition When you change SHOT TRANS p 62 press the ASSIGN button 1 repeatedly to exit the shot transition screen You cannot return from the stored SHOT A or SHOT B settings to previous settings after you activate the shot transition during recording If you press the following buttons during the shot transition operation the operation is canceled PICTURE PROFILE MENU EXPANDED FOCUS STATUS C...

Страница 47: ...p 64 Output signal setup VCR HDV DV etc p 69 Functions assigned to the ASSIGN buttons p 42 Camera setup p 59 Picture profile p 39 1 Press the STATUS CHECK button B 2 Turn the SEL PUSH EXEC dial A to display the desired item When the POWER switch is set to CAMERA the items appear in the following order AUDIO t OUTPUT t ASSIGN t CAMERA t PICT PROFILE When the POWER switch is set to VCR the items app...

Страница 48: ...and battery information appear for about 7 seconds You can view the battery information for up to 20 seconds by pressing the button again while the information is displayed Checking the remaining battery Battery Info 139 139 Remaining battery approx Recording capacity approx Changing checking the settings in your camcorder Continued ...

Страница 49: ... set memory display disappears 4 Press PLAY 5 Playback starts from the point designated 0 00 00 on the tape counter To cancel the operation Press ZERO SET MEMORY 4 again before rewinding b Notes There may be a discrepancy of several seconds between the time code and the tape counter Zero set memory will not function correctly if there is a blank section between recorded sections on the tape You ca...

Страница 50: ...ere an index signal is recorded p 44 1 Set the POWER switch to VCR 2 Press SEARCH M 1 on the Remote Commander repeatedly to select INDEX SEARCH 3 Press previous next 2 on the Remote Commander to select an index point You can select the index signal of the point that you want to start playing back the tape Playback starts automatically from the point where the selected index signal is recorded To c...

Страница 51: ...tings after connecting with an i LINK cable Pictures recorded in the DV format are played back as SD standard definition images regardless of the connection High definition TV 16 9 wide or 4 3 TV B C A HDMI i LINK COMPONENT IN AUDIO for HDV1080i HD high definition image quality An HDV formatted picture is played back as it is HD image quality A DV formatted picture is played back as it is SD image...

Страница 52: ...CR HDV DV t AUTO p 69 COMPONENT t 1080i 480i p 70 b Note An A V connecting cable is also needed to output audio signals Connect the white and red plugs of the A V connecting cable to the audio input jack of your TV 1 2 3 4 2 3 A Component video cable supplied A V connecting cable supplied Green Y Blue PB CB Red PR CR Red White Yellow Playing the picture on a TV Continued ...

Страница 53: ... audio signals Connecting HDMI OUT jack to an external device supplies high quality images and digital audio to you IN OUT REC menu t VCR HDV DV t AUTO p 69 i LINK CONV t OFF p 70 b Notes Your TV needs to have an i LINK jack compatible with HDV1080i For details confirm the specifications of your TV If your TV is not compatible with HDV1080i connect your camcorder and TV with the supplied component...

Страница 54: ... purpose Connecting to a 16 9 wide or 4 3 TV Signal flow Type Camcorder Cable TV Menu Setting IN OUT REC menu t VCR HDV DV t AUTO p 69 COMPONENT t 480i p 70 TV TYPE t 16 9 4 3 p 70 b Note A V connecting cable is also needed to output audio signals Connect the white and red plugs of the A V connecting cable to the audio input jack of your TV IN OUT REC menu t VCR HDV DV t AUTO p 69 i LINK CONV t ON...

Страница 55: ...t on the VCR using the A V connecting cable Set the input selector on the VCR to LINE VIDEO 1 VIDEO 2 etc IN OUT REC menu t VCR HDV DV t AUTO p 69 TV TYPE t 16 9 4 3 p 70 b Notes When connecting only an S VIDEO plug S VIDEO channel audio signals are not output To output audio signals connect the white and red plugs of the A V connecting cable with an S VIDEO cable to the audio input jack of your T...

Страница 56: ...CR STEADYSHOT COLOR BAR AF ASSIST AE SHIFT MENU END AUDIO SET p 64 DISPLAY SET p 65 IN OUT REC p 69 MEMORY SET p 71 OTHERS p 73 4 Select the desired item by turning the SEL PUSH EXEC dial then press the dial The available menu items vary depending on the power mode of your camcorder Unavailable items will be grayed out 5 Select the desired setting by turning the SEL PUSH EXEC dial then press the d...

Страница 57: ... AGC LIMIT z AT IRIS LMT z AWB SENS z FLCKR REDUCE z HANDLE ZOOM z SHOT TRANS z DV FRAME REC z BACK LIGHT z SPOTLIGHT z D EXTENDER z FADER z AUDIO SET menu p 64 AUDIO REC LV z DV AU MODE z MULTI SOUND z DV AUDIO MIX z DISPLAY SET menu p 65 PEAKING z HISTOGRAM z MARKER z EXP FOCUS TYPE z CAM DATA DSP z AU LVL DISP z LCD BRIGHT z z LCD COLOR z z LCD BL LEVEL z z VF B LIGHT z z VF POWERMODE z z DATA ...

Страница 58: ...T menu p 71 QUALITY z z ALL ERASE z FORMAT z z FILE NO z z NEW FOLDER z z REC FOLDER z z PB FOLDER z OTHERS p 73 CAMERA PROF z z ASSIGN BTN z z PHOTO EXP FOCUS z z CLOCK SET z z WORLD TIME z z LANGUAGE z z USB SELECT z PB ZOOM z QUICK REC z BEEP z z REC LAMP z REMOTE CTRL z z Position of POWER switch CAMERA VCR Menu items Continued ...

Страница 59: ... the screen brightness by turning the dial down Press the MENU button t select the CAMERA SET by turning the SEL PUSH EXEC dial EXPOSURE IRIS Fast moving subjects and actions which cannot be captured under the general shooting conditions can be shot in smooth moving slow motion This is useful to shoot fast actions such as a golf or tennis swing Select EXECUTE and press the REC START STOP button on...

Страница 60: ...SteadyShot function SOFT Select to activate the SteadyShot function so that it leaves a slight unsteadiness on the picture so the picture looks natural WIDE CONV Select when a wide conversion lens optional is attached This mode is the most effective with Sony VCL HG0862 wide conversion lens x ON OFF You can display the color bar or record it on the tape by setting to ON It is convenient to adjust ...

Страница 61: ...source such as an incandescent lamp or candle or under a blueish light source such as in outdoor shade B INTELLIGENT Adjustment is automatically performed to achieve a natural atmosphere according to the brightness of the scene HIGH Redness or blueness will decrease MIDDLE LOW Redness or blueness will increase b Notes This is only effective when white balance is adjusted automatically AWB SENS is ...

Страница 62: ...ving the subject a little Operate your camcorder using the Remote Commander to prevent camera shake B OFF Select to record in the standard recording mode ON Select to record pictures using the DV FRAME REC function 1 Select ON by the SEL PUSH EXEC dial 2 Press the MENU button to hide the menu screen 3 Press the REC START STOP button A picture approximately 6 frames is recorded and your camcorder e...

Страница 63: ...hours When you set D EXTENDER to ON the image is displayed about 1 5 times larger The picture quality deteriorates due to the digital process You can enlarge images of distant subjects such as wild birds The default setting is OFF b Note This is automatically set to OFF if you turn the power off and back on You can record a transition with the following effects adding to the interval between scene...

Страница 64: ... sound with high quality Press the MENU button t select the AUDIO SET by turning the SEL PUSH EXEC dial AUDIO REC LV DV AU MODE DV Audio mode b Note When recording in the HDV format sound is automatically recorded in 16BIT mode You can select whether to play back audio recorded using other devices with dual sound or stereo sound B STEREO Plays back with main and sub sound or stereo sound 1 Plays b...

Страница 65: ... set PEAKING to ON the outline of the subject on the screen is enhanced for easier focusing The default setting is OFF x COLOR WHITE RED YELLOW are available for the outline color The default setting is WHITE x LEVEL HIGH MIDDLE LOW are available for the outline level The default setting is MIDDLE b Note The image with enhanced outline is not recorded on the tape z Tip This makes focusing easier w...

Страница 66: ...setting is OFF b Note Screen indicators are not output from the analog jacks when a marker is displayed z Tips You can display the center marker and the guideframe marker at the same time You can obtain a balanced composition by positioning the subject at the cross points of the guideframe marker Markers are displayed only on the LCD panel and viewfinder they are not output from the jacks You can ...

Страница 67: ...L is automatically set to BRIGHT When you select BRIGHT the recordable time with the battery is slightly reduced You can adjust the brightness of the viewfinder B NORMAL Standard brightness BRIGHT Brightens the viewfinder screen b Notes When you connect your camcorder to outside power sources BRIGHT is automatically selected for the setting When you select BRIGHT the recordable time with the batte...

Страница 68: ...e without setting the clock and will appear BNORMAL Select to display the menu screen at normal size 2x Select to display the selected menu item at double the normal height LETTER SIZE F1 7 100 6dB 0 00 00 AUTO 60min 60min HDV1080i B AUTO Displays the remaining tape indicator for about 8 seconds in situations such as those described below When you set the POWER switch to VCR or CAMERA with a casse...

Страница 69: ...V Plays back only the portions recorded in HDV format During i LINK connection inputs outputs only HDV formatted signals from the HDV DV interface i LINK and records plays back You can also select this when connecting the camcorder to a computer etc DV Plays back only the portions recorded in DV format During i LINK connection inputs outputs only DV formatted signals from the HDV DV interface i LI...

Страница 70: ... the component input jack 480i Select when connecting your camcorder to a TV with the component input jack B1080i 480i Select when connecting your camcorder to a TV that has the component input jack and is capable of displaying the 1080i signal You can convert signals in HDV format to DV format and output pictures in DV format from the HDV DV interface i LINK B OFF Outputs the pictures from the HD...

Страница 71: ...th B The indicators in parentheses appear when the items are selected See page 56 for details on selecting menu items B FINE Records still images at the fine image quality level STANDARD Records still images at the standard image quality level Capacity of the Memory Stick Duo MB and the number of recordable pictures Press the MENU button t select the MEMORY SET by turning the SEL PUSH EXEC dial QU...

Страница 72: ...y Stick Duo with the write protect tab p 107 The folder will not be deleted even when you delete all the pictures in the folder Do not do any of the following while Erasing all data is displayed Operate the POWER switch operation buttons Eject the Memory Stick Duo You do not need to format the Memory Stick Duo since it is already formatted at the factory If you want to format the Memory Stick Duo ...

Страница 73: ...e marked with B The indicators in parentheses appear when the items are selected See page 56 for details on selecting menu items You can save up to two kinds of camera setups in your camcorder as camera profiles Using these saved profiles lets you quickly obtain suitable camera settings later z Tip The items that can be saved in the camera profile are set values of the menu the picture profiles an...

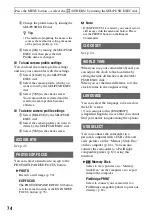
Страница 74: ...on as the EXPANDED FOCUS button p 35 b Note If EXP FOCUS is selected you cannot record still images with the main unit button Please use the PHOTO button on the Remote Commander See p 24 When you use your camcorder abroad you can adjust the clock to the local time by setting the time difference with the SEL PUSH EXEC dial When you set the time difference to 0 the clock returns to the original sett...

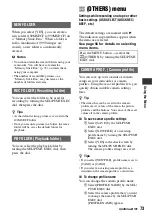
Страница 75: ...s stopped rotating but the transition from the last recorded scene may not be smooth Select this when you do not want to miss a recording chance z Tips If QUICK REC is set to ON the interval between scenes freezes for a moment editing on your computer is recommended When the camcorder is left in standby for more than about 3 minutes your camcorder exits from standby the drum stops rotating to prev...

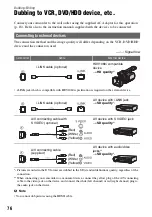
Страница 76: ...the SD standard definition quality regardless of the connection 2 When connecting your camcorder to a monaural device connect the yellow plug of the A V connecting cable to the video jack on the device and connect the white left channel or red right channel plug to the audio jack on the device 2 i LINK cable optional i LINK jack which is compatible with HDV1080i specification is required on the ex...

Страница 77: ...its the terminal on the device to be connected Copy format Camcorder recording format Format supported by the VCR DVD device Menu setting HDV format 1 DV format VCR HDV DV p 69 i LINK CONV p 70 Copy HDV recording as HDV HDV HDV 3 AUTO OFF Convert HDV recording to DV HDV DV DV ON Copy DV recording as DV DV DV DV OFF When tape is recorded in both HDV and DV format Convert both HDV and DV format to D...

Страница 78: ...dubbing to the VCR insert a cassette for recording When dubbing to the DVD recorder insert a DVD for recording If your recording device has an input selector set it to the appropriate input such as video input1 and video input2 3 Connect your VCR DVD device to your camcorder as a recording device See page 76 for connection details 4 Start playback on the camcorder and recording on the VCR DVD devi...

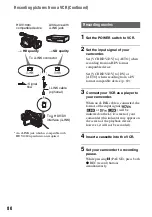
Страница 79: ...indicated on the LCD screen of your camcorder Recording pictures from a VCR You can record pictures from a VCR on a tape You can record a scene as a still image on a Memory Stick Duo You can record pictures in the HDV format by connecting an HDV1080i specification compatible device Be sure to insert a cassette or a Memory Stick Duo for recording in your camcorder beforehand You can connect your ca...

Страница 80: ... LINK cable is connected the format of the input signal or will be indicated on the LCD screen of your camcorder this indicator may appear on the screen of the playback device however it will not be recorded 4 Insert a cassette into the VCR 5 Set your camcorder to recording pause While pressing X PAUSE press both z REC record buttons simultaneously HDV1080i compatible device AV devicewith i LINK j...

Страница 81: ...tely If you pause or stop the recording and restart it the picture may not be recorded smoothly z Tip When a 4 3 video signal is input it appears with black bands on the right and left sides on the screen of your camcorder Be sure to insert a Memory Stick Duo for recording in your camcorder beforehand and set PHOTO EXP FOCUS to PHOTO the default setting p 74 1 Perform steps 1 to 4 in Recording mov...

Страница 82: ...n the Memory Stick Duo are recorded On your camcorder the date and time at which the picture was recorded on the tape are displayed Camera setting data recorded on the tape cannot be stored on the Memory Stick Duo Movies will be fixed to image size 1 2M when playing back in the HDV format Movies will be fixed to image size 0 2M 16 9 or VGA 0 3M 4 3 when playing back in the DV format You cannot rec...

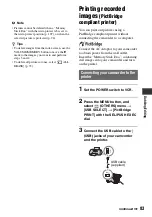
Страница 83: ...rded images PictBridge compliant printer You can print out pictures using a PictBridge compliant printer without connecting the camcorder to a computer Connect the AC Adaptor to your camcorder to obtain power from the wall outlet Insert the Memory Stick Duo containing still images into your camcorder and turn on the printer 1 Set the POWER switch to VCR 2 Press the MENU button and select OTHERS me...

Страница 84: ...printing is finished Printing disappears and the image selection screen appears again Press the MENU button when printing is completed b Notes We do not guarantee proper operation when a PictBridge incompatible device is connected Refer also to the operating instructions for the printer to be used Do not attempt the following operations when the printer is connected is on the screen The operations...

Страница 85: ...dustry standard established by the Camera Imaging Products Association CIPA You can print still images without using a computer by connecting a printer directly to a digital video camera or digital still camera regardless of model or manufacturer ...

Страница 86: ...able Remove the USB cable according to the correct procedure when disconnecting it from the computer p 88 Copying still images to a computer For Windows users OS Windows 2000 Professional Windows Millennium Edition Windows XP Home Edition Windows XP Professional Standard installation is required Operation is not assured if the above OS has been upgraded CPU MMX Pentium 200MHz or faster Others USB ...

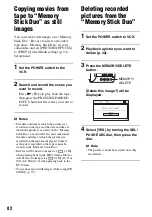
Страница 87: ... for your camcorder Use the supplied AC Adaptor to obtain AC power p 18 4 Set the POWER switch to VCR 5 Press the MENU button The menu index screen is displayed 6 Select OTHERS t USB SELECT t Memory Stick with the SEL PUSH EXEC dial p 74 7 Connect the USB cable to the USB jacks on your camcorder and your computer It may take a while until your computer recognizes your camcorder for the first time ...

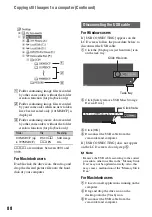
Страница 88: ...B cable 1 Click the Unplug or eject hardware icon on the task tray 2 Click Safely remove USB Mass Storage Device Drive 3 Click OK 4 Disconnect the USB cable from the camcorder and computer If USB CONNECTING does not appear on the LCD screen do only step 4 b Note Remove the USB cable according to the correct procedure otherwise files in the Memory Stick Duo may not be updated correctly Also this ma...

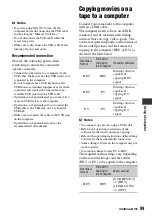
Страница 89: ...ed environments Copying movies on a tape to a computer Connect your camcorder to the computer with an i LINK cable The computer needs to have an i LINK connector and be installed with editing software that can copy video signals The software required depends on the format of the recorded pictures and the format for copying to the computer HDV or DV as shown in the table below b Notes You cannot co...

Страница 90: ...on while connected with an i LINK cable The format HDV or DV of input output signal appears on the LCD screen of your camcorder while connected with an i LINK cable Use the supplied AC Adaptor to obtain AC power p 18 1 Prepare editing software not provided 2 Turn on your computer 3 Insert a tape into your camcorder and set the POWER switch to VCR 4 Set the menu of your camcorder The menu settings ...

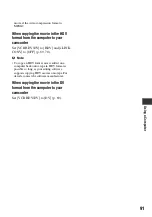
Страница 91: ...DV to HDV and i LINK CONV to OFF p 69 70 b Note To copy an HDV format movie edited on a computer back onto a tape in HDV format is possible so long as your editing software supports copying HDV movies onto tape For details contact the software manufacturer When copying the movie in the DV format from the computer to your camcorder Set VCR HDV DV to DV p 69 ...

Страница 92: ...ile you use it This is not a malfunction The CHARGE lamp does not light while the battery pack is being charged Slide the POWER switch to OFF CHG p 18 Attach the battery pack to the camcorder correctly p 18 Connect the power cord to the wall outlet properly The battery charge is completed p 18 The CHARGE lamp flashes while the battery pack is being charged Attach the battery pack to the camcorder ...

Страница 93: ...ctions between the Remote Commander and the remote sensor Keep strong light sources such as sunlight or overhead lighting away from the remote sensor otherwise the Remote Commander may not function properly Insert a fresh battery in the compartment with its terminals matching those of the compartment p 123 Another VCR malfunctions when you use the supplied Remote Commander Select a commander mode ...

Страница 94: ... handle zoom switch to H or L p 33 You cannot record on the Memory Stick Duo Release the lock on the write protect tab of the Memory Stick Duo if there is one p 107 The Memory Stick Duo is full Delete unnecessary pictures recorded on the Memory Stick Duo p 82 Format the Memory Stick Duo on your camcorder or insert another Memory Stick Duo p 72 You cannot record still images on the Memory Stick Duo...

Страница 95: ...binations of functions and menu items Shutter speed gain white balance or iris cannot be adjusted manually Set the AUTO LOCK switch to the center position to release the auto lock mode Tiny spots in white red blue or green appear on the screen This phenomenon appears when using a slow shutter speed p 37 This is not a malfunction Cannot use Situation BACK LIGHT EXPOSURE is set to manual Two or more...

Страница 96: ... record a TV screen or computer screen This can be improved by changing the shutter speed p 37 Fine patterns flicker diagonal lines look jagged Adjust SHARPNESS to 0 side p 40 If you are playing back pictures stored on a Memory Stick Duo refer also to the Cassette tapes Memory Stick Duo section p 93 You cannot play back tape Slide the POWER switch to turn on the VCR Rewind the tape p 31 Image data...

Страница 97: ...deo head is dirty p 112 Use the Sony mini DV cassette is displayed on the screen The tape you are playing was recorded without setting the date and time A blank section on the tape is being played The data code on a tape with a scratch or noise cannot be read Noises appear and or is displayed on the screen The tape was recorded in a TV color system other than that of your camcorder NTSC This is no...

Страница 98: ... video plug If you are using an S VIDEO plug or component video plug make sure the red and white plugs of the A V connecting cable are also connected p 51 You cannot view the picture or hear the sound on the TV connected with the component video cable Set COMPONENT according to the requirements of the connected device p 70 When you are using the component video cable make sure the red and white pl...

Страница 99: ...ing a picture from your camcorder When connected using an i LINK cable no picture appears on the monitor screen during dubbing Set VCR HDV DV according to the requirements of the connected device p 69 You cannot add sound to the recorded tape You cannot add sound to the recorded tape on this unit You cannot dub correctly using the HDMI cable You cannot dub pictures using the HDMI cable Still pictu...

Страница 100: ...t a Memory Stick Duo in the correct direction then push it all the way in You cannot use an i LINK cable Connect the camcorder and the computer using the USB cable Slide the POWER switch to turn on the VCR and set USB SELECT to Memory Stick p 74 The computer does not recognize the Memory Stick Duo during camcorder operations such as tape playback or editing Finish any camcorder operations and then...

Страница 101: ...RESET button p 122 and operate your camcorder again E 61 ss E 62 ss E 91 ss Contact your Sony dealer or local authorized Sony service facility Inform them of the 5 digit code which starts from E 101 1001 Warning indicator pertaining to files The file is damaged The file is unreadable p 108 E Battery level warning The battery pack is nearly used up Depending on the operating environment or battery ...

Страница 102: ...tte p 26 Check if the cassette is damaged QZ The tape is locked check the tab p 105 Cannot record due to copyright protection p 105 x Memory Stick Duo Incompatible type of Memory Stick A type of Memory Stick Duo incompatible with your camcorder is inserted p 106 Protected file Cannot delete Cancel file protection using your computer Reinsert the Memory Stick p 26 106 Reinsert the Memory Stick Duo ...

Страница 103: ...nnected device Switch off the printer and switch it on again then disconnect the USB cable and reconnect it Error Cancel the task Switch off the printer and switch it on again then disconnect the USB cable and reconnect it x Others Change to correct tape format The pictures cannot be played back because of an incompatible format No output image in VCR HDV DV Change format Stop playback or signal i...

Страница 104: ...wing DV format pictures recorded in DV format You need a TV with the AUDIO VIDEO input jack A connecting cable is also needed Simple setting of the clock by time difference When you are abroad you can easily adjust the clock to the local time by setting the time difference Select WORLD TIME then set the time difference p 74 System Used in NTSC Bahama Islands Bolivia Canada Central America Chile Co...

Страница 105: ...ication Your camcorder can play back pictures recorded in the HDV 720 30p format but cannot output it from the HDV DV interface i LINK To prevent a blank section from being created on the tape Go to the end of the recorded section using END SEARCH p 44 before you begin the next recording when you have played back the tape Copyright signal x When you play back If the cassette you play back on your ...

Страница 106: ... your camcorder However appearance on the list below does not guarantee the operation of all types of Memory Stick Duo in your camcorder Still image format Your camcorder compresses and records image data in the JPEG Joint Photographic Experts Group format The file extension is JPG File names of still images 101 0001 This file name appears on the screen of your camcorder DSC00001 JPG This file nam...

Страница 107: ...y Stick Duo Do not disassemble or modify the Memory Stick Duo Do not let the Memory Stick Duo get wet Be careful to keep Memory Stick Duo media out of the reach of small children There is danger that a child might swallow it Do not insert anything other than a Memory Stick Duo into the Memory Stick Duo slot Doing so may cause a malfunction x On a location for use Do not use or keep the Memory Stic...

Страница 108: ...ithium ion battery pack that has functions for communicating information related to operating conditions between your camcorder and an optional AC Adaptor charger The InfoLITHIUM battery pack calculates the power consumption according to the operating conditions of your camcorder and displays the remaining battery time in minutes With an AC Adaptor charger the remaining battery time and charging t...

Страница 109: ...ndicated correctly Note however that the battery indication will not be restored if it is used in high temperatures for a long time or if left in a fully charged state or when the battery pack is frequently used Use the remaining battery time indication as a rough guide only The E mark that indicates low battery flashes even if there are still 5 to 10 minutes of battery time remaining depending on...

Страница 110: ... are 3 types S100 approx 100Mbps S200 approx 200Mbps S400 approx 400Mbps The baud rate is listed under Specifications in the operating instructions of each piece of equipment It is also indicated near the i LINK interface on some devices The baud rate may differ from the indicated value when the unit is connected to a device with a different maximum baud rate Mbps stands for megabits per second or...

Страница 111: ...cause heat to build up inside When disconnecting the power cord pull it by the plug and not the cord Do not damage the power cord such as by placing anything heavy on it Keep metal contacts clean Keep the Remote Commander and button type battery out of children s reach If the battery is accidentally swallowed consult a doctor immediately If the battery electrolytic liquid has leaked consult your l...

Страница 112: ...a lot If this freezing point is created while playing back you can solve this problem and see the pictures by rewinding after slightly forwarding Such a freezing point cannot be recovered if it was created while recording To prevent such a problem use the Sony mini DV cassette If the following problem occurs clean the video heads for 10 seconds with the Sony DVM 12CLD cleaning cassette optional Pl...

Страница 113: ...at the seaside Store in a well ventilated location subject to little dirt or dust To prevent mold periodically clean the lens as described above It is recommended that you operate your camcorder about once a month to keep it in optimum state for a long time On charging the pre installed rechargeable battery Your camcorder has a pre installed rechargeable battery to retain the date time and other s...

Страница 114: ... While sliding the viewfinder release lever to the left 1 remove the viewfinder 2 2 Remove dust from inside the viewfinder and the part shown below with a blower 3 Attach the viewfinder following the reverse procedure of step 1 2 1 Maintenance and precautions Continued ...

Страница 115: ...0 cassette and AC Adaptor Viewfinder Electric viewfinder color Image device 4 5 mm 1 4 type 3CMOS sensor Recording Pixels HDV DV16 9 still recording Max 1 20 Mega 1 440 810 pixels 2 Gross Approx 1 120 000 pixels Effective movie 4 3 778 000 pixels Effective movie 16 9 1 037 000 pixels Effective still 4 3 778 000 pixels Effective still 16 9 1 037 000 pixels Lens Carl Zeiss Vario Sonnar T 20 Optical ...

Страница 116: ...en Picture 8 8 cm 3 5 type aspect ratio 16 9 Total dot number 211 200 960 220 General Power requirements DC 7 2 V battery pack DC 8 4 V AC Adaptor Average power consumption During camera recording using the viewfinder with normal brightness HDV recording 5 9 W DV recording 5 7 W During camera recording using the LCD with normal brightness HDV recording 5 9 W DV recording 5 7 W Operating temperatur...

Страница 117: ...2 1 4 1 1 4 4 in w h d excluding the projecting parts Mass approx 190 g 6 7 oz excluding the power cord See the label on the AC Adaptor for other specifications Rechargeable batterypack NP F570 Maximum output voltage DC 8 4 V Output voltage DC 7 2 V Capacity 15 8 Wh 2 200 mAh Dimensions approx 38 4 20 6 70 8 mm 1 9 16 13 16 2 7 8 in w h d Mass approx 100 g 3 5 oz Operating temperature 0 C to 40 C ...

Страница 118: ...ks of Sony Corporation and Victor Company of Japan Ltd HDMI HDMI logo and High Definition Multimedia Interface are trademarks or registered trademarks of HDMI Licensing LLC Pentium is a trademark or registered trademark of Intel Corporation All other product names mentioned herein may be the trademarks or registered trademarks of their respective companies Furthermore and are not mentioned in each...

Страница 119: ...ec lamp flashes if the remaining tape or battery is low G PHOTO EXPANDED FOCUS button 30 H REC START STOP button 28 I Battery pack 18 J Accessory shoe K Focus ring 34 L Zoom ring 33 M LANC jack The LANC control jack is used for controlling the tape transport of video device and peripherals connected to it N POWER switch 21 O COMPONENT OUT jack 51 P A V OUT jack 51 Q HDV DV jack 51 R DC IN jack 18 ...

Страница 120: ...E PROFILE button 39 O i headphones jack When you use headphones the speaker on your camcorder is silent P Tripod receptacle Make sure that the length of the tripod screw is less than 5 5 mm 7 32 inch Otherwise you cannot attach the tripod securely and it may damage your camcorder Q FOCUS button 34 R EXPANDED FOCUS button 35 The ASSIGN button 2 FOCUS button and SHUTTER SPEED button have raised tact...

Страница 121: ...28 H MIC jack When a microphone is connected it is dominantly used for sound recording over the internal microphone I Rec lamp front 28 The rec lamp flashes if the remaining tape or battery is low J Remote sensor front 123 K Lens 8 L Lens hood with lens cover 17 M Microphone To attach the shoulder strap Attach the shoulder strap optional to the hooks for the shoulder strap 7 8 9 1 3 5 6 2 4 qd qa ...

Страница 122: ...including the clock setting except the Picture profile and Camera profile settings return to the default J HDMI OUT jack 51 K USB jack 83 L Memory Stick Duo slot 26 Each of the PLAY button VOLUME MEMORY button and MEMORY INDEX button has a raised tactile dot The MEMORY INDEX button has it on the side Use it to identify the location of the buttons To attach the jack cover Attach the jack cover as s...

Страница 123: ...ng with the Remote Commander supplied with your camcorder your VCR may also operate In that case select a commander mode other than VTR 2 for your VCR or cover the sensor of your VCR with black paper To change the battery of the Remote Commander 1 While pressing on the tab inset your fingernail into the slit to pull out the battery case 2 Place a new battery with the side facing up 3 Insert the ba...

Страница 124: ...ute second During playback Time code hour minute second frame E Recording capacity of the tape approx F Audio level display 67 G Recording folder 73 H Image size 71 I Quality FINE or STD 71 J Recording indicator The date time during recording and the camera setting data will be recorded automatically They do not appear on the screen during recording but you can check them as DATA CODE during playb...

Страница 125: ...yback folder N Playback folder 73 O Previous Next folder icon The appear when the first or last picture of the current folder is displayed and when there are multiple folders on the same Memory Stick Duo You can move to Previous Next folder with the VOLUME MEMORY button Viewing movies 120 HDV1080i 12 0 08 12 17 qa 2 1 5 4 min min Viewing still images 125min 101 0011 1 2M 9 9 101 MEMORY PLAY 8 qs q...

Страница 126: ...LCD backlight off 22 Indicator Meaning Z Warning 101 2 Upper left Upper right Bottom Center Indicator Meaning HISTOGRAM 65 DV AU MODE DV Audio mode 64 AUDIO REC LV 64 9 Manual focus 34 Picture profile 39 SPOTLIGHT 63 Backlight 62 SteadyShot off 60 PEAKING 65 D EXTENDER 63 AE SHIFT 61 EXPOSURE IRIS dial control 34 Auto setting 66 n A B White balance 38 The settings can be made only for the pictures...

Страница 127: ... compartment 26 CHARGE lamp 18 Charging time 19 CINEMA 39 CINEMATONE GAMMA 40 CLOCK SET 24 74 CNTRST ENHCR 60 95 COLOR BAR 60 COLOR LEVEL 40 COLOR PHASE 40 COMPONENT 70 COMPONENT OUT jack 52 Component video cable 52 Computer 86 Connect TV 51 VCR 76 COPY 41 CURRNT FOLDER 72 D DATA CODE 67 DATE 67 Date search 49 DATE TIME 25 124 DC IN jack 18 DC plug 18 Deleting camera profile settings 74 Deleting r...

Страница 128: ...D BL LEVEL 67 LCD BRIGHT 67 LCD COLOR 67 Lens hood fixing screw 17 Lens hood with lens cover 17 LETTER SIZE 68 LINEAR 62 LP Long Play 70 M Macintosh 86 Maintenance 111 MARKER 66 MEMORY SET menu 71 Memory Stick 6 106 Memory Stick Duo 26 107 Insert Eject 26 Number of recordable pictures 71 Write protect tab 107 Memory Stick Duo adaptor 107 Memory Stick Duo slot 27 Memory Stick PRO Duo 107 MEMORY DEL...

Страница 129: ...ial 24 SHARPNESS 40 SHOT TRANS 42 62 Shot transition 45 Shoulder strap 121 Shutter speed 37 SHUTTER SPEED button 37 SKINTONE DTL 40 Skip scan 31 SMTH SLW REC Smooth slow recording 59 95 SOFT STOP 62 SOFT TRANS 62 SP Standard Play 69 Specifications 115 SPOTLIGHT 63 ST1 64 ST2 64 STANDARD 71 Status check 47 STATUS CHECK button 47 STEADYSHOT 60 STEREO 64 Still images 30 32 SUNSET 39 Supplied items 16...

Страница 130: ... FADER 63 WHT BAL button 38 Wide angle 33 WIDE CONV 60 Windows 86 WORLD TIME 74 Write protect tab 105 107 Z Zebra 37 ZEBRA switch 37 Zero set memory 49 ZERO SET MEMORY button 49 Zoom 33 Zoom lever 33 Zoom ring 33 Index Continued ...

Страница 131: ......
Отзывы: