background image

3

Figure 2

Figure 1

Figure 3

Figure 4

Shut Down and Open Computer


1.

 If you have not already done so, shut down your PowerBook. If 

the computer has been on for any length of time, wait a couple 
of minutes for it to cool before beginning the installation.


2.

 Disconnect all cables from your PowerBook, including the 

power cable. If necessary, move your PowerBook to an area with a 
fl at, level surface where you can freely work.


3.

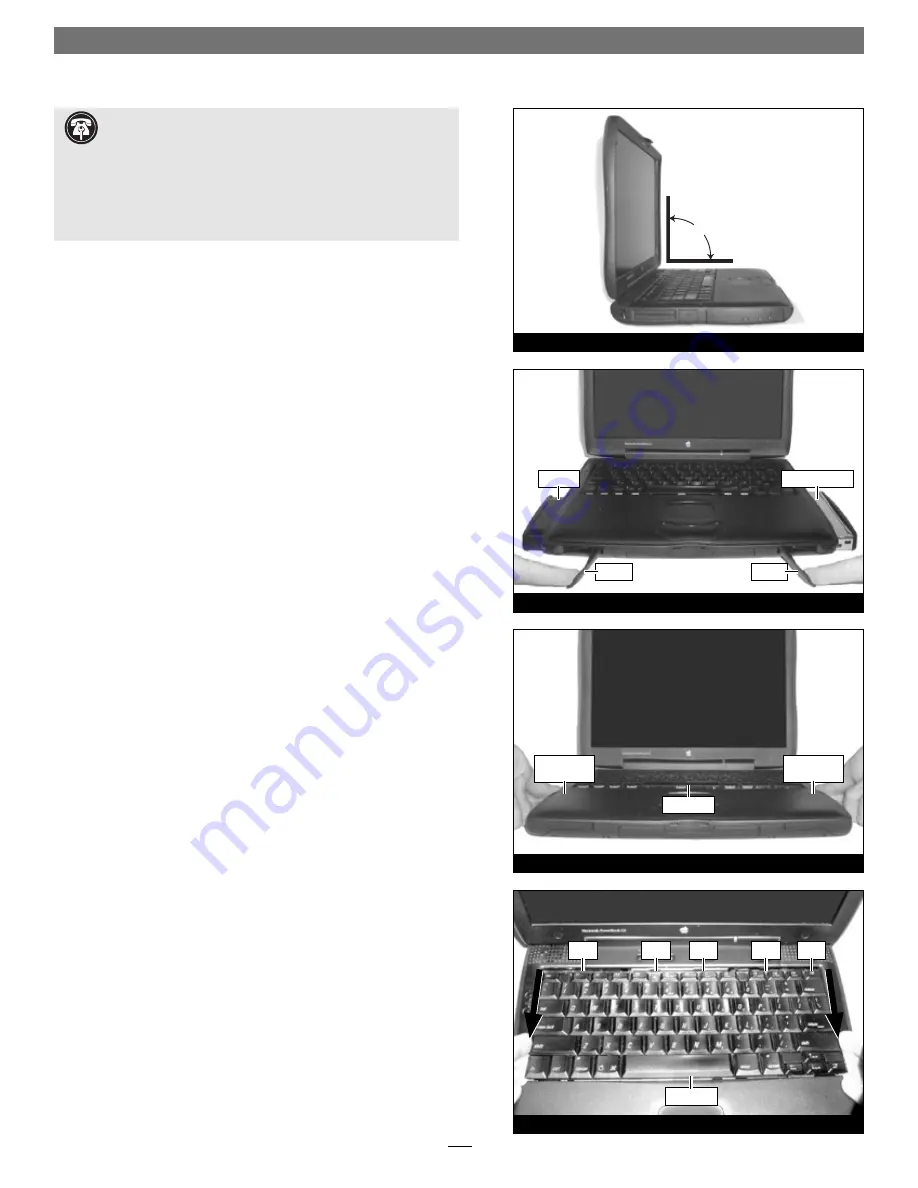
 Open the display on your PowerBook to a 90˚ angle; 

you must 

do this to prevent it from tipping over during the installation process


(Figure 1)


4.

 Locate the expansion bay release levers on the front edge of the 

computer 

(Figure 2)

, then pull them out to eject and remove bat-

teries and modules installed in both expansion bays.


5.

 Reach inside the expansion bays to locate the two small, ridged 

plastic tabs; these are the keyboard release levers. Slide the levers 
toward you until the lower edge of the keyboard rises 

(Figure 3)

.


6.

 Lift up the lower edge of the keyboard slightly, and pull it 

toward you until the tabs on the upper edge of the keyboard are 
visible 

(Figure 4)

.

Hardware Installation


 Support Note:

 When handling computer products, you must 

take care to prevent components from being damaged by 

static electricity. Before opening your computer or removing parts 
from their packages, always ground yourself first by touching a metal 
part of the computer, such as a port access cover, and work in an area 
free of static electricity; avoid carpeted areas. Handle all electronic 
components only by their edges, and avoid touching connector traces 
and component pins.

90˚

battery

CD-ROM drive

lever

lever

release lever

(inside)

release lever

(inside)

keyboard

keyboard

tab

tab

tab

tab

tab

Содержание Crescendo WS G3

Страница 1: ...k we strongly recommend that you first upgrade the Mac OS software Next install the Crescendo WS processor upgrade Finally install any remaining upgrades com plete each upgrade and test it before proc...

Страница 2: ...omputer s CD ROM drive Double click the Crescendo WS Installer icon to start the utility 2 Click the Install button to start the software installation the process takes just a few seconds 3 After the...

Страница 3: ...ach inside the expansion bays to locate the two small ridged plastic tabs these are the keyboard release levers Slide the levers toward you until the lower edge of the keyboard rises Figure 3 6 Lift u...

Страница 4: ...rom your body Figure 6 2 Remove the two screws securing the internal heat sink plate Figure 7 3 Pull up on the attached handle and remove the heat sink plate Figure 8 Hardware Installation Support Not...

Страница 5: ...card up and away from the logic board Move RAM Memory From Processor Card to Crescendo WS Depending on the configuration of your PowerBook your processor card may have RAM modules installed on both si...

Страница 6: ...hat the connectors are face down and the tabs on the edge of the card are facing left Figure 15 Grasping the card by its right edge and the edge of its RAM slot carefully insert the tabs into the proc...

Страница 7: ...sconnected for now 4 Affix the Powered by Sonnet label to your computer Turn On Computer 1 Press the Power button on your PowerBook You will NOT hear the normal startup sound but a long tone instead t...

Страница 8: ...graded PowerBook to switch between Mac OS 9 x and OS X see page 10 Enable AltiVec Existing OS 9 0 installation This section describes how to update an existing Mac OS 9 0 installa tion to enable AltiV...

Страница 9: ...AltiVec Upgrade to Mac OS 9 0 This section describes how to upgrade to your PowerBook s system soft ware to Mac OS 9 0 from a previous version AltiVec support for your Crescendo WS G4 upgraded PowerB...

Страница 10: ...elect your Mac OS X volume not the Mac OS X CD then click Restart your installation is complete Updating and Maintaining Mac OS X At some time in the future you may wish to upgrade to Mac OS X or upgr...

Отзывы: