background image

USER MANUAL 

22

 SOLOSHOT.COM

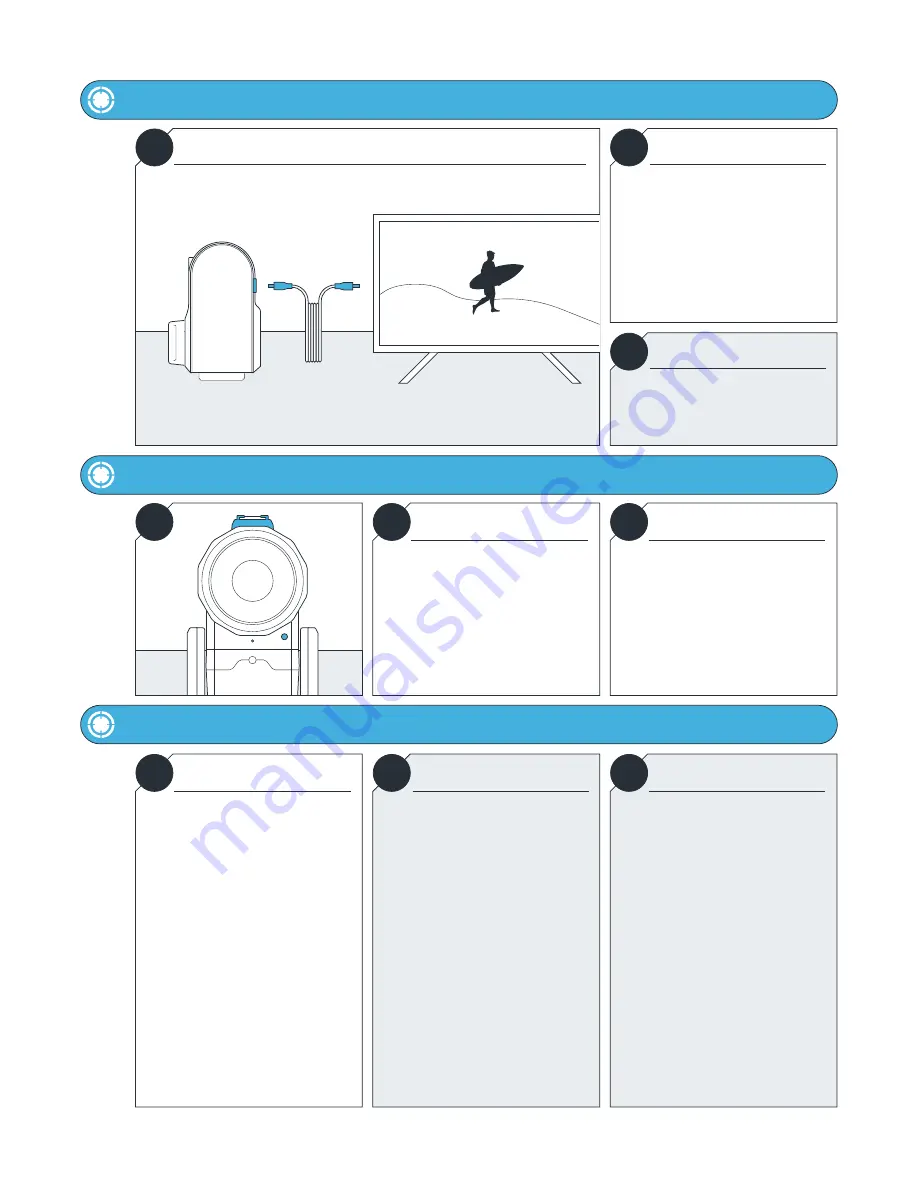
HDMI Out

Maintenance

Audio and Hot Shoe Mount

i

Overview

i

Information

!

WARNING

Provides output and Video Playback for TVs and Monitors.
Micro HDMI cable is required.

The Base outputs uncompressed video 

from the Optic65 and Optic25 Cameras 

at 720p60.
HDMI out is available anytime Camera 

Preview is available on the Base.
The color space of the HDMI output is 

RGB.

To avoid damage, remove all cables 

prior to and during calibration as the 

Base spins.

i

i

!

!

Care

DO NOT...

i

Audio

i

Hot Shoe

DO...

The Base contains many electrical and 

mechanical parts and must be cared for 

to prolong life. 
As a general rule of thumb, here are do’s 

and don’ts.

... submerge the Base and Camera 

underwater. They are not water 

resistant.
... stick any foreign objects between 

the tilt and main structure of the Base.
... manually pull the lens out of the 

camera. Attempting to do so will 

damage the motors.
... manually force the Base to tilt 

or pan.
... attempt to open the Base to 

troubleshoot. This will void your 

warranty.
... keep cables plugged in during device 

calibration.

Audio Compression: AAC 48KHz 

(128Kbit/s)
Internal Mic: Mono, Digital
External Mic: Analog, Stereo (3.5mm)
Remote Wireless Mic: Supported 

(sold separately)

... clean the Base by lightly wiping with 

a damp cloth.
... remove the Base from the tripod after 

each use.
... consistently update to the latest 

software to optimize the Base.
... rinse your Tag and armband in fresh 

water after contact with saltwater.
... clean the lens with a microfiber 

cleaning cloth.

The hot shoe can be used to mount an 

external mic and will accommodate 

future SOLOSHOT accessories.

Содержание Soloshot3

Страница 1: ...rajectory 14 CAMERA SETTINGS 15 Access Camera Settings 15 Video Mode 15 Photo Mode 16 Taking Photos 16 MULTI MODE 17 Requirements 17 Filming Multiple TAGS 17 from a Single BASE Filming a single TAG 18 from Multiple BASES Angles Filming Multiple TAGS 18 from Multiple BASES MOTION TIME LAPSE COMIMG SOON 19 Setting MTL Parameters 19 Setting Start and End Points 19 UPDATE APP 20 Performing a Software ...

Страница 2: ...USB Type A Port HDMI Out Micro SD Card Slot Camera Release Button Power Button Touchscreen 3 8 Tripod Mounting Head OpticX Camera Tripod Tool Tripod Adapter Screw Mini USB Charging Cord Base Tag Armband 1 2 3 USER MANUAL 02 SOLOSHOT COM 1 2 3 The Tag In the Box Your SOLOSHOT3 1 2 3 4 5 6 7 8 9 10 11 12 13 The Base OpticX Camera 2 4 5 6 7 8 13 3 1 9 10 11 12 ...

Страница 3: ...amera You will hear a click when fully inserted Your SD card will be completely erased Make sure to save any content that you don t want erased Visit support soloshot com for a list of compatible SD cards 2 Fully charge the Base and Tag prior to use This will take about 4 hours Charging time varies based on USB wall adapter rating Charging Time i INFO Only the Base Tag contain batteries and must b...

Страница 4: ...Tag A SOLOSHOT account is required before setup of your SOLOSHOT3 Preparing your SOLOSHOT3 Update and Registration 1 3 2 For the best results we recommend mounting the Base on a Tripod with a 3 8 mounting screw If you already have a pan tilt head on your tripod please remove it prior to connecting your Base If your tripod only has a screw use the provided Tripod Adapter Screw Connecting the Base t...

Страница 5: ...red on Do not setup under an overhang dense tree canopy or close to a building or cliffs Open and set up the Tripod by unlocking the Leg Locks a and extending the telescoping legs until the Tripod is at the desired height Lock the Leg Locks In windy or otherwise unstable conditions be sure to widen the leg stance using the Wide Leg Locks b Tripod Neck Extension Extend the Tripod Neck by loosening ...

Страница 6: ... your setup location and leaving your Base and Camera unattended Tags Select Tags that you would like to track from the Tag Manager Track Start stop tracking toggle record on off trigger single photos or bursts adjust tracking and camera settings quickly manage your Tag s and live stream Time Lapse Capture a series of photos at preselected intervals Coming Soon Settings Manage Wi Fi format the SD ...

Страница 7: ... you to either begin tracking or change tracking settings Select TRACK The Base and Camera will spin and tilt for about one minute as it calibrates the sensors USER MANUAL 07 SOLOSHOT COM Select the TRACK MODE that best matches your activity See page 14 Track Mode descriptions Tap CONTINUE to begin calibrating the system Before beginning your activity we recommend that you walk back and forth in f...

Страница 8: ...era viewfinder appears on the screen The LED at the front of the BASE blinks green If every selected Tag indicates they do not wish to be tracked then the Base will be idle LED is highly directional and changes brightness with distance If you can see it the Base is pointing at you and you are within range Slow Blinking Base is actively tracking No problems detected Rapid blinking or No blink Probl...

Страница 9: ...a Tag meets the pre requisites Tags remain in the list until the Base has been turned off but will remain in the ALL list Always wear the Tag with buttons facing upward Snap the Tag into the Armband Clip with the button side aligned with the clip window You will hear a distinct click when Tag is in place Check the alignment and adjust if necessary USER MANUAL 09 SOLOSHOT COM Tapping the Tag Icon w...

Страница 10: ...remain Home Exits the Track App ends tracking recording and takes you back to the Home Screen Wi Fi Opens WiFi settings Refine Allows you to manually adjust the framing of the the subject in the viewfinder Settings Opens the Settings window allowing you to change camera mode and tracking settings 6 9 8 Using the Tag Screen Battery Level Displays the remaining battery level Tracking Status Displays...

Страница 11: ...ignal Double tap the button to pause or resume tracking Tracking Paused Tracking Active USER MANUAL 11 SOLOSHOT COM i No Tags The system is smart If there are no other Tags to track then the Base will automatically stop recording tracking Users can override this from the Base Press and hold the button to toggle record on or off A good GPS signal is required for tracking Be sure to power on the Tag...

Страница 12: ...ion Sheet The live streaming action sheet allows you to begin live streaming or change live stream settings Tap GO LIVE or SETTINGS Tap the LIVE button REQUIREMENTS Connected to Wi Fi Internet Speed Requirements A minimum of 5 Mbps upload speed Stream quality depends on the internet connection speed Base is calibrated See page 8 CALIBRATING Regardless of recording resolution the live stream video ...

Страница 13: ...From the Home Screen Open Settings Default Settings Advanced Track Settings i i Minimum Distance Maximum Distance The Base is optimized to track Tags at least 10 feet away When tracking Tags inside a 10 feet radius the Base may temporarily lose the subject Up to 2 000 feet away If Tags fall out of range the Base will become idle or track the next available tag in multi mode Many tracking settings ...

Страница 14: ...determines where the subject will appear within the shot Choosing a framing setting is entirely based on personal preference Framing Parameters Top Left Top Center Top Right Middle Left Center Middle Right Bottom Left Bottom Center Bottom Right Note When the Field of View has been set to medium or tight the only framing parameters available are Middle Center and Bottom Center If the Base temporari...

Страница 15: ...S Select CAMERA SETTINGS Enter CAMERA SETTINGS above Tap RESOLUTION to change the video resolution Optic65 Camera 4k30 1080p30 1080p60 1080p120 Optic25 Camera 1080p30 1080p60 720p120 Select desired resolution Tap the BACK ARROW to exit CAMERA SETTINGS USER MANUAL 15 SOLOSHOT COM i The Camera is set to Video Mode with a resolution of 1080p60 DEFAULT SETTINGS IMPORTANT Tracking and recording stop wh...

Страница 16: ...e between when you tell the Camera to take a photo s to when the shutter fires When Burst is selected a new option is available Rate This setting allows you to choose the number of consecutive photos to take over a period of time In Photo Mode Must be Calibrated and Tracking Tap the SHUTTER RECORD button Press the Button on the Tag The Camera will take photos based on your selected settings USER M...

Страница 17: ...W Calibrate your Base and begin Tracking 1 Select Tags Enter the Tag Manager from either the Home Screen or the Track App Select which Tags you want to follow USER MANUAL 17 SOLOSHOT COM Requirements At least two 2 Tags and or Bases must be turned on and Tracking Purchase additional products at soloshot com Requirements The Tags that you d like to track in the session must be saved to the Base Clo...

Страница 18: ... tapping the BACK ARROW Calibrate your Base and begin Tracking Filming Scenarios Single Tag from multiple Base Filming Scenarios Multiple Tags from multiple Bases Enter the TAG MANAGER On all Bases being used Toggle tracking on for all Tags that you would like to track Select FOLLOW MODE Follow Modes can be different on each Base Exit the TAG MANAGER by tapping the BACK ARROW Calibrate your Base a...

Страница 19: ...se It is calculated by multiplying the interval by number of frames and is displayed in total minutes Setting Start and End Points Use the arrows to find a START point and adjust the field of view degree of zoom Tap SET Use the arrows to select the END point zoom is disabled at this stage Tap SET Tap the Time Lapse Icon to begin USER MANUAL 19 SOLOSHOT COM 2 Modify Settings Modify Interval and Num...

Страница 20: ...update the Base Tag and Camera If no updates are available then tap DONE to return to the home screen In the home screen select the UPDATE APP The system will automatically check for available update The Tag must be placed in Update mode before updating the software Power off the Tag by holding down the Power button for 2 seconds until the screen turns off Dock the Tag into the accessory port on t...

Страница 21: ...me and time zone Recommended Set automatically Account Within the Account app view the name and details associated with your Base s Creating an account is part of the process when using a new Base for the first time Go to app soloshot com to create an account Base Name Your first Base registered with your account will be listed as B1_username If you register a second Base it will be listed at B2_u...

Страница 22: ...ra underwater They are not water resistant stick any foreign objects between the tilt and main structure of the Base manually pull the lens out of the camera Attempting to do so will damage the motors manually force the Base to tilt or pan attempt to open the Base to troubleshoot This will void your warranty keep cables plugged in during device calibration Audio Compression AAC 48KHz 128Kbit s Int...

Страница 23: ...r computer does not have a built in reader an external reader will be needed A MicroSD Card Adapter below may be needed This is usually included with the MicroSD Card Offloading Content 1 Push the MicroSD card to eject it from the SD card port Carefully remove the MicroSD Card Do Not use sharp metal tools to remove the card This may damage the MicroSD Card port Ejecting the MicroSD Card ADAPTER Mi...

Отзывы: