background image

solasfires.com

3

LIGHTING & OPERATION

PM

AM

WARNING: If you do not follow these instructions 

exactly, a fire or explosion may result causing 

property damage, personal injury or loss of life.

When lighting this appliance, follow instructions exactly.

A.  This appliance is equipped with an ignition device that 

automatically lights the pilot. Do not try to light the pilot 

by hand.

B.  BEFORE OPERATING THE BURNER SYSTEM, smell 

around the appliance area for gas. Be sure to smell next 

to the floor because some gas is heavier than air and 

will settle on the floor.

WHAT TO DO IF YOU SMELL GAS

• Do not try to light the appliance.
•  Do not touch any electric switch; do not use any telephone 

in your building.

•  Immediately call your gas supplier from a neighbor’s 

telephone. Follow the gas supplier’s instructions

•  If you cannot reach your gas supplier, call the fire 

department.

C.  Use only your hand to operate the gas controls. Never 

use tools. If a knob will not push in or turn by hand, don’t 

try to repair it, call a qualified service technician. Force 

or attempted repair may result in a fire or explosion.

D.  Do not use this appliance if any part has been under 

water. Immediately call a qualified service technician 

to inspect the appliance and to replace any part of the 

control system which has been under water.

OPERATING INSTRUCTIONS

1.  STOP! Read the safety information above on this label.
2.  This appliance is equipped with an ignition device that 

automatically lights the pilot. Do not try to light the pilot 

by hand.

3.  Using the Remote, or the optional Wall Touch Pad, push 

the “ON/OFF" button until you hear an audible signal to 

insure the appliance is off.

4.  Wait five (5) minutes to clear out any gas. Then smell for 

gas including near the floor. If you smell gas, STOP! Follow 

“B" in the safety information above. If you don’t smell gas, 

proceed to step 5.

5.  Using either the Remote or the optional Wall Touch Pad, 

press and hold the “ON/OFF" button for 4 seconds. An 

audible signal confirms the start sequence has begun.

6.  Continuing beeps confirm the ignition is in process. Once 

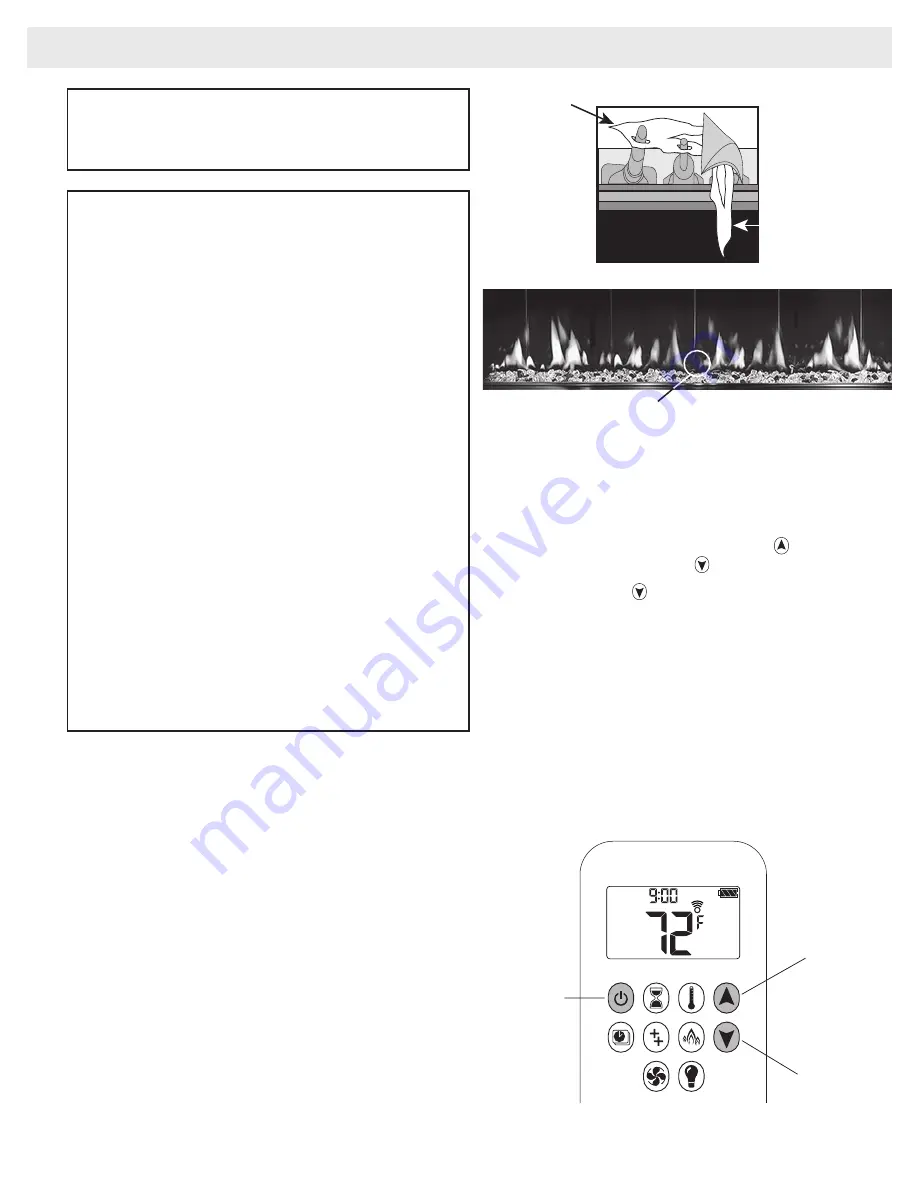
lighting the pilot flame should appear as shown below. 

Once the pilot is confirmed, the main burner ignites on high. 


Flame

Flame


NOTE:

 If the pilot does not stay lit after several tries, 

proceed to step 9

.

7.  Use the flame height adjustment buttons on either the 

Remote or the optional Wall Touch Pad to adjust the flame.  

To increase flame height, press and hold  . To decrease 

flame height, press and hold  . 

8.  Press and hold the   button on the Remote or optional 

Wall Touch Pad to set the appliance to Pilot flame only.

9.  If the appliance will not operate, follow the instructions 

“TO TURN OFF GAS TO THE APPLIANCE" and call your 

gas service technician or gas supplier.

TO TURN OFF GAS TO THE APPLIANCE

1.  To turn off gas to the appliance, push and release the 

“OFF" button on either the Remote or the optional Wall 

Touch Pad. An audible signal will confirm.

2.  TO TURN OFF THE GAS SUPPLY TO THE APPLIANCE, 

close the shut-off valve on the gas supply line to the 

appliance.

HI Flame

LO Flame

ON/OFF

Pilot Light

Pilot Light Location

Содержание One-Touch Remote

Страница 1: ...ake great pride in every fireplace we make with every product being fully tested throughout the production process to ensure your safety and warmth throughout the years Sincerely The SÓLAS Team SUPPLEMENTAL MANUAL Your Fireplace has been equipped with the SÓLAS next generation control system Please refer to this supplemental manual for operation of the SÓLAS One Touch Remote ONE TOUCH REMOTE ...

Страница 2: ...ame supervision device which will shut off the gas supply if for any reason the pilot flame goes out This device incorporates a fixed probe which senses the heat from the pilot flame If the probe is cool the device will prevent any gas flow unless manually lighting the pilot See full lighting instructions NOTE Periodically conduct a visual check to ensure the pilot and burner flames are as shown t...

Страница 3: ...t automatically lights the pilot Do not try to light the pilot by hand 3 Using the Remote or the optional Wall Touch Pad push the ON OFF button until you hear an audible signal to insure the appliance is off 4 Wait five 5 minutes to clear out any gas Then smell for gas including near the floor If you smell gas STOP Follow B in the safety information above If you don t smell gas proceed to step 5 5...

Страница 4: ...s and hold the Control Module s RESET button until you hear one short beep and one long beep After the second beep release the reset button 5 Within the subsequent 20 seconds press and hold the button on the Remote for 2 3 seconds will be displayed and flash on the Remote during the pairing sequence The Remote will count up from 1 to 8 and you will hear two short beeps confirming the pairing is co...

Страница 5: ...e breaker Automatic Shut Off in certain conditions Your fireplace s Remote is equipped with an automatic shut off mechanism which is activated in certain conditions See page 38 in the Remote Control Operation section for a description of this feature NOTE Before using the remote control system for the first time the Control Module and the Remote are synchronized at the factory See the section SÓLA...

Страница 6: ...ld Proof Light not used Comfort Blower Program Mode Temperature Time Auxiliary Feature not used Countdown Timer Battery Status Split Flow Mode not used F or C DO NOT leave the Remote on the hearth mantel or on top of the fireplace Use the Remote wall mount holder provided ONE TOUCH REMOTE MAIN DISPLAY OVERVIEW ...

Страница 7: ...ilot does not stay lit after several tries call your local service technician or gas supplier TO TURN OFF FIRE Press to turn OFF When the pilot is off it will take 2 minutes before it can be lit again NOTE There is a 2 minute delay after switching off before the next ignition is possible CAUTION Always check the fire and pilot visually to ensure they are off FLAME HEIGHT ADJUSTMENT To increase fla...

Страница 8: ...hold simultaneously 2 disappears Child Proof is now inactive and the Remote has full function COUNTDOWN TIMER You can set your fireplace to automatically turn off at the end of a timer To set a Countdown Timer 1 Press and hold until is displayed Hour flashes 2 Press or to select Hour 3 To confirm press Minutes flash 4 Press or to select Minutes 5 To confirm press or wait To turn off a Countdown Ti...

Страница 9: ...erature for Thermostatic Mode is the temperature for the ON time in Program Mode Changing the Thermostatic Mode set temperature also changes the ON time temperature in Program Mode Default Settings ON TIME Thermostatic TEMPERATURE 70 F 21 C OFF TIME TEMPERATURE pilot flame only Temperature Setting 1 Press and hold until flashes ON and set temperature set in Thermostatic Mode is displayed 2 To cont...

Страница 10: ...te This could cause a short circuit NOTE The batteries in your SÓLAS One Touch remote control and control module are to be replaced annually Only use brand name alkaline batteries such as Duracell or Energizer Remote The battery icon will show when the battery needs to be replaced Replace with two 1 5 V AAA alkaline batteries Control Module Frequent beeps for 3 seconds when the motor turns indicat...

Страница 11: ...3 failed ignition sequences F06 shown No gas supply Air in pilot supply line No spark Reversed polarity in thermocouple wiring F06 F06 4 seconds 3 failed ignition sequences in 5 minutes Fire is not responding no pilot flame No gas supply Air in pilot supply line No spark Reversed polarity in thermocouple wiring Incorrect pilot orifice if valve has been converted from LPG to NG or vice versa F07 Lo...

Страница 12: ...OSING solasfires com We recommend that our gas hearth products be installed and serviced by professionals who are certified in the U S by the National Fireplace Institute NFI as NFI Gas Specialists www NFIcertified org ...

Отзывы: