PROGRAMMING
TRANSMITTER LEARNING
Important! The remote starter will hold 3 transmitter codes. It is recommended that when programming in transmitters, you fill up all three
transmitter codes, even if only using one or two transmitters. This will clear all other transmitter coding from the unit and prevent stray coding
or possible interference from other remote transmitters.
1. Turn Ignition ON-OFF-ON.
2. Press the valet switch TWICE (button) in the antenna, siren/horn (optional) will chirp once each time button is pressed.
3. Press and hold the valet switch, siren/horn will chirp 3 times & parking lights will turn on to indicate you have entered Transmitter
Learning Mode.
4. Press Button 1 (Lock) of every transmitter to be coded. For 2-Button Remotes press both buttons together, for 1 Button remotes press
the Start button. The siren/horn will chirp once and the parking lights will flash once to indicate successfully learning. System will exit
Learn Mode and lights will turn off after 15 seconds of no activity.
5. Turn ignition OFF and the unit will exit code-learning mode.
TACH LEARNING
1. Start the vehicle with the key.
2. Press foot brake and hold down.
3. Within 10 seconds, press and release the valet switch. The unit will enter Tach Learning Mode automatically.
4. If a Tach signal is detected, the parking light will flash and siren/horn will chirp according to Chart below.
2 FLASHES - Tach Learn - Hard wired Tach Source from vehicle or hard wired output from bypass module
3 FLASHES - Data Tach Learn - Tach signal from bypass module through 2-Way Datalink
4 FLASHES - Tachless Mode - No tach wire is connected and remote starter monitors the vehicle system to ensure it is running
10 FLASHES - Tachless Mode Not allowed in Manual Transmission
ENTERING PROGRAM MODE
1. Turn ignition ON-OFF-ON. (Leaving Key is ON position)
2. Press the valet switch 1 time and release.
The parking lights will flash and the siren/horn will chirp once to confirm.
3. Press and Hold valet button for 3 seconds. The system confirms with 1 siren/horn pulse and park light flash to confirm that it is now in
Program Mode.
Selecting Program Menu
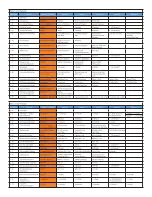
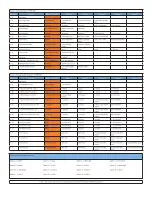
1. Once Program mode has been entered, pressing the remote will select the different program menus as below.
Button 1 ( Lock) will select MENU 1 – 1 light flash siren / horn chirp
Button 2 (Unlock) will select MENU 2 - 2 light flashes siren / horn chirps
Once a MENU is selected by remote, the system will be in at Setting 0, which is the reset to default for that Menu
Selecting Program Feature Menu
1. Enter Program Mode and select Menu.
2. Press and release the Valet (Program) Button the correct number of times to select the desired Feature. The park lights will flash once and
the siren/horn will chirp each time the programming button is pressed. The LEDs in the antenna will flash in sets to indicate which Feature
Menu has been selected. (e.g. 3 flashes = Feature 3)
Changing a Feature Setting
1. Once the correct Feature Menu has been selected, press and hold the Program Button until the park lights flash and the siren/horn chirps
to confirm the desired setting. For example:
1 park light flash and 1 chirp= Setting 1;
2 park light flashes and 2 chirps= Setting 2, etc...
The LEDs will continue to flash indicating which Feature Menu you are in (Note: LEDs turn off when the programming button is held
down).
NOTE: Turning the ignition key to the off position or 15 seconds of no activity will exit program mode. Specific Output Times
can only be programmed with the Solace Hand Held Programmer.
MASTER RESET (To reset ALL menus)
1. Turn ignition ON-OFF-ON. (Leaving Key in the ON position)
2. Press and release the valet switch 3 times.
The parking lights will flash and the siren/horn will chirp 3 times.
3. Press and Hold valet button for 3 seconds. The system confirm with 5 siren/horn pulses & park light flashes to confirm system reset was
performed.
4. To exit turn ignition off


