


TESTING VEHICLE WIRES
CONTINUED
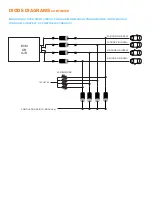
WHEN LOOKING FOR A POSITIVE (+) WIRE CONNECT ONE LEAD OF YOUR MULTI METER TO A CHASSIS
GROUND.
WHEN LOOKING FOR A NEGATIVE (-) WIRE CONNECT ONE LEAD OF YOUR MULTI METER TO A 12V (+)
CONSTANT SOURCE
IGNITION (+)
- This wire provides a 12V(+) Source to the Ignition circuit on the vehicle.
To test for this wire use a multi meter set to DC Voltage with one lead to chassis ground and the other lead to
probe for a wire that reads between 10-16Volts (+) when the key is in the run and STAYS ON during Start (Crank)
position in the key switch. Connect the Pink wire on CN1 to this wire. If there are more than 1 starter wires on
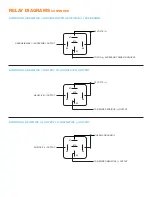
the vehicle then you can use the Pink/White from CN1 and program for 2nd Ignition in Menu 2-01 or use the
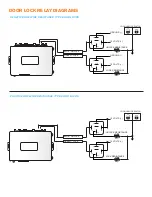
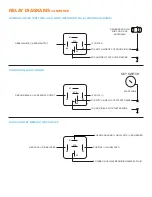
Pink/Black on CN3 through a Relay to power this wire. See relay guide.
IGNITION (-)
- This wire provides a Negative(-) Source to the Ignition circuit on the vehicle.
To test for this wire use a multi meter set to DC Voltage with one lead to 12V(+) Constant and the other lead to
probe for a wire that reads between 10-16Volts (-) when the key is in the Run position and STAYS ON during Start
(Crank) position in the key switch. Connect the Pink/Black wire on CN4 to this wire.
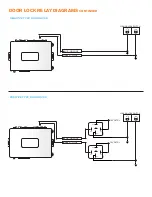
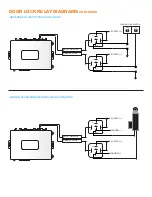
PARK LIGHTS (+)
- This wire will usually be found at the park light switch but on most vehicles can be found at
the Fuse Box or Driver’s Kick panel. To test for this wire use a multi meter set to DC Voltage with one lead to
chassis ground and the other lead to probe for a wire that reads between 10-16Volts (+) when just the park lights
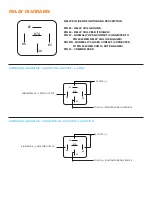
are turned on by the switch. If there is more than 1 park light wire on the vehicle you can isolate them by using 2
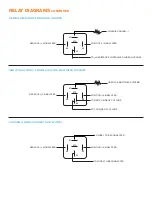
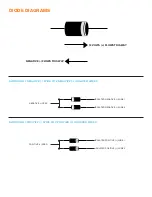
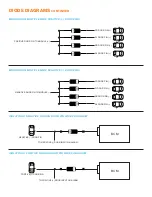
6 amp diodes or relays. See Diode and/or Relay Guide for installation.
PARK LIGHTS (-)
- This wire will usually be found at the park light switch.
To test for this wire use a multi meter set to DC Voltage with one lead to 12V(+) Constant and the other lead to
probe for a wire that reads between 10-16Volts (-) when just the park lights are turned on by the switch. Connect
the White/Black wire on CN4 to this wire to. It may be possible that a negative park light wire be Multiplexed. In
this case please refer to the Relay Diagram for installation.
HORN (-)
- This wire will be usually found at the clock spring or in the harness coming from the steering wheel.
To test for this wire use a multi meter set to DC Voltage with one lead to 12V(+) Constant and the other lead to
probe for a wire that reads between 10-16Volts (-) when the horn is on, it will most likely rest at 12V (+). Connect
the Brown/Black wire on CN4 to this wire. It is possible that some vehicles may need a shorter or longer timing
output to sound the horn. The timing of the pulsed output on this wire can be adjusted in Menu 3-08
DISARM AND REARM (-)
-Test the vehicle for a OEM Content Alarm System (Factory Alarm). There a number of
ways to test if the vehicle has a OEM Alarm System.
1.
Sit in the vehicle with all doors shut and press lock on the OEM Keyless remote, or
With the door open press lock on the door panel lock switch and shut the door, or
Shut the door and turn the key in the lock key cylinder on the exterior of the door.
2.
Wait approximately 1 minute then manually unlock the door and open. If the horn starts to sound then
the vehicle has a OEM Alarm System and proceed to Step 2. If there is no horn honks then the vehicle is not
equipped with an OEM Alarm System and you can move on to testing wires
3.
To shut off the alarm follow this sequence, turn the key to the unlock position in the door cylinder. If the
horn stops honking then this is the way to disarm the OEM Alarm System, if this doesn’t work then try,
Starting the vehicle by key, if the horn stops honking then this is the way to disarm the OEM
Alarm System, if this doesn’t work then try,
Pressing unlock on the OEM Keyless Remote, if the horn stops honking then this
is how to disarm the OEM Alarm System


