123
Settings (Using PC WEB UI)
809SH
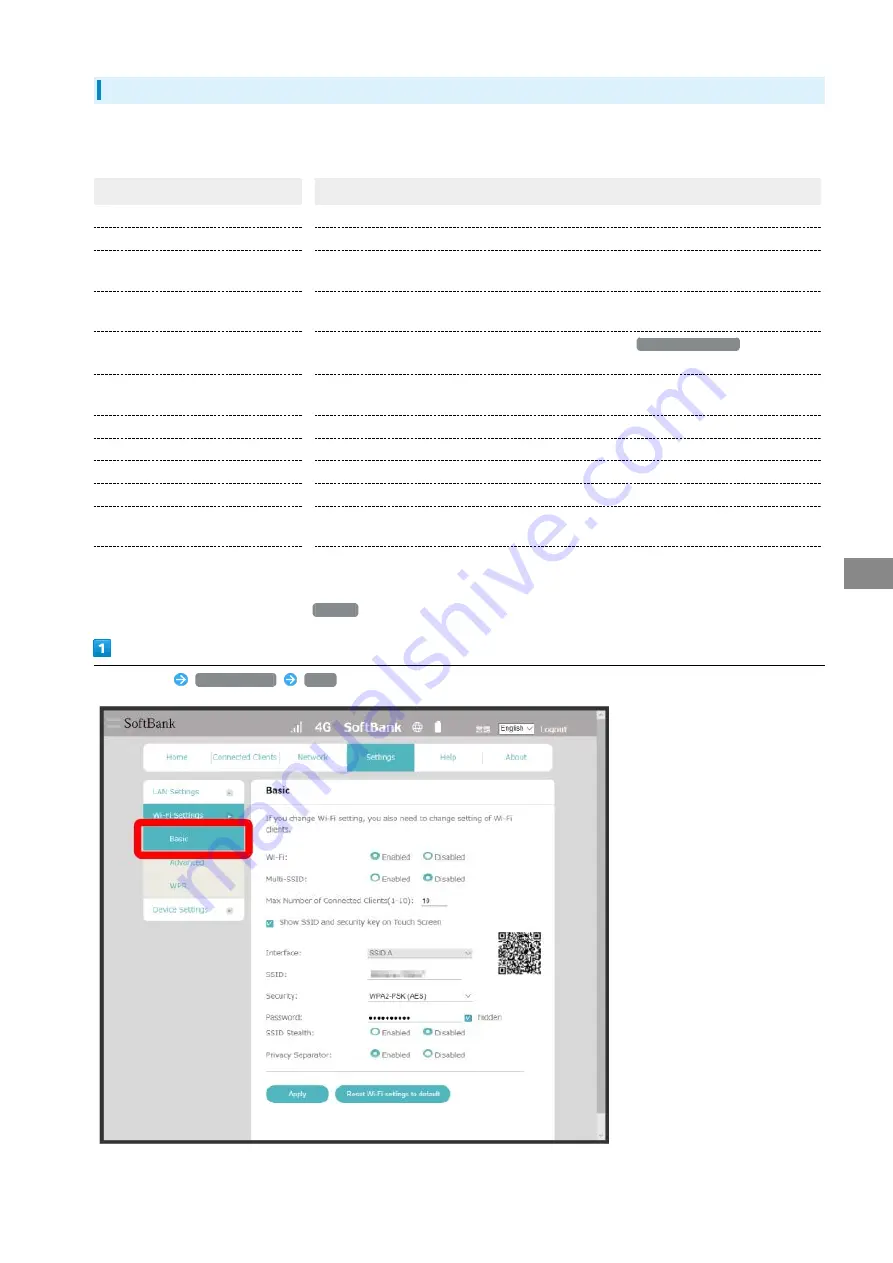
Enabling Multi SSID Function (SSID B)
Make basic WLAN settings for SSID B. Enable Multi-SSID beforehand.
Setting items are as follows:
Item
Description
Wi-Fi
1
Set whether to enable WLAN.
Multi-SSID
Set to enable SSID B.
Multi-SSID AP Isolation
2
Set whether to permit interactive communication between SSID A and SSID B connected
devices.
Max Number of Connected Clients
(1-10)
1
Set the number of connectable devices to Wi-Fi router.
Show SSID and password on Touch
Screen.
1
Checkmark to show SSID and password (Security Key) when
Manual Connection
is tapped on
Wi-Fi router's Touch Menu.
Interface
Select SSID to set. Not selectable by default. Only SSID A is shown. If Multi-SSID is enabled,
SSID B becomes also selectable.
SSID
Set SSID B name that is shown on WLAN devices to be connected.
Security
Set security.
Password
Set password.
SSID Stealth
Set whether not to notify SSID B name of Wi-Fi router.
Privacy Separator
Set whether to prohibit interactive communication between WLAN devices connected to SSID
B.
Access the Web Interface
2
Set whether to permit access to Web UI from WLAN devices connected to SSID B.
1 Setting common to SSID A/SSID B.
2 Available when "Multi-SSID" is set to
Enabled
.
"Settings" tab
Wi-Fi Settings
Basic
Содержание 809SH
Страница 1: ...809SH User Guide...
Страница 2: ......
Страница 8: ...6...
Страница 34: ...32...
Страница 38: ...36...
Страница 42: ...40...
Страница 76: ...74...
Страница 79: ...77 Settings Using PC WEB UI 809SH Logging into Web UI In Web UI Home Page Login Login window opens...
Страница 88: ...86 4G LTE 3G 4G LTE Apply The desired network is set...
Страница 92: ...90 OK International roaming setting is applied...
Страница 94: ...92 OK Wi Fi Automatic Disconnection is set...
Страница 96: ...94 New Creation screen for a new profile appears...
Страница 98: ...96 PIN Verification Set PIN Verification SIM PIN is set to 9999 by default Network tab PIN Management...
Страница 103: ...101 Settings Using PC WEB UI 809SH Change PIN PIN change screen appears Set each item OK PIN is modified...
Страница 106: ...104 Set each item Apply DHCP is set...
Страница 108: ...106 Set each item Apply IP address filtering and WAN port PING block are set...
Страница 112: ...110 Canceling IP Address and Port Filtering Settings tab LAN Settings IP Address Filtering Click for the rule to delete...
Страница 113: ...111 Settings Using PC WEB UI 809SH OK Filtering is canceled...
Страница 115: ...113 Settings Using PC WEB UI 809SH Add Rule Set each item OK...
Страница 116: ...114 OK Port Mapping is set To edit setting click on setting list...
Страница 117: ...115 Settings Using PC WEB UI 809SH Canceling Port Mapping Settings tab LAN Settings Port Mapping...
Страница 118: ...116 OK Port Mapping setting is deleted...
Страница 120: ...118 Enabled Set DMZ IP address Apply DMZ is set...
Страница 122: ...120 Enabled Disabled Apply VPN pass through function is set...
Страница 126: ...124 Set Multi SSID to Enabled Select SSID B in Interface...
Страница 129: ...127 Settings Using PC WEB UI 809SH Set each item Apply OK Wi Fi is disconnected and Advanced Wi Fi setting is performed...
Страница 134: ...132 Enter current password Enter new password...
Страница 135: ...133 Settings Using PC WEB UI 809SH Enter new password again Apply New password is set...
Страница 138: ...136 OK Notification is deleted...
Страница 140: ...138 Checkmark Show usage on lock screen and icon Apply Data traffic volume is shown on Lock Screen and Icon...
Страница 142: ...140 Enter number for maximum traffic volume Select unit Apply Maximum traffic is set Select a unit GB or MB...
Страница 145: ...143 Settings Using PC WEB UI 809SH Setting USB Standard Set USB standard Settings tab Device Settings USB Mode...
Страница 146: ...144 2 0 3 0 Apply OK Device is restarted and USB communication standard is set...
Страница 150: ...148 Restore Restoration of settings start...
Страница 152: ...150 Enabled Disabled Apply Enabled Disabled of automatic software update is switched...
Страница 153: ...151 Settings Using PC WEB UI 809SH Updating Software Settings tab Device Settings Software Update...
Страница 156: ...154 Restore Factory Settings OK Wi Fi router reboots to its default settings...
Страница 157: ...155 Settings Using PC WEB UI 809SH Restarting Wi Fi Router Settings tab Device Settings Reboot Reboot...
Страница 158: ...156 OK Wi Fi router is restarted...
Страница 163: ...161 Settings Using Mobile WEB UI 809SH Logging into Web UI In Web UI Home Page Login Login window opens...
Страница 165: ...163 Settings Using Mobile WEB UI 809SH Web UI Window Layout Item Description Main Menu Toggle tab menu...
Страница 168: ...166 4G LTE 3G 4G LTE Apply The desired network is set...
Страница 169: ...167 Settings Using Mobile WEB UI 809SH International Roaming Set International data roaming Network tab Roaming Settings...
Страница 170: ...168 Enabled Apply...
Страница 171: ...169 Settings Using Mobile WEB UI 809SH OK International roaming setting is applied...
Страница 173: ...171 Settings Using Mobile WEB UI 809SH Settings tab Wi Fi Settings Basic...
Страница 174: ...172 Set each item Apply...
Страница 177: ...175 Settings Using Mobile WEB UI 809SH Settings tab Wi Fi Settings Basic...
Страница 178: ...176 Set Multi SSID to Enabled...
Страница 179: ...177 Settings Using Mobile WEB UI 809SH Select SSID B in Interface...
Страница 180: ...178 Set each item Apply...
Страница 183: ...181 Settings Using Mobile WEB UI 809SH Settings tab Wi Fi Settings Advanced...
Страница 184: ...182 Set each item Apply...
Страница 185: ...183 Settings Using Mobile WEB UI 809SH OK Wi Fi is disconnected and Advanced Wi Fi setting is performed...
Страница 187: ...185 Settings Using Mobile WEB UI 809SH Start WPS Status changes to PROCESSING...
Страница 190: ...188 Enter current password...
Страница 191: ...189 Settings Using Mobile WEB UI 809SH Enter new password...
Страница 192: ...190 Enter new password again Apply New password is set...
Страница 194: ...192 for notification to check Notification is shown...
Страница 196: ...194 Checkmark notifications to delete Checkmark the top checkbox to select all...
Страница 197: ...195 Settings Using Mobile WEB UI 809SH...
Страница 198: ...196 OK Notification is deleted...
Страница 200: ...198 Checkmark Show usage on lock screen and icon Apply Data traffic volume is shown on Lock Screen and Icon...
Страница 202: ...200 Enter number for maximum traffic volume Select unit Apply Maximum traffic is set Select a unit GB or MB...
Страница 205: ...203 Settings Using Mobile WEB UI 809SH Switching to PC Web UI Switch to Web UI for PC Switching to PC Web UI PC View tab...
Страница 206: ...204 OK Changes to Web UI for PC...
Страница 208: ...206 About tab Check device information...
Страница 218: ...216...
Страница 219: ...Safety Precautions Safety Precautions 218 General Notes 225...
Страница 233: ......


