background image


Disassembly sequence series 4060 


21


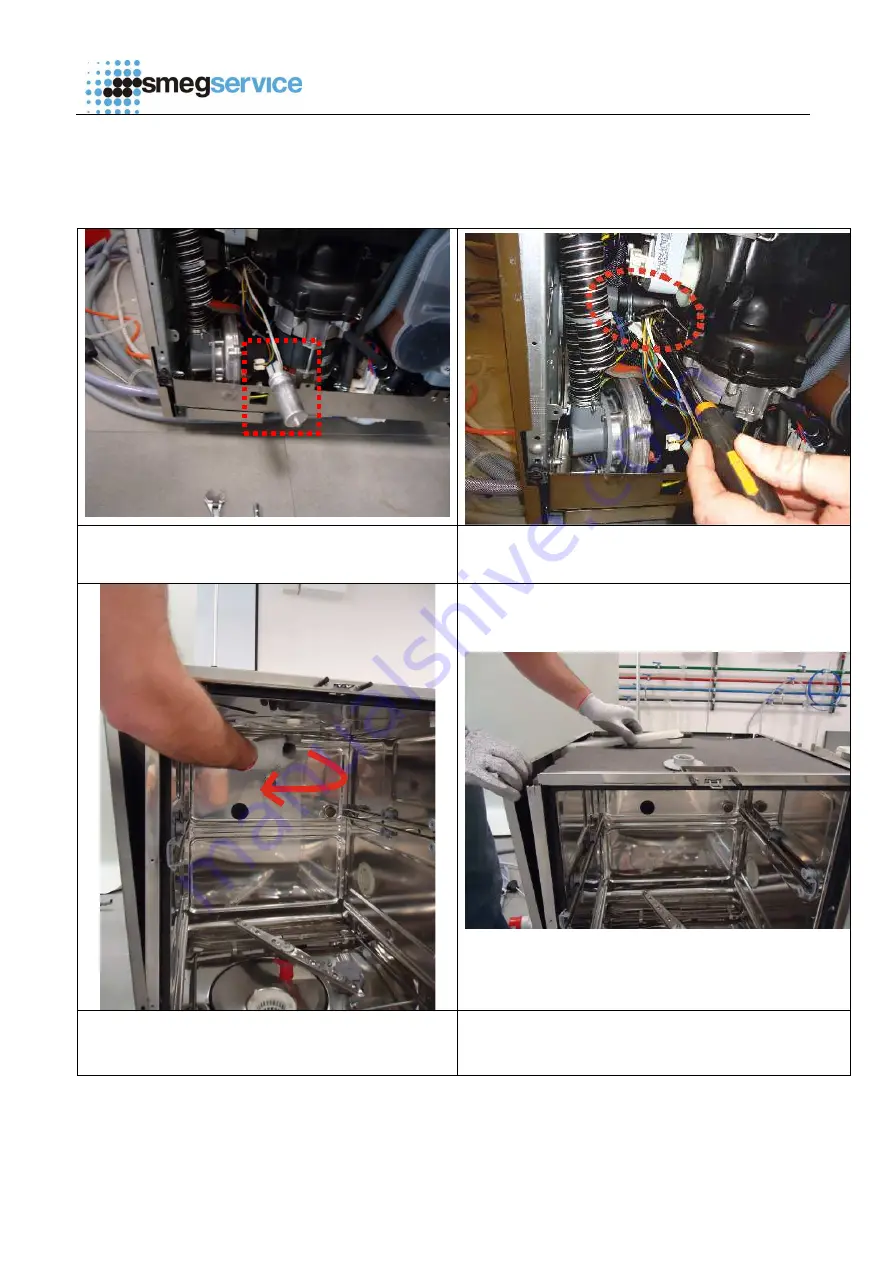
8.Remove the electrical connections to 
completely release the capacitor. 
 

9. Remove the clamp that fastens the upper spray 
arm delivery tube. 


10.Open the dishwasher door and remove the 
upper spray arm 


11. Now it is possible to remove the duct from the 
top of the appliance and .... 


Содержание 4060 Series

Страница 1: ...Disassembly sequence series 4060 1 COMPONENTS DISASSEMBLY SEQUENCE SERIES 4060 ...

Страница 2: ...d in the disassembly procedure 3 Tools used 4 Screws used 5 Front panel lock display board disassembly 6 Main electronic circuit board disassembly 10 Motor disassembly 13 Upper spray arm delivery tube disassembly 18 Transducer disassembly 23 Air trap disassembly 25 ...

Страница 3: ...TION TO MAKE WITH SPECIAL CARE SOME STEPS OF THE PROCEDURE REQUIRE THE PRESENCE OF 2 PERSONS OPERATION TO BE CARRIED OUT WITH THE HELP OF SUITABLE GLOVES Caution maintenance and any repairs must be performed by Smeg authorized service technician Warning For any replacement an original Smeg spare part must be used ...

Страница 4: ... TOOL No 2 Long nose pliers TOOL No 3 13mm Open ended spanner TOOL No 4 Box spanner 7mm TOOL NO 5 ELECTRIC IMPACT WRENCH AND OR SCREWDRIVER WITH INSERT FOR CROSS HEAD SCREW TOOL No 6 flat blade screwdriver TOOL No 7 Box spanner 6mm LIQUIDS VACUUM CLEANER PROTECTIVE GLOVES LATEX GLOVES ...

Страница 5: ...EWS USED Caution the machine requires different screws which must not be mixed Screws with smooth head steel for fastening the front components inside the machine Screws with knurled head for fastening components on the back of the machine ...

Страница 6: ... 2 DOOR LOCK 2 DISPLAY ELECTRONIC BOARD Tools required in this disassembly procedure TOOL No 1 Phillips slotted screwdriver Before any maintenance and repair of the equipment electrically disconnect the machine MACHINE FULL VIEW 1 Open the door of the appliance ...

Страница 7: ...ossible to remove the front panel paying attention to the electrical connections 3 View of components inside the front panel 1 Lock 2 Main electronic board 4 Disconnect the cable that electrically connects the display board FRONT PANEL REMOVAL OPERATION COMPLETED 5 Disconnect the earth wire Now it is possible to completely remove the front panel ...

Страница 8: ...ries 4060 8 2 door lock disassembly After removing the front panel according to the above procedure continue disassembling the door lock 1 Remove the two screws that secure the lock to the door tool n 1 DETAIL OF LOCK REMOVED ...

Страница 9: ...ng the display board 1 Remove the two screws that secure the display board unit to the front panel tool no 1 2 Now it is possible to remove the display board unit 3 Remove the two screws that secure the buttons and the silkscreen to the board and to the related support tool no 1 DETAIL 1 BUTTONS AND SILKSCREEN 2 DISPLAY BOARD 3 DISPLAY BOARD GUARD ...

Страница 10: ...red in this disassembly procedure TOOL No 1 Phillips slotted screwdriver 1 Open the door and remove the 6 screws that secure the front panel tool no 1 2 Now it is possible to remove the front panel paying attention to the electrical connections 3 Detail of the main electronic board ...

Страница 11: ...quence series 4060 11 4 Remove the two screws that secure the shell electronic board tool no 1 5 Disconnect the electronic board power supply cable 6 Now it is possible to remove the electronic board from its housing ...

Страница 12: ...ications TL TC TA Be careful when re connecting the TL TC TA connectors respectively washing temperature control temperature drying temperature as silkscreen printed on the board Warning for proper connection of the connectors match the silkscreen printing both on the electronic board and on the connector to be connected ...

Страница 13: ...e the top secured by two screws on the rear side of the machine tool no 1 2 Now pressing with the hand on the front top 1 push towards the back of the machine lifting it 2 to completely remove the component 3 Remove the 6 lateral screws and the 3 screws on the upper left corner that secure the rear panel of the machine VIEW OF COMPONENTS ATTACHED ON THE BACK OF THE APPLIANCE 1 2 ...

Страница 14: ...eries 4060 14 4 Front view place the machine on its left side taking care not to damage it 5 Now operate on the rear side of the machine Remove the screws indicated to disassemble the lower rear crossbar APPLIANCE REAR SIDE ...

Страница 15: ...series 4060 15 6 Loosen the cable gland of the power cord 7 Disconnect the capacitor drain tube 8 Release the pressure switch from the lower rear crossbar Tool no 2 Now it is possible to completely remove the lower crossbar ...

Страница 16: ...10 Disconnect the tubes shown 11 Now operate from the base of the dishwasher Remove the 3 screws that secure the base protection of the appliance tool no 1 12 Remove the base protection forward to remove it completely APPLIANCE BASE VIEW ...

Страница 17: ...ng tool no 7 remove the 6 screws that secure the washing motor to the related support bracket 14 Disconnect the pressure switch connecting tube and the electrical connections 15 Remove the motor from the housing MOTOR REMOVED Dishwasher bottom ...

Страница 18: ...ps slotted screwdriver TOOL No 2 Long nose pliers TOOL No 3 13mm Open ended spanner TOOL No 6 flat blade screwdriver 1 Remove the top secured by means of two screws on the rear side of the machine tool no 1 2 Now pressing with the hand on the front top 1 push towards the back of the machine lifting it 2 to completely remove the component 1 2 ...

Страница 19: ...60 19 3 Remove the 3 front screws that secure the left side tool no 1 4 Using tool no 6 press on the retention tooth that secures the side of the machine in order to access the lateral components APPLIANCE BASE VIEW Retention tooth ...

Страница 20: ...e the unit on its back taking care not to damage it Remove the 3 screws that secure the base protection of the appliance tool no 1 6 Remove the base protection forward to remove it completely 7 Remove the capacitor tool no 3 APPLIANCE BASE VIEW ...

Страница 21: ...trical connections to completely release the capacitor 9 Remove the clamp that fastens the upper spray arm delivery tube 10 Open the dishwasher door and remove the upper spray arm 11 Now it is possible to remove the duct from the top of the appliance and ...

Страница 22: ... sequence series 4060 22 12 by slightly moving the left side front view completely remove the component Warning the tightening of the clamp that secures the spray arms duct must not be positioned at the stroke end ...

Страница 23: ...illips slotted screwdriver TOOL No 2 Long nose pliers GLOVES 1 Remove the skirting board 2 Remove the two screws that secure the components protection tool no 1 3 Slip the protection downwards and rotate it slightly forward to remove it completely from the 4 Remove the clamp that secures the transducer tube tool no 2 ...

Страница 24: ...Disassembly sequence series 4060 24 housing 5 Remove the connector for electrical connection 6 Now it is possible to fully release the component from it housing ...

Страница 25: ...25 AIR TRAP DISASSEMBLY Tools required in this disassembly procedure TOOL No 1 Phillips slotted screwdriver TOOL No 2 Long nose pliers 1 Remove the skirting board 2 Remove the two screws that secure the components protection tool no 1 ...

Страница 26: ...e taking care not to damage the appliance 4 Remove the 3 screws that secure the base protection of the appliance tool no 1 5 Remove the base protection forward to remove it completely 6 Disconnect the tube that connects the air trap by removing the clamp tool no 2 APPLIANCE BASE VIEW ...

Страница 27: ...er spray arm 8 Remove the filter by turning it counterclockwise 1 1 1 2 9 Remove the drain compartment cover secured by means of 4 screws tool no 1 10 Grasp the air trap rotate clockwise 1 and then push the component 2 towards the machine back to remove it completely from the seat ...

Страница 28: ...RNING every time the air trap is changed it is recommended to replace also the black gasket Warning after assembling the new air trap spare part put back the clamp that secures the tube to the air trap as before to prevent any leaks gasket ...

Отзывы: