background image


HD-TVI Speed Dome

·

Quick Start Guide


2400 

OFF 

OFF 

4800 

ON 

OFF 

9600 

OFF 

ON 

19200 

ON 

ON 

1.2.1


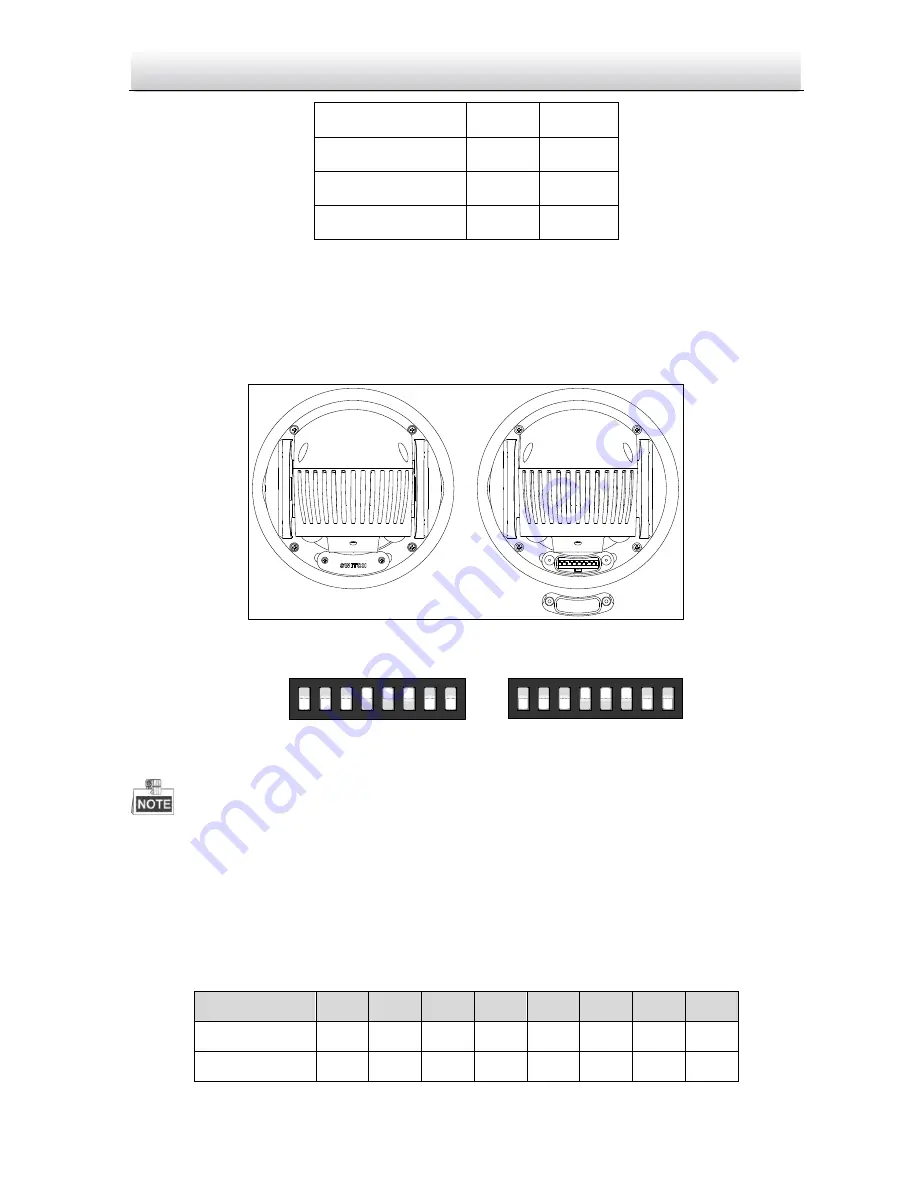
H20IPSDIR302 IR Speed Dome Settings 

Two DIP switches 

SW1

 and 

SW2

 are for setting the speed dome address, baudrate, protocol, etc., 

with value ON=1 and OFF=0. The switch label is on the back of the SWITCH cover as shown in Figure 
1-5. 
Each number of the switch represents a DIP value, ranging from 1 to 8 for the lowest to highest.   

SW1

SW2


Figure 1-5


Label of DIP Switch for IR Speed Dome 

ON

1

2

3

4

5

6

7

8

SW2

ON

1

2

3

4

5

6

7

8

SW1


Figure 1-6


Enlarged View of DIP Switch 


The default dome address is 0; the default baudrate is 2400; and the default value of the 120Ω 
terminator is OFF. 

Address Settings 

The SW1 switch is used for setting the address of speed dome. You can refer to Table 1-5 for details 
of setting the speed dome address to a specific number. 

Table 1-5


Set the Dome Address 

Dome Address 

OFF 

OFF 

OFF 

OFF 

OFF 

OFF 

OFF 

OFF 

ON 

OFF 

OFF 

OFF 

OFF 

OFF 

OFF 

OFF 

Содержание H20TVISD302

Страница 1: ......

Страница 2: ...ts or procedures described in the manual The figures in this manual are for reference only DISCLAIMER STATEMENT Underwriters Laboratories Inc UL has not tested the performance or reliability of the security or signaling aspects of this product UL has only tested for fire shock or casualty hazards as outlined in UL s Standard s for Safety UL60950 1 UL Certification does not cover the performance or...

Страница 3: ...rence received including interference that may cause undesired operation EU Conformity Statement This product and if applicable the supplied accessories too are marked with CE and comply therefore with the applicable harmonized European standards listed under the Low Voltage Directive 2006 95 EC the EMC Directive 2004 108 EC the RoHS Directive 2011 65 EU 2012 19 EU WEEE directive Products marked w...

Страница 4: ...or ceiling the device shall be firmly fixed If smoke odors or noise rise from the device turn off the power at once and unplug the power cable and then please contact the service center If the product does not work properly please contact your dealer or the nearest service center Never attempt to disassemble the speed dome yourself We shall not assume any responsibility for problems caused by unau...

Страница 5: ...mera Please use the gloves provided when handling the dome cover avoid handling the dome cover with bare hands Please use a soft and dry cloth when cleaning the inside and outside surfaces of the dome cover do not use alkaline detergents Please keep all packing from the speed dome It may come in useful if the dome fails and needs to be returned ...

Страница 6: ...IP Switch Settings 2 1 2 1 H20IPSDIR302 IR Speed Dome Settings 4 1 3 Installation 6 1 3 2 Installing the Bracket 6 1 3 1 Setting the DIP Switch 7 1 3 2 Installing the Speed Dome 7 2 1 System Application 8 2 2 Basic Operations 8 2 2 1 Configuring Patrol 9 2 2 2 Configuring Park Actions 12 ...

Страница 7: ...s The cable connections are shown in the following figure The cables are distinguished by different colors The labels attached on the cables are for identification H20TVISDIR302 RED AC24V YELLOW GREEN GND BLACK AC24V YELLOW R485 ORANGE R485 Video Output Yellow Green Yellow Orange Black Red Figure 1 1 Cables of 7 inch IR Speed Dome Table 1 1 Cables Description Name Description AC24V Power supply RS...

Страница 8: ...ption Name Description AC24V Power supply RS485 485 control CVBS VIDEO SD analog video output HD TVI VIDEO HD TVI and coaxial video output ALARM 2 ch alarm inputs and 1 ch alarm output 1 2 DIP Switch Settings The SW1 is used to set the address The SW2 is used to set the baudrate The default dome address is 0 The default baudrate is 2400 The speed dome is self adaptive to the Pelco P Pelco D and Pr...

Страница 9: ...he speed dome address Table 1 3 Set the Dome Address Switch No Dome Address 1 2 3 4 5 6 7 8 0 OFF OFF OFF OFF OFF OFF OFF OFF 1 ON OFF OFF OFF OFF OFF OFF OFF 2 OFF ON OFF OFF OFF OFF OFF OFF 3 ON ON OFF OFF OFF OFF OFF OFF 255 ON ON ON ON ON ON ON ON Baudrate Settings The number 1 and 2 SW2 switches are used for setting the baudrate of the speed dome The baudrate can be 2400bps 4800bps 9600bps an...

Страница 10: ...1 to 8 for the lowest to highest SW1 SW2 Figure 1 5 Label of DIP Switch for IR Speed Dome ON 1 2 3 4 5 6 7 8 SW2 ON 1 2 3 4 5 6 7 8 SW1 Figure 1 6 Enlarged View of DIP Switch The default dome address is 0 the default baudrate is 2400 and the default value of the 120Ω terminator is OFF Address Settings The SW1 switch is used for setting the address of speed dome You can refer to Table 1 5 for detai...

Страница 11: ...he Dome DIP Switch SW2 Baudrate Settings Baudrate 1 2 3 2400 ON OFF OFF 4800 OFF ON OFF 9600 ON ON OFF 19200 OFF OFF ON Protocol Settings The speed dome is self adaptive to PELCO D PELCO P and private protocol which cannot set by the DIP switches Communication Mode Settings The No 7 of SW2 switch is for setting the RS485 communication mode of the dome to simplex or half duplex Table 1 7 Set Commun...

Страница 12: ...ithstand more than 8 times the weight of the dome Steps 1 Check that the type of the bracket and the number of accessories are correct as shown in the figure below Figure 1 7 Wall Mount Bracket Nuts and Flat Washers 2 Drill 4 screw holes in the wall to match the holes of the bracket Insert M8 expansion screws into the mounting holes Figure 1 8 Drill Mounting Holes 3 Attach the wall bracket to the ...

Страница 13: ...l Resistor OFF Please refer to the Section 1 2 DIP Switch Settings for DIP switch settings 1 3 2 Installing the Speed Dome Steps 1 Hang the safety clip to the speed dome and then hook to the mount as shown in Figure 1 10 left 2 Route the cables of the speed dome through the wall mount 3 Connect the corresponding video power RS 485 cables 4 Install the speed dome to the mount and secure the speed d...

Страница 14: ...perations Make sure the speed dome is connected correctly and the following basic operations are working Panning and tilting Click the direction buttons to control the pan and tilt movement of the speed dome Zooming Click the ZOOM and ZOOM buttons to control the zooming Focusing Click the FOCUS and FOCUS buttons to adjust the focus Iris Click the IRIS and IRIS buttons to adjust the iris Preset con...

Страница 15: ...ase refer to the user manual for more detailed instructions on the camera OSD 2 2 1 Configuring Patrol You can configure the patrol function from the DVR Configuring Patrol by DVR Steps 1 Enter the PTZ Control interface Menu Camera PTZ Figure 2 3 PTZ Settings 2 Select patrol No in the drop down list of patrol 3 Click the Set button to add key points for the patrol ...

Страница 16: ...k the OK button to save the key point to the patrol You can delete all the key points by clicking the Clear button for the selected patrol or click the Clear All button to delete all the key pints for all patrols Configuring Patrol by OSD Menu Steps 1 Call the preset 95 to enter the main menu and move the cursor to enter patrol configuration submenu MAIN MENU DOME SETTINGS PATROLS PATROLS PATROL N...

Страница 17: ...eed dome stays on a certain preset the patrol speed level 1 40 selectable is the scanning speed the speed dome switching between the presets 4 Follow the above steps to define the other presets for the selected patrol You can configure up to 32 presets in sequence for a patrol Press IRIS to save the new settings or press IRIS to cancel and return to the previous menu 4 Call the defined patrol Back...

Страница 18: ...g button to activate the park action Park Quick Patrol The dome starts patrol from the predefined preset 1 to preset 32 in order after the park time The undefined preset will be skipped Park Patrol 1 The dome starts move according to the predefined patrol 1 path after the park time Park Preset 1 The dome moves to the predefined preset 1 location after the park time The park time can only be set th...

Страница 19: ...FF DOME SPEED 6 BACK EXIT Figure 2 8 PTZ Configuration 2 Move the cursor to the PARK TIME and set the value in the range from 5 to 720 seconds 3 Move the cursor to the PARK ACT and the action can be set as preset 1 8 pattern 1 5 patrol 1 10 pan scan tilt scan random scan frame scan panoramic scan day mode night mode patrol d or none ...

Отзывы: