background image

6

• Hold the bottom lid as shown in Fig 4 and pull the tab marked 

“PULL TO REMOVE BAG”

FIGURE 4

• Turn the filter bag inside out and hose off all debris as shown in Fig 5.  If very dirty it may be washed in 

your washing machine, inside out, with cold water, mild detergent, and by itself.  

Do not put in dryer.

FIGURE 5

• Hose all debris off the bottom lid being sure to get all dirt out of the fine filters on the intake doors 

as shown in Fig 6.

FIGURE 6

• To reattach the filter to the bottom lid, turn the filter bag right-side-out.  Start at the back where the 

filter bag says 

“Warning: Push bag behind bottom lid TAB”

and insert the filter frame into the 

channel, so that the tabs are holding the bag in near the label with the word 

“Warning: Push bag 

behind bottom lid TAB”

, as shown in Fig 7.

FIGURE 7

FIGURE 7A

FIGURE 7B

CORRECT INSTALLATION

INCORRECT INSTALLATION

• Press the filter frame down all the way around the perimeter making sure that it is 

completely seated and behind all the tabs as shown in Fig 8.

FIGURE 8

FIGURE 11

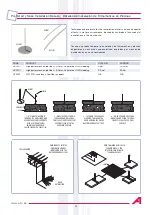
• Pick up the bottom lid and turn it over so the bag hangs below it.  Place the bottom lid back into the 

cleaner being careful to feed the filter bag into the body of the cleaner. 

MAKE SURE ALL FILTER 

MATERIAL IS INSIDE THE CLEANER OTHERWISE THE LID WILL NOT CLOSE AND LATCH PROPERLY.

FIGURE 9

FIGURE 12

• Press the rear 

section of the bottom 
lid into the cleaner while
pushing the locking 
clips towards the edge 
of the cleaner until an 
audible click is heard 
as shown in Fig 10.

FIGURE 10

CLICK

• Once the bottom lid 

is properly seated, turn 
the red locking clips in 
the opposite direction 
of the arrows embossed 
on the bottom lid until 
it locks between the two 
raised locks.

CABLE MAINTENANCE

UNCOILING THE CABLE

STORING THE CABLE

• Loosely loop the cable as shown in Figure 12.

• Hold the cord close to the cleaner.

• Make a roughly two foot loop with the cord as shown.

• When making loop, roll the cable slightly in a counter-

clockwise manner to maintain form.  DO NOT WRAP THE 
CORD TIGHTLY AROUND OBJECTS.

The unit should be stored in an area that will afford some
protection from the elements to insure that it retains its finish. 

Do

not store near open chemicals.

STORAGE

WINTER

SUMMER

If temperatures will regularly be below 45 degrees Fahrenheit or
5 degrees Celsius, the cleaner and power supply should be stored
indoors.

In the event that the cable does coil on itself, it can easily be straightened by following the below instructions.
• Turn the power supply to the off position
• Remove the cleaner from the pool and place it on the far end of the pool deck/yard (away from the 

power supply)

• Unscrew the blue cable from the power supply
• Hold the black collar at the plug end and gently lift the cable off the ground (FIGURE 11)
• Gently pull on the cable to straighten
• The swivel will rotate as tension is applied, eliminating the coils in the cable
• Return to normal cleaner use

Содержание 7i

Страница 1: ...SMARTPOOL CLIMBER NC52S ROBOTIC POOL CLEANER OPERATION MANUAL www smartpool com ...

Страница 2: ...o avoid damage to the power supply and cord never carry the power supply by the cord or pull on the cord to disconnect from an outlet Instead disconnect by pulling the plug itself from the outlet Do not pull cord around sharp corners or edges Do not play with the cleaner or cable or apply to body It can trap or tear hair or body parts The cable can trip or entangle swimmers which could result in d...

Страница 3: ...The short cord from cleaner to swivel 8 will need to be connected to the small end of the swivel A The long cable from the swivel to the power supply 40 or 50 will need to be connected to the large end of the swivel B as seen in Figure S1 NOTE The connections are designed to be distinctly different to prevent the wrong end of the cord from being plugged into the wrong end of the swivel See Figures...

Страница 4: ... and the Floating Swivel 3 Disconnect the short cable from the swivel by loosening the black collar and gently pulling on the plug Figure E1 5 Secure the connection by rotating the black collar in a clockwise direction until it is hand tight 6 Insert the Extension Cord Union on the end of the Extension Cord and secure it by hand tightening the black collar on the end of the cable Figure E3 NOTE Th...

Страница 5: ...t so that excess cable will not be pulled into the pool the Velcro strap originally attached to the cable can be used Be sure to only plug the power supply into a GFCI ground fault current interrupter or ELI earth leak interrupter protected electrical outlet Look at the power supply and check that the power supply switch is in the off position middle switch position Plug the power supply into the ...

Страница 6: ...of the bottom lid into the cleaner while pushing the locking clips towards the edge of the cleaner until an audible click is heard as shown in Fig 10 FIGURE 10 CLICK Once the bottom lid is properly seated turn the red locking clips in the opposite direction of the arrows embossed on the bottom lid until it locks between the two raised locks CABLE MAINTENANCE UNCOILING THE CABLE STORING THE CABLE L...

Страница 7: ...15 Pump Motor Impeller 14 NC1019 Rear Intake Door w Spring and Debris Filter Set of 2 15 NC1040 Spring for Rear Bottom Lid Intake Door Set of 2 16 NC1035 Bottom Lid Locking Tab Set of 2 17 NC1016B Replacement Bottom Lid Black 18 NC1041 Intake Filters Front and Rear Set of 2 19 NC1018 Front Intake Door w Spring and Debris Filter Set of 2 20 NC1039 Spring for Front Bottom Lid Intake Door Set of 2 21...

Страница 8: ...RUCTION LOOSE SWIVEL CONNECTION ENSURE ALL CONNECTIONS TO FROM THE SWIVEL ARE SECURE BACK FORTH DOING WHEELIES OR SPINNING IN CIRCLES FILTER BAG INSTALLATION RUN THE CLEANER WITHOUT THE FILTER BAG AND CHECK THE BOTTOM LID FILTER BAG FOR PROPER INSTALLATION DEBRIS CAUGHT IN TRACKS BRUSHES IMPELLER CHECK FOR DEBRIS AND CLEAN WITH A GARDEN HOSE MAY HAVE TO REMOVE IMPELLER CAP 1 SCREW CLEANER CAUGHT O...

Страница 9: ...character This warranty does not include replacements of the filter bag bottom lid and brushes This warranty only applies to cleaners used in a residential pool Cleaners operating in a commercial setting will not be covered by this warranty THERE ARE NO OTHER WARRANTIES OR REPRESENTATIONS EITHER EXPRESSED OR IMPLIED WHETHER OF MERCHANTABILITY FITNESS FOR A PARTICULAR PURPOSE OR OTHER MADE BY SMART...

Страница 10: ...10 ...

Страница 11: ...10 ...

Страница 12: ...acement de pièces peut inclure le recours aux composants et aux appareils remis à neuf En aucun cas ou pour quelque montant que ce soit SmartPool Inc ne sera tenu responsable de dommages indirects ou accidentels de préjudices ou de blessures survenus à des personnes utilisant l appareil ou à des biens utilisés en rapport avec celui ci ou encore d aucune perte de profit ou coûts et dépenses de quel...

Страница 13: ...LA PISCINE ÉTEINDRE LE ROBOT ET TIRER DÉLICATEMENT SUR LE CÂBLE POUR LE DÉGAGER DE L OBSTRUCTION DESSERREZ LA CONNEXION DU RACCORD PIVOTANT ASSUREZ VOUS QUE TOUTES LES CONNEXIONS ALLANT ET PARTANT DU RACCORD FLOTTANT SONT SÉCURISÉES AVANCE ET RECULE SE CABRE OU TOURNE EN ROND SUR PLACE L INSTALLATION DU SAC FILTRANT FAIRE MARCHER LE ROBOT SANS LE SAC FILTRANT ET OU VÉRIFIER LE COUVERCLE INFÉRIEUR ...

Страница 14: ...ateur 7A NC3410 Cable 8 Du raccord pivotant au nettoyeur 8 NC1023 Transformateur 9 NC1007 Tube de la roue d entrainemnent 10 NC1006B 02 Moteur d entrainement 11 NC1032 Réducteur de tension du câble 12 NC1024 02 Moteur de pompe 13 NC1015 Turbine 14 NC1019 Admission arrière 15 NC1040 Ressort 16 NC1035 Clip arrière du couvercle inférieur 17 NC1016B Couvercle inférieur Noir 18 NC1041 Filtre de prise d...

Страница 15: ...MERA PAS ET NE SE VEROUILLERA PAS CORRECTEMENT IMAGE 9 Appuyez sur la partie arrière tout en poussant les deux loquets vers les côtés du nettoyeur jusqu à ce que vous entendiez un clic audible tel qu illustré à l image 10 IMAGE 10 CLICK Une fois le couvercle correctement installé tournez les loquets rouges dans la direction opposée des flèches apparaissant sur le couvercle jusqu à ce qu ils se blo...

Страница 16: ...scine NE SORTEZ PAS LE NETTOYEUR DE LA PISCINE EN LE TIRANT PAR LE CORDON Penchez vous et saisissez la poignée du nettoyeur pour le sortir de la piscine tel qu indiqué ci dessous Nettoyage du sac à filtre Le sac à filtre doit être nettoyé après chaque utilisation Retournez le nettoyeur et posez le sur le sol couvercle inférieur vers le haut Tournez les goupilles de verrouillage rouges près des rou...

Страница 17: ...d pivotant 3 Déconnectez le câble court du raccord en desserrant la bague noire et en tirant doucement sur la fiche Figure E1 5 Sécurisez la connexion en tournant la bague noire dans le sens des aiguilles d une montre jusqu à ce qu il soit bien serré à la main 6 Insérez l union du câble d extension à l extrémité de la rallonge et fixez le à la main en serrant la bague noire au bout du câble Figure...

Страница 18: ...le long 40 ou 50 12 2m ou 15 2m comme montré sur la Figure S4 2 Insérez la fiche noire du câble long 40 ou 50 12 2 ou 15 2m dans l extrémité la plus large du raccord flottant B comme montré sur la Figure S5 et assurez vous que les broches sont correctement alignées Pressez fermement afin d assurer une connexion solide 3 Saisissez le pivot et serrer le collier noir du câble à la main jusqu à ce qu ...

Страница 19: ...le cordon pour le débrancher de la prise de courant Tirez plutôt directement sur la fiche elle même pour la débrancher Ne tirez pas sur le cordon lorsqu il contourne des coins ou des rebords coupants Ne jouez pas avec le nettoyeur ni son câble et ne l appliquez pas sur une quelconque partie du corps Il peut aspirer et arracher les cheveux ou la peau Les utilisateurs et nageurs peuvent trébucher su...

Страница 20: ...www smartpool com Mode d emploi du nettoyeur automatique pour piscines SmartPool Climber NC52S ...

Отзывы: