background image

Set Up 

24 

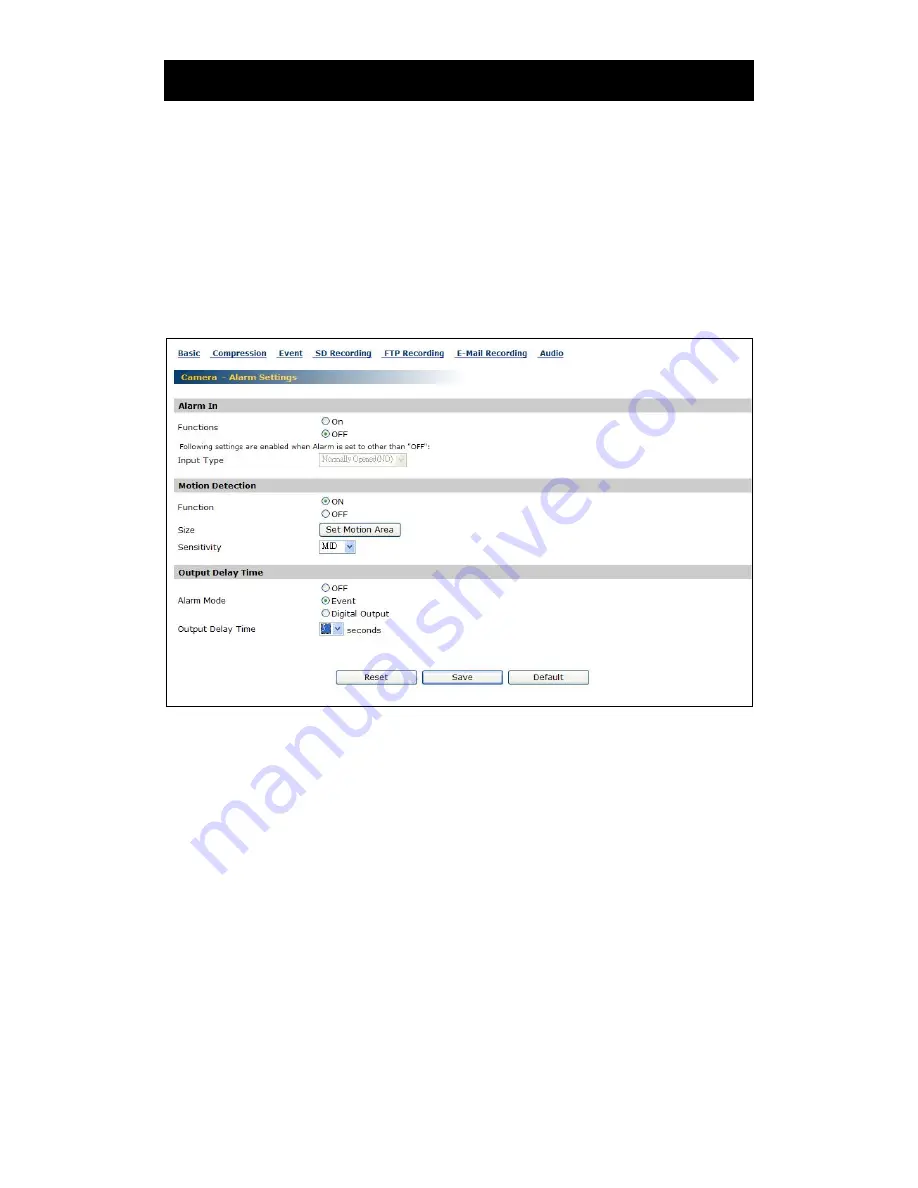
2.4 Camera/Event Settings 


External alarms and motion sensors can be set. Connecting a sensor or other device 

to the alarm input terminal notifies an alarm when the sensor detects a trouble.   

For example, mounting a sensor on a door notifies an alarm each time the door is 

opened or closed. By setting the motion sensor to activate, an alarm is notified by 

detecting a change in a screen. 


1

 Click "Image Settings" on the setting menu. 

  A sub menu for Camera Settings will appear. 

2

 Click "Event" in the sub menu. 

  The screen of "Camera - Alarm Settings" will appear. 


3

 Configure each setting items.


  Click the Save button to save settings. 

  The settings will not be reflected unless the Save button is clicked. 

 Alarm In 

1) Set an "alarm" to be detected. 

ON: Detects an external alarm. 

OFF: Does not perform "Alarm In".   

2) Set "Input type" for alarms if "Function" is set to other than "OFF". 

Normally Opened (NO): A no-voltage contact system. Set in case of normally 

open, closed in case of an alarm. 

Normally Closed (NC): A no-voltage contact system. Set in case of normally 

closed, open in case of an alarm. 


NOTE


 Camera starts alarm recording when camera detects alarm signal. (Signal length 

requires more than 100ms). 


 Motion Detection 

1) Function 

ON: Camera detects motion. (A change in the screen is detected and an alarm 

is sent) 

Содержание STC-IPM3095A

Страница 1: ...Smartec www smartec security eu STC IPM3095A User Manual Megapixel D N IP Camera...

Страница 2: ...mera and Personal Computer by Network 13 1 12 Using the Camera Search Application IPFinder 15 1 13 Log in Screen 16 1 14 Viewing and Listening 17 Set up 2 1 Setting 19 2 2 Camera Basic Settings 20 2 3...

Страница 3: ...and if not installed and used in accordance with the instructions may cause harmful interference to radio communications However there is no guarantee that interference will not occur in a particular...

Страница 4: ...w the manufacturer s instructions and should use a mounting accessory recommended by the manufacturer 9 Ventilation This camera should never be placed near or over a radiator or heat register This cam...

Страница 5: ...at are covered by the instruction manual as an improper adjustment of other controls may result in damage and will often require extensive work by a qualified technician to restore the camera to its n...

Страница 6: ...REDUCE THE RISK OF FIRE OR E L E C T R I C S H O C K D O N O T EXPOSE THIS APPLIANCE TO RAIN OR MOISTURE FIELD INSTALLATION THIS INSTALLATION SHOULD BE MADE BY A QUALIFIED SERVICE PERSON AND SHOULD C...

Страница 7: ...mera may malfunction Install the camera where no video noise appears If cables are wired near electric lighting wires or a TV set noise may appear in images In this event relocate cables or reinstall...

Страница 8: ...essories Confirm that all of the following accessories have been supplied with the network camera CD ROM x1 The instruction manual and IPFinder are contained Quick Guide x1 2GB SD card x1 Screw set Wo...

Страница 9: ...plied with a purchased memory card An SD memory card can be used for the loop recording of images The life span number of rewrites possible of an SD memory card is greatly affected by the capacity of...

Страница 10: ...other jacks as this may cause a malfunction When removing the connection cable disconnect the cable by holding its plug Do not disconnect the cable by pulling on the cable Do not drop the power adapt...

Страница 11: ...ork Camera The network camera can deliver video images and audio in real time using the Internet or an intranet The camera is equipped with Ethernet RJ 45 10BASE T 100BASE TX network interfaces It can...

Страница 12: ...card interface The use of SD memory cards enables the recording of images for long periods of time as well as recordings when alarms go on SD memory card 8 16 32 64 128 256 and 512 MB 1 2 GB SD memor...

Страница 13: ...Introduction 11 1 9 Names of Camera Parts...

Страница 14: ...Internet Explorer Version 6 0 or later CPU Intel Pentium 4 2GHz or higher Memory 512MB or more Network camera Please purchase the required and appropriate number of cameras corresponding to the desire...

Страница 15: ...system equipment also carefully such as the router hub and modem When entering the IP address manually set DHCP ON OFF to OFF in Network Basic Setting and enter the IP address subnet mask default gate...

Страница 16: ...the user s guide of the personal computer 3 Test the camera connection using ping Start a command prompt Type ping 192 168 0 30 and press Enter key If the Reply from message appears the connection is...

Страница 17: ...personal computer if it is operated by other OS Do not install IPFinder with other OS Using IPFinder to Search for a Camera 1 From the Start menu point to Programs and IPFinder and then select IPFinde...

Страница 18: ...inistrator log in screen and camera image screen will appear The administrator log in ID and password are set to admin and to 1234 respectively by default Important Administrator Log in allows rewriti...

Страница 19: ...or the log in method When the security warning screen VeriSign appears on the first use of the system click Yes NOTE Administrator authorization is needed to install Active X control Install Active X...

Страница 20: ...rver may cause some problem Install the network cameras after consulting the network administrator Using the network cameras via a proxy server sometimes takes a long time till images are displayed af...

Страница 21: ...ings Network Settings Admin Functions Event Log or Information in the Setting Menu The sub menu of the clicked setting will show up Unless logged in as an administrator the Administrator Setup Menu wi...

Страница 22: ...e images even under bright conditions AUTO automatically to enable it to capture pictures in diverse lighting conditions adapt automatically to low light conditions and operate even in very dark envir...

Страница 23: ...becomes longer Blurred images sometimes are prominent with moving objects Backlight Compensation Set an area for backlight compensation Backlight compensation is a function that achieves the brightnes...

Страница 24: ...l enable automatic setting of this parameter Lower values of White Balance more suitable for the environment of higher color temperature Higher Values of White Balance more suitable for the environmen...

Страница 25: ...es JPEG files varies in accordance with compression ratio Low compression This setting produces highest image quality The file size increases Mid compression Standard setting High compression This set...

Страница 26: ...ngs will appear 3 Configure each setting items Click the Save button to save settings The settings will not be reflected unless the Save button is clicked Alarm In 1 Set an alarm to be detected ON Det...

Страница 27: ...election will trigger the alarm out pin with a high voltage Digital output According to DigitalOut cgi from SDK the digital output function enables the alarm out pin which can set the output delay tim...

Страница 28: ...memory card Important Be certain to check Remove SD Utility card in the SD Utility Card In Out portion when removing the SD card Then click the Execute button Removing SD Card without executing Remove...

Страница 29: ...ra Event Settings portion Setting the Overwrite mode to ON deletes files beginning with old files If important data is to be saved set the Overwrite mode to OFF Getting a record list of the SD memory...

Страница 30: ...e authority to access the server Password Input the registered password associated with Login ID Password Confirm Re enter the password FTP Port Number set 21 as default FTP Mode active mode This mode...

Страница 31: ...utomatically store images in the SD card when images cannot be recorded in the server due to a network failure or other trouble The stored images can be transferred to the FTP server when the network...

Страница 32: ...ut your e mail account password Password Confirm confirm your e mail password Administrator E mail Address input your e mail address Press save test e mail button to save your setting and to test your...

Страница 33: ...e mail when motion has been detected Subject input your subject title for your sending e mail Message input the alarm message as a notification Send URL You can send images to URL when you select ON...

Страница 34: ...o the camera Audio Input Level HIGH Increases the audio input level MIDDLE Adjusts the audio input level to a medium level LOW Reduces the audio input level Audio Output ON The camera receives audio O...

Страница 35: ...to enter Default Gateway if it is not used Ask your Network Administrator for Default Gateway information Primary DNS Enter a primary DNS if you use it Otherwise leave it blank as default setting Seco...

Страница 36: ...nput your DDNS server User ID password and password confirm and then presses save to save your setting FTP Server If you wish to enable FTP function select ON to activate FTP function Input your Login...

Страница 37: ...min ID admin Password 1234 You can adjust your own Admin ID and password up to 16 characters Date and Time Input the date time and time zone here to setup system time You can also enable Network Time...

Страница 38: ...00 the image will be very clear Update Setting You can update system firmware once the update file is available It is the customer s responsibility to update firmware All camera motions will shut down...

Страница 39: ...ort button and select the configuration setting file to start importing file to your network camera Factory Default Clicking the Default button in the setup screen the configuration Information resets...

Страница 40: ...t Log Click Event Log on the setting menu You can setup a condition for log view Select Set Condition in Display filter setting Select appropriate option in Display Condition Settings Click the save b...

Страница 41: ...Set Up 39 2 12 Information Information Click on Information on setting menu The information shows camera s Hardware Firmware version and Mac Address...

Страница 42: ...Specification 40...

Страница 43: ...in accordance with the instructions on the screen Important Viewer is compatible only with Windows 2000 and Windows XP Glitches may occur with your personal computer if it is operated by other OS Do n...

Страница 44: ...o capture current view window or select Save Cam XX Image to capture individual channel display You can also print images from individual channel s submenu Select Print Cam XX Image and press ok butto...

Страница 45: ...ag of Record File Choose camera from IP CAM portion Click Time Search folder to display File List screen Select the item you want to playback then double click the chosen item it will start playback a...

Отзывы: