background image

CHAPTER 3

USING APPS ON YOUR SMART BOARD MX100

18

smarttech.com/kb/171289

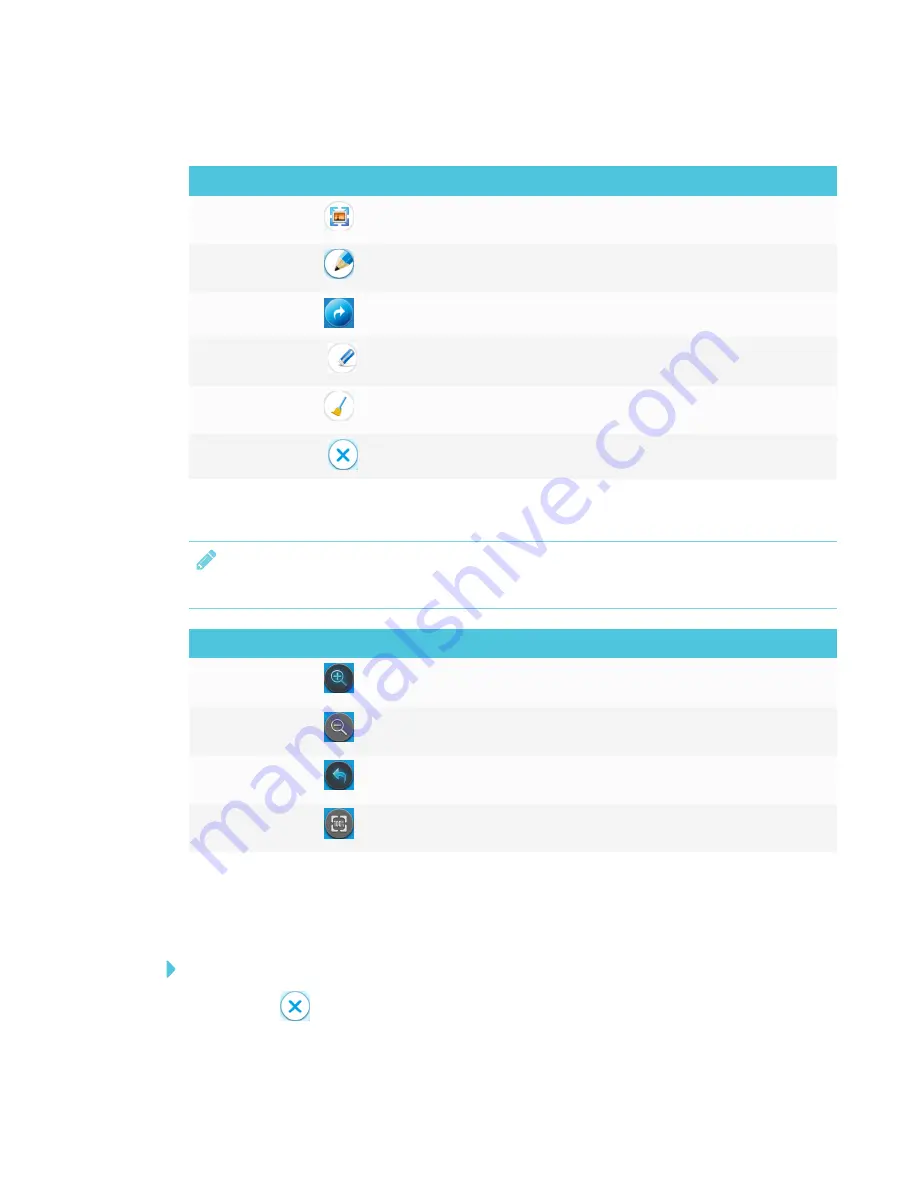
Acetate tools

Tool

Icon

Description

Zoom

Opens up the zoom menu. See

Zoom tools

below.

Pen

Tap the button to change pen type, ink width and ink color.

Back

Tap the button to exit the pen options menu.

Erase

Tap the button use the eraser.

Erase All

Tap the button to erase all ink.

Exit

Tap the button to exit the acetate and return to the app.

Zoom tools

NOTE

While zoomed in or zoomed out, you can pan using one finger.

Tool

Icon

Description

Zoom In

Tap the button to zoom in on the screen.

Zoom Out

Tap the button to zoom out of the screen

Back

Tap the button to return to writing and drawing on the acetate.

Reset Zoom

Tap the button to reset the zoom.

Exiting an acetate

When you exit an acetate, your writing or drawing is not saved. Press

To exit an acetate

Tap

Exit

.

Содержание SBID-MX165

Страница 1: ...Was this document helpful smarttech com docfeedback 171289 SMART Board MX100 series interactive displays USER S GUIDE FOR MODELS l SBID MX165 l SBID MX175 l SBID MX186 ...

Страница 2: ... 2018 SMART Technologies ULC All rights reserved No part of this publication may be reproduced transmitted transcribed stored in a retrieval system or translated into any language in any form by any means without the prior written consent of SMART Technologies ULC Information in this manual is subject to change without notice and does not represent a commitment on the part of SMART This product an...

Страница 3: ...ecause they could touch dangerous voltage points and cause electric shock fire or product damage which may not be covered by the warranty l Do not place heavy objects on the power cable Damage to the cable could cause shock fire or product damage which may not be covered by the warranty l If the glass is broken do not touch the liquid crystal To prevent injury handle glass fragments with care when...

Страница 4: ...f this device and allnearby persons This transmitter must not be co located or operated in conjunction with any other antenna or transmitter Innovation Science and Economic Development Canada statement This device complies with RSS 247of the Innovation Science and Economic Development Canada Rules Operation is subject to the following two conditions 1 This device may not cause harmfulinterference ...

Страница 5: ...1 Interacting with content 13 Writing drawing and erasing 14 Adjusting audio 14 Chapter 3 Using apps on your SMART Board MX100 15 Using the launcher on your SMART Board MX100 16 Using acetates 16 Using Whiteboard 19 Using Browser 23 Using File Manager on your SMART Board MX100 24 Using Input 28 Using EShare 29 Using iMirror 33 Appendix A Troubleshooting the e experience 37 Resolving general issues...

Страница 6: ......

Страница 7: ...s 7 SBA 100 projection audio system 8 SMART Audio 400 classroom amplification system 8 USB extenders 8 More information 9 This chapter introduces the SMART Board MX100 series interactive displays About the SMART Board MX100 The SMART Board MX100 series interactive display is the hub of your classroom or meeting room The e experience provides one touch access to collaborative tools including a whit...

Страница 8: ... users to interact with objects on the screen at the same time 1 Writing and drawing support You can write over applications in digital ink using one of the supplied pens and then erase the digital ink using your palm Audio support The display includes integrated speakers for presenting audio from connected input sources Identifying your SMART Board MX100 series interactive display model The follo...

Страница 9: ...1 Screen Page 4 2 Front control panel Page 5 3 Light sensor page 7 4 Remote control sensor status light page 3 5 Pen 2 Page 4 6 Speakers Page 7 7 Front connector panel Page 4 8 Side connector panel page 11 Not pictured 9 AC switch See SMART Board MX100 series interactive displays installation and maintenance guide smarttech com kb 171288 ...

Страница 10: ...42 9 cm 80 4 cm SBID MX175 74 1 2 189 3 cm 66 1 2 38 168 8 cm 96 6 cm 65 36 1 2 165 cm 92 8 cm SBID MX186 85 5 8 190 5 cm 76 3 8 43 3 4 194 1 cm 111 2 cm 74 5 8 42 189 5 cm 106 6 cm Pens The display comes with two pens The display s bottom frame includes magnetic holders for the pens Remove a pen from its holder and use the pen to draw digital ink CAUTION When you return a pen to the magnetic hold...

Страница 11: ...HDMI 3 input connector Connect a computer or other input source to the display see page 11 Front control panel The front control panel contains the Power Input Select Menu Freeze Mute and volume control buttons No Name SMART Board MX100 procedure 1 Power Press to wake the display Press to again enter Sleep mode 2 Input select Press to switch input source 3 Menu Open the e experience and the displa...

Страница 12: ...ep mode 2 SCREENSHOT Take a screenshot 3 MUTE Mute or unmute the volume 4 HOME Return to the home screen 5 Up Move selection up 6 Left Move selection left 7 Right Move selection right 8 Down Move selection down 9 OK Confirm selection 10 VOL VOL Increase or decrease volume 11 BACK Return 12 SOURCE Open the input source menu 13 AUDIO Change audio mode 14 ZOOM Change aspect radio ...

Страница 13: ...inks green and red when it registers a button being pressed on the remote control When the status light is red the display is in a low power state To wake the display press the Power button on the front control panel or POWER on the remote control Ambient light sensor The ambient light sensor can detect the room brightness and adjust the display s brightness Make sure Auto is enabled in Brightness...

Страница 14: ...aker options are available including wall and ceiling mounted speakers The amplifier receives audio signals from the microphones and translates them into crystal clear sound through the speakers For more information see the SMART Audio 400 classroom amplification system specifications smarttech com kb 171137 NOTE The SMART Audio 400 classroom amplification system is available only in Canada and U ...

Страница 15: ...5 MX275 and MX286 installation instructions smarttech com kb 171274 Installation and maintenance guide smarttech com kb 171288 SBID MX165 specifications smarttech com kb 171265 SBID MX175 specifications smarttech com kb 171266 SBID MX186 specifications smarttech com kb 171267 Comparison smarttech com kb 171161 These documents are available in the Support section of the SMART website smarttech com ...

Страница 16: ......

Страница 17: ...ol panel To return the display to a partial sleeping state press the Power button on the front control panel For information about turning the display off see SMART Board MX100 series interactive displays installation and maintenance guide smarttech com kb 171288 Using e experience apps You can use the display s e experience apps to complete many of the same tasks you can complete on a computer se...

Страница 18: ...o connect computers using the side and bottom connector panels see SMART Board MX100 series interactive displays installation and maintenance guide smarttech com kb 171288 l For full interactivity connect a USB cable to the associated USB Type B receptacle on the connector panel or convenience panel as shown in the above diagrams and install SMART Product Drivers and SMART Ink on the connected com...

Страница 19: ...everything on the display that you can do at your computer You can also use an array of gestures within applications NOTE Not all gestures work in all applications Refer to an application s documentation to learn which gestures it supports Pan one finger Pan two fingers scroll Pinch to zoom in scale enlarge Pinch to zoom out scale reduce Rotate Flick ...

Страница 20: ...bles you to write or draw in digital ink over applications files folders websites and any other open window on the computer To write or draw in digital ink 1 Pick up one of the display s pens 2 Use the pen to write or draw in digital ink To erase digital ink Move your fist or palm over the digital ink you want to erase Adjusting audio You can use the buttons on the front control panel to increase ...

Страница 21: ...ation tools 20 Writing and erasing notes 20 Starting a new whiteboard 21 Changing the background 21 Navigating in the Whiteboard 21 Opening a Whiteboard 22 Sharing a Whiteboard 22 Exporting notes 23 Saving a Whiteboard 23 Using Browser 23 Using Browser 24 Using File Manager on your SMART Board MX100 24 About File Manager 24 Opening File Manager 24 Viewing content 25 Moving or copying content 25 Su...

Страница 22: ... desktop to the display 34 Supported Apple devices and operating systems 34 Verifying that the display and mobile device or computer are connected to the same network 35 This chapter introduces the e experience apps on the SMART Board MX100 series interactive displays Using the launcher on your SMART Board MX100 The launcher contains all your apps and settings Opening and closing the launcher To o...

Страница 23: ...S l If you write or draw over a playing video the video will continue to play in the background l You re unable to write or draw when you re zoomed in on the screen 1 Tap the Home button to open the launcher and then tap Freeze OR Press Freeze on the front control panel The acetate menu appears 2 Use the pen to write or draw in digital ink 3 When you re done tap Exit to exit the acetate To erase i...

Страница 24: ... Tap the button to erase all ink Exit Tap the button to exit the acetate and return to the app Zoom tools NOTE While zoomed in or zoomed out you can pan using one finger Tool Icon Description Zoom In Tap the button to zoom in on the screen Zoom Out Tap the button to zoom out of the screen Back Tap the button to return to writing and drawing on the acetate Reset Zoom Tap the button to reset the zoo...

Страница 25: ...sessions Tap in the lower left corner to open the whiteboard menu Menu tools Tool Icon Description New Start a new whiteboard Open Open a previously saved whiteboard Save Save the whiteboard Export Export the whiteboard as a png file The image is saved to the display Share Share the whiteboard using a QR code NOTE The shared whiteboard doesn t update if the whiteboard is shared again Background Ch...

Страница 26: ...con Description Pen Tap the button to change the pen type ink width and ink color Eraser Tap the button to select the eraser selection eraser or delete all objects Shape and lines Tap the button to change line type shape type line width and line color Selection Tap the button and pick up a pen Use the pen to draw a selection marquee to move individual objects around the Whiteboard Undo Tap the but...

Страница 27: ...ere are multiple pages in the Whiteboard each page can have a different background When you export or share the whiteboard the background you ve selected will also appear To start a new whiteboard 1 Tap Menu 2 Tap Background 3 Select a background or tap to add a background from the display or a USB drive 4 The background appears Navigating in the Whiteboard Use a single finger to pan anywhere in t...

Страница 28: ...here you left off in a saved Whiteboard To open a saved Whiteboard 1 Tap Menu and then tap Open The file selection window appears 2 Select the Whiteboard you want to open and tap Open Sharing a Whiteboard If your mobile device has a QR code scanner it can open the image in a web browser NOTE The shared whiteboard doesn t update if the whiteboard is shared again ...

Страница 29: ...le device s documentation for more information on saving images Exporting notes The Whiteboard app can export the note as a png NOTE A png file cannot be opened in the Whiteboard app To export the Whiteboard as a png file 1 Tap Menu and then tap Export 2 Enter a folder name Each page in the Whiteboard is saved as a sequentially numbered png You can copy or move those files to a USB drive See Using...

Страница 30: ...r videos saved on the display About File Manager File Manager on the display is very similar to Windows Explorer or Finder on Mac computers You can view images or play audio or videos that have been saved to the display As well you can copy files from a USB drive that s been connected to the display or copy files from the display to a USB drive Any Whiteboard notes that have been exported are save...

Страница 31: ...n File Manager tap the file To stop viewing content Tap the Home button to open the launcher and then tap Back Moving or copying content To move content from the USB drive to the display 1 Connect a USB drive to the display on the front connector panel 2 Tap the Home button to open the launcher and then tap Apps 3 Tap File Manager File Manager appears 4 Tap USB drive 5 Browse to the files you want...

Страница 32: ...ppears 4 Tap USB drive 5 Browse to the files you want to move 6 Tap the file s checkbox to select it 7 Tap Copy 8 Tap Local storage 9 Browse to the folder you want to move the file to 10 Tap the folder to open it 11 Tap Paste The file is saved to the display and remains on the USB drive To move content from the display to a USB drive 1 Connect a USB drive to the display on the front connector pane...

Страница 33: ...onnect a USB drive to the display on the front connector panel 2 Tap the Home button to open the launcher and then tap Apps 3 Tap File Manager File Manager appears 4 Tap Local storage 5 Browse to the files you want to move 6 Tap the file s checkbox to select it 7 Tap Move 8 Tap USB drive 9 Browse to the folder you want to move the file to 10 Tap the folder to open it 11 Tap Paste The file is saved...

Страница 34: ...display s HDMI 1 HDMI 2 HDMI 3 or VGA connectors NOTE To enable touch control of the device connect a USB cable to the associated USB port 2 Open the launcher The launcher appears 3 Tap Input OR Press Input on the front control panel The Input selection menu appears NOTE Inputs that have a device connected to it are blue while inputs without a connection are black 4 Tap the input you want to view ...

Страница 35: ...ng to the e experience To return to the e experience on the display 1 Press Input on the front control panel The Input selection menu appears 2 Tap SMART MX e The e experience appears on the display Using EShare You can share content wirelessly to the display from your computer or mobile device NOTES l EShare is a third party application and is not supported by SMART l Some EShare features are not...

Страница 36: ...ices To share files on your device to the display 1 Open the EShare app on your device 2 Connect the EShare app to the display 3 On your device tap Local files 4 Select the video or photo you want to show on the display Controlling the display You can control the display using the EShare app on your display Choose to use the remote control feature or duplicate the display s screen to your device U...

Страница 37: ... 1 Open the EShare app on your device 2 Connect the EShare app to the display 3 On your device tap Remote 4 Control the display using the touchpad on your mobile device or mouse on your computer Opening apps using EShare You can open apps on the display using the EShare app NOTE This is only available for iOS and Android mobile devices To open apps using EShare 1 Open the EShare app on your device...

Страница 38: ... keyboard to change the display s name 6 Tap Close To add a connection code 1 On the display tap the Home button on the screen to open the launcher 2 Tap EShare 3 Tap Settings 4 Tap Use Code 5 Tap the edit button beside the Device Name field and then tap in the Connect Code field to use the on screen keyboard to change the code OR Tap Refresh to generate a new code 6 Tap Close To stop using a conn...

Страница 39: ...cts see Supported Apple devices and operating systems on the next page NOTE Make sure your Mac computer or iOS device is connected to the same network as the display See Supported Apple devices and operating systems on the next page for more information Mirroring your iOS device s screen to the display 1 On the display tap the Home button on the screen to open the launcher The launcher appears 2 T...

Страница 40: ...n your Mac computer is sharing content with AirPlay Extending your Mac computer s desktop to the display 1 On the display tap the Home button on the screen to open the launcher The launcher appears 2 Tap iMirror NOTE Remember the display s name 3 On your Mac computer click the AirPlay icon in the menu bar 4 Select the display s name The AirPlay icon turns blue when your Mac computer is sharing con...

Страница 41: ...the screen to open the launcher 2 Tap Settings Network If the display is connected to a wireless network note the name of the network the display is connected to If the display is connected to a wired network note the IP v4 address and compare the first 3 octets to the IP address on the mobile device or computer 3 On your mobile device or computer verify that the mobile device or computer is conne...

Страница 42: ......

Страница 43: ...Contact SMART Support The display can t connect to a 5 GHz wireless network The wireless networkmay be operating on bands that the display doesn t support Contact your networkadministrator You need to identify the display See Appendix B Identifying your display on page 43 An app is missing or not available l If the app is missing from the launcher enable the app in Settings See SMART Board MX100 s...

Страница 44: ...onnected computer to open SMART Notebookfile Resolving issues with Browser Issue Solutions Browser isn t working correctly l Make sure the display is connected to a networkand the networkis configured properly and the networkis connected to the Internet See SMART Board MX100 series interactive displays installation and maintenance guide smarttech com kb 171288 l Make sure Ethernet or Wi Fiis enabl...

Страница 45: ... is not working or is not accurate l If touch interactivity is slow close some open applications on the computer l Make sure the USB cable is securely fastened to both your computer and the display l Make sure the USB cable is not longer than the maximum specified in the display s specifications l Use a USB 2 0 cable and make sure it s connected to the correct USB connector that s associated with ...

Страница 46: ...play s Wi Fihotspot See SMART Board MX100 series interactive displays installation and maintenance guide smarttech com kb 171288 c Connect your computer or device to the display s Wi Fihotspot d Open the EShare app on your computer or device l Download the EShare app onto your device See Downloading the EShare app on page 29 Audio isn t working correctly l See SMART Board MX100 series interactive ...

Страница 47: ...ctive displays installation and maintenance guide smarttech com kb 171288 l Make sure your Apple device isn t muted l Turn up the volume on your device l Turn up the display s volume See Front controlpanelon page 5 The iMirror app is not activated l Make sure the display is connected to a networkthat has Internet access a Restart the display See SMART Board MX100 series interactive displays instal...

Страница 48: ......

Страница 49: ...rol panel A list of input sources appears 2 If the input source list doesn t include SMART MX e the display is a SMART Board MX series interactive display The display has an iQ appliance installed If the input source list includes SMART MX e the display is a SMART Board MX100 series interactive display The display includes the e experience ...

Страница 50: ......

Страница 51: ......

Страница 52: ...SMART TECHNOLOGIES smarttech com support smarttech com contactsupport smarttech com kb 171289 ...

Отзывы: