E_MH_Instalation_instructions_Skylux_Climax_Panorama
20/11/2020
42/60
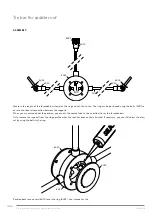
Ridge for saddle roof
ASSEMBLY
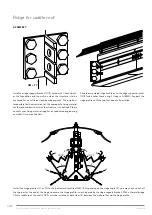
Install the hinge profiles (S1 or S2) to the bottom wall profiles (MB) (1). Depending on the slope angle (2), you may have to cut off
the top part at the end of the hinge to ensure the hinge profile is not hindered by the ridge support bracket. With a thermal bridge
Climax saddle roof, the seal (C11CX) must be installed at both sides (3) between the wall profile and the hinge profile.
Install the ridge support bracket (NCZ) to the wall. Check wheth-
er the foundation and the walls on which the structure is to be
anchored have a sufficient load-bearing capacity. The installer is
responsible for the assessment of the appropriate fixing material
for the load and basis on which the structure is to be fixed. Please
contact your fixing material supplier or specialised engineering
consultants in case of doubts.
Slide the assembled ridge profile on to the ridge support bracket
(NCZ) and anchor these using 2 fixing sets (BMR). Support the
ridge profile until the roof has been fully installed.
HM + 17
3
3
3
3’
1
1
2
2’
C11CX
C11CX
Содержание Climax Panorama
Страница 19: ...20 11 2020 19 60 E_MH_Instalation_instructions_Skylux_Climax_Panorama INSTALLATION TIPS CLIMAX PANORAMA ...
Страница 56: ...E_MH_Instalation_instructions_Skylux_Climax_Panorama 20 11 2020 56 60 ...
Страница 58: ...E_MH_Instalation_instructions_Skylux_Climax_Panorama 20 11 2020 58 60 ...
Страница 59: ...20 11 2020 59 60 E_MH_Instalation_instructions_Skylux_Climax_Panorama ...


