background image

SkyCaddie

®

: #1 Rangefinder in Golf

12

C H A P T E R   3

Customizing Your SkyCaddie For Play

Your SkyCaddie can be customized to fit your style of play and to display information in the format you prefer.

3.1  Preferences

To customize the information to be displayed during play, press the Menu button, scroll to “Preferences” and 
press the Left Soft Key under “Select”. Within Preferences, a list of settings is displayed as follows:

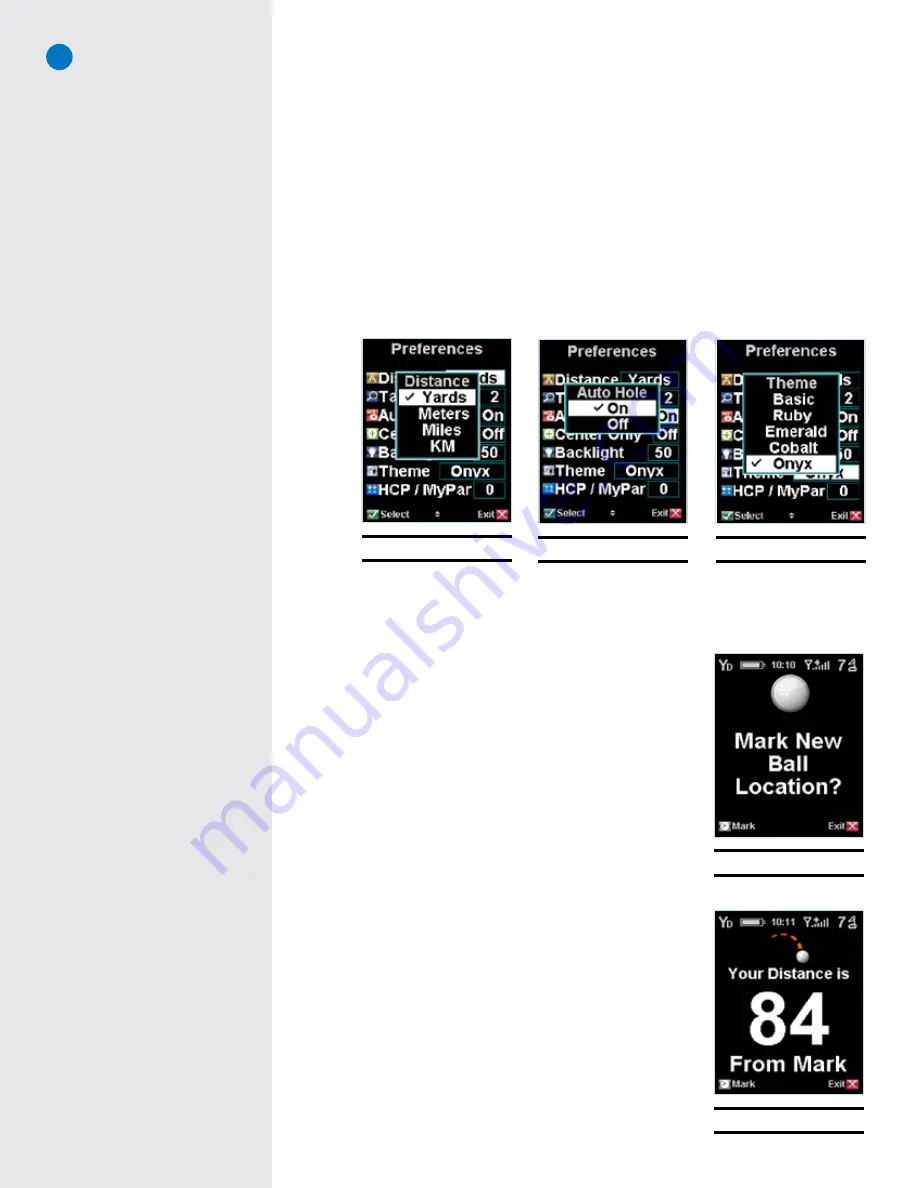
•  Distance:

 You can set your preferred unit of distance as (“Y

ds

” = Yards, “M” = Meters, “mi” = 

Miles, “K” = kilometers) by selecting “Distance”, then choosing the unit of measurement you prefer. 
A checkmark will be placed next to the item you have chosen (Fig. 24). 

•  Target Views:

 Set the desired target views as detailed in Section 2.4.2.

Fig. 24: 

Distance preference

Fig. 25: 

Auto-Hole option

•  Auto Hole:

 If enabled, your SkyCaddie will automatically detect that you are moving toward the next 

hole and will automatically advance to that hole. To enable, scroll to “Auto Hole” and select. Press the 
Scroll Pad to move either UP or DOWN to highlight ON or OFF and select (Fig. 25). Upon returning to 
the Preferences screen, confirm that your selection appears in the box next to “Auto Hole”. 


As noted in a previous section, target lists will automatically scroll off 
the bottom of the display as you move forward along the fairway without 
the need of using the Scroll Pad. In addition, the target list will switch 
to the IntelliGreen view automatically as you approach the green. By 
combining the ability to auto scroll targets and automatically advancing 
to the next hole, your SkyCaddie gives you hands-free operation.

•  Center  Only:

  If  you  prefer  that  the  SkyCaddie  only  display  the 

distance to the center, enable “Center Only” (For more information 
see Section 2.4.3).

•  Theme: 

Further personalize the look of the SkyCaddie software by 

choosing one of several user-selectable themes. Within Preferences, 
scroll to and select “Theme”. Then scroll to and select the desired 
color theme option (Fig. 26 above).

3.2  Determining Shot Distance

Simply press the Mark button at the location where you are going to 
take your shot. The “Mark New Ball Location?” screen will display (Fig. 
27). Select “Mark” (Left Soft Key) to record your current location and 
then take your shot. When you get to the location where your ball came 
to rest, press the Mark button again to record and display the distance 
(Fig. 28). You may return to your previous screen by selecting “Exit” or 
choose “Mark” to mark the distance for another shot.

3.3  Information 

To view information regarding the current hole, simply press the Info 
button. Pressing the Info button a second time will display on-screen 
instructions and information to help you navigate the SkyCaddie.

Fig. 26: 

Theme selection

Fig. 27: 

Mark Ball

Fig. 28: 

Shot Distance

Содержание SkyCaddie SG3.5

Страница 1: ...SkyCaddie SG3 5 User Guide...

Страница 2: ...Desktop Software 5 1 6 Activating and Registering Your SkyCaddie 5 1 7 Benefits of SkyPlayer Club Membership 6 1 8 Downloading Courses to Your SkyCaddie 6 Chapter 2 Playing Golf With Your SkyCaddie 7...

Страница 3: ...time While viewing the IntelliGreen or Target views press Info and select Time with the Right Soft Key Adjust the hour if needed by selecting Adj Menu Displays the SkyCaddie Main Menu Hole Displays i...

Страница 4: ...recommended Microsoft Internet Explorer 6 0 or later PC Safari 2 0 or later Mac 1 3 Installing the Batteries Prior to using your SkyCaddie insert the supplied AAA disposal batteries To install the bat...

Страница 5: ...cessfully installed a SkyCaddie icon will be placed on your computer s desktop This will allow you to easily launch the program anytime you need to download courses or manage your account 1 6 Activati...

Страница 6: ...bmit your Unpublished SkyCourses to SkyGolf Our database is growing daily through the efforts of SkyGolf professionals and SkyCaddie members Share Courses with Other Users Members can submit courses t...

Страница 7: ...selected the SkyCaddie will ask you for the hole to start on or the Driving Range D Make the appropriate selection to begin 2 3 Turning the Digital Scorecard On or Off During start up the SkyCaddie w...

Страница 8: ...ions Select the desired target views to display a checkmark will appear next to each selected target view The SkyCaddie will display View and iGreen at the bottom of each target view screen View Left...

Страница 9: ...how many shots it took to complete the hole Fig 13 By default it will show what par is for that hole 1 Press left right on the Scroll Pad to adjust the total number of actual shots taken 2 Next press...

Страница 10: ...elect then set to Off Fig 17 5 Press Exit to exit out of the Menu back to the play screens 2 6 MyPar Scoring Option SkyCaddie also allows you to enter your handicap or a MyPar goal into the scoring sy...

Страница 11: ...pars for hole numbers that you will be able to use your handicap on will be highlighted in blue Figs 21 22 2 If you set a MyPar goal the pars for hole numbers that you will be allowed extra strokes on...

Страница 12: ...ou move forward along the fairway without the need of using the Scroll Pad In addition the target list will switch to the IntelliGreen view automatically as you approach the green By combining the abi...

Страница 13: ...tance setting Fig 31 Scroll UP DOWN to adjust the distance from 50 500 yards Choose Select to save the set ting Targets First Sets your SkyCaddie to display the target list from the tee first when you...

Страница 14: ...screen showing Front Back and Center Scroll to the desired green target to record and select Record Left Soft Key You will be prompted to stand still for 5 seconds while the SkyCaddie is recording the...

Страница 15: ...ourse name or delete to remove the course from your SkyCaddie 4 7 Publishing Personal SkyCaddie Courses You have the option to publish your personal recorded courses so other SkyCaddie users can take...

Страница 16: ...ters Target Views Enable up to 4 different target views Choose Stan dard Graphical Expanded or Big Number Refer to Section 2 4 2 for information regarding Target Views Auto Hole Enable the Auto Hole f...

Страница 17: ...target list views To enable scroll to and select Green Tgts to open the menu item Move the Scroll Pad to ON and select A checkmark will appear next to the item you choose System Settings System Setti...

Страница 18: ...signal strength in weak areas It is normal for the satellite signal strength indicator to fluctuate as you move around the golf course DO make sure that the SkyCaddie s battery level is full before p...

Страница 19: ...een Gn Plate Plt Fairway Target FT End of Fairway EoF Fairway Fwy Bunker Right BkrRt Bunker Left BkrLt Bunker Bkr Carry Cy Creek Crk Mound Mnd UpSlope UpSlp DownSlope DnSlp Tee T PopUp PU BallWasher B...

Страница 20: ...telliGreen Technology X X X Upgradeable X X X Access to professionally mapped courses X X X Access to course and software updates X X X Maximum number of published SkyCourses stored on the SkyCaddie 0...

Страница 21: ...SG3 5 User Guide 21 A ppendix C Target Examples These examples illustrate the kinds of targets you would see on the SkyCaddie Fig C 1 Par 5 Fig C 2 Par 4 Fig C 3 Par 4 Fig C 4 Par 5...

Страница 22: ...yHawke Technologies LLC All Rights Reserved U S Patent No 7 118 498 6 456 938 SkyCaddie User s Guide All content within is copyrighted by SkyHawke Technologies LLC and may not be reprinted without per...

Отзывы: