background image


34


System Settings 

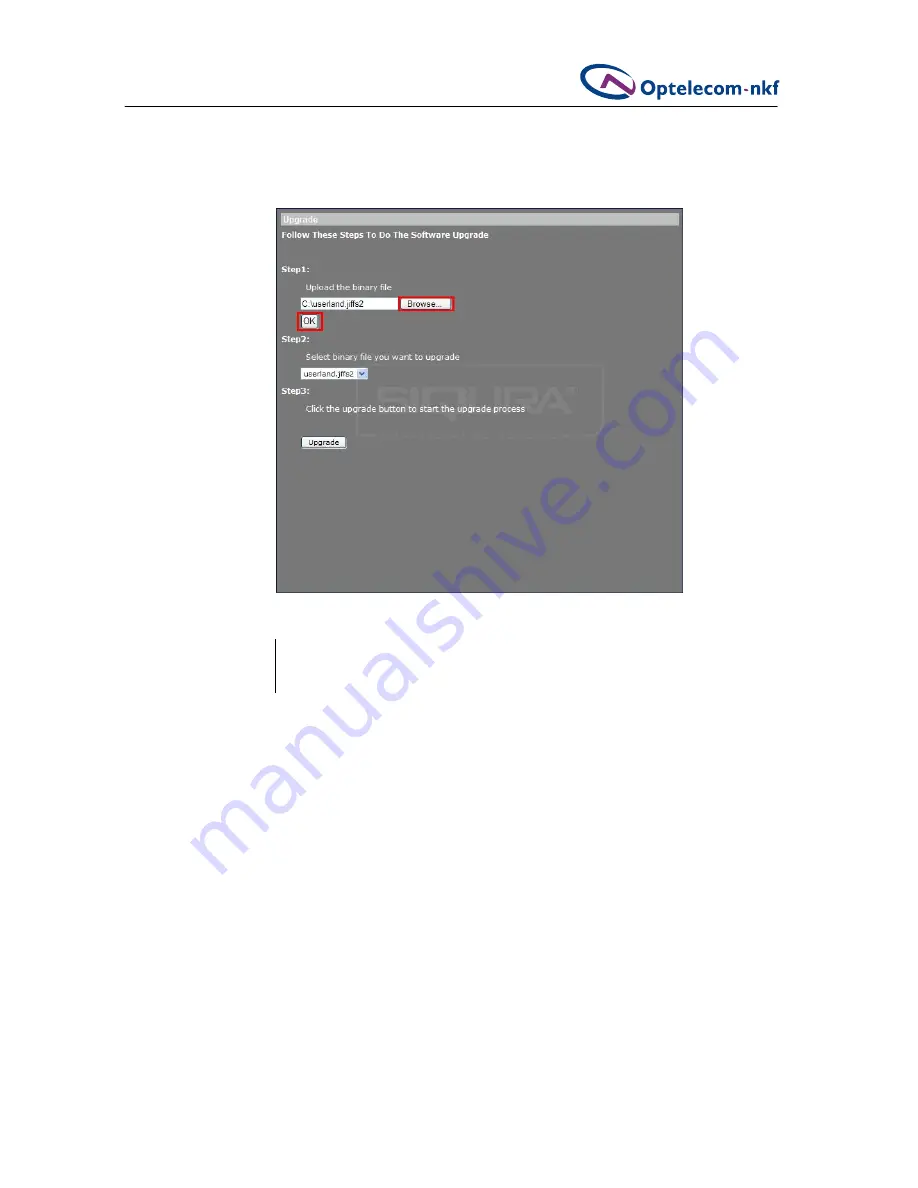
3.


Click 

OK

Software uploading will begin. 


please note


Do not change the upgrade file name, or the system will fail to find the file. 


4.


When notified that the file has uploaded successfully, click 

OK

 to continue. 

Figure 5.21  Software upgrade

Содержание BC2x Series

Страница 1: ...User Manual Siqura BC2x Series 1 3 CCD Color Box Camera...

Страница 2: ......

Страница 3: ...SETTINGS 13 5 1 1 Sync with computer time 13 5 1 2 Manual 14 5 2 USER MANAGEMENT 14 5 2 1 Root password 14 5 2 2 Add user 15 5 2 3 User permissions 15 5 2 4 Manage users 16 5 2 5 User information 16 5...

Страница 4: ...42 6 4 VIDEO FRAME SKIP 43 6 5 AUDIO MODE AND BIT RATE SETTINGS 44 7 CAMERA SETTINGS 47 7 1 EXPOSURE 47 7 2 WHITE BALANCE 48 7 3 BACKLIGHT SETTING 49 7 4 BRIGHTNESS SETTING 49 7 5 SHARPNESS SETTING 50...

Страница 5: ...ght Under copyright laws the contents of this installation manual may not be copied photocopied translated reproduced or reduced to any electronic medium or machine readable format in whole or in part...

Страница 6: ...ealth which could otherwise be caused if this product is thrown into the garbage bin The recycling of materials will help to conserve natural resources For more details information about recycling of...

Страница 7: ...k a qualified technician for servicing Do not operate the camera beyond the specified temperature humidity and power source ratings Verify the power source is appropriate before you plug in and operat...

Страница 8: ......

Страница 9: ...age quality and conserve bandwidth With ultra high resolution users can monitor critical areas with greater detail like never before 3 1 Features Image Quality Sony progressive scan CCD CMOS sensor 1...

Страница 10: ......

Страница 11: ...ternatively users can search the for the camera in their network using the application DeviceSearch exe found in the supplied CD s DeviceSearch folder This application will detect and list all the Siq...

Страница 12: ...ces will be listed in the page as shown in the figure below The IP Camera s default IP address not shown in figure 4 3 is in the 10 x x x series The precise address is printed on a label on the bottom...

Страница 13: ...reasons of security it is strongly advised to change the administrator s password See section 5 2 User Management for further details Additionally users can change the camera s network property either...

Страница 14: ...lick the selected item and choose Network Setup as shown in figure 4 5 Meanwhile record the IP Camera s MAC address for future identification 3 In the Network Setup page select DHCP and click Apply pl...

Страница 15: ...quraViewer To install the SiquraViewer software 1 When first accessing the camera via the browser you are prompted to install the SiquraViewer The installation file is named install cab When Internet...

Страница 16: ...g In this section the Administrator sets host name system time root password network related settings etc This area is further described in section 5 System Settings Streaming setting In this section...

Страница 17: ...ections please note The System configuration page is only accessible to the Administrator 5 1 System Time Settings To view the options discussed in this section click the first category Date Time in t...

Страница 18: ...2 User Management To add and delete users and to configure user permissions click User management in the left hand column This screen is shown in figure 5 2 5 2 1 Root password please note The root us...

Страница 19: ...ssion to view the Home page and operate its controls is granted to all users by default 4 Click Add to add the new user The new user will be displayed in the user name list please note User names and...

Страница 20: ...From the list labeled Existing User select the name of the user and click Edit 3 In the pop up dialog select the user s permissions change the user s password and click Save please note It is require...

Страница 21: ...Streaming and Camera respectively Figure 5 4 shows NewUser 1 1 0 0 NewUser is the username The number 1 indicates a privilege is granted the number 0 indicates a privilege is denied Therefore NewUser...

Страница 22: ...cameras use a fixed IP address but the administrator can configure the camera to use DHCP to acquire its IP address To acquire the IP address via DHCP 1 In the left hand menu select Network as shown i...

Страница 23: ...DeviceSearch folder on the camera s CD or enter the IP address in the browser s address bar and press Enter IP address The IP address identifies the camera on the network Subnet mask The subnet mask...

Страница 24: ...100 8080 instead of http 192 168 0 100 Host name The name identifies the camera For example if the alarm function is enabled and set to send alarm messages by Mail FTP the host name entered here will...

Страница 25: ...the Host name field 6 In the Username E mail field type the username or e mail required by the DDNS provider for authentication 7 In the Password Key field type the password or key required by the DD...

Страница 26: ...erver Account Name Password E mail Address For SMTP server details contact your network service provider 5 6 FTP The Administrator can configure the camera to send alarm messages to a specific File Tr...

Страница 27: ...priate fields 3 Enable the 1st FTP passive mode or the 2nd FTP passive mode or both 4 Press Save when finished For FTP server details contact your network service provider 5 7 Alarm Configuration The...

Страница 28: ...the Alarm Output settings correspond with the Alarm Type Normal close corresponds with Output high and Normal open corresponds with Output low 5 Check the boxes Send Alarm Message by FTP or Send Alar...

Страница 29: ...wing parameters levels of Motion Detection Sampling pixel interval 1 100 Default value 10 Detection level 1 100 Default value 10 Sensitivity level 1 100 Default value 80 Time interval sec 0 7200 Defau...

Страница 30: ...gger if the Motion detection function is disabled or while the Motion Detection settings are saving In these cases a window displays in the viewport of the Motion Detection webpage as shown in figure...

Страница 31: ...rage location for snapshots 1 From the left hand menu select Image Capture as shown in figure 5 14 2 In the box labeled All images stored at type the directory where you want to store captured snapsho...

Страница 32: ...chieve consistent exposure output To configure the auto iris lens 1 From the left hand menu select Iris Adjustment as shown in figure 5 15 2 Ensure that the iris lens is in place 3 Superimpose a Gamma...

Страница 33: ...ile The log file provides useful information about configuration and connections after system launch To view the system log In the left hand menu click View log file as shown in figure 5 16 The system...

Страница 34: ...rs The BC2x camera s parameters are stored in its configuration file To view all of the system s parameters Click View parameters in the left hand menu The parameters display in the browser as shown i...

Страница 35: ...he camera s settings to those present when shipped from the factory To restore the camera s default settings Click the Set Default button The system will restart in 30 seconds please note The IP addre...

Страница 36: ...ftware Version To display the camera s software and firmware versions In the left hand menu select Software version The camera s software and firmware versions are displayed as shown in figure 5 19 Fi...

Страница 37: ...defaults including IP address Make sure to note all settings before proceeding Make sure the upgrade software file is available before carrying out software upgrade To upgrade your camera s software 1...

Страница 38: ...OK Software uploading will begin please note Do not change the upgrade file name or the system will fail to find the file 4 When notified that the file has uploaded successfully click OK to continue F...

Страница 39: ...pgrade select the appropriate file as shown in figure 5 22 6 Click Upgrade The system will check whether the upgrade file exists or not After the upgrade process is finished the viewer will return to...

Страница 40: ......

Страница 41: ...ming tab at the top of the page The items display in the left hand column In this section the administrator can configure specific video resolution video compression mode video protocol and audio tran...

Страница 42: ...olutions resolution hxv PAL NTSC D1 720x576 720x480 2 3 D1 480x576 480x480 1 2 D1 352x576 352x480 2CIF 720x288 720x240 CIF top field only 352x288 352x240 QCIF 176x144 176x120 Table 6 1 MPEG 4 resoluti...

Страница 43: ...nu select Video Format 2 Choose one of the following video rotation types Normal video No rotation applied Flip Rotates the image vertically Mirror Rotates the image horizontally 180 Degree Inverts th...

Страница 44: ...o Streaming 6 2 Video Compression Administrators can select the appropriate MJPEG MPEG 4 compression mode on the Video Stream Protocol page shown in figure 6 3 depending on the application Figure 6 3...

Страница 45: ...MPEG 4 compression setting 1 From the Main menu select Streaming and from the left hand menu select Video Compression 2 Choose one of the following compression settings 128 kbps highest compression l...

Страница 46: ...ng TCP transport To configure the Video Stream protocol 1 From the Main menu select Streaming and from the left hand menu select Video Stream Protocol 2 Select one of the following protocol settings M...

Страница 47: ...ame Skip Video frame skipping is useful for saving bandwidth The setting page is shown in figure 6 5 To enable MJPEG frame skip 1 From the Main menu select Streaming and from the left hand menu select...

Страница 48: ...ing options No skipping default Frame skipping at 5 frame internal Frame skipping at 10 frame internal Frame skipping at 15 frame internal 3 Click Save please note Higher frame skipping rates decrease...

Страница 49: ...n to the other one site at a time Simplex Talk only One site can only speak to the other site Simplex Listen only One site can only listen to the other site Disable Select this item to turn off the au...

Страница 50: ......

Страница 51: ...rameter setting are described in the following sections 7 1 Exposure The exposure is the amount of light received by the image sensor and is determined by the width of lens diaphragm opening iris adju...

Страница 52: ...size of the Iris opening The higher the number the more light is let into the lens Manual Shutter Mode In this mode users can select the shutter speed Shutter speed values range from 1 5 to 1 10000 s...

Страница 53: ...ond to the red warmer hues temperature ranges To change the white balance manually 1 Select a number between 1 and 11 2 Press SET to confirm the new setting 7 3 Backlight Setting Backlight compensatio...

Страница 54: ...new setting 7 7 Digital Zoom Setting Digital zoom takes a portion of the image and expands that portion to the full size of the image The camera s digital zoom is adjustable from x1 to x12 at VGA reso...

Страница 55: ...000K Operation Video Compression MPEG 4 MJPEG Video Streaming Simultaneous MPEG 4 and MJPEG video stream dual stream Resolution MPEG 4 VGA QVGA CIF QCIF MJPEG 1280x960 4 VGA 640x480 VGA Frame Rate MPE...

Страница 56: ...Ethernet RJ 45 Protocol TCP IP UDP RTP RTSP HTTP ICMP FTP SMTP DHCP and IGMP Password Levels User and Administrator Internet Browser Internet Explorer 6 0 User Accounts 20 please note Weight and dime...

Страница 57: ...he test chart or object at least 75 feet 23 meters away or as far as possible 2 Make sure the iris is wide open It is advised to keep the environment in a low light condition 3 Adjust the focus to inf...

Страница 58: ...Optelecom NKF B V 2008 Version 1 3 082306 1c Siq BC2x UM MW03SP3 199925410750 00 www siqura com www optelecom nkf com...

Отзывы: