background image

9

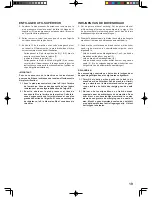
ACCESSOIRES

  1.  Aiguilles 

  2.  Canettes 
  3.  Porte-bobine auxiliaire vertical

  4.  Rondelle feutre 

  5.  Chapeau pour bobine (petit) 
  6.  Chapeau pour bobine (moyen) 

  7.  Chapeau pour bobine (grand) 

  8.  Séparateur de boutonnière/découseur et brosse

  9.  Tournevis pour plaque aiguille 
10.  Pied fermeture à glissière

11.  Pied point bourdon
12.  Pied ourlet invisible
13.  Pied boutonnière  

ACCESSOIRES

  1.  Set naalden
  2.  4 spoelen (1 zit in de machine) 

  3.  Tweede garenpen
  4.  2 garenpenviltjes 

  5.  Garenschotel (klein)

  6.  Garenschotel (groot)
  7.  Garenschotel (extra groot) 
  8.  Tornmes/knoopsgatenopener/kwastje

  9.  Schroevendraaier voor naaldplaat

10.  Ritssluitingvoet

11. Cordonvoet
12. Blindsteekvoet

13.  Knoopsgatvoet

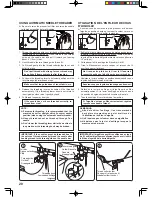
Le pied qui accompagne la machine à 

coudre est appelé le pied universel et 

est utilisé pour la plus grande partie des 

travaux de couture.

De meegeleverde voet wordt standaardvoet

g e n o e m d  e n  w o r d t  b i j  d e  m e e s t e 

naaiwerkzaamheden gebruikt.

Le pied point bourdon (11) est un autre 

pied très utile et devrait être utilisé pour la 

plus grande partie des travaux de couture 

décorative - spécialement le nid d’abeille   , 

l’étoile    , etc.

Ook de cordonvoet (11) is zeer nuttig 

en wordt voor de meeste decoratieve 

s t e e k p a t r o n e n  g e b r u i k t  -  m e t  n a m e 

SMOCKSTEEK    , STEERSTEEK      enz.

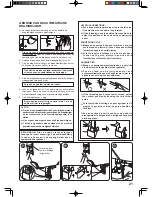
Lors de l’achat de bobine additionnel 

assurez-vous qu’elles soient des bobines de 

type « Classe 15 J »

Bij aankoop van extra spoelen dient u erop 

te letten, dat het gaat over spoelen van 

klasse 15 J.

Содержание One

Страница 1: ...INSTRUCTION MANUAL MANUEL D INSTRUCTION HANDLEIDING 1 F 1 ...

Страница 2: ...he sewing machine off 0 when making any adjustments in the needle area such as threading needle changing needle threading bobbin or changing presser foot etc 18 Always unplug sewing machine from the electrical outlet when removing covers lubricating or when making any other user servicing adjustments mentioned in the instruction manual 19 To avoid electrical shock never put the machine nor the mai...

Страница 3: ...s utiliser d aiguille gauchies 16 Ne pas tirer ni pousser le tissu en cousant Il pourrait faire dévier l aiguille et la briser 17 Fermer l interrupteur OFF avant de faire un quelconque ajustement autour de l aiguille comme enfiler l aiguille la changer embobiner du fil ou changer de pied sur le rhéostat etc 18 Toujours débrancher la machine à coudre de la prise pour retirer des couverts lubrifier ...

Страница 4: ...plaat Een verkeerde of beschadigde steekplaat kan naaldbreuk veroorzaken 15 Gebruik geen scheve naalden 16 Duw of trek niet aan de stof terwijl u naait Hierdoor kan de naald verbuigen en breken 17 Schakel de machine uit O als u aanpassingen uitvoert in de buurt van de naald zoals naald verwisselen of draad inrijgen van de naald of bij het verwisselen van de naaivoet en dergelijke 18 Haal altijd de...

Страница 5: ...ENTS For European version Blindhem stitch Multi stitch zig zag 38 39 Stretch and Decorative Stitches 40 45 Straight stretch stitch Ric rac stitch Honeycomb stitch Overedge stitch Feather stitch Pin stitch blanket stitch Ladder stitch Slant overedge stitch Entredeux stitch Decorative Patterns 44 45 Ideas on design stitching Continuous patterns Sewing on a button 44 45 Sewing a buttonhole 46 49 Usin...

Страница 6: ...s motifs Point invisible Zigzag multi point 38 39 TABLE DES MATIÈRES Point décoratifs et points extensibles 40 45 Point droit extensible Point ric rac Nid d abeille Point surjet extensible Point plume Point épingle Point de languette Point d échelle Point épingle oblique Point entredeux Points décoratifs 44 45 Idées sur les points décoratifs Motifs en continus Pose de boutons 44 45 Confection des ...

Страница 7: ...men 38 39 INHOUD Zigzag met meerdere steken 40 45 Stretchsteken 40 45 Rechte stretchsteek Drievoudige rechte steek Smocksteek Overlocksteek Veersteek Picosteek Festonneersteek Trapsteek Elastische overlocksteek Entredeux steek Decoratieve patronen 44 45 Enkele naaitips voor decoratieve steken Doorlopende patronen Knopen aannaaien 44 45 Knoopsgaten maken 46 49 Gebruik van de knoopsgatvoet werkwijze...

Страница 8: ... 15 Cord socket 16 Identification plate 17 Presser foot lifter 18 Buttonhole lever 19 Twin thread guide 20 Thread guide 21 Presser foot screw 22 Needle 23 Bobbin cover plate 24 Needle bar 25 Alternate thread cutter 26 Foot release button 27 Needle clamp screw 28 Presser foot 29 Feed dogs 30 Needle plate 31 Bobbin cover release button 32 Power line cord 33 Foot control 34 Instruction manual 1 KNOWI...

Страница 9: ...AMING VAN DE ONDERDELEN 1 UW NAIMACHINE STELT ZICH VOOR 1 Guide pré tension 2 Disque de tension du bobineur 3 Réglage de la tension du fil supérieur 4 Levier d enfilage 5 Plaque frontale 6 Coupeur et reteneur de fil 7 Table de rallonge Boîte d accessoires 8 Axe du bobineur 9 Butée d arrêt du bobinage 10 Bouton du point de marche arrière 11 Porte bobine horizontal 12 Poignée 13 Volant 14 Interrupte...

Страница 10: ...pper foot 11 Satin stitch foot 12 Blindhem stitch foot 13 Buttonhole foot The foot that comes on your sewing machine is called the general purpose foot and will be used for the majority of your sewing 2 3 1 4 9 10 11 12 5 6 7 8 The satin foot 11 is another very useful foot and should be used for most of your decorative sewing especially honeycomb star a etc When purchasing additional bobbins be su...

Страница 11: ...11 Cordonvoet 12 Blindsteekvoet 13 Knoopsgatvoet Le pied qui accompagne la machine à coudre est appelé le pied universel et est utilisé pour la plus grande partie des travaux de couture De meegeleverde voet wordt standaardvoet g e n o e m d e n w o r d t b i j d e m e e s t e naaiwerkzaamheden gebruikt Le pied point bourdon 11 est un autre pied très utile et devrait être utilisé pour la plus grand...

Страница 12: ...WITCH Your machine will not operate until the power light switch is turned on The same switch controls both the power and the light When servicing the machine or changing needles etc machine must be disconnected from the power supply Always disconnect the machine from power supply by removing the plug from the electrical outlet NOTE W h e n f o o t c o n t r o l i s disconnected the machine will n...

Страница 13: ...het licht als de machine aan Zet altijd de aan uit schakelaar op uit als u de machine schoonmaakt of alleen moet laten staan M a a k d e m a c h i n e s t e e d s l o s v a n d e stroomvoorziening door de stekker uit het stopcontact te verwijderen D é b r a n c h e z t o u j o u r s L a m a c h i n e d e l alimentation électrique en retirant la fiche de la prise murale REMARQUE Lorsque le rhéostat...

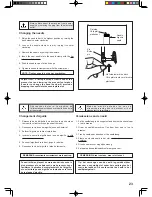
Страница 14: ...ons for your presser foot 1 Lower the presser foot to sew 2 Raise the lifter to the middle position to insert or remove fabric and to change presser foot 3 Lift it to its highest position to insert or to remove thick fabric VERTICAL SPOOL PIN for large thread spool Attach the spool pin Place the felt disc over it Place a thread spool on the spool pin Spool Bobine Garenklos Spool pin Porte bobine G...

Страница 15: ...en place vous obtiendrez une plus grande surface de travail Pour retirer la table de rallonge tenez la fermement avec les deux mains et tirez la à gauche vers l extérieur comme indiqué sur l illustration Pour la remettre en place faites glisser la table de rallonge à sa place jusqu à ce qu elle s enclenche En retirant la table de rallonge la machine se transforme en bras libre pour confectionner d...

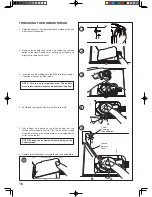
Страница 16: ...s not already there Place bobbin onto shaft with end of thread coming from top of bobbin Push bobbin winder shaft to the right until it clicks Hold onto end of thread 4 Start machine After the bobbin has begun to fill stop to cut the thread tail Step on the foot control again to continue to fill the bobbin The bobbin will automatically stop turning when completely filled Push shaft to the left to ...

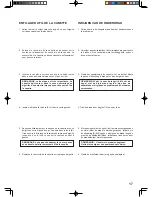
Страница 17: ...ats een garenklos op de garenpen en zet deze met behulp van de garenschotel vast Trek de draad via de draadgeleider uit de garenklos zoals afgebeeld is 2 Steek het draaduiteinde door het gatje in de lege spoel van binnen zoals afgebeeld is 3 Druk het spoelwinderasje zover mogelijk naar links Plaats de spoel op het spoelwinderasje en houd de draad omhoog Spoelwinderasje naar rechts schuiven u een k...

Страница 18: ...n you pull the thread 4 Pull thread through the slot A and then to the left 5 With a finger held gently on top of the bobbin pull the thread until it stops in the slot B Then pull the thread along the groove on the needle plate until it is snipped with cutter on the top left 6 Replace the clear bobbin cover plate onto the needle plate NOTE Sewing can be started without picking up the bobbin thread...

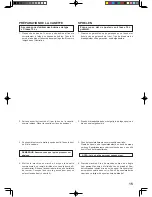
Страница 19: ...en REMARQUE cette étape est très importante La canette doit tourner dans le sens contraires des aiguilles d une montre lorsque vous tirez sur le fil de la canette OPMERKING dat is zeer belangrijk Mocht de spoel met de klok mee draaien dan kan de onderdraad eruit glijden en problemen bij het naaien veroorzaken ENFILAGE DU FIL DE LA CANETTE 1 Faites tourner le volant vers vous jusqu à ce que l aigui...

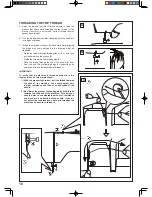
Страница 20: ...hread into the thread guide 4 Pass the thread through the eye of the needle 5 from front to back See following page for instructions on operation of the Automatic Needle Threader IMPORTANT To verify that the machine is threaded properly in the tension discs do this simple check 1 With the presser foot raised pull the thread towards the back of the machine You should detect only a slight resistance...

Страница 21: ...e déflection de l aiguille Si vous ne sentez pas de résistance le fil a été mal enfilé et vous devez le ré enfiler INRIJGEN VAN DE BOVENDRAAD A Zet de persvoethevel omhoog Zet de persvoethevel altijd omhoog alvorens de bovendraad in te rijgen Als de persvoethevel niet omhoog gezet wordt kan de juiste draadspanning niet worden verkregen B Draai het handwiel naar u toe totdat de naald in de hoogste ...

Страница 22: ...eading Ne tirez pas trop fort sur le fil car le fil pourrait ressortir du chas de l aiguille après avoir été enfilée Make sure that the guide doesn t touch fabric etc Assurez vous que le guide ne touche pas au tissu ect If the needle has not been threaded correctly re thread from step 1 Si l aiguille n est pas enfilée correctement répétez le processus depuis l étape 1 IMPORTANT If the needle canno...

Страница 23: ...de inrijghaak het garen niet kan grijpen 1 Rijg de machine in met uw linkerhand en pak de draad met uw rechterhand Haak de draad in de draadgeleider van de naaldstang en trek de draad ongeveer 10 cm naar u toe 2 Haak de draad aan de dubbele draadgeleider A en B 3 Trek de draad voorzichtig in de draadafsnijder houder om de draad af te snijden en vast te maken 4 Druk de inrijghendel helemaal naar be...

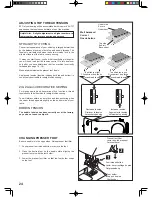
Страница 24: ...t Polyester coton 100 polyester Polyester coton 100 polyester Nylon Polyester coton Polyester Nylon 2020 tige rouge 2020 tige rouge 2020 tige rouge TYPE CALIBRE 11 80 bague orange 14 90 bague bleue 16 100 bague pourpre 18 110 bague jaune LÉGERS Batiste Gaze Crêpe MOYENS Velours côtelé Flanelle Gabardine Guigan Toile de lin Mousseline Crêpe de laine LOURDS Tissus apprêtés Toile forte Tissu de mante...

Страница 25: ... abaissant le pied presseur vous faciliterez l opération de remplacement de l aiguille et ceci évitera qu une aiguille ne tombe dans la fente de la plaque d aiguille Tip het vervangen van de naald is gemakkelijker wanneer u een stukje stof onder het voetje legt en het voetje laat zakken Dit voorkomt dat de naald in het naaldplaatgat valt REMARQUE resserrez la correctement mais pas trop OPMERKING d...

Страница 26: ...n a nicer stitch and less puckering when the upper thread appears slightly on the bottom side of your fabric BOBBIN TENSION The bobbin tension has been correctly set at the factory so you do not need to adjust it CHANGING PRESSER FOOT Be sure needle is in the up position Raise presser foot lifter 1 Push presser foot release button to remove the foot 2 Place the desired foot on the needle plate ali...

Страница 27: ...lenche de lui même sur son support AFSTELLEN VAN DE BOVENDRADSPANING Vo o r 9 0 v a n u w n a a i w e r k h o e f t u a l l e e n d e draadspanningsregelaar op AUTO in te stellen De draadspanningsregelaar bevindt zich op de machinekop DRAADSPANNING VOOR RECHTE NADEN Het goed uitzien van uw steek is afhankelijk van het instellen van de balans van boven en spoeldraad De spanning is in balans als het...

Страница 28: ...default position you can manually change the length width or straight stitch needle postition according to your preference At each manual adjustment point the LED lights in yellow The setting you determine on each stitch pattern will continue until you power off the machine LED indicator Témoin DEL LED indicator Stitch length control Longueur du point Regelknop steeklengte Stitch width needle posi...

Страница 29: ...ij de rechte steek Dat houdt in dat u nu met de rechte steek kunt naaien Om andere steekpatronen uit te kiezen drukt u zolang op de patroonkeuze toets van de patroonreeks waarin uw gewenste steekpatroon zich bevindt totdat het gewenste steekpatroon gaat branden Regelaars voor steeklengte en breedte naaldpositie Voor de meeste naaiwerkzaamheden zijn de automatische steekbreedte en steeklengteïnstel...

Страница 30: ...hine makes 4 tiny tacking stitches to tie off the sewing on all patterns except straight and zigzag stitches The position of the tacking stitches will be at the exact spot in the pattern where the reverse tacking stitch button is pushed NOTE This function is very useful for tying off the sewing pattern to avoid raveling at the start and end of sewing Reverse stitch button Bouton du point de marche...

Страница 31: ...outon marche arrière point d arrêt ACHTERWAARTSKNOP Dubbele functieknop voor achterwaarts naaien en afhechten Achterwaarts naaien voor rechte steken en zigzag steken Voor het achterwaarts naaien houdt u de achterwaartsknop ingedrukt De machine naait achteruit zolang deze knop ingedrukt blijft Afhechtfunctie voor het afwerken van andere steken De naaimachine naait 4 kleine naadafwerksteken voor het...

Страница 32: ... IN HANDGENAAIDE OPTIEK 2 4 2 0 4 0 ZIGZAG ZIGZAG ZIGZAGSTEEK 2 0 0 3 0 5 0 0 6 0 STRETCH BLINDHEM OURLET EXTENSIBLE ELASTISCHE BLINDZOOMSTEEK 2 0 1 0 3 0 3 0 2 0 7 0 MULTI STITCH ZIGZAG ZIGZAG MULTI POINT ZIGZAG MET MEERDERE STEKEN 1 4 0 2 4 6 0 2 5 6 0 REGULAR BLINDHEM INVISIBLE GEWONE BLINDZOOMSTEEK 2 0 1 0 3 0 3 0 0 5 6 0 STAR POINT EN ÉTOILE STEERSTEEK 3 0 5 0 5 0 6 0 OVEREDGE SURJET EXTENSIB...

Страница 33: ...6 0 3 0 6 0 ENTREDEUX ENTREDEUX ENTREDEUX STEEK 2 4 1 4 3 0 5 0 2 0 7 0 LADDER ÉCHELLE TRAPSTEEK 2 4 1 4 3 0 5 0 1 0 7 0 SLANT OVEREDGE SURJET OBLIQUE ELASTISCHE OVERLOCKSTEEK 2 0 1 0 3 0 5 0 0 5 7 0 BLANKET LANGUETTE FESTONNEERSTEEK 2 4 1 4 3 0 7 0 0 5 7 0 BUTTON SEWING POSE DE BOUTONS KNOPEN AANNAAIEN 3 0 2 0 4 5 WIDE BARTACK BUTTONHOLE BOUTONNIÈRE LARGE KNOOPSGAT BREED 0 4 0 4 0 6 0 8 5 5 NARRO...

Страница 34: ...e presser foot draw the fabric to the rear and cut off excess threads with the thread cutter located on the top of face cover as shown KEEPING SEAMS STRAIGHT To keep the seam straight use one of the numbered guide lines on the needle plate The numbers indicate distance from the needle at its center position The guide line on the bobbin cover plate is 1 4 6mm seam guide line which is used for pieci...

Страница 35: ...et vervolgens het voetje omhoog trek de stoffen naar achteren en knip het teveel aan draad af met behulp van de draadsnijder aan de onderzijde van het frontkapje zoals getoond REMARQUE en fonction du poids du tissu une légère mise au point fine de la tension peut être nécessaire REMARQUE la plaque d aiguille est dotée de marques métriques et impériales pour faciliter le guidage du tissus lorsque v...

Страница 36: ... not show 3 Increase thread tension a little at a time and continue until you acheive the desired appearance 4 Start to sew NOTE For a dramatic appearance experiment with different tension and stitch length combinations Needle to left of foot Needle to right of foot Naald links van de voet Naald rechts van de voet Aiguille à gauche du pied presseur Aiguille à droite du pied presseur PIPING Create ...

Страница 37: ...ans l ouverture du côté gauche du pied Pour coudre le côté gauche fixer le côté droit du pied au support du pied RITSSLUITING AANBRENGEN Voor het naaien van de rechterkant van de ritssluiting dient de ritssluitingvoet links in de voethouder te worden vergrendeld zodat de naald links van het voetje insteekt Voor het naaien van de linkerkant van de ritssluiting dient de ritssluitingvoet rechts in de...

Страница 38: ...e values shown in the chart are actual sewing lengths and widths and do not correspond to the scale and number markings on the sewing machine mm 0 0 5 1 0 1 5 2 0 2 5 3 0 3 5 4 0 4 5 5 0 5 5 6 0 0 0 25 0 5 0 75 1 0 1 25 1 5 1 75 2 0 2 5 3 0 Under side Côté de dessous onderkant Top side Côté de dessus bovenkant Center position Position centrale Middenpositie STITCH LENGTH LONGUEUR DU POINT STEEKLEN...

Страница 39: ...stelde steekbreedte 5 mm De grijze velden staan voor alle willekeurige waarden die manueel instelbaar zijn RÉGLAGE DE LA LARGEUR ET DE LA LONGUEUR DU POINT AFSTELLEN VAN DE STEEKBREEDTE EN LENGTE OPMERKING de in de tabel aangegeven waarden zijn actuele steeklengten en breedte Ze vormen geen weergaven van de markeringen op de naaimachine SATIJNSTEEK Dit is een leuke dicht op elkaar genaaide steek v...

Страница 40: ... stitching is almost invisible on the right side of the fabric BLINDHEM STITCH Settings Presser foot Blind stitch foot Thread Tension Control AUTO The blindhem stitch is primarily used for hemming curtains trousers skirts etc B A 1 2 1 2 3 4 NOTE It takes practice to sew blind hems Always make a sewing test first NOTE In addition to the adjustment on the foot the stitch width control can be used T...

Страница 41: ...e Blindsteekvoet invisible Spanningsregelaar AUTO RÉGLAGES Pied presseur Pied ourlet invisible Réglage tension du fil supérieur AUTO Gewone blindzoomsteek voor normale stoffen Elastische blindzoomsteek voor fijne rekbare stoffen REMARQUE en plus des ajustements possibles sur le pied le contrôle de la largeur du point peut être utilisé Le contrôle de la largeur du point change le déplacement de l a...

Страница 42: ...nts RIC RAC STITCH Ric rac is primarily used for a decorative top stitch It is ideal for edging neck bands armholes sleeves and hems When manually adjusted to a very narrow width it can also be used for sewing high stress seams HONEYCOMB STITCH The honeycomb stitch is ideal for smocking and useful for overcasting and attaching elastic and stretch lace 1 Make several rows of gathers across the fabr...

Страница 43: ...oint très étroit il peut être utilisé pour faire des coutures résistantes DRIEVOUDIGE ZIGZAGSTEEK Deze steek wordt hoofdzakelijk als decoratieve stiksteek gebruikt Met deze steek kunt u de stofkanten afwerken en tevens als decoratieve steek gebruiken om kraagjes mouwen manchetten enz af te werken Door het manueel instellen van de steekbreedte op een lage waarde kunt u robuuste naden realiseren NID...

Страница 44: ...a special effect will be obtained for decoration Another use for the ladder stitch is couching over narrow ribbon yarn or elastic For drawn thread work choose a coarse linen type fabric and after sewing draw the thread out within the ladder for an open airy appearance BLANKET STITCH The blanket stitch is traditionally a hand sewn stitch used to put bindings on blankets This multi purpose stitch ca...

Страница 45: ...t echter ook voor het opstikken van smalle biezen ook met contrasterende kleuren gebruikt Door gerichte plaatsing van de steekpatronen kunnen decoratieve effecten worden gerealiseerd De trapsteek is ook geschikt voor platborduursels op smalle biezen inloopgarens en rubberen biezen Open zoom naaiwerk lukt het best bij grover linnen Na uitvoering van een trapsteek trekt u de draden langs de binnenka...

Страница 46: ...is stitch pattern for table linen edges first sew the stitch and then trim the edge of the fabric along the edge of the stitch Be careful not to cut the stitch at this time Helpful hint For a more pleasing appearance experiment with a slightly lower tension setting CONTINUOUS PATTERNS These are the optimum patterns for sewing continuous patterns often seen on borders or hems of garments and home d...

Страница 47: ...er le résultat Avant de débuter une couture vérifier qu il y a assez de fil enroulé sur la bobine afin de ne pas manquer de fil lors de la couture Diminuez légèrement la tension du fil supérieur RÉGLAGES Pied presseur Pied point bourdon Réglage tension du fil supérieur AUTO Conseil utile pour une meilleure apparence faite des essais en diminuant légèrement la tension du fil supérieur Tip voor een ...

Страница 48: ...hole with your button 1 Select one of buttonhole patterns 2 Replace the presser foot with the buttonhole foot Refer to Changing presser foot on page 24 25 3 Insert the button into the buttonhole foot Refer to Using buttonhole foot above 4 Lower the buttonhole lever C so that it drops down vertically between the stoppers A and B 5 Carefully mark the position of buttonhole on your garment 6 Place th...

Страница 49: ...sen de aanslagen A en B omlaag komt 5 Markeer de positie van het knoopsgat op de stof 6 Plaats de stof onder de voet Trek de spoeldraad onder de stof over een lengte van ongeveer 10 centimeters naar achteren 7 Lijn de knoopsgatmarkering op de stof uit met de markering op de knoopsgatvoet en zet vervolgens de knoopsgatvoet omlaag 8 Houd de bovendraad vast en start de machine PROCÉDURE Utilisez un e...

Страница 50: ...ic marking Marque du tissu Marca de material Sewing will be completed automatically in the following order 1 2 3 4 5 6 7 CORDED BUTTONHOLES Hook filler cord crochet thread or buttonhole twist over the spur and pull both ends of the cord forward under the foot and tie off the cord as shown in the illustration Sew buttonhole so that zigzag stitches cover the cord When completed release the cord from...

Страница 51: ...NNIÈRE GANSÉES RENFORCÉES la tige du pied à boutonnière et tirez les deux extrémités sous le pied vers le devant Attachez le cordonnet tel que sur l illustration Coudre la boutonnière de manière à ce que le zig zag recouvre le cordonnet La boutonnière terminée détachez le cordonnet du pied tirer les bouts vers l avant et tailler la longueur excédentaire KNOOPSGAT MET KOORDINLEG Haak de koordinleg ...

Страница 52: ...gs and hook area with the lint brush Put one drop of sewing machine oil on the hook race as indicated by the arrows A B 5 Replace the bobbin case with the projection 3 positioned against the spring 4 6 Make sure that the needle is at its highest position and put and slide the needle plate into position as illustrated Cleaning the sewing machine and foot controller After using keep sewing machine a...

Страница 53: ... het noodzakelijk deze goed schoon te maken 1 Zet de naald in de hoogste stand 2 Beide schroeven van de naaldplaat 1 eruit draaien Naaldplaat naar u toe schuiven zoals in de afbeelding weergegeven is en verwijderen 3 Verwijder de capsule 2 4 Maak de transporteur en de grijperruimte goed schoon met het kwastje Doe een drupje olie in de grijperbaan waar de capsule in loopt aangegeven door de pijltje...

Страница 54: ... Twin needles are available in a range of sizes Check with your Singer retailer The twin needle is an optional purchase THREADING THE TWIN NEEDLE 1 Insert the second spool pin Place a spool on each spool pin Thread the two threads as one Draw one thread through each needle from front to back 2 Pick up bobbin thread as for single needle sewing Pull the three threads together under the presser foot ...

Страница 55: ...ue pour une seul aiguille Tirez les trois fils ensemble en dessous du pied presseur vers l arrière de la machine laissant environ 15 cm 6 po de fil DUBBELE NALD Optioneel Met de dubbele naald kunnen twee rijen parallelle steken worden gerealiseerd bijv voor figuurnaden dubbele stiksteken en decoratieve steken Bij het gebruik van dubbele naalden mag de steek nooit de gemarkeerde steekbreedte van de...

Страница 56: ...ctly see page 18 19 Top thread tension is too loose see page 24 25 Fabric is being pulled or pushed against machine feeding action Guide it gently Bobbin has not been wound evenly Rewind bobbin Needle breaks Fabric is being pulled or pushed against machine feeding action Guide it gently Needle size is not correct for thread and fabric see page 22 Needle is not all the way up into the needle clamp ...

Страница 57: ... de l aiguille n est pas correcte pour le fil et le tissu voir page 22 Le fil de la canette casse La boîte à canette n est pas enfilée correctement voir page 16 17 La bourre du tissu s est accumulée dans la boîte à canette ou le crochet l enlever voir page 50 51 Le tissu fronce La tension du fil supérieur et inférieur est trop serrée l ajuster voir page 24 25 La longueur du point est trop longue p...

Страница 58: ...d lower position Raise buttonhole lever and begin sewing 3 The buttonhole lever is in an incorrect starting position Lower the buttonhole lever so that it drops down vertically between the stoppers See page 46 for details 1 Something other than foot control is detected in the machine socket for the foot control Remove foreign particle from socket 2 Foot control is connected or disconnected This is...

Страница 59: ...knoopsgat 2 Een steekpatroon is geselecteerd maar de knoopsgathendel is geactiveerd staat omlaag Plaats de knoopsgathendel omhoog en begin te naaien 3 De knoopsgathendel staat niet in de juiste startpositie Laat de knoopsgathendel zakken zodat deze recht naar beneden komt tussen de stoppers Zie pagina 46 voor meer details 1 Un objet autre que le rhéostat est détecté dans la prise du réhostat Retir...

Страница 60: ... Part No 82981 F 4 ENGLISH FRANÇAIS NEDERLANDS ...

Отзывы: