background image

5.

Open the GoFree application - the unit should be automatically detected. The name
displayed will be either the default, or that assigned in the Device Name setting. If the unit
does not appear, follow the on screen instructions to manually find the device.

6.

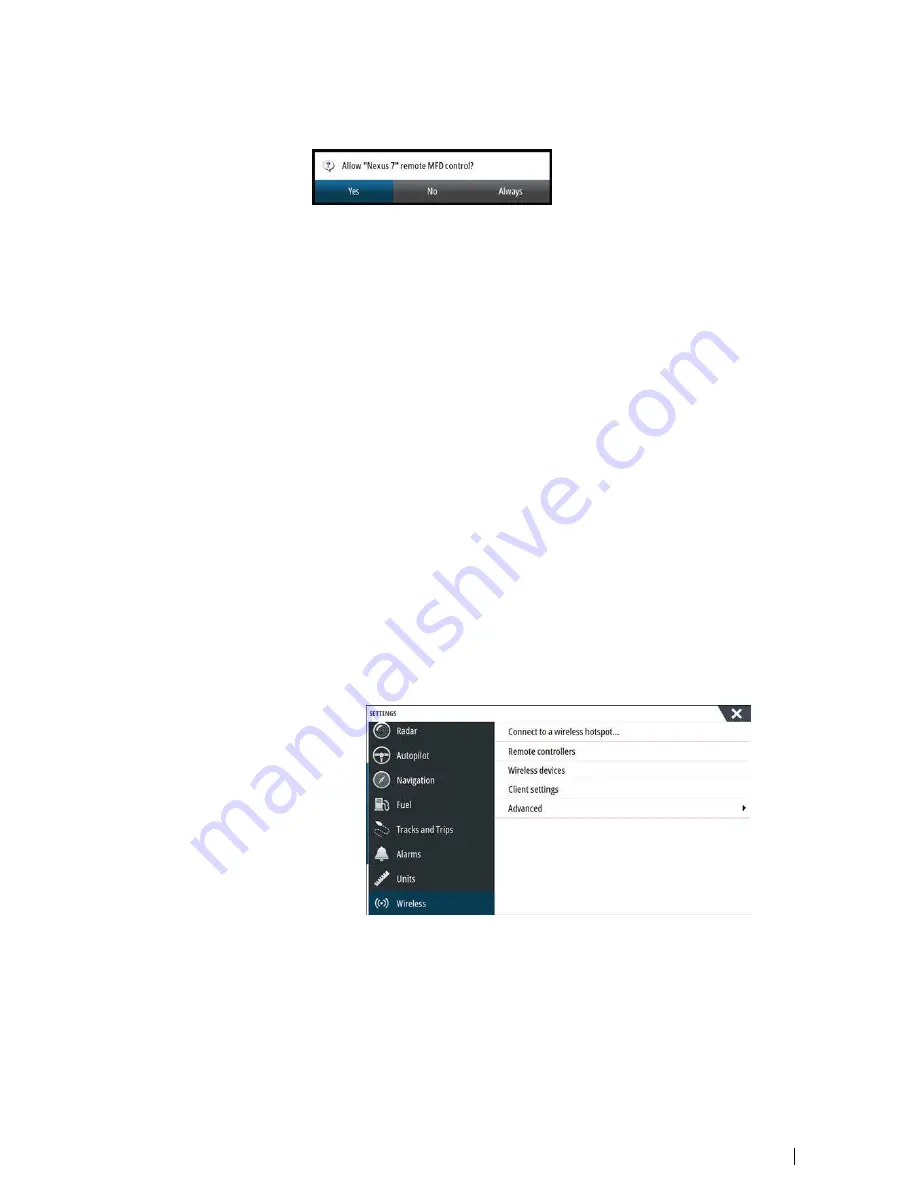
Select the graphic icon of the unit. The unit displays a prompt similar to the following:

7.

Select 

Yes

 for one-time connection, or 

Always

 if device is to be remembered for regular

connection. This setting can be changed later if required.

Ú

Note: 

The internal wireless module only supports GoFree connection to itself. Other

units connected on the network are not visible.

Connecting a smartphone

Install the GoFree App on the smartphone before following this procedure.

1.

Set the internal wireless to 

Access Point

 mode. To do this, select the 

Wireless devices

page in the Wireless settings dialog and then select the unit's Internal Wireless. Next,
select the 

Mode

 option and then select 

Internal Access Point

.

2.

Select a device on the 

Wireless devices

 page to view its Network Key.

3.

Navigate to the wireless network connection page on the smartphone, and find the unit
or GoFree wireless 

xxxx

 network. If more than one is in range, review the 

Wireless devices

page from the unit's Wireless settings dialog to confirm which wireless device is
connected to the unit.

4.

Enter the Network Key in the smartphone to connect to the network.

5.

Open the GoFree application on the smartphone, the unit should be automatically
detected. The name displayed will be either the default, or that assigned in the Device
Name setting. If the unit does not appear, follow the on screen instructions to manually
find the device.

The MFD's display is shown on the smartphone. To change the MFD's display on the
smartphone, use the MFD to change the display on the MFD. The display change on the
MFD is reflected on the smartphone.

Wireless settings

Provides configuration and setup options for the wireless functionality.

Remote controllers

When a wireless device is connected, it should appear in the 

Remote controllers

 list.

Selecting 

Always allow

 means the device can automatically connect without needing a

password each time. This menu also allows disconnection of devices that no longer require
access.

Software Setup

 | NSS evo3 Installation Manual

37

Содержание NSS evo3

Страница 1: ...ENGLISH NSSevo3 Installation Manual...

Страница 2: ...vico Holding AS Warranty The warranty card is supplied as a separate document Compliance statements This equipment complies with CE under 2014 53 EU Directive The requirements of level 2 devices of th...

Страница 3: ...sult the dealer or an experienced technician for help Internet usage Some features in this product use an internet connection to perform data downloads and uploads Internet usage via a connected mobil...

Страница 4: ...Multimedia Interface are trademarks or registered trademarks of HDMI Licensing LLC in the United States and other countries Navico product references This manual refers to the following Navico product...

Страница 5: ...nnection to NMEA 2000 21 Transducer connection 22 Ethernet connector 23 Video in 24 Software Setup 24 First time startup 24 Configuring the WheelKey 24 Time and Date 24 Power Control 24 Data source se...

Страница 6: ...List 48 NMEA 0183 supported sentences 49 Technical specifications 49 Technical specifications 51 Dimensional drawings 51 7 Unit dimensions 51 9 Unit dimensions 52 12 Unit dimensions 52 16 Unit dimens...

Страница 7: ...rews 4Gx1 2 x4 for 7 x8 for 9 12 x12 for 16 units 6 Dust caps different sizes for NMEA 2000 x1 Ethernet x1 for 7 9 x2 for 12 16 and Sonar x2 connectors 7 Dust cap for HDMI connector 12 and 16 only 8 D...

Страница 8: ...topilot connected to the system Short press toggles between panels on split screen Long press maximizes active panel on split screen Default with an autopilot connected to the system Short press opens...

Страница 9: ...ar 1 single channel CHIRP 50 200 kHz conventional or HDI transducer 6 Sonar 2 singel channel CHIRP 50 200 kHz conventional TotalScan StructureScan or ForwardScan transducer 7 HDMI video output for ext...

Страница 10: ...iver Test the unit in its intended location to ensure satisfactory reception An external GPS source can be added to overcome poor reception areas Check that it is possible to route cables to the inten...

Страница 11: ...loosening of the knobs 2 Mark the screw locations using the bracket as a template and drill pilot holes Use fasteners suited to the mounting surface material If the material is too thin for self tapp...

Страница 12: ...ducer mounting location Transducer location selection and installation are two of the most critical steps in sonar installation To function properly the transducer must be in the water at all times an...

Страница 13: ...urbulence at higher speeds A good transducer location on these types of boats is between the ribs closest to the engine Note If the transducer is not placed in a smooth flow of water interference caus...

Страница 14: ...If power is left on or turned on during the installation fire electrical shock or other serious injury may occur Be sure that the voltage of the power supply is compatible with the unit Warning The p...

Страница 15: ...low wires connected together Power Control Bus Set one or more displays to be a Power Control Master Power Control unconnected Device will turn on and off when the power button on the front of the uni...

Страница 16: ...ve wire red 3 Ground wire black 4 Power control wire yellow 5 Alarm wire blue 6 Ignition switch Power Control master slave bus Turning on the master device turns on connected slave devices _ 5 2 1 6 7...

Страница 17: ...nowledged from all devices Individual devices can also be configured to not sound their internal buzzer but still display the alarm information For information about configuring alarms refer to the Al...

Страница 18: ...mmonly used size While most Navico products use Micro C cabling and connectors some products still use proprietary SimNet connectors which are easily made compatible with adaptor cables A network cons...

Страница 19: ...ection elsewhere in the network and ensure the existing network is not powered by 24 V DC Note Do not connect the NMEA 2000 power cable to the same terminals as the engine start batteries autopilot co...

Страница 20: ...Interface Bridge can also be used for expansion of the NMEA 2000 network when the maximum node limit node any device connected to network for the network has been reached or the maximum cable length o...

Страница 21: ...re as the 12 and 16 have two Connection of network devices such as radar sonar and other multifunction displays can be made directly to the Ethernet port or via a network expansion device to the Ether...

Страница 22: ...with male RCA cables to suit Note The video images will not be shared with another unit via the network It is only possible to view video on the unit connected to the video source Note Both NTSC and...

Страница 23: ...To configure the Wheel key select Configure WheelKey on the System Setting dialog Select the Short press option or Long press option in the WHEELKEY CONFIGURATION dialog and then an option from the li...

Страница 24: ...ys over to a different source from any display This only includes products set to Group mode Note In order to enable group selection the display must be set to Simrad group Devices with the Group set...

Страница 25: ...play backlighting Units metric or imperial units of measure Damping to dynamic data and Alarms can be grouped either in Simrad group or groups 1 through to 6 If any of the settings require discrete co...

Страница 26: ...to this unit Other devices on the network will not have these offsets applied External Alarm Setup The Siren Enabled option must be set in order for the unit to drive the buzzer when an alarm conditio...

Страница 27: ...n images on the regular Echosounder image When activated the Echosounder menu expands to include basic DownScan options Echosounder installation Use this dialog to setup and configure available Echoso...

Страница 28: ...MPH and SOG records 10 knots 11 5 MPH the calibration value needs to be increased to 117 To calculate the adjustment divide the SOG by the paddlewheel speed and multiply the product by 100 Calibratio...

Страница 29: ...r is plugged in before the unit has been powered on You should set the Structure depth offset for the structure transducer This settings is in the Echosounder Settings dialog Radar setup Use the Radar...

Страница 30: ...traight sea walls or piers having curves or an indentation Objects close to your vessel may appear pulled in or pushed out Adjust the range offset as below when the vessel is about 45 to 90 m 50 to 10...

Страница 31: ...may need to monitor 5 10 radar sweeps to be sure they have been eliminated 5 Traverse the area again and readjust if sidelobes returns still occur 6 Exit the dialog Radar sector blanking Halo radar on...

Страница 32: ...as a STBY key when configured for autopilot control To configure the WheelKey refer to ConfiguringtheWheelKey on page 24 Fuel setup The fuel utility monitors a vessel s fuel consumption This informat...

Страница 33: ...sel loads That is filled fuel and water tanks stowed tender supplies etc Fuel flow configuration After the number of engines is set it is required to set which fuel flow sensor is connected to which e...

Страница 34: ...ssignment of the Fluid Level devices Select Device list on the Network page and view the Device Configuration dialog for each sensor and set the Tank location Fluid type and Tank size For setting up t...

Страница 35: ...s the existing file on the NSS evo3 and all connected CZone devices For further information see BackingupandImportinguserdata on page 44 Wireless setup The unit includes built in wireless functionalit...

Страница 36: ...ate to the wireless network connection page on the smartphone and find the unit or GoFree wireless xxxx network If more than one is in range review the Wireless devices page from the unit s Wireless s...

Страница 37: ...ted to only one unit Once this unit is set to secondary a second module may be turned on connected and will automatically default to primary Note In a network with only one WIFI 1 and one or more inte...

Страница 38: ...find all DHCP servers on a network dhcp_probe may be run from the NSS evo3 Only one DHCP device may be operational on the same network at a time If a second device is found turn off its DHCP feature i...

Страница 39: ...uire the baud rate to be set to 38 400 Serial Output Selection determines whether the data is output via Tx lines and will enable editing of the output sentences list Serial Output Sentences This list...

Страница 40: ...e data a physical NMEA 2000 or NMEA 0183 connection is still required NMEA 2000 setup Receive waypoint Select this option to allow another device capable of creating and exporting waypoints via NMEA 2...

Страница 41: ...shows the IP address of the display being viewed top of list the Master display with This display next to it and any other displays in a multiple display network The function of the Master is invisib...

Страница 42: ...ervice assistant that creates a report of the devices installed on the NMEA 2000 and Ethernet network such as the software versions serial numbers and information from the settings file to assist in t...

Страница 43: ...egion If Export Region is selected the chart page will be displayed centered on vessel location Using the touch screen adjust the red boundary box to outline the area to be exported The export option...

Страница 44: ...EVO3 ZEUS3 9 EDGE BEZELS 000 13751 001 NSS12 EVO3 ZEUS3 12 EDGE BEZELS 000 13752 001 NSS16 EVO3 ZEUS3 16 EDGE BEZELS 000 13753 001 NSS7 EVO3 ZEUS3 7 DASH MOUNT KIT 000 13754 001 NSS9 EVO3 ZEUS3 9 DASH...

Страница 45: ...Output Status 127505 Fluid Level 127506 DC Detailed Status 127507 Charger Status 127508 Battery Status 127509 Inverter Status 128259 Speed Water referenced 128267 Water Depth 128275 Distance Log 12902...

Страница 46: ...ure 130576 Small Craft Status 130577 Direction Data NMEA 2000 PGN transmit 126208 ISO Command Group Function 126992 System Time 126996 Product Info 127237 Heading Track Control 127250 Vessel Heading 1...

Страница 47: ...it RMC RMB XTE XDR TX RX Sonar Receive DBT DPT MTW VLW VHM Transmit DBT DPT MTW VLW VHM TX RX Compass Receive HDG HDT HDM Transmit HDG TX RX Wind Receive MWV MWD Transmit MWV MWD TX RX AIS DSC Receive...

Страница 48: ...Supply voltage 12 24 V DC 10 31 2 V DC min max Power consumption Max 7 unit 20 W 4 W 9 unit 23 W 4 W 12 unit 30 W 5 W 16 unit 45 W 5 W Recommended fuse rating 7 unit 3 A 9 unit 3 A 12 unit 5 A 16 uni...

Страница 49: ...g 2 42 lbs 9 unit 1 41 kg 3 11 lbs 12 unit 3 1 kg 6 83lbs 16 unit 4 65 kg 10 25lbs Compass Safe Distance Metric imperial 50 cm Mounting type Bracket Supplied or panel mount Autopilot Manouveres Turn p...

Страница 50: ...131 0 mm 5 15 2 75 18 5 mm 0 73 70 0 mm 149 9 mm 5 90 248 2 mm 9 77 65 3 mm 2 57 9 Unit dimensions 310 9 mm 12 24 287 0 mm 11 30 179 5 mm 7 07 166 3 mm 6 55 131 0 mm 5 15 2 74 18 5 mm 0 73 69 6 mm 66...

Страница 51: ...78 1 mm 3 07 225 3 mm 8 87 18 5 mm 0 73 349 0 mm 13 74 106 7 mm 4 20 16 Unit dimensions 462 1 mm 18 19 436 5 mm 17 19 263 9 mm 10 39 170 3 mm 6 70 79 6 mm 256 0 mm 10 08 434 0 mm 17 09 18 5 mm 0 73 3...

Отзывы: