background image

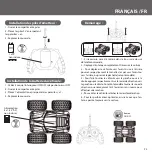
Alimentazione

4 x 1,5 V “AA” 

non incluso

1 x 9V

non incluso

+

+

+

+

+

9V

ON/OFF

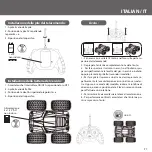
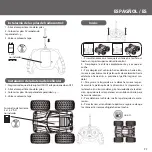
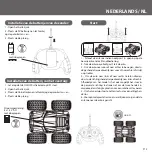
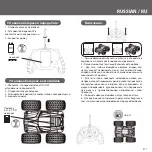
Installazione delle pile del telecomando :

Avvio : 

ITALIAN / IT

Installazione della batteria del veicolo :

1 - Aprite il vano delle pile
2 - Posizionate le pile 9V rispettando
le polarità + e -
3 - Riposizionate il coperchio

1 - Accertatevi che l’interruttore ON/OFF sia posizionato su OFF
2 - Aprite il vano delle Pile
3 - Posizionate le pile AA rispettando le polarità + e -
4 - Riposizionate il coperchio

1 - Se necessario, avvitate l’antenna nel foro sulla parte su-
periore del telecomando
2 - Dispiegate l’antenna completamente. Avviate l’auto.
3 - Per fare spostare il veicolo in avanti o all’indietro spin-
gere rispettivamente la levetta del gas in avanti o indietro 
oppure premete il grilletto (secondo il modello)
4 - Per fare girare il veicolo a sinistra o a destra premete ris-
pettivamente la leva di direzione verso sinistra o verso des-
tra. Oppure, a seconda del modello, ruotare la rotellina di 
direzione, o ancora  posizionate le 2 leve in senso contrario 
per effettuare una rotazione.
5 - Per arrestare il veicolo rilasciare la leva di accelerazione
6 - Per performance ottimali, accertatevi che l’antenna pu-
nti sempre verso l’auto.

P 7

Содержание Exost 360 Cross

Страница 1: ......

Страница 2: ...jouet d licatement avec un chiffon propre Gardez le jouet l cart de toute source directe de chaleur Ne pas immerger le jouet dans l eau ceci pouvant endommager les composants lectroniques Remplacez le...

Страница 3: ...trou sur le dessus de la t l commande 2 D ployez l antenne compl tement D marrez la voiture 3 Pour d placer le v hicule vers l avant ou vers l arri re poussez respectivement la manette des gaz vers l...

Страница 4: ...re and maintenance Always remove the batteries from the toy if it is not used for a long time Wipe the toy gently with a clean cloth Keep the toy away from direct sources of heat Do not immerse the to...

Страница 5: ...arities 4 Replace the cover 1 If necessary screw the antenna into the hole on the top of the remote control 2 Extend the antenna fully Start the car 3 To move the car forwards or backwards push the th...

Страница 6: ...t ultimo non viene usato per un periodo di tempo prolungato Pulite il giocattolo delicatamente con un panno pulito Tenete il giocattolo lontano dalla luce solare diretta Non immergere il giocattolo in...

Страница 7: ...foro sulla parte su periore del telecomando 2 Dispiegate l antenna completamente Avviate l auto 3 Per fare spostare il veicolo in avanti o all indietro spin gere rispettivamente la levetta del gas in...

Страница 8: ...juguete cuando no se vaya a utilizar durante una temporada Limpiar con cuidado utilizando un trapo limpio Guardar lejos de toda fuente directa de calor No sumergirlo en el agua lo cual podr a da ar l...

Страница 9: ...orificio si tuado en la parte superior del radiocontrol 2 Despliegue la antena completamente y arranque el coche 3 Para desplazar el veh culo hacia adelante o hacia atr s mueva respectivamente la pal...

Страница 10: ...as pilhas do brinquedo quando n o utilizado durante muito tempo Limpar o brinquedo delicadamente com um pano limpo Guardar o brinquedo longe de todas as fontes directas de calor N o mergulhar o brinqu...

Страница 11: ...a antena na abertura no topo do telecomando 2 Estique totalmente a antena Arranque com o carro 3 Para andar com o carro para a frente ou para tr s empurre alavanca de acelera o para a frente ou puxe...

Страница 12: ...ltijd de batterijen uit het speelgoed als het langere tijd niet zal worden gebruikt Veeg het speelgoed voorzichtig af met een schone doek Bewaar het speelgoed uit de buurt van elke di recte warmtebron...

Страница 13: ...g vast in opening op de bovenkant van de afstandsbediening 2 Trek de antenne volledig uit Start de auto 3 Om de auto naar voor of naar achter te bewegen duwt u de gashendel respectievelijk naar voor o...

Страница 14: ...l ngere Zeit unbenutzt sind stets die Batterien heraus zu nehmen Das Spielzeug mit einem sauberen Tuch vorsichtig reinigen Das Spielzeug stets fern von einer direkten W rmequelle halten DasSpielzeug n...

Страница 15: ...uerung schrauben 2 Die Senderantenne vollkommen ausfahren Das Fahrzeug in Betrieb setzen 3 Um das Fahrzeug nach Vorn oder Hinten zu bewegen ist der Beschleunigungshebel resp nach Vorn oder Hinten zu b...

Страница 16: ...V AA LR6 AM3 P 16 5 3 TECKIT INTERNATIONAL LIMITED Rm 1102A East Ocean Center 98 Granville Road Tsimshatsui East Kln Hong Kong SILVERLIT SAS 80 rue Barthelemy Danjou 92100 Boulogne Billancourt France...

Страница 17: ...4 x 1 5 V AA 1 x 9V 9V ON OFF RUSSIAN RU 1 2 9V 3 1 ON OFF OFF 2 3 AA 4 1 2 3 4 5 6 P 17...

Страница 18: ...gen Controleer of de afstand tussen de zender en het voertuig niet meer dan 15m is De bediening van twee of meer voertuigen op dezelfde frequentie heft on derlinge storing tot gevolg Kies in dat geval...

Отзывы: