background image

5. List of Functions

97

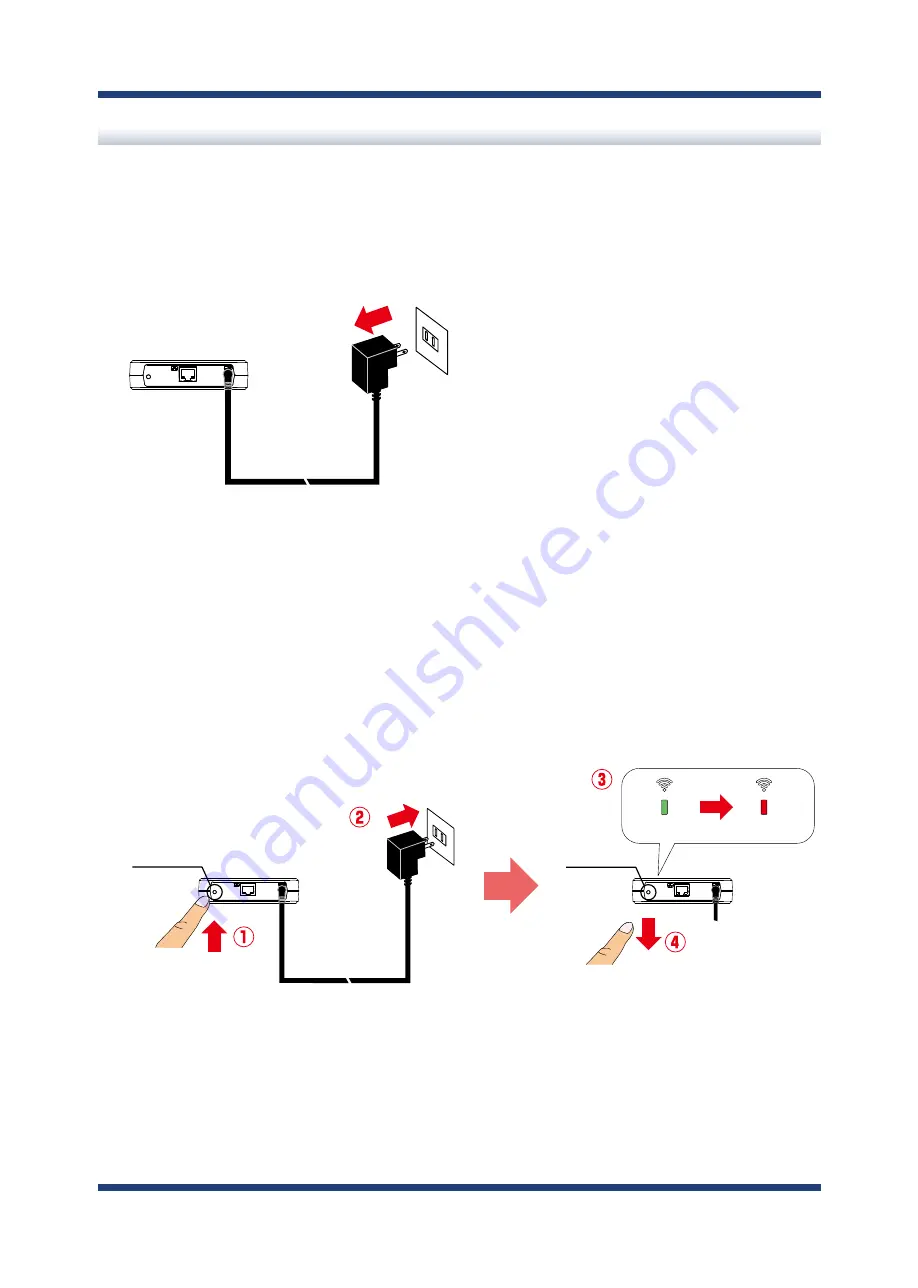
Factory Default Configuration

2.

Press and hold the push switch on the front while inserting the AC adaptor back into 
the electrical outlet.
When the WLAN LED turns green and then to red, release the push switch. The factory 
default configuration begins. 
After the factory default configuration is completed, the BR-500AC will start in a normal 
mode.

How to reset BR-500AC to factory defaults using the Push Switch:

1.

Unplug the AC adaptor of BR-500AC from the outlet.

AC adaptor

BR-500AC

Electrical Outlet

Push Switch

Release the push switch

Red

Green

BR-500AC

BR-500AC

AC adaptor

Electrical Outlet

Push Switch

Keep holding

Содержание BR-500AC

Страница 1: ...Wireless Bridge BR 500AC User s Manual...

Страница 2: ...Copyright 2021 silex technology Inc All rights reserved WA106560XA...

Страница 3: ...of Radio Waves 15 Notes on Usage 15 2 6 Notes on Security 17 3 Before You Begin 19 3 1 Operating Mode 19 Single Client Mode 20 Multi Client Mode 21 3 2 Configuration Method 22 Easy Configuration Using...

Страница 4: ...ng BR 500AC in Configuration Mode 54 Configuration via Web Configuration Interface 56 5 2 IEEE802 1X Authentication 58 Network Configuration 58 IEEE802 1X Authentication 60 Certificate Standard 62 MAC...

Страница 5: ...Setting 93 5 6 Maintenance 95 Restarting 95 Factory Default Configuration 97 Firmware Update 99 A Appendix 103 A 1 List of All Settings 103 A 2 Troubleshooting 118 A 3 What s AMC Manager 121 How to D...

Страница 6: ...Blank page...

Страница 7: ...Technology will not be held liable for any damages as a result of errors setting examples or other content Trademarks AMC Manager is a registered trademark of Silex Technology Microsoft and Windows a...

Страница 8: ...ce of a hazard that could result in death or serious injury if the safety instruction is not observed Caution Caution indicates the existence of a hazard that could result in serious injury or materia...

Страница 9: ...a strange smell smoke or sound or becomes too hot to touch When foreign objects metal liquid etc gets into BR 500AC Keep the cords and cables away from children It may cause an electrical shock or se...

Страница 10: ...cables are plugged correctly before using BR 500AC When BR 500AC will not be used for a long time unplug the power cables of BR 500AC and the other devices you are using with Do not use or store BR 50...

Страница 11: ...Support is available by e mail or telephone for any problems that you may encounter If you cannot find the relevant problem in this manual or on our website or if the corrective procedure does not res...

Страница 12: ...6 BR 500AC User s Manual Blank page...

Страница 13: ...10 100 1000BASE T network device as a wireless device With 2 4G 5GHz band support various non wireless devices can easily be connected over a wireless network The enterprise security feature will ensu...

Страница 14: ...considered for a work line Also cost reductions is largely expected as you will no longer have to pay for wiring construction IEEE 802 11a b g n ac BR 500AC supports communications at both 2 4GHz 5GH...

Страница 15: ...Multi Client Mode Up to 16 non wireless devices can be bridged over wireless network if a HUB is connected to a LAN port of the BR 500AC For a MAC address to use for wireless LAN connection the MAC ad...

Страница 16: ...efault configuration Press and hold the push switch while turning on BR 500AC Release the switch when the WLAN LED turns green and then to red 2 Link LED Green Orange ON Green Linked in wired LAN 1000...

Страница 17: ...n 7 WLAN LED Green Red Orange ON Green Running in Infrastructure mode BLINK Green Processing setup using the Smart Wireless Setup OFF Wireless LAN is OFF Blinks green together with the STATUS LED when...

Страница 18: ...6 132 136 140 144 W58 149 153 157 161 165 USA 2 4GHz 1 11ch 5GHz W52 36 40 44 48 W53 52 56 60 64 W56 100 104 108 112 116 120 124 128 132 136 140 144 W58 149 153 157 161 165 EU 2 4GHz 1 13ch 5GHz W52 3...

Страница 19: ...des 5150 5250 MHz et 5250 5350 MHz ont restreinte une utilisation l int rieur seulement WARNING The Industry Canada regulations provide that changes or modifications not expressly approved by the part...

Страница 20: ...ion layer DHCP Client 1 DNS Client NTP Client HTTP SX SMP TCP UDP 60000 60001 DNS Server simple reply function only DHCP Server simple server function only NetBIOS over TCP IP Name Service only Networ...

Страница 21: ...ts Generally if they are used near BR 500AC it will not cause any problems However when they approximate BR 500AC sound or image noise may occur Do not use BR 500AC near a cellular phone TV or Radio I...

Страница 22: ...ence medical equipment and licensed in room or low power non licensed radio stations Before you use BR 500AC check that it does not interfere with other devices If interference occurs stop using BR 50...

Страница 23: ...third party Unauthorized access to the network Leakage of personal information ID and Card information Spoofing and the falsification of intercepted data System crashes and data corruption Nowadays wi...

Страница 24: ...18 BR 500AC User s Manual Blank page...

Страница 25: ...ng mode is set to Single Client Mode 3 Before You Begin This chapter explains each operating mode and available configuration methods for BR 500AC as well as the wireless setting information you need...

Страница 26: ...ection Connect a single non wireless device Only one device can be connected to a LAN port The following actions are treated as an error If one of these occurs the bridge function will abort Connectin...

Страница 27: ...can be connected using a HUB BR 500AC Access Point Wireless Router Printer Monitoring camera Non wireless devices MAC address of the BR 500AC s wireless module and IP address of the connected device...

Страница 28: ...re 3 configuration methods as follows Please select the one appropriate for your environment Easy configuration using Configuration Mode Wireless configuration using Smart Wireless Setup Push Switch W...

Страница 29: ...2 wireless networks can be shown by BR 500AC Easy Configuration Using Configuration Mode In this configuration method you connect the BR 500AC to a PC using a LAN cable to configure the settings from...

Страница 30: ...the push switch on BR 500AC You will not have to get wireless setting information beforehand as configuration is automatically handled by the BR 500AC and your Access Point For this configuration met...

Страница 31: ...BR 500AC To access the Web configuration interface connect the BR 500AC directly to a PC using a LAN cable and start it in Configuration Mode You will not have to get wireless setting information befo...

Страница 32: ...he IEEE802 1X authentication refer to 5 2 IEEE802 1X Authentication SSID The SSID is an ID that distinguishes a wireless LAN network from others For wireless devices to communicate with each other on...

Страница 33: ...guration Method 4 How to Configure BR 500AC This chapter explains how to configure BR 500AC Following configuration methods are available 1 Configuration using Configuration Mode 2 Configuration using...

Страница 34: ...ectrical outlet 4 1 Easy Configuration Using Configuration Mode Starting BR 500AC in Configuration Mode 1 Connect BR 500AC and the PC to use for setup using a LAN cable How to configure BR 500AC using...

Страница 35: ...D and STATUS LED will start to blink green together Release the push switch then BR 500AC will start running in the Configuration Mode and be ready to configure from the PC that has been connected to...

Страница 36: ...appears enter the password to configure for BR 500AC and click Submit If the Web page is not displayed enter http silex in the address bar of the Web browser and press the Enter key Note TIP The logi...

Страница 37: ...ured to the PC If a wireless LAN is enabled on your PC please disable it If a static IP address is set to the PC the Web configuration interface cannot be displayed in the following cases An IP addres...

Страница 38: ...e Shared Key at A 1 List of All Settings To connect multiple network devices using an Ethernet HUB click Advanced and select Multi Client Mode for Client Mode If the Access Point is operating in a ste...

Страница 39: ...ter and click Submit The SSID filter will become active after the PC is restarted If the Detailed Configuration tab is not displayed click Wireless LAN from the page menu Note 5 When the confirmation...

Страница 40: ...connect the BR 500AC to it using a LAN cable The connection method will vary depending on each operating mode Printer BR 500AC LAN Cable BR 500AC LAN Cable HUB Printer Monitoring camera For details o...

Страница 41: ...You can use the non wireless device over a wireless network Depending on the non wireless device you have connected further network settings may need to be configured to that device In such a case ple...

Страница 42: ...mode To ensure proper communication during this configuration please temporarily move the BR 500AC closer to the Access Point The WPS feature may need to be enabled on your Access Point manually For d...

Страница 43: ...Mode you need to connect a non wireless device to the BR 500AC in order to start the configuration When the operating mode is Multi Client Mode you do not have to connect a non wireless device In suc...

Страница 44: ...ady to configure using Smart Wireless Setup Depending on the non wireless device you have connected further network settings may need to be configured to that device In such a case please configure it...

Страница 45: ...ccess Point If two or more Access Points are waiting for wireless connections BR 500AC will not be able to connect properly 5 Press and hold the push switch at the front of BR 500AC The WLAN LED and S...

Страница 46: ...start from 4 again Note If you plan to use BR 500AC in Single Client Mode you can keep using the connected non wireless device to use it wirelessly To replace it with the other non wireless device tur...

Страница 47: ...sly and connect the BR 500AC to it using a LAN cable The connection method will vary for each operating mode Printer BR 500AC LAN Cable BR 500AC LAN Cable HUB Printer Monitoring camera For details on...

Страница 48: ...AC adaptor to the BR 500AC and the AC plug to the outlet Depending on the non wireless device you have connected further network settings may need to be configured to that device In such a case please...

Страница 49: ...ease temporarily move the BR 500AC closer to the Access Point The WPS feature may need to be enabled on your Access Point manually For details see the operating manual that came with your Access Point...

Страница 50: ...D turns green or blinks green When the POWER LED turns green and the WLAN LED turns on or blinks press and hold the push switch on the front of BR 500AC In 5 seconds the WLAN LED and STATUS LED will s...

Страница 51: ...played Enter the password to set for BR 500AC and click Submit If the Web page is not displayed enter http silex in the address bar of the Web browser and press the Enter key Note TIP The login passwo...

Страница 52: ...d to the PC If a wireless LAN is enabled on your PC please disable it If a static IP address is set to the PC the Web configuration interface cannot be displayed in the following cases An IP address o...

Страница 53: ...figuration interface click Wireless LAN Smart Wireless Setup and check the PIN code Keep this screen displayed as it will be used again at Configuration in the next page Do not click the Smart Wireles...

Страница 54: ...o the Smart Wireless Setup page of the BR 500AC and click the Smart Wireless Setup Execute The method to enter the PIN code on Access Point will differ depending on each Access Point For details refer...

Страница 55: ...pidly In such a case read the TIP at the beginning of 4 3 Configuration Using Smart Wireless Setup Pin Code and try again To change the PIN code see Checking a PIN Code Note If you plan to use the PC...

Страница 56: ...y and connect the BR 500AC to it using a LAN cable The connection method will vary for each operating mode Printer BR 500AC LAN Cable BR 500AC LAN Cable HUB Printer Monitoring camera For details on ea...

Страница 57: ...You can use the non wireless device over a wireless network Depending on the non wireless device you have connected further network settings may need to be configured to that device In such a case ple...

Страница 58: ...52 BR 500AC User s Manual Blank page...

Страница 59: ...ation interface each setting can be configured How to start the BR 500AC in Configuration Mode as well as access the Web configuration interface are explained When the IP address is set to BR 500AC th...

Страница 60: ...configuration the PC and BR 500AC need to communicate each other properly Confirm that an IP Address is correctly configured to the PC If a wireless LAN is enabled on your PC please disable it 2 Conne...

Страница 61: ...een When the POWER LED turns green and the WLAN LED turns on or blinks press and hold the push switch on the front of BR 500AC In 5 seconds the WLAN LED and STATUS LED will start to blink green togeth...

Страница 62: ...ord for BR 500AC and click Login 1 Recommended Web browsers Microsoft Edge Safari If a static IP address is set to the PC the Web configuration interface cannot be displayed in the following cases An...

Страница 63: ...ns 57 BR 500AC needs to be restarted for changes to take effect Note 2 The Web configuration interface of BR 500AC is displayed In the Web configuration interface the operating mode wireless setting e...

Страница 64: ...500AC The reliability of non wireless devices connected to BR 500AC is identified using the MAC address filtering Network Configuration Connect the BR 500AC to a network as below when you use the IEEE...

Страница 65: ...To Backbone Network RADIUS Server Access Point The reliability of non wireless device is identified by MAC address filtering of BR 500AC Only the trusted devices can be connected to the backbone netw...

Страница 66: ...C User s Manual BR 500AC supports the following IEEE802 1X authentication methods These can be set using the Web page IEEE802 1X Authentication IEEE802 1X Authentication mode EAP TLS EAP TTLS PEAP EAP...

Страница 67: ...ls EAP User Name This is an ID and password for the RADIUS server to identify the client EAP Password Inner Authentication Method Specify the authentication protocol to use For PEAP MSCHAPv2 is used S...

Страница 68: ...e Public key algorithm RSA Public key size 512bit 1024bit 2048bit 4096bit Signature algorithm SHA1 SHA2 SHA 224 SHA 256 SHA 384 SHA 512 withRSA MD5withRSA Certificate Compatible standards Client certi...

Страница 69: ...IEEE802 1X authentication on BR 500AC the information below will be required 1 User name and password to access the RADIUS server To access the RADIUS server the user name and password are required A...

Страница 70: ...hat requires a certificate import the certificate file IEEE802 1X Authentication Settings 1 In the Web configuration interface of the BR 500AC click Wireless LAN Detailed Configuration In the Detailed...

Страница 71: ...u select 2 Select one of the followings for Authentication Method EAP TLS EAP TTLS PEAP EAP FAST LEAP 3 Enter the MAC address of the non wireless device the one you want to use wirelessly using BR 500...

Страница 72: ...e Address Check the MAC address of the non wireless device to bridge and register it to Network Device Address Please configure this even when you connect only one non wireless device in a Single Clie...

Страница 73: ...e saved by BR 500AC Details of each log are as follows System Log Power on status operating status etc of BR 500AC are saved as a log file In case of a network trouble you can check the operating stat...

Страница 74: ...m log is saved into the log partition of flash memory Each file is 200Kbyte and 10 rotated files are saved Total 11 files 2 2Mbyte are saved Note File name Description System Product information Proce...

Страница 75: ...Description System System Start BR 500AC started System Rebooting BR 500AC restarted Update Model Name Version Information Firmware update was executed Initialize Setting was initialized Change mode...

Страница 76: ...lient Device MAC address not registered to the MAC address filter of IEEE802 1X authentication was detected IF Name Adopt MAC address Single Client BR 500AC set the registered or detected MAC address...

Страница 77: ...1 Connect BR 500AC and the PC using a LAN cable The system log saved on BR 500AC can be accessed from the Web configuration interface 2 Connect the AC adaptor to BR 500AC and the AC adaptor s plug to...

Страница 78: ...nks press and hold the push switch on the front of BR 500AC In 5 seconds the WLAN LED and STATUS LED will start to blink green together Release the push switch then BR 500AC will start running in the...

Страница 79: ...e following cases An IP address of the different segment is entered to the address bar when the default gateway address is not configured to the PC A URL www silextechnology com etc is entered to the...

Страница 80: ...74 BR 500AC User s Manual 6 The message for compressed file of all system logs sys_log_archive tgz appears Click Open file or for the desired option The system log has been saved...

Страница 81: ...AC and the PC using a LAN cable The system log saved on BR 500AC can be deleted from the Web configuration interface 2 Connect the AC adaptor to BR 500AC and the AC adaptor s plug to an electrical out...

Страница 82: ...nks press and hold the push switch on the front of BR 500AC In 5 seconds the WLAN LED and STATUS LED will start to blink green together Release the push switch then BR 500AC will start running in the...

Страница 83: ...igured to the PC If a wireless LAN is enabled on your PC please disable it If a static IP address is set to the PC the Web configuration interface cannot be displayed in the following cases An IP addr...

Страница 84: ...78 BR 500AC User s Manual 6 When the confirmation message is displayed click OK All system logs are deleted If Cancel is clicked the system log will not be deleted The system log has been deleted Note...

Страница 85: ...plained The event log saved on BR 500AC can be accessed from the Web configuration interface 1 Connect BR 500AC and the PC using a LAN cable 2 Connect the AC adaptor to BR 500AC and the AC adaptor s p...

Страница 86: ...nks press and hold the push switch on the front of BR 500AC In 5 seconds the WLAN LED and STATUS LED will start to blink green together Release the push switch then BR 500AC will start running in the...

Страница 87: ...the following cases An IP address of the different segment is entered to the address bar when the default gateway address is not configured to the PC A URL www silextechnology com etc is entered to th...

Страница 88: ...82 BR 500AC User s Manual 6 The message for event log file appears Click Open file or for the desired option The event log has been saved...

Страница 89: ...AC and the PC using a LAN cable The event log saved on BR 500AC can be deleted from the Web configuration interface 2 Connect the AC adaptor to BR 500AC and the AC adaptor s plug to an electrical outl...

Страница 90: ...nks press and hold the push switch on the front of BR 500AC In 5 seconds the WLAN LED and STATUS LED will start to blink green together Release the push switch then BR 500AC will start running in the...

Страница 91: ...yed in the following cases An IP address of the different segment is entered to the address bar when the default gateway address is not configured to the PC A URL www silextechnology com etc is entere...

Страница 92: ...86 BR 500AC User s Manual 6 When the confirmation message is displayed click OK All event logs are deleted If Cancel is clicked the event log will not be deleted The event log has been deleted Note...

Страница 93: ...describe it on the system log and event log To configure the NTP setting open the Web page of BR 500AC and click TCP IP from the menu The setting can be configured at NTP Configuration Note For how to...

Страница 94: ...OFF If this feature is ON the management table information is used for the combination information MAC address IP address of non wireless devices to connect to BR 500AC The addresses are automaticall...

Страница 95: ...IPv6 1 In the Web configuration interface of the BR 500AC click Advanced Select Multi Client Mode for Client Mode 2 Select ON for Address Management Table enter the MAC address and IP address and clic...

Страница 96: ...90 BR 500AC User s Manual 3 The combination information is listed in the management table Click Submit...

Страница 97: ...guration interface of the BR 500AC click Advanced 2 At the address management table select combination of MAC address and IP address from the list and click Remove Repeat the same process to delete mo...

Страница 98: ...92 BR 500AC User s Manual 3 Click Submit...

Страница 99: ...at the priority of communication can be given to them It is also possible to set the access category default access category to assign when there is no priority setting on the wired packets If the pri...

Страница 100: ...94 BR 500AC User s Manual 2 Select the default access category to use and click Submit...

Страница 101: ...e AC adaptor back into the outlet How to restart BR 500AC by unplugging the AC adaptor 3 When the POWER LED turns green the restart is completed After the restart the BR 500AC will start in a normal m...

Страница 102: ...2 From the left menu on the Web configuration interface click Restart In the page displayed click Yes How to restart BR 500AC using the Web configuration interface 3 When the POWER LED turns green af...

Страница 103: ...push switch The factory default configuration begins After the factory default configuration is completed the BR 500AC will start in a normal mode How to reset BR 500AC to factory defaults using the...

Страница 104: ...ace using your Web browser 2 From the left menu on the Web page click Setting Initialization In the page displayed click Yes 3 After the factory default configuration is completed the BR 500AC will au...

Страница 105: ...or how to upload the firmware file to BR 500AC refer to the firmware update procedure sheet file contained in the firmware file you download 2 Go to the support section and download the firmware file...

Страница 106: ...AC s firmware 1 Start the BR 500AC in Configuration Mode and login to the Web configuration interface using your Web browser 2 From the left menu on the Web page click Firmware Update In the page disp...

Страница 107: ...101 3 In the file selection dialog select a new firmware file and click Open 4 Check that the specified firmware file is displayed at New firmware and click Update 5 When the confirmation message is...

Страница 108: ...turns orange and the WLAN LED and STATUS LED turn green BR 500AC Turns green during the firmware update Turns orange during the firmware update Do not turn off BR 500AC or close the Web browser while...

Страница 109: ...Range Access Point of the wireless network to connect Default Value None Enter the Network Key Details Enter the WEP Key or Pre Shared Key of the wireless network for Network Key Range WEP Key or Pre...

Страница 110: ...stinguishes a wireless LAN network from others For wireless devices to communicate with each other on a wireless network they must share the same SSID SSID Filter Details Select whether to response to...

Страница 111: ...Default Value 1 WEP Key1 4 Details Set the WEP key for WEP encryption Up to 4 WEP keys can be set This setting must be the same as that of your wireless devices A WEP key must be entered using hexade...

Страница 112: ...source Request protocol A time of roaming may take longer depending on the combination with other settings of BR 500AC The following items are displayed when Network Authentication is WPA2 Personal Wi...

Страница 113: ...rk Authentication is WPA3 Personal Wireless LAN Detailed Configuration WPA3 Personal Configuration Pre Shared Key Details Set the Pre Shared Key to use for encryption The Pre Shared Key is a keyword u...

Страница 114: ...red Key Details Set the Pre Shared Key to use for encryption The Pre Shared Key is a keyword used to create the encryption key It is also referred to as network key or password Range 8 64 alphanumeric...

Страница 115: ...s WPA WPA2 Enterprise AES cannot be used IEEE802 11r Fast Transition Details This setting is displayed when the network authentication mode is WPA2 Enterprise and the Authentication Method is EAP TLS...

Страница 116: ...assword between the RADIUS server and client IEEE802 11ai Fast Initial Link Setup Details This setting is displayed when the network authentication mode is WPA2 Enterprise and the Authentication Metho...

Страница 117: ...AP TLS Select a client certificate to use for client authentication Range A certificate file used to authenticate BR 500AC Inner Authentication Method Details This setting is displayed when the Authen...

Страница 118: ...he server to use for manual distribution of PAC Protected Access Credential PAC Password Details This setting is displayed when the Authentication Method is EAP FAST and Auto PAC Provisioning is OFF S...

Страница 119: ...ON Note If the device filter is disabled communication will be bridged even for devices not registered to the network device address The device authentication one security feature of IEEE802 1X authe...

Страница 120: ...sk obtained from it will be applied Range 0 0 0 0 255 255 255 255 Default Value 0 0 0 0 Note When set to 0 0 0 0 a subnet mask appropriate for the IP address is automatically assigned Default Gateway...

Страница 121: ...ct Single Client Mode to bridge only one device connected to a LAN port of the BR 500AC In Single Client Mode not only TCP IP but various communication protocols can be used Select Multi Client Mode t...

Страница 122: ...unicast address is supported for MAC address and IP address BR 500AC checks the existence of device information to save at 5 sec interval If BR 500AC is turned off before the saving process is comple...

Страница 123: ...ay become unstable Range 35 to 95 Default Value 75 Note A time of roaming may take longer depending on the combination with other settings of BR 500AC WME Default Access Category Details Set the acces...

Страница 124: ...be displayed in the list Too many wireless devices may be operating exceeding the maximum number of devices the BR 500AC can show on up to 32 devices Solution Up to 32 wireless devices can be display...

Страница 125: ...access the non wireless device connected to a LAN port of the BR 500AC The BR 500AC or non wireless device may not be operating correctly Solution Please check the LED status on BR 500AC Please also...

Страница 126: ...initialize the BR 500AC NOTE The imported certificate is validated only when it is used Even if you keep the certificate it has no impact on the authentication process since the imported certificate i...

Страница 127: ...ee version AMC Manager can be downloaded from the Silex Technology s website To use AMC Manager non free version a license key needs to be purchased Please contact Silex Technology to purchase a licen...

Страница 128: ...122 BR 500AC User s Manual Blank page...

Отзывы: