SIIG USB Over IP Скачать руководство пользователя страница 64

User's Manual

4-20

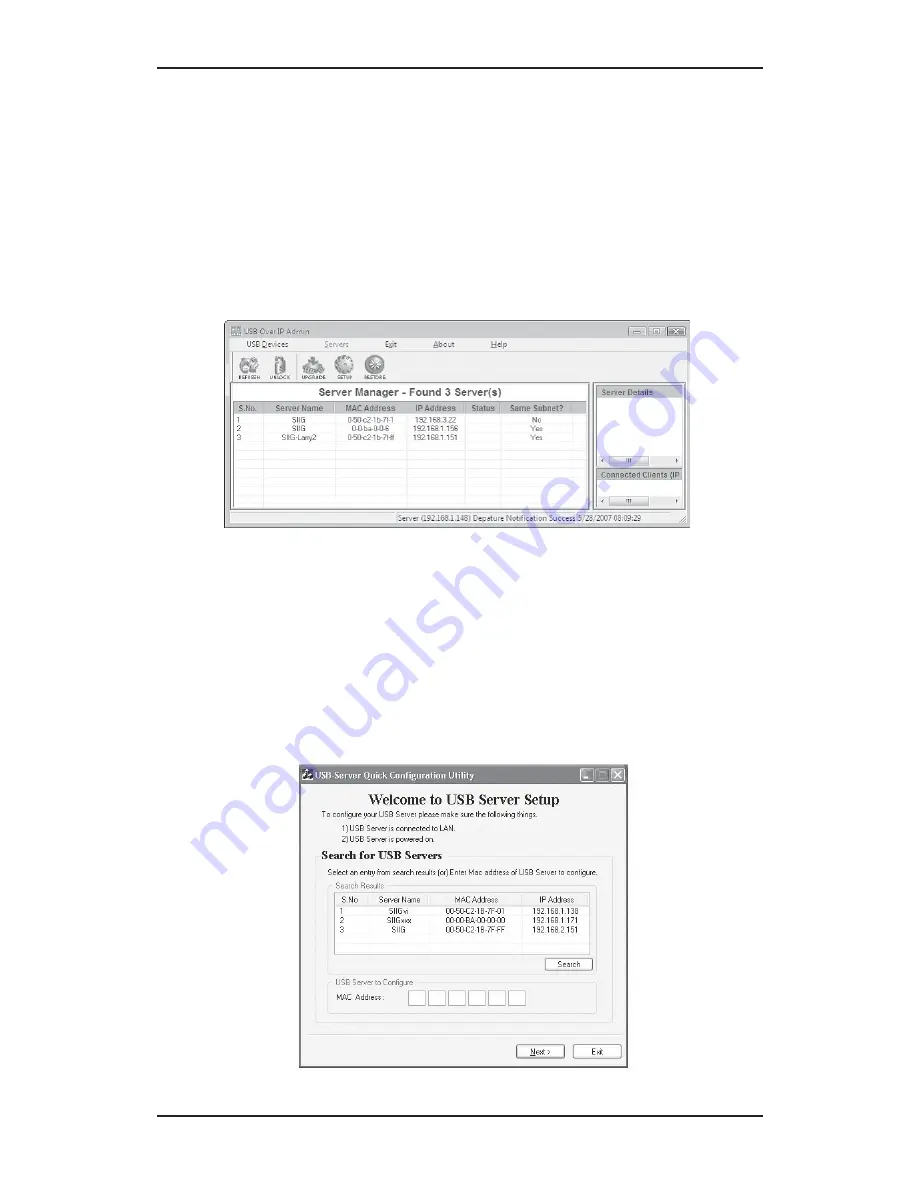
4-3.2.6  Configure IP Address:   Server Not On the Same

Subnet

1.

At the Server Manger screen, select the server that

is not on the same subnet, then double click it.  Click

Yes

 to add this application to Windows firewall

exceptions list.

2.

At Welcome to USB Server Setup, type in the Mac

address of the server that's not on the same subnet,

then click 

Next

.  If the server is not on the list go

directly to section 

4-4.2.7

.  Otherwise continue to

step 3.

Содержание USB Over IP

Страница 1: ...erIP User s Manual SIIG s ONLINE SUPPORT and Product Registration Visit SIIG s web site at www siig com and click Support for instant technical support Also click Support Register to register your pro...

Страница 2: ...g and more SIIG is the premier one stop source of upgrades and is committed to providing high quality products while keeping economical and competitive prices High quality control standards are eviden...

Страница 3: ...and Device Compatibility 2 1 Hardware Installation 2 1 2 2 Device Connection 2 1 2 3 USB Device Support 2 2 2 3 1 USB Device Interoperability List 2 2 Chapter 3 Driver Installation 3 1 Driver Installa...

Страница 4: ...ping 4 6 4 3 1 1 How to Connect Status Free 4 6 4 3 1 2 How to Connect Status Busy 4 7 4 3 1 3 How to Disconnect 4 8 4 3 1 4 Disable Auto Connect 4 9 4 3 1 5 Printer Sharing 4 10 4 3 2 Server Manager...

Страница 5: ...videsunpackinginstructions andintroducesfeatures and specifications Chapter 2 Hardware Installation and Device Compatibility General overview to connect and install your adapter Chapter 3 Driver Insta...

Страница 6: ...n your system Providetechnicalsupportinformationintheevent of a problem Before installing the board please review this chapter for unpacking instructions and an overview of the key features Then refer...

Страница 7: ...ures please follow the guidelines below Discharge any static electricity build up in your body by touching a large grounded metal surface or the computer case if plugged in for a few seconds During in...

Страница 8: ...ectivity Supports various types of USB devices Four high speed USB ports Compatible with bulk interrupt and isochronous USB devices Network Connectivity Supports Ethernet networks RJ45 LAN connectors...

Страница 9: ...r LED USB over IP is powered on Ready LED when the box is first powered on the USB over IP goes through it s initialization bootup sequence This LED will blink for 10 seconds then it will go off for 1...

Страница 10: ...Using a paper clip pen tip or similar size object press in and hold down the button for 5 10 seconds The default settings are SIIG Server Name 192 168 3 22 IP and 192 168 3 1 Gateway Ethernet Port con...

Страница 11: ...hing your computer case for a few seconds 1 Connect one end of your Ethernet cable to the Ethernet Port of the USB over IP 2 Connect the other end of the Ethernet cable to an availableRJ45portonyourEt...

Страница 12: ...host only as if the device is connected to it s USB ports 2 3 1 USB Device Interoperability List The following USB devices were tested in Windows XP SP2 32 bit operating system in default setup mode...

Страница 13: ...Quickcam Pro 4000 Logitech Quick Communicate STX Microsoft LifeCam VX 1000 Microsoft LifeCam VX 3000 Creative Vista Plus Webcam Quantum QHMPL 500lm 8lm Frontech e CAM Microsoft LifeCam VX 6000 Logite...

Страница 14: ...icrosoft Microsoft Basic mouse Logitech Logitech mouse Sun Sun mouse Dell Dell mouse IBM IBM mouse Joystick Microsoft Joystick Mass Storage Device Iomega USB Zip 100 Toshiba Transmemory Kingston DataT...

Страница 15: ...rt 3200 LaserJet 2200d Epson EPL 6200L Stylus C87 Plus Stylus C58 Plus LX 300 II Canon iP1700 Samsung ML 1210 WeP Bloom Laser 1600 Multi function printers HP OfficeJet 4315 All in One DeskJet F380 All...

Страница 16: ...Connection Sharing ICS must be running before installing the USB over IP drivers 3 1 1 Windows XP 32 64 bit 1 Connect the USB over IP to your network 2 At the Windows desktop insert the driver CD 3 Au...

Страница 17: ...User s Manual 3 2 5 At Choose Components click Next 6 At Choose Install Location click Install...

Страница 18: ...Driver Installation 3 3 7 At the Security Alert click Yes skip this step for 32 bit XP 8 Click Yes to add the application to Windows Firewall exceptions list then click Finish...

Страница 19: ...User s Manual 3 4 9 At the Found New Hardware Wizard select No not this time click Next skip this step if not prompted 10 Select Install the software automatically Recommended click Next...

Страница 20: ...Driver Installation 3 5 11 At the Security Alert click Yes skip this step for 32 bit XP 12 Click Finish...

Страница 21: ...address 15 Click Finish then restart XP to complete the installation 3 1 2 Windows Server 2003 32 64 bit Windows Firewall Internet Connection Sharing ICS mustberunningbeforeinstallingtheUSBoverIPdrive...

Страница 22: ...Driver Installation 3 7 4 At the USB Over IP screen click Install 5 At Choose Components click Next...

Страница 23: ...User s Manual 3 8 6 At Choose Install Location click Install 7 At Security Alert click Yes...

Страница 24: ...Driver Installation 3 9 8 Click Yes to add the application to Windows Firewall exceptions list then click Finish 9 At the Found New Hardware Wizard select No not this time then click Next...

Страница 25: ...User s Manual 3 10 10 Select Install the software automatically Recommended click Next 11 At Security Alert click Yes...

Страница 26: ...s Server 2008 32 bit Make sure that Windows Firewall is configured before installing the USB over IP driver 1 Connect the USB over IP to your network 2 At the Windows desktop insert the driver CD 3 Au...

Страница 27: ...User s Manual 3 12 4 At the USB Over IP screen click Install 5 At Choose Components click Next...

Страница 28: ...Driver Installation 3 13 6 At Choose Install Location click Install 7 At Windows Security click Install this driver software anyway two times...

Страница 29: ...application to Windows Firewall exceptions list then click Finish Click Finish 3 1 4 Windows Vista 32 bit 1 Connect the USB over IP to your network 2 At the Windows desktop insert the driver CD AttheA...

Страница 30: ...If Auto Play doesn t start click Start in the Start Search box type D Launch exe Change D to match your CD ROM drive letter 3 Right click Launch click Run as administrator Click Allow 4 At the USB Ove...

Страница 31: ...User s Manual 3 16 5 At Choose Components click Next 6 At Choose Install Location click Install...

Страница 32: ...nstallation 3 17 7 At Windows Security click Install this driver software anyway two times 8 Click Yes to add the application to Windows Firewall exceptions list then click Finish to complete the inst...

Страница 33: ...twork 2 At the Windows desktop insert the driver CD AttheAutoPlaywindow clickOpenfoldertoview files If Auto Play doesn t start Double click Computer right click the CD DVD ROM drive showing the SIIG U...

Страница 34: ...Driver Installation 3 19 4 At the USB Over IP screen click Install 5 At Choose Components click Next...

Страница 35: ...User s Manual 3 20 6 At Choose Install Location click Install 7 At Windows Security click Install this driver software anyway two times...

Страница 36: ...Installation 3 21 8 Click Yes to add the application to Windows Firewall exceptions list then click Finish to complete the installation 9 RightclicktheUSBOverIPAdminiconlocatedon the desktop click Pro...

Страница 37: ...User s Manual 3 22 10 Click Compatibility tab Check Run this program as an administrator click OK after clicking OK wait up to 30 seconds to complete 11 Click Start All Programs USB Over IP...

Страница 38: ...Driver Installation 3 23 12 Right click the USB Over IP Admin icon click Properties 13 Click Compatibility tab check Run this program as an administrator click OK...

Страница 39: ...mputer click Manage click Device Manager For Windows Vista Right click Computer click Manage click Continue click Device Manager For Windows XP Server 2003 Right click My Computer click Manage click D...

Страница 40: ...may not match your network ssubnetaddress inthiscase yourUSBdevices will not be detected by the USB Over IP Admin This section guides you through setting the IP address to match the subnet mask of yo...

Страница 41: ...doesn t show up go directly to section 3 3 2 IP Config DiscoveryUtility Otherwise type in the Mac address of the server and click Next 4 At Server Settings select either Static to assign IP and Gatew...

Страница 42: ...t button For Windows 7 Vista 2008 In the Start Search box type D IPConfig DiscoveryUtility exe press Enter Change D to match your CD ROM drive letter For Windows XP Server 2003 Click Run type D IPConf...

Страница 43: ...f Servers double click the MAC address of the USB Over IP you want to change 4 At IP Configuration screen either type in the IP Address subnetmask andgatewayorselectDHCP to have them assigned by your...

Страница 44: ...Driver Installation 3 29 5 At the List of Servers box click Refresh to view your changes When ready click Exit to close the utility...

Страница 45: ...s and much much more Supports various types of USB Devices class multifunction and vendor specific Supports all types of USB traffic control bulk interrupt and isochronous Designed to comply with Micr...

Страница 46: ...Start Icon installs automatically during driver installation and is located on the right side of the taskbar by the system clock Double click the icon to open the USB Over IP Admin 4 2 2 USB Devices...

Страница 47: ...nection settings box Printer Auto Connect automatically connects and disconnect to your printer when a print job is sent 4 2 3 Servers The Servers screen is divided into three sections Server Manager...

Страница 48: ...sword enabled Restore restores the USB Over IP to factory default IP settings of 192 168 3 22 4 2 4 Global Commands Global commands effect every device and USB Over IP connected to your network 4 2 4...

Страница 49: ...sion number and date 4 2 4 3 Exit Disconnects the system from all devices and USB Over IP servers and closes the USB Over IP Admin 4 2 5 Notes 1 In Windows XP SP1 32 bit without Windows Firewall insta...

Страница 50: ...ping window select a device who s status is Free then click the Connect button 2 The Status will change to Connected 3 Depending on the device Windows will either automatically install a driver for it...

Страница 51: ...e device to the system that controls it 1 In the Device Mapping window select a device who s status is Busy and do either A or B A Click the Request icon located on the top of the window B Right click...

Страница 52: ...User s Manual 4 8 4 3 1 3 How to Disconnect 1 In the Device Mapping window select a device who sstatusisConnected thenclicktheDisconnect button 2 The Status will change to Unloading then to Free...

Страница 53: ...be disabled on a device by device basis If you choose to do so follow the directions below 1 Right click on a USB device connected to your system or with status as Free then click Settings 2 Inthe Set...

Страница 54: ...feature Makesureyouare disconnectedfromtheprinterbefore continuing see section 4 4 1 2 for instructions on how to disconnect 1 Click the Printer auto connect button 2 Select the check box next to the...

Страница 55: ...fy IP settings and enable or disable password If the server is password protected the setup button will be disabled To enable the Setup button go to section 4 4 2 2 Unlock Server and Reset Password 1...

Страница 56: ...dify then either select Static and type in your IP address and gateway or to have your server configured automatically select DHCP 5 Select Password tab Check Modify then enable disable or change your...

Страница 57: ...et the Password Whenever the USB Over IP is password protected Locked will display in the Status column Follow the steps in the order that they appear to unlock the server 1 Select the server and clic...

Страница 58: ...firmed or denied click OK If failed try again If you continue to have problems check with your system administrator for the correct password 4 ClicktheRefreshbutton theserver sstatusshould be Unlocked...

Страница 59: ...Configuration Utility 4 15 5 Select the Password tab 6 Check Modify uncheck Enable Password then click Save...

Страница 60: ...User s Manual 4 16 4 3 2 3 Refresh Refresh Servers 1 Click the Refresh button 2 The Searching for Servers box will pop up...

Страница 61: ...3 The Server Manager list will be refreshed 4 3 2 4 Restore Restore Factory Default Settings The factory default settings are SIIG Server Name 192 168 3 22 IP and 192 168 3 1 Gateway 1 Select a serve...

Страница 62: ...User s Manual 4 18 2 Click OK 3 Click OK again 4 Click Refresh to display the server list...

Страница 63: ...Upgrade Upgrade Firmware 1 Select a server click the Upgrade button 2 In Select File box browse to or type in the location of the file then click Transfer Do not unplug the power adapter from the USB...

Страница 64: ...at isnotonthesamesubnet thendoubleclickit Click Yes to add this application to Windows firewall exceptions list 2 At Welcome to USB Server Setup type in the Mac address of the server that s not on the...

Страница 65: ...ther select Static and type in the IP address and Gateway or select DHCP to have them assigned by the DHCP server After making your changes click Update 4 Click Yes to save your changes then click OK...

Страница 66: ...the USB Over IP CD 2 Click the Start button For Windows 7 Vista 2008 In the Start Search box type D IPConfig DiscoveryUtility exe press Enter Change D to match your CD ROM drive letter For Windows XP...

Страница 67: ...st of Servers double click the MAC address of the USB Over IP you want to change 4 At IP Configuration screen either type in the IP Address subnetmask andgatewayorselectDHCP to have them assigned by y...

Страница 68: ...User s Manual 4 24 5 At the List of Servers box click Refresh to view your changes When ready click Exit to close the utility...

Страница 69: ...nd instructions on how to configure and install this product in your system We encourage you to consult this manual as your first step for technical assistance There are several steps you can take sho...

Страница 70: ...problems with this product please follow the procedures below A If it is within the store s return policy period please return the product to the store where you purchased it B If your purchase has pa...

Страница 71: ...5 3 Technical Support Product Return Blank Page...

Страница 72: ...03 0315B...

Отзывы: