background image

SIG

L

ENT 

22


SDS1000X User Manual


To Set the Vertical System 

 
This chapter introduces how to set the vertical system of the oscilloscope. 


The contents of this chapter: 
 

  To Enable the Channel   

  To Adjust the Vertical Scale 

  To Adjust the Vertical Position 

  To Specify Channel Coupling 

  To Specify Bandwidth Limit 

  To Specify Probe Attenuation Factor 

  To Specify channel Input Impedance 

  To Specify Amplitude Unit   

  To Invert a Waveform 


www.biall.com.pl

Содержание SDS1102X

Страница 1: ...User Manual SDS1000 Series Digital oscilloscope UM0101X E01A 2015 SIGLENT TECHNOLOGIES CO LTD www biall com pl...

Страница 2: ...www biall com pl...

Страница 3: ...places all previously corresponding material Any way of copying extracting or translating the contents of this manual is not allowed without the permission of SIGLENT Product Certification SIGLENT gua...

Страница 4: ...ver All Terminals Ratings To avoid fire or electric shock please look over all ratings and sign instruction of the instrument Before connecting the instrument please read the manual carefully to gain...

Страница 5: ...rized personnel Do Not Operate in Wet Conditions In order to avoid short circuiting to the interior of the device or electric shock please do not operate in a humid environment Do Not Operate in an Ex...

Страница 6: ...hat could result in damage to this product or other property Terms on the product These terms may appear on the product DANGER Indicates direct injuries or hazards that may happen WARNING Indicates po...

Страница 7: ...own to the user Measurement category II is for measurements performed on circuits directly connected to the low voltage installation Examples are measurements on household appliances portable tools an...

Страница 8: ...on overvoltage category II WARNING Make sure that no overvoltage such as that caused by thunderbolt can reach the product or else the operator might expose to danger of electric shock Installation ove...

Страница 9: ...have free air When using the oscilloscope in a bench top or rack setting provide at least 10 cm clearance beside above and behind the instrument for adequate ventilation WARNING Inadequate ventilation...

Страница 10: ...according to its operating conditions 1 Disconnect the instrument from all power sources and then clean it with a soft wet cloth 2 Clean the loose dust on the outside of the instrument and probe with...

Страница 11: ...cope Serial Trigger and Decode Introduce how to trigger and decode the input signal To Save Reference Waveform Introduce how to save and display REF waveform To Make Math Operation Introduce the math...

Страница 12: ...S for example and the descriptions here have contained all the functions and performances of other models SDS1000X series includes the following models Model Analogy Bandwidth channels AWG SDS1102X 10...

Страница 13: ...ply 5 Power on Inspection 6 To Connect the Probe 7 Function Inspection 8 Probe Compensation 9 Front Panel Overview 10 Rear Panel Overview 11 Front Panel Function Overview 12 Horizontal 12 Vertical 13...

Страница 14: ...Mode 42 Normal 42 Peak Detect 43 Average 44 High Resolution 45 Change the Horizontal Format 46 Use Sequence Mode 47 To Trigger the Oscilloscope 49 Trigger Source 51 Trigger Mode 52 Trigger Level 53 T...

Страница 15: ...tion and Division 101 FFT Operation 102 Math Function Operation 105 Differentiate 105 Integrate 106 Square Root 107 To Make Cursors Measurements 108 X Cursors 108 Y Cursors 108 To Make Cursor Measurem...

Страница 16: ...O Set 142 To Set the USB Device 142 To Set the LAN 143 To Set Aux Output 144 To Enable Quick Cal 145 To Update Firmware and Configuration 146 Do Self Test 147 Screen Test 147 Keyboard Test 148 LED Tes...

Страница 17: ...ise Reject 56 Figure 22 Turn on the Noise Reject 57 Figure 23 Edge Trigger 59 Figure 24 Slope Trigger 61 Figure 25 Pulse Trigger 63 Figure 26 Video Trigger 66 Figure 27 Absolute Window Trigger 68 Figu...

Страница 18: ...117 Figure 67 Vectors Display 119 Figure 68 Dots Display 119 Figure 69 Color Temperature 120 Figure 70 Persist Set to Infinite 121 Figure 71 Intensity Set to 100 123 Figure 72 Intensity Set to 10 123...

Страница 19: ...SIGLENT SDS1000X User Manual XVII www biall com pl...

Страница 20: ...www biall com pl...

Страница 21: ...he front panel rear panel and user interface of the oscilloscope The contents of this chapter General Inspection Appearance and Dimensions To Prepare the Oscilloscope for Use Front Panel Overview Rear...

Страница 22: ...s The consigner or carrier shall be liable for the damage to instrument resulting from shipment SIGLENT would not be responsible for free maintenance rework or replacement of the unit 2 Inspect the in...

Страница 23: ...SIGLENT SDS1000X User Manual 3 Appearance and Dimensions 340mm Figure 1 Front View Figure 2 Top View 175mm 111mm www biall com pl...

Страница 24: ...Use To Adjust the Supporting Legs Adjust the supporting legs properly to use them as stands to tilt the oscilloscope upwards for stable placement of the oscilloscope as well as better operation and ob...

Страница 25: ...Power Supply The power requirements of SDS1000X are 100 240 V 50 60 440 Hz Please use the power cord supplied with the accessories to connect the oscilloscope to the power source Figure 4 To Connect t...

Страница 26: ...s the power key at the lower left corner of the front panel to start the oscilloscope During the start up process the oscilloscope performs a series of self tests and you can hear the sound of relay s...

Страница 27: ...tion of the probes please refer to the corresponding Probe User s Guide Connect the Probe 1 Connect the BNC terminal of the probe to a channel BNC connector of the oscilloscope at the front panel 2 Co...

Страница 28: ...Terminal of the probe 4 Press the Auto Setup softkey 5 Observe the waveform on the display In normal condition the display should be a square waveform as shown in the figure below Figure 5 Function In...

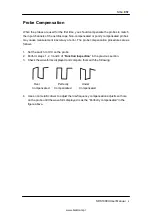
Страница 29: ...compensation procedures are as follows 1 Set the switch to 10X on the probe 2 Perform steps 1 2 3 and 4 of Function Inspection in the previous section 3 Check the waveforms displayed and compare them...

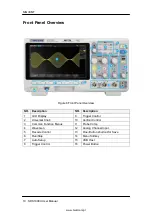
Страница 30: ...scription 1 LCD Display 9 Trigger Control 2 Universal Knob 10 Vertical Control 3 Common Function Menus 11 Probe Comp 4 Wave Gen 12 Analog Channel Input 5 Decode Control 13 One Button shortcut for Save...

Страница 31: ...gnal that reflects the current waveform capture rate of the oscilloscope at each trigger or a pass fail test pulse 5 AWG Output terminal The model SDS1102X S and SDS1202X S provide built in signal gen...

Страница 32: ...right and the trigger position message at the upper right corner of the screen would change accordingly Press down this knob to quickly reset the trigger delay to Zero Horizontal Scale Knob adjust th...

Страница 33: ...would change accordingly Press down this knob to quickly reset the vertical position to zero Vertical Variable Knob adjust the vertical scale of the current channel Turn clockwise to decrease the sca...

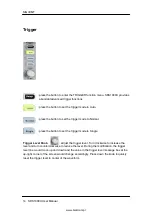
Страница 34: ...s the button to set the trigger mode to Single Trigger Level Knob adjust the trigger level Turn clockwise to increase the level and turn counterclockwise to reduce the level During the modification th...

Страница 35: ...input signal to realize optimum waveform display press the button to set the acquisition state to Run or Stop In RUN state the key is illuminated in yellow In STOP state the key is illuminated in red...

Страница 36: ...operation press any menu softkey and turn the Universal Knob to select the desired submenu under the menu and push down the knob to confirm the current submenu Turn clockwise to up the intensity and...

Страница 37: ...the button to clear persist Press the button to enter the history mode In history mode it can record most 80000 frames waveforms If sequence function is enabled it only record the frames which you se...

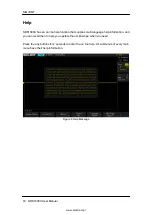
Страница 38: ...t supplies multi language help information and you can recall then to help you operate the oscilloscope when you need Press the any buttons for 2 seconds to enter the on line help All submenus of ever...

Страница 39: ...the channel 3 Trigger Status Available trigger status includes Ready Auto Stop Arm Trig d 4 Horizontal Time Base Represent the time per grid on the horizontal axis on the screen Use the HORIZONTAL SC...

Страница 40: ...the waveform amplitude automatically 10 Channel Setup Probe attenuation factor display the current probe attenuation factor of the channel Available probe attenuation factors 0 1X 0 2X 0 5X 1X 2000X...

Страница 41: ...please buy it yourself to lock the oscilloscope to a fixed location The method is as follows align the lock with the lock hole and plug it into the lock hole vertically turn the key clockwise to lock...

Страница 42: ...he oscilloscope The contents of this chapter To Enable the Channel To Adjust the Vertical Scale To Adjust the Vertical Position To Specify Channel Coupling To Specify Bandwidth Limit To Specify Probe...

Страница 43: ...ess the CH1 button in the vertical control area VERTICAL at the front panel to enable CH1 The channel setting menu is displayed at the bottom of the screen and the channel label at the right side of t...

Страница 44: ...ckwise to increase The scale information in the channel label at the right side of the screen will change accordingly during the adjustment The adjustable range of the vertical scale is related to the...

Страница 45: ...ng mode is displayed in the channel label at the right side of the screen You can also press the Coupling softkey continuously to switch the coupling mode To Specify Bandwidth Limit Set the bandwidth...

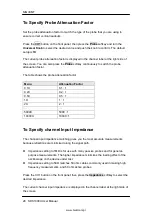
Страница 46: ...nu Attenuation Factor 0 1X 0 1 1 0 2X 0 2 1 0 5X 0 5 1 1X 1 1 2X 2 1 5000X 5000 1 10000X 10000 1 To Specify channel Input Impedance The channel input impedance matching gives you the most accurate mea...

Страница 47: ...3 Press the Unit softkey to select the desired unit V or A The default setup is V To Invert a Waveform When Invert is set to On the voltage values of the displayed waveform are inverted Invert affects...

Страница 48: ...the Horizontal System This chapter introduces how to set the horizontal system of the oscilloscope The contents of this chapter Adjust the Horizontal Scale Adjust the Trigger Delay Set Roll Mode Use...

Страница 49: ...se information at the upper left corner of the screen will change accordingly during the adjustment The range of the horizontal scale is from 2ns div to 50s div The Horizontal Scale Knob works in the...

Страница 50: ...e points are indicated along the top of the display grid All events displayed left of the trigger point happened before the trigger occurred These events are called pre trigger information and they sh...

Страница 51: ...er The fixed reference point on the screen is the right edge of the screen and refers to the current moment in time Events that have occurred are scrolled to the left of the reference point Since ther...

Страница 52: ...s outlined with a box and the rest of the normal display is ghosted The box shows the portion of the normal sweep that is expanded in the lower half To change the time base for the Zoom window turn th...

Страница 53: ...This chapter introduces how to use the run control and set the sampling system of the oscilloscope The contents of this chapter Run Control Overview of Sampling To Specify Memory Depth To Select Samp...

Страница 54: ...a single acquisition whether the oscilloscope is running or stopped press Single The Single run control lets you view single shot events without subsequent waveform data overwriting the display Use S...

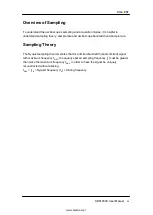
Страница 55: ...e bandwidth and sample rate Sampling Theory The Nyquist sampling theorem states that for a limited bandwidth band limited signal with maximum frequency fMAX the equally spaced sampling frequency fS mu...

Страница 56: ...Waveform Distortion when the sample rate is too low some waveform details are lost and the waveform displayed is rather different from the actual signal 2 Waveform Confusion when the sample rate is lo...

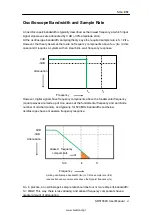
Страница 57: ...ncy However digital signals have frequency components above the fundamental frequency square waves are made up of sine waves at the fundamental frequency and an infinite number of odd harmonics and ty...

Страница 58: ...b to select the desired value and push down the knob to confirm Press the Mem Depth softkey continually can also select the desired value The actual memory depth is displayed in the information area a...

Страница 59: ...e samples and displays waveform within a trigger event The maximum real time sample rate of SDS1000X is 1GSa s Press the RUN STOP button to stop the sample the oscilloscope will hold the last display...

Страница 60: ...oints The oscilloscope can use interpolation method for filling out the gaps between points to reconstruct an accurate waveform Press the Acquire button on the front panel to enter the ACQUIRE Functio...

Страница 61: ...SIGLENT SDS1000X User Manual 41 Figure 12 x Interpolation Figure 13 Sinx Interpolation www biall com pl...

Страница 62: ...front panel to enter the ACQUIRE function menu 2 Press the Acquisition softkey then turn the Universal Knob to select the desired acquisition mode and push down the knob to confirm The default setup...

Страница 63: ...of the signal or the narrow pulse of the signal that might be lost In this mode signal confusion can be prevented but the noise displayed would be larger In this mode the oscilloscope can display all...

Страница 64: ...is the lower the noise will be and the higher the vertical resolution will be but the slower the response of the displayed waveform to the waveform changes will be The available range of averages is...

Страница 65: ...This is generally used when the sample rate of the digital converter is higher than the storage rate of the acquisition memory High Resolution mode can be used on both single shot and repetitive signa...

Страница 66: ...s pressure volts versus current or voltage versus frequency The phase deviation between two signals with the same frequency can be easily measured via Lissajous method The figure below shows the measu...

Страница 67: ...en To use the sequence mode the HORIZONTAL Format must be set to YT Do the following steps to use the sequence mode 1 Press the Acquire button on the front panel to enter the ACQUIRE function menu 2 P...

Страница 68: ...the frame number that displaying on the screen 3 Press the Frame No softkey and then turn the Universal Knob to select the frame to display 4 Press the softkey to replay the waveform from the current...

Страница 69: ...verlap to display stable waveform The following is the schematic diagram of the acquisition memory As shown in the figure below the position of the trigger event is determined by the reference time po...

Страница 70: ...ter Trigger Source Trigger Mode Trigger Level Trigger Coupling Trigger Holdoff Noise Rejection Trigger Type Edge Trigger Slope Trigger Pulse Trigger Video Trigger Window Trigger Interval trigger DropO...

Страница 71: ...annel can work normally External trigger input External trigger source can be used to connect external trigger signal to the EXT TRIG channel when all of the four channels are sampling data The trigge...

Страница 72: ...t setting if the specified trigger conditions are not found triggers are forced and acquisitions are made so hat signal activity is displayed on the oscilloscope The Auto trigger mode is appropriate w...

Страница 73: ...Level Knob You can push the Trigger Level Knob to set the level to the waveform s 50 value immediately If AC coupling is used pushing the Trigger Level knob sets the trigger level to about 0 V The pos...

Страница 74: ...into the trigger path AC block all the DC components and attenuate signals lower than 5 8 Hz Use AC coupling to get a stable edge trigger when your waveform has a large DC offset LF Reject block the...

Страница 75: ...ble trigger on the repetitive pulse burst shown below set the holdoff time to be 200 ns but 600 ns Holdoff 200ns 600ns Trigger Point The correct holdoff setting is typically slightly less than one rep...

Страница 76: ...lity of triggering on noise However this also decreases the trigger sensitivity so that a slightly larger signal is required to trigger the oscilloscope Press the Setup button on the front panel and t...

Страница 77: ...stabilize the displayed waveform by removing the noise from the trigger path Second reduce the noise on the displayed waveform 1 Connect a signal to the oscilloscope and obtain a stable display 2 Rem...

Страница 78: ...e SDS1000X provides abundant advanced trigger functions including various serial bus triggers Edge trigger Slope trigger Pulse trigger Video trigger Window trigger Interval trigger DropOut trigger Run...

Страница 79: ...tem function menu 2 Press the Type softkey turn the Universal Knob to set select Edge and then push the knob to confirm 3 Press the Source softkey turn the Universal Knob to select CH1 CH2 EXT EXT 5 o...

Страница 80: ...ersal Knob to set select Slop and then push the knob to confirm 3 Press the Source softkey turn the Universal Knob to select CH1 or CH2 as the trigger source 4 Press the Slop softkey turn the Universa...

Страница 81: ...value trigger when the positive or negative slope time of the input signal is greater than the specified time value within a range of time value trigger when the positive or negative slope time of the...

Страница 82: ...ss the Polarity softkey to select Positive or Negative pulse that to trigger on The current trigger polarity is displayed at the upper right corner of the screen 6 Press the Limit Range softkey turn t...

Страница 83: ...n the specified upper limit of time value For example for a positive pulse if you set t pulse real width 100ns and t 300ns the waveform will trigger outside a range of time value trigger when the posi...

Страница 84: ...e Universal Knob to select CH1 or CH2 as the trigger source Turn the Trigger Level Knob does not change the trigger level because the trigger level is automatically set to the sync pulse 4 Press the S...

Страница 85: ...to 562 1 to 563 The following are exercises to familiarize you with video triggering To trigger on a specific line of video To use Custom video trigger To Trigger on a Specific Line of Video Video tr...

Страница 86: ...gger source and push down the knob to confirm 4 Press the Standard softkey turn the Universal Knob to select Custom and push down the knob to confirm 5 Press the Setting softkey to enter the custom se...

Страница 87: ...tude range while the lower trigger level is out of the waveform amplitude range the oscilloscope will trigger on rising edge only If the lower trigger level is within the waveform amplitude range whil...

Страница 88: ...iversal Knob to select CH1 or CH2 as the trigger source 4 Press the Window Type softkey to select Relative 5 Press the Center Delta softkey to select Center or Delta trigger level mode then turn the T...

Страница 89: ...SIGLENT SDS1000X User Manual 69 Figure 28 Relative Window Trigger www biall com pl...

Страница 90: ...lect desired condition less than a time value trigger when the positive or negative pulse time of the input signal is lower than the specified time value greater than a time value trigger when the pos...

Страница 91: ...SIGLENT SDS1000X User Manual 71 Figure 29 Interval Trigger www biall com pl...

Страница 92: ...e passes through the trigger level is greater than the timeout time set as shown in the figure below Trigger Trigger To set edge DropOut trigger 1 Press the Setup button on the front panel to enter th...

Страница 93: ...Universal Knob to select DropOut and push doown the knob to confirm 3 Press the Source softkey turn the Universal Knob to select CH1 or CH2 as the trigger source 4 Press the Slope softkey to select r...

Страница 94: ...Press the Type softkey then turn the Universal Knob to select DropOut and push down the knob to confirm 3 Press the Source softkey turn the Universal Knob to select CH1 or CH2 as the trigger source 4...

Страница 95: ...SIGLENT SDS1000X User Manual 75 Figure 32 Runt Trigger www biall com pl...

Страница 96: ...m 3 Press each channel softkey to select Invalid High or Low Low sets the pattern to low on the selected channel A low is a voltage level that is less than the channel s trigger level or threshold lev...

Страница 97: ...s In Range when the pattern is present for a time within a range of values Out of Range when the pattern is present for a time outside of range of values 7 Press the Holdoff Close softkey to turn on t...

Страница 98: ...AN and LIN serial trigger and decode This chapter introduces how to set every kind of serial trigger and decode in details The contents of this chapter IIC Trigger and Decoder SPI Trigger and Decoder...

Страница 99: ...ress the Decode option and select IIC with the Universal Knob and then push down the Universal Knob to confirm Figure 34 IIC SINGAL Menu 4 Press Signal softkey to enter the IIC SIGNAL menu 5 For both...

Страница 100: ...DA data transitions from high to low while the SCL clock is high For triggering purposes including frame triggers a restart is treated as a start condition Stop Condition The oscilloscope triggers whe...

Страница 101: ...all bits in the pattern match The frame is in the format Frame Start Address byte 1 Write Address byte 2 Ack Data The oscilloscope triggers on a read or write frame in 10 bit addressing mode on the 26...

Страница 102: ...0x3FF 10 bit hexadecimal When triggering on a read write frame the oscilloscope will trigger after the start address read write acknowledge and data events occur If don t care is selected 0xXX or 0xX...

Страница 103: ...e Display softkey and choose On to display the decode line on the display 4 Press the List softkey to enter the LIST function menu 5 Press the Display softkey and choose On to display the decode list...

Страница 104: ...ecoded text is truncated at the end of the associated frame when there is insufficient space within frame boundaries Blue vertical bars indicate you need to expand the horizontal scale and run again t...

Страница 105: ...the knob to confirm Serial 1 and Serial 2 could not be set to SPI at the same time And the default setup of Serial 2 is SPI 4 Press the Signal softkey to enter the SPI SIGNAL menu Figure 38 SPI SINGAL...

Страница 106: ...SPI SINGAL menu 11 Press the CS softkey to open the SPI CS menu Figure 42 SPI CS Menu In the SPI CS menu a Press the Cs Type softkey to select a framing signal that the oscilloscope will use for dete...

Страница 107: ...then turn the Universal Knob to select the chip select signal threshold voltage level The threshold voltage level is used in decoding and it will become the trigger level when the trigger type is set...

Страница 108: ...data signal 5 Press the Data Length softkey and turn the Universal Knob to set the number of bits in the serial data string The number of bits in the string can be set anywhere from 4 bits to 96 bits...

Страница 109: ...SIGLENT SDS1000X User Manual 89 Figure 44 SPI Trigger www biall com pl...

Страница 110: ...SPI decoded data 3 Press the Display softkey and choose On to display the decode line on the display 4 Press the List softkey to enter the LIST function menu 5 Press the Display softkey and choose On...

Страница 111: ...ndaries Pink vertical bars indicate you need to expand the horizontal scale and run again to see decode Red dots in the decode line indicate that there is data that is not being displayed Scroll or ex...

Страница 112: ...ey then turn the Universal Knob to select the signal threshold voltage level The threshold voltage level is used in decoding and it will become the trigger level when the trigger type is set to the se...

Страница 113: ...T menu Figure 49 UART TRIG SET Menu 4 Press the Source Type softkey to select TXDATA or RX DATA 5 Press the Trigger softkey and set up the desired trigger condition Start The oscilloscope triggers whe...

Страница 114: ...Display softkey and choose On to display the decode line on the display 3 Press the List softkey to enter the LIST function menu 4 Press the Display softkey and choose On to display the decode list on...

Страница 115: ...o expand the horizontal scale and run again to see decode When the horizontal scale setting does not permit the display of all available decoded data red dots will appear in the decoded bus to mark th...

Страница 116: ...ompared against other waveforms Four reference waveforms can be displayed at a time Use the appointed Variable knob and the Position knob which on the right side of the front panel to adjust the verti...

Страница 117: ...ct the position to save the REF waveform The source includes analog channel and math waveforms 4 Press the Save softkey to save the channel or math waveform to the appointed location The vertical scal...

Страница 118: ...osition softkey and turn the universal knob to adjust the vertical scale and position of the reference waveform The vertical scale and position information display at the middle of the screen The init...

Страница 119: ...aveform is displayed in white and labeled with M You can use cursors to measure it The contents of this chapter Units for Math Waveforms Math Operators To Adjust the Math Waveform Scale and Offset Uni...

Страница 120: ...nd the result is displayed 1 Press the Math button on the front panel to enter the MATH function menu 2 Press the Source A and Source B softkey respectively and then turn the Universal Knob to select...

Страница 121: ...H function menu 2 Press the Source A and Source B softkey respectively and then turn the Universal Knob to select the source to do math operation Analog channels CH1 and CH2 and reference waveforms RE...

Страница 122: ...in When the FFT function is selected the FFT spectrum is plotted on the oscilloscope display as magnitude in dBV versus frequency The readout for the horizontal axis changes from time to frequency Her...

Страница 123: ...nd after the multiplication are the basically the same Sine waveform with the same amplitude and rather similar frequencies Wide band random noise with relatively slowly changing waveform spectrum Han...

Страница 124: ...l and the FFT operation results are displayed in the same window to view the frequency spectrum more clearly and to perform more precise measurement Figure 54 FFT Waveform In Split Mode To measure FFT...

Страница 125: ...ence The dx option under d dt math function operation menu shows the point to point time difference and it ranges from 0 02div to 0 40div div indicates the number of the pixel points that each divisio...

Страница 126: ...re I integrated waveform t point to point time difference y channel 1 2 or REFA REFB co arbitrary constant i data point index The integrate operator provides an Offset softkey that lets you enter a DC...

Страница 127: ...57 Integral with Offset Square Root Square root calculates the square root of the selected source Where the transform is undefined for a particular input holes zero values appear in the function outpu...

Страница 128: ...e between X1 and X2 T and 1 T When set cursor type to X1 X2 use Universal Knob will move the X1 and X2 cursors together The value under the menu option is the difference between the X1 and X2 cursors...

Страница 129: ...use the Universal Knob to move the X1 and X2 cursors to desired place If necessary set the cursor type to X1 X2 move X1 and X2 cursors together To measure vertical voltage or current use the Universa...

Страница 130: ...results of the last five selected measurements are displayed at the bottom of screen and above the menu Delay parameters are under the All Measure submenu Set the Delay option to On to display all the...

Страница 131: ...op is the same as Maximum 6 Vbase The Base of a waveform is the mode most common value of the lower part of the waveform or if the mode is not well defined the base is the same as Minimum The Y cursor...

Страница 132: ...recedes a major edge transition expressed as a percentage of Amplitude The X cursors show which edge is being measured edge closest to the trigger reference point Figure 62 Preshoot 15 Level X the vol...

Страница 133: ...pulse 4 Width the time difference between the 50 threshold of a falling edge to the 50 threshold of the next rising edge of the pulse 5 Rise Time the time for the signal amplitude to rise from 10 to...

Страница 134: ...of source 2 of 50 voltage level 5 FFF The time between the first falling edge of source 1 and the first falling edge of source 2 of 50 voltage level 6 LRR The time between the last rising edge of sour...

Страница 135: ...ed are available for measurements 3 To select and display measurement parameters Press the Type softkey and then turn the Universal Knob to select the desired measurement parameter 4 Press the Univers...

Страница 136: ...SIGLENT 116 SDS1000X User Manual Note if the parameter does not match the measure condition it will display as Figure 65 Added the Measurement www biall com pl...
Страница 137: ...voltage time and delay parameters of the current measurement source and display the results on the screen Figure 66 All Parameters Measurement Do the following steps to make all parameters measuremen...

Страница 138: ...pe waveform intensity grid brightness and transparence The contents of this chapter To Set Display Type To Set Color Display To Set and Clear Persistence To Clear the Display To Select Grid Type To Ad...

Страница 139: ...mple points are connected by lines and displayed Normally this mode can provide the most vivid waveform to view the steep edge of the waveform such as square waveform Dots display the sample points di...

Страница 140: ...s the display with new acquisitions but does not immediately erase the results of previous acquisitions All previous acquisitions are displayed with reduced intensity New acquisitions are shown in the...

Страница 141: ...oscope will start to accumulate acquisitions again 4 To return to the normal display mode turn off persist and the previous acquisitions will be clear at once To clear the display Press the Display bu...

Страница 142: ...ally demand Display 14X8 grid type Display 2X2 grid type Display without grid To Adjust Waveform Intensity Do the following steps to adjust waveform intensity 1 Press the Display Persist button on the...

Страница 143: ...Manual 123 Note Waveform intensity adjustment affects analog channel waveforms only not math waveforms reference waveforms digital waveforms etc Figure 71 Intensity Set to 100 Figure 72 Intensity Set...

Страница 144: ...ce Transparence can be used to adjust the transparence of the message box of cursor measure Pass Fail and all pop up menus to an appropriate value to observe the date more conveniently Under Cursor or...

Страница 145: ...l oscilloscope memory or to a USB storage device The saved setups waveforms can be recalled later SDS1000X provides an USB Host interface on the front panel to connect an USB device for external stora...

Страница 146: ...annels turned on can be saved in the same file At recall the data will be displayed on the screen directly 3 Picture SDS1000X saves the screen image in external memory in bmp format You can specify th...

Страница 147: ...knob to confirm 4 Press the Save To softkey to select Internal to save the current setup of the oscilloscope to the internal memory 5 Press the Setup softkey button and then turn the Universal Knob t...

Страница 148: ...d type of file in the external USB flash device 1 Press the Save Recall button on the front panel to enter the SAVE RECALL function menu 2 Press the Type softkey to select Waveforms or Setup 3 Press t...

Страница 149: ...ed press the New softkey to turn on the interface as shown in the figure below Refer to the descriptions in To Create a new file or fold to create a new file name Figure 75 File Name Dialogue 6 Press...

Страница 150: ...all button on the front panel to enter the SAVE RECALL function menu 8 Press the Type softkey to select Waveforms or Setup 9 Press the Recall softkey to enter the SAVE RECALL file system 10 Turn the U...

Страница 151: ...he oscilloscope is connected with a USB storage device Before using external disk make sure that the USB storage device is connected correctly Execute the following operations through the disk managem...

Страница 152: ...below aA is used to switch upper lower case Name Input Area Keyboard Area Upper lower Case Switch Figure 76 Input Keyboard 4 To delete the name in the name input area press the Delete softkey continuo...

Страница 153: ...d then press the Delete softkey Then the file or folder will be deleted To rename a file or a folder This operation is only valid in external storage 1 Press the Save Recall button on the front to ope...

Страница 154: ...pdate and remote interface configure The contents of this chapter To View the System Status To Do Self Calibration IO Set To Enable or Disable the Sound To Specify the Language To do Pass Fail Test To...

Страница 155: ...es record the boot strap times of the oscilloscope Software Version list the current software version of the oscilloscope Fpga Version list the current fpga version of the oscilloscope Hardware Versio...

Страница 156: ...the self calibration Do the following steps to do self calibration 1 Disconnect all the input channels 2 Press the Utility button on the front panel and then press the Do Self Cal softkey and the osc...

Страница 157: ...lect or to turn on or off the sound To Specify the Language SDS1000X supports multiple language menu Chinese English help and prompt messages 1 Press Utility button on the front panel to enter the UTI...

Страница 158: ...ust remain in order to comply with chosen parameters Compliance to the mask is verified point by point across the display The test results can be displayed on the screen as well as be declared through...

Страница 159: ...the frame number of the channel waveform that matches the mask Total the frame number of the channel waveform that have been acquired It is the total of Pass and Fail 11 Press the Next Page softkey to...

Страница 160: ...K function menu 7 Press the X Mask or Y Mask softkey and then turn the Universal Knob to select the desired value 8 Press the Location softkey to select Internal 9 Press the Save softkey to save the m...

Страница 161: ...cation softkey to select External 9 Press the Save softkey to enter the file SAVE RECALL system 10 Save the test mask file refer to the Save and Recall chapter Recall Test Mask from External Memory Do...

Страница 162: ...TILITY function menu 4 Press the IO Set softkey to enter the I O SET function menu 5 Press the USB Device softkey to select USBTMC 6 Use EasyScopeX or NI Vista to communicate with the oscilloscope Do...

Страница 163: ...F1 softkey the first softkey below the screen continually to go to the DHCP line then turn the Universal Knob to select Enable or Disable Enable the DHCP server in the current network will assign the...

Страница 164: ...ux Output softkey to select Trig Out or Pass Fail The default setup is Trig Out Trig Out if this type is selected the oscilloscope outputs a signal that can reflect the current capture rate of the osc...

Страница 165: ...age of the UTILITY function menu 3 Press the Quick Cal to select On If the Quick Cal has been set to On before powering on and the current vertical scale is 2mV or 5mV of any channel the oscilloscope...

Страница 166: ...off the oscilloscope otherwise the oscilloscope will not restart again 9 After finish the update the screen will pop out the message Update success please restart the DSO and you will heard a sound of...

Страница 167: ...ey to go to the third page of the UTILITY function menu 4 Press the Do Self Test softkey to enter the SELFTEST function menu 5 Press the Screen Test softkey to enter the screen test interface as the p...

Страница 168: ...on menu 4 Press the Do Self Test softkey to enter the SELFTEST function menu 5 Press the Keyboard Test softkey to enter the keyboard test interface as the picture shown below Figure 82 Keyboard Test 6...

Страница 169: ...he SELFTEST function menu 5 Press the LED Test softkey to enter the keyboard test interface as the picture shown below Figure 83 LED Test 6 According to the prompting information displaying on the scr...

Страница 170: ...Press the Next Page softkey to go to the second page of the UTILITY function menu 3 Press the Next Page softkey to go to the third page of the UTILITY function menu 4 Press the Screen Saver softkey a...

Страница 171: ...ge of the UTILITY function menu 3 Press the Next Page softkey to go to the third page of the UTILITY function menu 4 Press the Options softkey to enter the OPTION function menu Figure 85 OPTION Functi...

Страница 172: ...versal Knob or press the Enter softkey to confirm the characters and the oscilloscope will activate the corresponding option using the license key currently input Press the Delete softkey to delete th...

Страница 173: ...e will keep the stop state Press History and Stop button to turn off History function 2 Press the List softkey to turn on or off the list display The list records the timestamp of every frame It is ac...

Страница 174: ...K 398 14M 1 280K 198 250MSa s 3 5K 3779 700K 78 7K 1891 1 4M 38 14K 945 2 8M 18 17 5K 757 7M 7 35K 378 14M 3 70K 188 500MSa s 35 80000 140K 93 70 77026 175K 74 140 65667 700K 17 350 45526 1 4M 8 700 2...

Страница 175: ...DS1000X build in Arbitrary waveform generation provides sine square ramp pulse DC noise cardiac Gauss pulse exp rise exp fall and Arbitrary waveforms The contents of this chapter To Set Wave Type and...

Страница 176: ...d value Use the same method the set the other parameters Wave Type Character Frequency Range Amplitude High Z Offset High Z Sine Use the Universal Knob to adjust the Frequency Frequency Fine Period Pe...

Страница 177: ...Frequency Frequency Fine Period Period Fine Amplitude Amplitude Fine High Level High Level Fine Offset Offset Fine Low Level Low Level Fine value 1uHz 5MHz 4mV 6V 3 0V Exp Rise Use the Universal Knob...

Страница 178: ...hows as the picture below Figure 89 Send Wave Dialogue 5 Click the Store location area and select the location to keep the arbitrary waveform 6 Click the Send option then the oscilloscope will pop out...

Страница 179: ...50 Figure 91 SETTING Function Menu The output load of the Wave Gen must match with the oscilloscope or the amplitude of the signal will be incorrect Recover the Default Values of Wave Gen 1 Press the...

Страница 180: ...the Wave Gen button on the front panel to enter the WAVEFORM function menu 2 Press the Setting softkey to enter the SETTING function menu 3 Press the AWG Self Cal softkey to perform AWG self calibrat...

Страница 181: ...iv 1 S div Delay 0 S Zoom Off Format Y T Vertical Channel on off CH1 V div 1 V div Offset 0 V Coupling DC BW Limit Full Adjust Coarse Probe 1X Impedance 1 M Unit V Invert Off Acquire Acquisition Norma...

Страница 182: ...3 5 s X2 3 5 s Save Recall Type Setups Save To Internal Setup NO 1 Utility IO Set USB Device USBTMC Aux Output Trig Out Sound Sound On Pass Fail Enable Test Off Source CH1 Operate Off Mes Display Off...

Страница 183: ...offset 0 V Source A CH1 Source B CH1 Invert Off V div 1 00 V 2 div offset 0 V 2 Source A CH1 Source B CH1 Invert Off V div 1 0 div offset 0 FFT Source CH1 Window Hanning Horizontal 1X Vertical Scale...

Страница 184: ...ocation REF A Display Off Decode Serial 1 Serial I2C Display Off List Off Serial 2 Serial SPI Display Off List Off I2C SCK CH1 Threshold 1 60V SDK CH2 Threshold 1 60V Address 7 SPI CLK CH1 Threshold 1...

Страница 185: ...H CH1 Threshold 1 60V CAN L CH2 Threshold 1 60V Bound 100kb S Decode Source CAN_H LIN Source CH1 Threshold 1 60V Baud 2400 Wave Gen Function Off Wave Type Sine Output Load High Z Sine Frequency 1 KHz...

Страница 186: ...h 200 s DC Offset 0 0mVdc Noise Stdev 448 mV Mean 0 mV Cardiac Frequency 1 KHz Amplitude 4 Vpp Offset 0 Vdc Gaus Pulse Frequency 1 KHz Amplitude 4 Vpp Offset 0 Vdc Exp Rise Frequency 1 KHz Amplitude 4...

Страница 187: ...4 Check whether there are signals generated from the item to be tested you can connect the probe compensation signal to the problematic channel to determine which has problem the channel or the item t...

Страница 188: ...the setting in USB Device matches the device currently connected If needed restart the oscilloscope 8 The USB storage device cannot be recognized 1 Check whether the USB storage device can work normal...

Отзывы: