


.
6. Cowling
a.
Lay the left cowl half on the Fuselage Side View plan and scribe a small mark on the outside of it with a knife to indicate the
exact location of the thrust line. This mark won't be needed until after the cowl halves are joined, but it is much easier to
mark it now while the cowl will sit flat on the plan.
b.
Butyrate dope thinner, MEK, or
cyanoacrylate adhesive can be used to
assemble the cowl. Hold the plastic
joiner in place on the inside of one cowl
half. Leave half of the joiner strip
extending over the edge so as to lap
onto the other cowl half when it is
attached. Flow a few drops of adhesive
under the edge of the strip. It will spread
along the seam by capillary action.
Squeeze and hold together any area of
the strip that is not down tight against
the cowl. Be careful not to let the
adhesive get under you finger, it will
leave a finger print that may be hard to
remove.
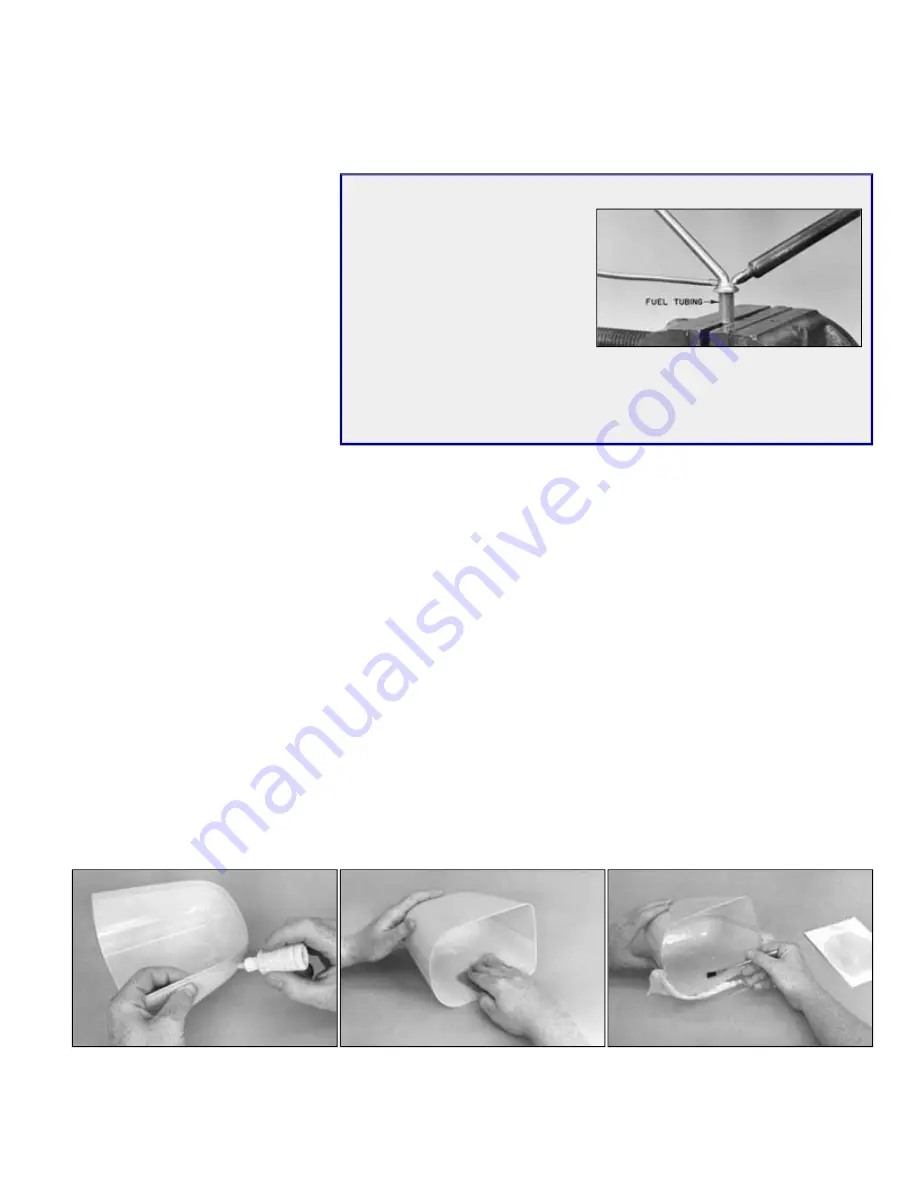
Soldering Hint
When soldering a flat metal washer
onto a wire part, it is very helpful to
first slip a short piece of Sig Heat-
Proof Silicone Fuel Line Tubing onto
the wire and push it up tight against
the washer to hold it in correct
position for soldering (the following
photo is not actually of the Cub's
tailwheel assembly but does show a
typical example of the method we're describing). The heat-proof tubing will not
melt from the heat of soldering, and it will also keep excess solder from getting
on the wrong side of the washer. After the solder cools, cut the fuel tubing off of
the wire.
c.
After the joiner strip has dried in the first cowl half, hold the second half in place and carefully flow adhesive into the seam.
Squeeze and hold together any areas of the seam that are open. Allow to dry thoroughly.
d.
Even up the back edge of the cowl with a sanding block.
e.
Due to its large size, the cowl needs to be strengthened by lining the inside with fiberglass cloth, stuck down with slow-
drying epoxy glue or polyester glass resin. The first step is to sand the inside of the cowl with 80 grit garnet or similar
grained sandpaper. Remove as much of the gloss from the plastic as possible. Don't worry about scratches in the plastic, a
rough surface on the inside will help the cloth and glue stick better.
CAUTION: Never use.sandpaper coarser than 220 grit on the outside of the cowl! It will cut deep scratches in the plastic
that may open up wider when paint is applied. Refer to section "Sanding and Painting Plastic Parts", in section 20.
f.
Cut a piece of Sig Regular Weight Glass Cloth (SIGGF001, not supplied) that will cover approximately half of the inside of
the cowl. The cloth is stretchy and will flow most of the contours of the cowl easily. Trial fit the piece of cloth inside the cowl
without any glue to see if you can get it to lay down without any bad wrinkles. If you have had no experience in applying
cloth before, you might consider doing the cowl in 3, or even 4, separate pieces of cloth and batches of glue. It will take a
little longer that way, but you'll probably do a better job.
g.
Mix up a batch of glue large enough for the area you've decided to cover in one step. Brush the glue onto the inside of the
cowl, putting on as smooth a coat as you can. Lay the cloth in place and pat down until it's well saturated with the glue.
Smooth out the cloth, pulling out any wrinkles. When satisfied with the job, mix up another small batch of glue and apply the
next piece of cloth. (Note: An alcohol soaked rag is handy for wiping excess epoxy off your hands or off the outside of the
cowL) After the entire inside of the cowl is covered, let dry thoroughly.
h.
When dry, trim off any excess cloth along the back edge of the cowl with a single edge razor blade or sharp X-Acto knife. If
there are any big uneven spots or ridges inside the cowl, sand them down smooth so that they will not interfere with the fit
of the cowl to the fuselage.