background image


4


Step 4. Connect the SpeedStream 4100 DSL Modem


Note: In order to provide you with the best possible connectivity, your DSL circuit must "train" for 
at least 10 days when first activated. During this period you must leave the DSL modem plugged in, 
turned on, and connected at all times. You do not need to leave your computer turned on during this 
period- just the DSL modem. For best results, please plug in your DSL modem and turn it on the day 
before your scheduled installation date, and leave it turned on for at least 10 days. 
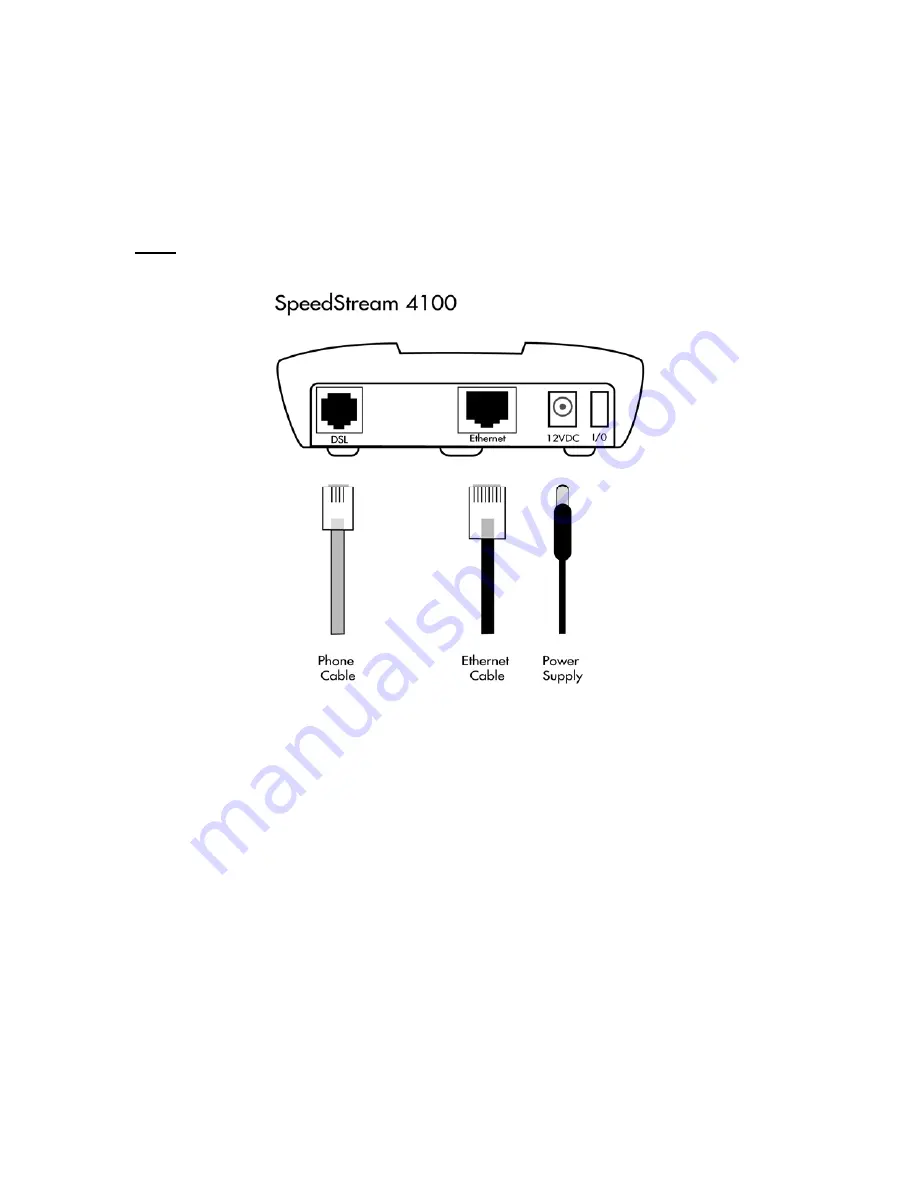


1.


Ensure that one end of the supplied 

phone cable 

is connected securely to the 

DSL port 

on the 

SpeedStream modem.  The other end of the phone cable should be connected to a 

DSL

 port on the 

splitter filter

, which should be plugged into your phone jack, as outlined in step 3-1. 

 
2.


Plug one end of the supplied 

Ethernet Cable 

into the 

Ethernet port

 on the SpeedStream modem.  

Connect the other end of the Ethernet cable to the Ethernet port on your computer. 

 
3.


Plug the power supply into the DSL modem and into an electrical outlet or surge protector. Push the 
power button (unless it is already depressed).  The DSL Modem will begin a self-test routine; during 
this period the lights on the front of the DSL Modem will flash on and off. 

 
4.


The 

Power 

light should turn solid green right away, and the 

DSL 

light should turn solid green within 

two minutes (if your circuit is active- see notes in step 5.) While the Modem is starting up, the lights 
may blink erratically- this is normal behavior. 

 
5.


If the 

Power 

light does not turn on, check your power cable.  Make sure your power supply is 

connected to a live electrical outlet, and that your connections are secured. 

Содержание SpeedStream 4100

Страница 1: ... the DSL modem For best results please plug in your DSL modem and turn it on the day before your scheduled installation date and leave it turned on for at least 10 days Please follow all instructions carefully Some computer or network configurations may cause software windows to appear that are not depicted in this guide Please read and follow the instructions on those screens to continue the inst...

Страница 2: ...Operating System Win 95 NT or newer MacOS 7 6 or newer Macintosh users your Macintosh must be Ethernet capable You may also need an AAUI Ethernet Transceiver depending on your model Consult your computer s documentation or your vendor for system specifications Step 2 Verify the contents of your self install kit Your self install kit includes A 1 SpeedStream 4100 DSL modem B 1 Power supply C 1 Ethe...

Страница 3: ...he supplied SpeedStream DSL Modem A B If you have a phone fax machine or any other telephony device at this location plug the telephone device into the Phone port of the DSL Splitter Filter 3 2 Install filters for all other telephones or devices All other equipment on the phone line must have filters installed This applies to equipment such as telephone answering machines Caller ID units analog co...

Страница 4: ...h should be plugged into your phone jack as outlined in step 3 1 2 Plug one end of the supplied Ethernet Cable into the Ethernet port on the SpeedStream modem Connect the other end of the Ethernet cable to the Ethernet port on your computer 3 Plug the power supply into the DSL modem and into an electrical outlet or surge protector Push the power button unless it is already depressed The DSL Modem ...

Страница 5: ...dicative of a problem please wait until the day after your scheduled installation date before reporting a problem Unplug the modem reboot the computer and then plug the modem back in Try another telephone jack in your home If none of these steps cause the LINK light to turn green and your installation date has passed please contact your Internet Service Provider s support department ...

Страница 6: ... the radial button for Obtain DNS server address automatically h Click OK and close all other open windows Windows 2000 XP Settings i Windows XP Click on Start go to Control Panels and click on Network Connections Windows 2000 Click on the Start button go to Settings and click on Network and Dial up Connections j Right click on the Local Area Connection icon and choose Properties from the pop up m...

Страница 7: ...ple Menu b Click on Control Panels and then on TCP IP c From the Connect drop down box choose Ethernet d From the Configure drop down box choose Using DHCP Server e Close the window When prompted save your changes 6 Configuring your computer to connect via DSL After you have installed your DSL Modem and Ethernet card and entered the correct network settings you may need to make one more set of cha...

Страница 8: ...ck on this Icon When the Icon opens click on the Connections tab at the top of the window Please consult the following screen shots to find your version of the Internet or Internet Options control panel and edit your settings to match Internet Explorer version 5 or 5 5 If your Connections screen looks like this Click the Radio Button labeled Never dial a connection Then Click on the LAN Settings b...

Страница 9: ...Configuring Outlook Express 5 6 or Vista Mail Open Outlook Express or Vista Mail Click on the Tools pull down menu and select Accounts Click on the Mail tab Click on your account to highlight it and then click the Properties button Click on the Connection tab Check the box labeled Always connect to this account using Click on the drop down box and select Local Area Connection Click on the OK butto...

Отзывы: