background image

Operating Instructions

 | SICHARGE UC Dispenser UL

Preparing the SICHARGE UC dispenser for switch-on  


Switch on the following switching elements at the SICHARGE UC charging station for the 

power supply cable of the    


SICHARGE UC dispenser:  


• 


Backup 

fuse 


•  Residual current operated circuit breaker  

Automatic startup  


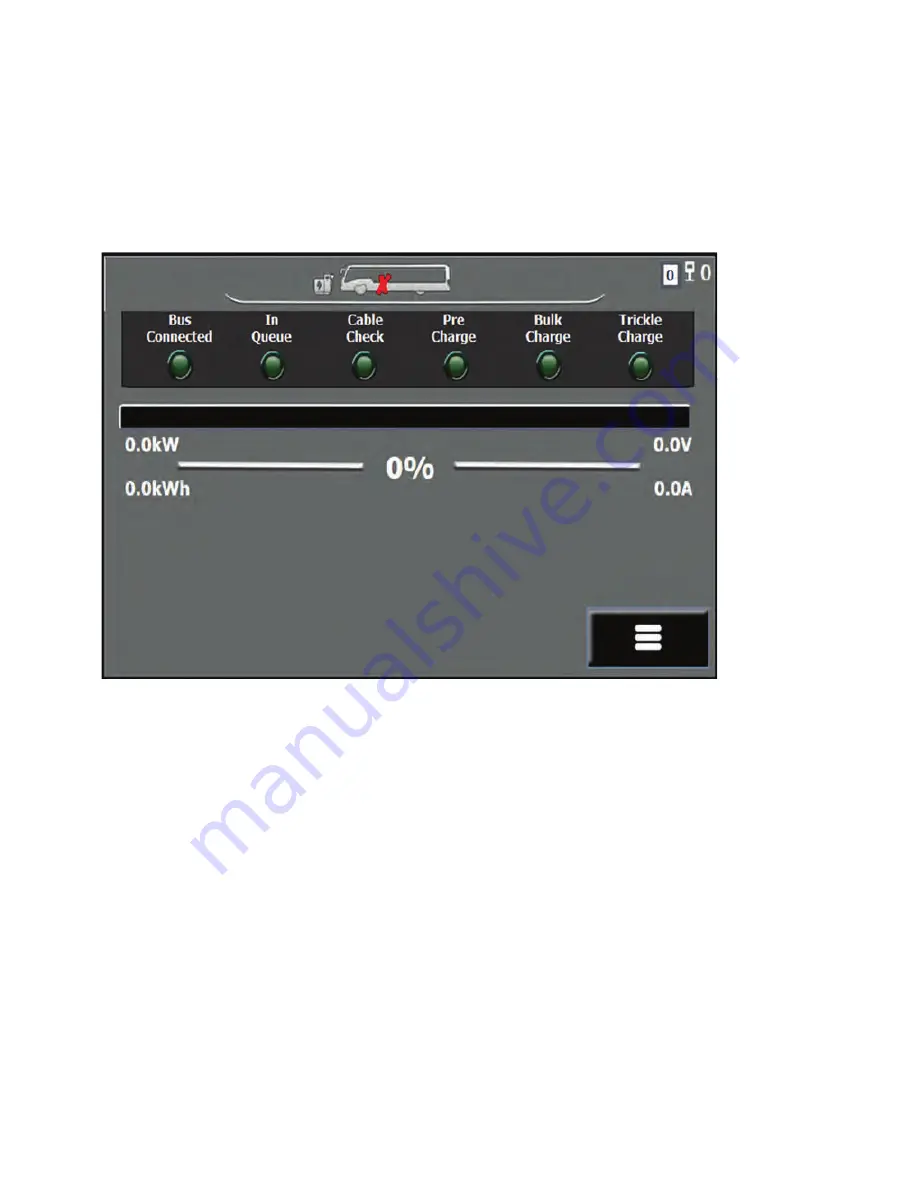
The SICHARGE UC dispenser starts automatically. Wait until the SICHARGE UC dispenser has started up completely.    


When the display shows the "Start" menu, the SICHARGE UC dispenser is ready for operation.  


Figure 7-1  

"Start" menu  


 61

Содержание SICHARGE UC

Страница 1: ...OPERATING INSTRUCTIONS SICHARGE UC Dispenser UL May 2022 usa siemens com sichargeuc ...

Страница 2: ...tructions 3 Description 4 Application planning 5 Installation 6 Connecting 7 Commissioning 8 Operation 9 Handling alarms and errors 10 Maintenance and service 11 Disposal 12 Service and support 13 Technical specifications 14 Declaration of Conformity A Abbreviations Sections 2 ...

Страница 3: ...ic task in accordance with the relevant documentation in particular its warning notices and safety instructions Qualified personnel are those who based on their training and experience can identify risks and avoiding potential hazards when working with these products systems Proper use of Siemens products Note the following WARNING Siemens products may only be used for the applications described i...

Страница 4: ...8 3 2 Overview of variants 20 3 3 Structure of a SICHARGE UC dispenser 22 3 3 1 External structure 22 3 3 2 Internal structure 25 3 4 Charging cable type 1 25 3 5 Electrical protection devices 28 4 Application planning 30 4 1 Incoming inspection of the devices 30 4 1 1 Checking the delivery for completeness and correctness 30 4 1 2 Checking the transport packaging 31 4 1 3 Unpackaging the charging...

Страница 5: ...ugging in the charging cable 64 8 3 Monitoring the charging process 66 8 4 Stopping charging 69 8 5 Unplugging the charging cable 70 8 6 Displaying alarms 71 8 7 Operating the Service menu 74 8 7 1 Selecting options 74 8 7 2 Checking recorded alarms 75 8 7 3 Restarting the charging process after an alarm 77 8 7 4 Displaying information about the charging station 79 8 7 5 Displaying energy delivere...

Страница 6: ... station 100 10 5 1 Cleaning the touch screen 100 10 5 2 Cleaning the cabinet and the charging cable 101 10 5 3 Cleaning the ventilation grille 102 11 Disposal 104 11 1 Disposing of the packaging 104 11 2 Disposing of the charging station 104 12 Service and support 105 13 Technical specifications 106 13 1 Technical specifications 106 13 2 Charging the current power curve 108 14 Declaration of Conf...

Страница 7: ... is encouraged to try to correct the interference by one or more of the following measures Reorient or relocate the receiving antenna Increase the separation between the equipment and the receiver Connect the equipment to an outlet on a circuit different from that to which the receiver is connected Consult the dealer or an experienced radio TV technician for help Changes or modifications not expre...

Страница 8: ...and handling instructions Definition SICHARGE UC charging station The SICHARGE UC charging station converts the connected main voltage into direct voltage for charging electric vehicles To provide multiple charge points for electric vehicles at a SICHARGE UC charging station you can connect multiple SICHARGE UC dispensers in series to the SICHARGE UC charging station SICHARGE UC dispenser The SICH...

Страница 9: ...e implemented please visit https www siemens com industrialsecurity Siemens products and solutions undergo continuous development to make them more secure Siemens strongly recommends that product updates are applied as soon as they are available and that the latest product versions are used Use of product versions that are no longer supported and failure to apply the latest updates may increase cu...

Страница 10: ...ions In order to ensure comprehensive safety adhere to the following guidelines and regulations Guidelines for occupational safety Regulations for the prevention of accidents Trade regulations Technical connection conditions of the power supply unit Building regulations Generally accepted rules of technology Target group These operating instructions are intended for the following persons Planners ...

Страница 11: ...hazards Electrical engineering work may only be performed by qualified electricians themselves or under their direction and supervision A qualified electrician is someone who is able to assess the work assigned to them and recognize potential dangers due to their professional training knowledge and experience as well as knowledge of the relevant standards Personal protective equipment PPE PPE prot...

Страница 12: ...sher or steam cleaner to clean the SICHARGE UC dispenser Set up the SICHARGE UC dispenser at a flood proof location Protection against unauthorized opening A lock system protects the SICHARGE UC dispenser from unauthorized opening of the device door Only make the key available to authorized personnel for work performed inside the SICHARGE UC dispenser Do not leave the SICHARGE UC dispenser unatten...

Страница 13: ...injury or death Use the operating instructions to verify that all safety signs and warnings are attached Replace missing safety signs and warnings Do not remove safety signs and warnings Replace unrecognizable safety signs and warnings NOTICE Manipulation at the connections Manipulation of the following connections is prohibited Charging plug AC DC inputs AC DC outputs WARNING Electric shock in ca...

Страница 14: ...Install temporary grounding means 5 Install temporary shields over any adjacent live parts Prepare to switch on again after work is finished After finishing and checking the work prepare the restart as follows Inform persons no longer required that the work is completed and no further work is permitted Withdraw all persons no longer required Remove all tools equipment and aids used Switch on the e...

Страница 15: ...penser Safety signs in the cabinet of the SICHARGE UC dispenser The following safety signs are attached in the cabinet of the SICHARGE UC dispenser Safety sign Meaning Marking of the center of gravity Warning of tipping hazard Marking of the places at which forklifts are not allowed to lift Tilt indicator Safety sign Meaning Warning of dangerous voltage 15 ...

Страница 16: ...nd networks Systems machines and components should only be connected to the enterprise network or the internet if and to the extent that it is necessary and with appropriate security measures in place such as using firewalls and network segmentation In addition the recommendations of Siemens regarding appropriate protective measures should be observed You can find additional information about Indu...

Страница 17: ...ns the identification data of the device the manufacturer and the UL marking Information on the nameplate You can find the following information on the nameplate of the charging station Figure 2 1 Example of a SICHARGE UC dispenser UL nameplate Position of the nameplate on the device The nameplate is positioned at the upper right corner on the front of the cabinet 17 ...

Страница 18: ...ized distribution of charging ports of a SICHARGE UC charging station Performance features The SICHARGE UC dispenser charges your electric vehicle quickly and safely To start the charging process connect the charging cable to your vehicle The SICHARGE UC dispenser then controls the entire charging process fully automatically and accurately The SICHARGE UC dispenser is characterized by the followin...

Страница 19: ...he local SICHARGE UC dispenser may not include one of the options described The figure below shows the two different mounting variants a Floor mounting s Wall mounting Figure 3 1 Mounting variants Application The SICHARGE UC dispenser is intended for charging of electric vehicles in semi public commercial and industrial areas such as Terminals Vehicle depots Company parking lots 19 ...

Страница 20: ...s Overview of variants for floor mounting The following table shows a comparison of the basic version and the variant with all options available for floor mounting Floor mounting a LED lighting s Touch screen HMI d Cable holder f Ventilation slots g Floor mounting plate 20 ...

Страница 21: ...UL Overview of variants for wall mounting The following table shows a comparison of the basic version and the variant with all options available for wall mounting Wall mounting a LED display s Touch screen HMI d Cable holder f Ventilation slots 21 ...

Страница 22: ...l structure display and operator controls of the SICHARGE UC dispenser For this example we selected the water cooled 300 A variant with an air conditioning unit LED HMI and RFID Structure display and operator controls a LED lighting s Touch screen HMI d Cable holder f Ventilation slots g Charging cable h Floor mounting plate j Control cabinet lock k Charging plug and plug holder 22 ...

Страница 23: ...ting bar for wall and ceiling mounting LED display Indication Status Description Red Permanent light Active fault shutdown state Not ready to charge Rapid flashing E STOP Blue Permanent light Charging Charging in progress Slow flashing Vehicle connected but not charging charging about to start or in queue Green Permanent light Vehicle not connected idle Flashing Charging completed E STOP Indicatio...

Страница 24: ...e device door of the SICHARGE UC dispenser is equipped with a lock system The door locks secure access to the inside of the SICHARGE UC dispenser You need a special door key to open the device door The door key is included in the delivery Charging plug and cable holder Use the charging plug to establish a charging connection to all electric vehicles that are equipped with a charging socket accordi...

Страница 25: ... 1 Option 3 4 Charging cable type 1 The charging station is equipped with a charging cable for charging electric vehicles with direct current The charging cable enables charging of electric vehicles according to the standard CCS type 1 SAEJ1772 a LED lighting s Air conditioning unit1 d DC contactors f Siemens controller g Ethernet switch h PLC gateway j Control cabinet heater k DC fuses l Industri...

Страница 26: ...tatus CS The PD contact enables the vehicle to detect the presence of a charging plug d Protective Earth PE The PE grounding contact protects the device in case of a faulty cable connection f Direct Current Plus DC The DC contact forms the plus pole for direct current charging g Direct Current Minus DC The DC contact forms the negative pole for DC charging h Control Pilot CP Vehicle and charging s...

Страница 27: ...harging contacts DC and DC during the entire charging process When the temperature at one of the charging contacts exceeds 86 C 188 F the charge controller reduces the maximum output current When the temperature at one of the charging contacts exceeds 90 C 194 F the charge controller immediately switches off the power supply of the charging cable Performance features The table below shows the perf...

Страница 28: ...ition the control system of the charging station constantly monitors the mains voltage If the main voltage exceeds or falls below the permissible limits the charging station interrupts the charging process in progress or does not start the charging process Overload protection A separate system constantly monitors the input current and the output current in the SICHARGE UC dispenser The SICHARGE UC...

Страница 29: ...ls below the permissible limit the insulation monitoring device switches off the output current and disconnects the AC DC converter from the AC input In addition the insulation monitoring device sends a message to the controller that shows the Ground Fault Detection alarm message For safety reasons the charging station switches to the safe EMERGENCY OFF state In the EMERGENCY OFF state the operati...

Страница 30: ...ing inspection of the equipment with the following steps Check the completeness of the delivery Check that the delivery documents correspond to the goods delivered Additional material The following is transferred directly to the customer during the transfer process Documents Password Note Disclaimer of liability Customers are responsible for safekeeping of the documents and objects received Siemen...

Страница 31: ...sport The indicator tube indicates that the container has been tilted by more than 80 by turning red A red indicator can be a sign of damage during transport Perform a visual inspection of the tilt indicator as follows 1 Check for the presence of a tilt indicator on the transport packaging 2 Check whether the glass tube in the middle of the indicator has turned red 3 Report any red colored or miss...

Страница 32: ...lows 1 Remove transport film 2 Remove the edge protection strips 3 Remove the spacers Removing the packaging for air transport To remove the packaging proceed as follows 1 Remove the side walls of the packaging one by one as follows Unscrew the screws in the side panel Remove the side panel 2 Remove the cover of the transport packaging Removing the packaging for sea transport To remove the packagi...

Страница 33: ...te Report incomplete delivery or damaged delivery items If the delivery is incomplete or damaged inform the following persons immediately Contact of the supplier see delivery note Contact of the purchaser see delivery note Person responsible for the transport company 4 2 Location planning For the safe operation of the SICHARGE UC dispenser you need a location that meets the following requirements ...

Страница 34: ... SICHARGE UC dispenser the floor space must meet the following requirements Level Dry Sufficiently strong and able to bear the weight the dispenser Note Sealing the mounting plate Seal the mounting plate and the cable openings in the foundation with suitable materials to prevent moisture animals and insects from getting inside the station Wall mounting To ensure a secure hold of the SICHARGE UC di...

Страница 35: ...eration and maintenance and to ensure proper ventilation of the SICHARGE UC dispenser you must maintain the following minimum clearances in mm a SICHARGE UC dispenser front Figure 4 2 Minimum clearances for floor mounting top view Figure 4 3 Minimum clearances for floor mounting front view 35 ...

Страница 36: ...ure at air inlet The maximum permissible ambient temperature is 45 C When the ambient temperature exceeds 45 C the charging process is interrupted The SICHARGE UC dispenser must not be operated above the maximum permissible ambient temperature Direction of air flow Please note the direction of air flow when using the following options Air conditioning unit The supply air enters the SICHARGE UC dis...

Страница 37: ...lude for example the use of EMC filters or ferrites that must then be installed at the output of the DC charging cable Ethernet Connect the SICHARGE UC dispenser and the SICHARGE UC charging station with an Ethernet cable These are the specifications for cable routing Low voltage and DC cables must be installed shielded from the Ethernet cable Separate cable routing to low voltage and DC cables mi...

Страница 38: ...s Vehicle d SICHARGE UC dispenser Figure 4 5 Example Correct position of bumper and SICHARGE UC dispenser Plan for bumpers based on the dimensions of the vehicles used The bumper must stop the vehicle before the vehicle overhang touches the SICHARGE UC dispenser However the bumper must not prevent opening the cabinet door of the SICHARGE UC dispenser 38 ...

Страница 39: ...mounting surface on the floor you must prepare the mounting surface Cable entry position The figure below shows the position of the cable entry into the SICHARGE UC dispenser from below a Front s Recess for cable entry Figure 4 6 Cable entry CAUTION Secure work area Ensure a sufficiently large safety zone around the mounting surface For example use warning signs and barriers 39 ...

Страница 40: ... for the fixing points Y Figure 4 7 Fixing points of the mounting plate Fixing to the floor The mounting material is not included in the scope of delivery We recommend the following fixing material for mounting the SICHARGE UC dispenser to the base area 6 bolt anchors M12 6 washers M12 6 nuts M12 Sealing material to prevent the ingress of moisture animals and insects 40 ...

Страница 41: ...ser with the option to connect additional dispensers daisy chain a Cable glands for DC cable and PE cable s Cable gland for AC cable d Ethernet cable gland Figure 4 8 Cable entry for wall ceiling mounting You will find a table with the connection plan for connection to the SICHARGE UC charging station and the cable diameters in the section Technical specifications Page 106 CAUTION Secure work area...

Страница 42: ...l the retaining washer and hex nut on all six anchor studs Hanging the dispenser on the wall With the dispenser wall mount brackets installed to the dispenser position the studs into the hanging holes on the mounting bracket The washer and hex nut will fit into the larger hole on the mounting bracket Once all studs are aligned in the holes the dispenser can be set down into the smaller slots on th...

Страница 43: ...llowing conditions Horizontal surface Protection from mechanical stress for example due to shocks or vibrations Dust free Low pollutant atmosphere Constant room temperature Permissible room temperature range 40 C to 75 C Permissible relative humidity up to 95 no condensation NOTICE Damage to property due to improper storage In case of improper storage there is a risk of damages to the SICHARGE UC ...

Страница 44: ...ail a lifted load can drop If you are in the hazardous area under or next to the lifted load at this time death serious injury and material damage may result Always use hoisting gear and load handling equipment properly Do not stay in the hazardous area under or next to lifted loads DANGER Danger to life due to improper transport If you transport the SICHARGE UC dispenser incorrectly the device ma...

Страница 45: ...on the transverse or longitudinal side 2 Drive in until the forks are protruding out of the pallet at the other end 3 Lift the SICHARGE UC dispenser vertically 4 Transport the SICHARGE UC dispenser to the location in an upright position Transporting the dispenser for floor mounting with lifting equipment The SICHARGE UC dispenser floor mounting is delivered with two transport plates for mounting 1...

Страница 46: ...g is delivered with mounting rails on the rear of the device 1 Mount the shackle into the holes on the right and left of the mounting rail 2 Attach the shackles to the lifting equipment Only use suitable and approved lifting equipment 3 Lift the SICHARGE UC dispenser vertically from the transport pallet 4 Transport the SICHARGE UC dispenser suspended to the location 46 ...

Страница 47: ...fe when standing under lifted loads If hoisting gear or load handling equipment fail a lifted load can drop If you are in the hazardous area under or next to the lifted load at this time death serious injury and material damage may result Always use hoisting gear and load handling equipment correctly Do not stay in the hazardous area under or next to a lifted load WARNING Fall arrester Use approve...

Страница 48: ...ed at the output of the DC charging cable NOTICE Accident risks Avoid accidents and injuries as well as damages to vehicles and the SICHARGE UC dispenser These include for example inattentiveness slipping and tripping risks as well as vandalism Provide additional protective measures for example Warning signs Safe location of the SICHARGE UC dispenser Barriers Training of drivers and operators Suff...

Страница 49: ...equipment To mount the SICHARGE UC dispenser at the location you must lift the SICHARGE UC dispenser off the transport pallet If the SICHARGE UC dispenser is heavy transport it to the prepared mounting area using a forklift Lifting the SICHARGE UC dispenser To lift the SICHARGE UC dispenser off the transport pallet follow these steps 1 Connect the transport lugs of the SICHARGE UC dispenser and th...

Страница 50: ...ess of moisture animals and insects 10 Remove the two transport plates on the rear of the SICHARGE UC dispenser Keep the transport plates 5 3 Wall mounting 5 3 1 Mounting the dispenser to the wall Due to the variety of options the total weight of the SICHARGE UC dispenser is different depending on the equipment To mount the SICHARGE UC dispenser at the location you must lift the SICHARGE UC dispen...

Страница 51: ...heck whether the alignment of the SICHARGE UC dispenser above the bottom bolt anchor of the mounting surface is correct 3 Lower the SICHARGE UC dispenser onto the bottom bolt anchor 4 Attach the washers to the bottom bolt anchors 5 Screw the cap nuts onto the bottom bolt anchors 6 Remove the lifting gear and the shackles from the top mounting rail 7 Slide the SICHARGE UC dispenser onto the top bol...

Страница 52: ...dition observe the following safety instructions WARNING Electric shock due to lack of grounding If the protective conductor connection is missing or incorrectly connected high voltages may be present on exposed parts Touching the parts can lead to serious injury or death To ground the SICHARGE UC dispenser properly connect the protective conductor WARNING Qualified personnel Only qualified and tr...

Страница 53: ...tions to the specified tightening torque Check all power connections at regular intervals particularly after transport NOTICE Danger to life and damage to property due to loose power connections Insufficient tightening torques and vibrations lead to loose power connections Loose power connec tions can result in high voltages on exposed parts Touching the parts can lead to serious injury or death L...

Страница 54: ... all local codes and ordinances Cable routing considerations All circuits incoming AC power wiring DC wiring to dispensers and communications wiring should be ran in separate conduit runs until reaching the cable gland plates Requirements You have opened the cabinet You have inserted the power cable into the cabinet Connections of the power supply cable The figure below shows the connection of the...

Страница 55: ...steps 1 Remove the sheath of the power supply cable to a length of approximately 5 cm 2 Select a wire end ferrule for the appropriate conductor cross section 3 Strip the insulation from the end of the conductor so that the remaining insulation extends up to the ferrule 4 Properly attach the wire end ferrule to the conductor end 5 Insert the wire end ferrule into the terminal strip of the respectiv...

Страница 56: ...f the SICHARGE UC dispenser Requirements You have opened the cabinet You have removed the protective cover on the left You have inserted the DC cable into the cabinet Connections for the DC cable The following figure shows the connection of the DC cable a DC conductor s DC conductor d PE conductor f Loop through for daisy chain DC DC PE shown as dashed lines Figure 6 2 DC cable connection 56 ...

Страница 57: ...ble lug 4 Fasten the cable lug correctly to the end of the conductor 5 Insert a shrink on sleeve over the cable lug The shrink on sleeve must extend slightly beyond the insulation of the cable and cover the crimping point of the cable lug 6 Use a suitable tool to heat the shrink on sleeve 7 Plug the DC cable lug onto the DC busbar 8 Tighten the screw with the DC cable lug with a tightening torque ...

Страница 58: ...tion connect the Ethernet cable to the Ethernet switch of the SICHARGE UC dispenser Requirements You have opened the cabinet You have inserted the Ethernet cable into the cabinet Ethernet connection The following figure shows the connection of the Ethernet cable a Ethernet cable s Loop through for daisy chain dashed lines Figure 6 3 Ethernet connection 58 ...

Страница 59: ...nnector Cable routing considerations All circuits incoming AC power wiring DC wiring to dispensers and communications wiring should be ran in separate conduit runs until reaching the cable gland plates Fastening the cable Secure the Ethernet cable after the connection to the cable duct Connection of additional SICHARGE UC dispensers The Ethernet connection is looped through to connect additional S...

Страница 60: ...ue to condensed water Before commissioning the SICHARGE UC dispenser an authorized and qualified electrician must check whether there is moisture inside the SICHARGE UC dispenser Manually remove even small amounts of condensation before commissioning Take appropriate measures for drying Do not switch off the power supply for an extended period of time after commissioning This will prevent condensa...

Страница 61: ...arging station for the power supply cable of the SICHARGE UC dispenser Backup fuse Residual current operated circuit breaker Automatic startup The SICHARGE UC dispenser starts automatically Wait until the SICHARGE UC dispenser has started up completely When the display shows the Start menu the SICHARGE UC dispenser is ready for operation Figure 7 1 Start menu 61 ...

Страница 62: ...CE Accident risks Avoid accidents and injuries as well as damages to vehicles and the SICHARGE UC dispenser These include for example inattentiveness slipping and tripping risks as well as vandalism Provide additional protective measures for example Warning signs Safe location of the SICHARGE UC dispenser Barriers Training of drivers and operators Sufficient lighting WARNING Falling parts When wor...

Страница 63: ...socket of the vehicle Do not change the vehicle position during charging Always use the charging cable without an adapter or extension cable Do not bend or twist the charging cable Do not drop the charging cable After removing the charging plug place it immediately into the plug holder of the SICHARGE UC dispenser Always place the charging cable back on the cable holder of the SICHARGE UC dispense...

Страница 64: ...E Damage due to unsuitable objects If you touch the touch screen with unsuitable objects you are significantly reducing the service life of the display If there is severe damage the touch screen can also fail To avoid damaging the touch screen follow the instructions below Do not touch the touch screen with sharp or pointed objects Avoid shock or impact with hard objects Touch the touch screen onl...

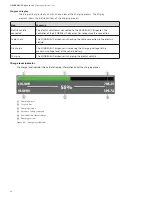
Страница 65: ...he vehicle s charging socket The electric vehicle automatically locks the plug in connection between the charging cable and the electric vehicle Automatic start of the charging process Once the plug in connection is locked the charging process starts automatically The Start menu is displayed on the SICHARGE UC dispenser touch screen Symbols in the status bar indicate the current vehicle status and...

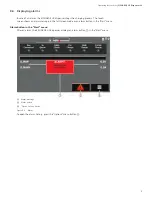
Страница 66: ... SICHARGE UC dispenser display automatically shows the Start menu Several display elements provide precise information about the progress of the charging process Start menu To monitor the charging process the Start menu offers you the following display elements a Vehicle status display s Stop charging process button progress indicator d Charge level indicator 66 ...

Страница 67: ...arging Connection status display The following symbols provide information about the connection status between the vehicle and the SICHARGE UC dispenser Symbol Vehicle status The vehicle is not ready for charging The vehicle is connected and ready for charging The vehicle is charging The battery is fully charged Symbol Connection status Th plug connection is unlocked The plug connection is locked ...

Страница 68: ... connection Cable check The SICHARGE UC dispenser is checking the cable connection to the electric vehicle Pre charge The SICHARGE UC dispenser is increasing the charging voltage to the maximum voltage level of the vehicle battery Charging The SICHARGE UC dispenser is charging the electric vehicle Charge level indicator The charge level indicator shows the following information about the charging ...

Страница 69: ...time by pressing the Stop charging button Stop charging button In the Start menu the SICHARGE UC dispenser displays the Stop charging button a Stop charging button Figure 8 3 Start menu Stop charging To stop the charging process press the Stop charging button The SICHARGE UC dispenser will stop the charging process 69 ...

Страница 70: ...llowing symbols in the status bar can you unplug the charging cable Unplugging the charging cable To unplug the charging cable from the electric vehicle proceed as follows 1 Unplug the charging plug from the vehicle s charging socket 2 Place the cable back on the cable holder 3 Plug the charging plug into the holder on the SICHARGE UC dispenser DANGER Explosion or electric shock If you force the c...

Страница 71: ...e touch screen shows an alarm message in the full screen mode or an alarm button in the Start menu Alarm button in the Start menu After an alarm the SICHARGE UC dispenser displays an alarm button a in the Start menu a Alarm message s Alarm button d Options menu button Figure 8 4 Alarm To open the alarm history press the Options menu button d 71 ...

Страница 72: ...SICHARGE UC Dispenser UL Operating Instructions To access the Alarms History menu In the Options menu press the Alarms History button Figure 8 5 Options menu 72 ...

Страница 73: ...Operating Instructions SICHARGE UC Dispenser UL Alarm History menu In the Alarm History menu the SICHARGE UC dispenser lists all recorded alarms Figure 8 6 Alarm History display 73 ...

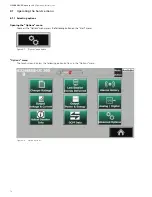
Страница 74: ... menu 8 7 1 Selecting options Opening the Options menu To access the Options menu press the following button on the Start menu Figure 8 7 Options menu button Options menu The touch screen displays the following option buttons in the Options menu Figure 8 8 Option buttons 74 ...

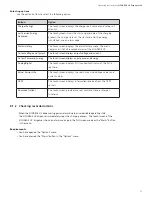
Страница 75: ...he unit Last Session Energy Delivered The touch screen shows the start and end date of the charging process the charge states at the start and end the energy transferred and an alarm code Alarms History The touch screen displays the alarm history menu The menu contains a list of all recorded alarms of the SICHARGE UC Output Voltage and Current The touch screen displays output voltage and current O...

Страница 76: ...the Alarm History menu Figure 8 9 List of recorded alarms For each recorded alarm the touch screen displays the time a and date s that the alarm was tripped as well as the alarm status The Alarm History also highlights the active alarm with a light blue coloring No Alarm status Meaning a I Active alarm s I O Inactive alarm 76 ...

Страница 77: ...vate the active alarm Note First eliminate the cause of the alarm Only trained personnel may operate the SICHARGE UC dispenser and reset alarms When you press the Acknowledge alarm button when deactivating an alarm the controller of the SICHARGE UC dispenser checks the cause of the alarm again As long as the cause of the alarm is still present the SICHARGE UC dispenser does not deactivate the alar...

Страница 78: ... Instructions Alarm History menu In the Alarm History menu the SICHARGE UC dispenser shows the currently active alarm against a light blue background a Active alarm s Warning Fault Acknowledgment button Figure 8 10 Alarm History menu 78 ...

Страница 79: ...ent button the cause of the alarm is still present Continue to observe the safety instructions in the general section Safety instructions Page 10 and the safety instructions for the operation Page 62 Then check again whether you can eliminate the cause of the alarm If you cannot eliminate the cause of the alarm contact technical support 8 7 4 Displaying information about the charging station In th...

Страница 80: ...SICHARGE UC Dispenser UL Operating Instructions Figure 8 11 Charger Session Info menu 80 ...

Страница 81: ...ions menu Value Meaning Input voltage A N AC voltage measured in line conductor A N Input voltage B N AC voltage measured in line conductor B N Input voltage C N AC voltage measured in line conductor C N Input current A AC current measured in line conductor A Input current B AC current measured in line conductor B Input current C AC current measured in line conductor C DC link voltage Voltage meas...

Страница 82: ...e SoC of the vehicle battery End Date Indicates the end date and time of charging Final SoC Displays the final state of charge SoC of the vehicle battery Energy Delivered Indicates the amount of energy transferred to the electric vehicle during charging Alarm Code The charging station displays the following alarm codes Value 0 The SICHARGE UC dispenser has completed the charging process without er...

Страница 83: ...ed the Options menu In the Options menu you have pressed the Graphics button EV Targets DC Outputs menu In the EV Targets DC Outputs menu the SICHARGE UC dispenser visually displays the setpoints and actual values of charging voltage and charging current a Diagram area s Display area for DC Output Power d Display area for DC Delivered Energy 83 ...

Страница 84: ... Dispenser UL Operating Instructions a Diagram area s Display for actual value and setpoint of charging voltage d Display for actual value and setpoint of charging current Figure 8 13 EV Targets DC Outputs menu 84 ...

Страница 85: ...d additional SICHARGE UC dispensers Requirements You have opened the Options menu You have pressed the Extended information button in the Options menu Select device a Parameter limits s Control PID d Exit Runtime In this screen you select the Options menu that you want to access Gesture Function Move your finger on the display to the left The diagram area shifts to the right on the time axis Move ...

Страница 86: ...ge state of charge Parameter Limits The Parameter Limits allows the user the option of changing limits on Output Power Output Voltage and Current and Alarm Output Current and Voltage Bulk and full chargeSoC limits are used with optional sequential charging when setting up a two step system These limits cannot be set above the charger physical maximum limits 86 ...

Страница 87: ... manual test charging procedure d Switch for DC converter manual f Switch for manual output contactor g Switch for engaging fast discharge of DC output h Setpoint for fast discharge in seconds defaults to 2 seconds j Countdown timer to selected fast discharge setting k Setpoint for voltage and current l Status lights for main contactor output and discharge resistor Home button Figure 8 16 Manual C...

Страница 88: ...arging station Full screen alarms Emergency Stop alarm message Page 88 Cabinet s Door Opened alarm message Page 90 Ground Fault Detection alarm message Page 91 Alarm messages in the Alarm history Page 92 Energy Meter alarm code menu Page 82 9 2 Emergency Stop alarm message To bring the SICHARGE UC dispenser into a safe state immediately in case of danger the SICHARGE UC charging station is equippe...

Страница 89: ... The charging process is stopped immediately The SICHARGE UC dispenser switches to the safe EMERGENCY OFF state In the EMERGENCY OFF state operation of the SICHARGE UC dispenser is no longer possible for safety reasons Cancel the EMERGENCY OFF state Note Eliminate the hazardous situation First eliminate the hazardous situation Only then cancel the EMERGENCY OFF state To cancel the EMERGENCY OFF st...

Страница 90: ... Opened Alarm status When you open a cabinet door the SICHARGE UC dispenser automatically switches off the power supply of the charging cable The safety shutdown also ends any charging in progress The SICHARGE UC dispenser switches into a safe state When a cabinet door is open operation of the SICHARGE UC dispenser is not possible Ending the alarm state When you close the cabinet door the SICHARGE...

Страница 91: ...in full screen mode Figure 9 3 Alarm message Ground Fault Detection alarm status When the insulation monitoring triggers the Ground Fault Detection alarm the SICHARGE UC dispenser switches off the power supply of the charging cable for safety reasons The safety shutdown also takes place during an ongoing charging process The SICHARGE UC dispenser switches into a safe state During the alarm state t...

Страница 92: ...ng In the Alarm History menu the charging station lists the following alarm messages Alarm Code Description Error Handling 0 No Error 1 The EMERGENCY OFF button has been pressed Check the EMERGENCY STOP button Eliminate the hazardous situation Reset the EMERGENCY OFF button Switch off the alarm 2 The cabinet door is open Close the cabinet door completely Switch off the alarm 3 DC ground fault Ther...

Страница 93: ...ed by various specific events Repeat the charging process Check whether the fault persists 10 High output current The high output current can be caused by various specific events Repeat the charging process Check whether the fault persists 11 CAN communication interrupted SECC Termination of CAN communication can be caused by various specific events Repeat the charging process Check whether the fa...

Страница 94: ... its position Bring the vehicle to a standstill 20 Vehicle error Failure of the charging plug interlock The vehicle has not recognized the charging plug inserted into the charging socket or the charging plug cannot be disconnected 21 Vehicle error Battery malfunction Any unrecoverable fault or unrecoverable fault state of the vehicle battery 22 Vehicle error Charging current difference The vehicle...

Страница 95: ...ous electrical voltage for up to 10 minutes during discharging Touching the live parts can lead to death or serious injury Wait 10 minutes after switching off the power supply Make sure that the SICHARGE UC dispenser does not carry any live voltage Only then start working on the SICHARGE UC dispenser WARNING Fall arrester Use approved protective equipment to protect persons components and tools ag...

Страница 96: ... shoes Helmet Safety vest Gloves Protective goggles NOTICE Risk of crushing cutting During maintenance and service pay attention to moving parts and protruding cables and bolts NOTICE Damage to property due to foreign objects inside the station During maintenance work foreign objects such as dirt tools or loose components can be left behind in the SICHARGE UC dispenser This can result in a short c...

Страница 97: ...Visual inspection to ensure proper condition Check the exterior of the cabinet for visible damage Check the touch screen for visible damagea Check the position of the charging plug in the plug holder Check the ventilation openingss Check the charging plug for the presence of moisture dust or corrosion Check the charging plug and the charging cable for damage and wear Firm seat of the strain relief...

Страница 98: ...intervals as required by the ambient conditions of the SICHARGE UC dispenser Visual check of the outside Check the following 1 Visible damages of the cabinet exterior 2 Correct position of the charging plug 3 Correct position of the charging plug holder 4 Ventilation openings 5 The charging plug for signs of wear humidity dust or corrosion 6 The charging cable for damage and wear 7 Check the displ...

Страница 99: ...dust and corrosion 2 Check for correct function Relay Lights Other display elements Mechanical check of the inside 1 Check the tightness of the connections L1 N PE 2 Check the tightening torque of 45 Nm of the connections DC DC PE and apply sealing paint 3 Check the fixing points of the base plate WARNING Qualified electrician Only a qualified and trained electrician may work on the SICHARGE UC di...

Страница 100: ...ple of a mild detergent would be dish washing liquid Use only soft cleaning cloths Note Observe information on chemical resistance To ensure a long service life observe the following information regarding the chemical resistance of SIMATIC HMI devices WARNING Electric shock due to water ingress Water entering the SICHARGE UC dispenser can damage the SICHARGE UC dispenser If the unit is damaged dan...

Страница 101: ...d detergent would be dish washing liquid Deionized water is particularly suitable for cleaning the unit WARNING Electric shock due to water ingress Water entering the SICHARGE UC dispenser can damage the SICHARGE UC dispenser If the unit is damaged dangerous voltages may be present on the cabinet or exposed components which can cause serious injury or death if touched Always keep the cabinet doors...

Страница 102: ...gn objects from entering To guarantee air conditioning of the SICHARGE UC dispenser and the charging cable cooling within the permissible temperature range remove any dirt and foreign objects from the ventilation openings WARNING Electric shock due to water ingress Water entering the SICHARGE UC dispenser can damage the SICHARGE UC dispenser If the unit is damaged dangerous voltages may be present...

Страница 103: ...ng liquid Deionized water is particularly suitable for cleaning the unit Cleaning the ventilation grille Vacuum dirt and foreign bodies at the ventilation grilles Wipe down the ventilation grilles of the SICHARGE UC dispenser with a damp cloth Then rub the ventilation grilles of the SICHARGE UC dispenser dry Do not scrape off stubborn dirt using hard objects Do not use any sharp edged tools 103 ...

Страница 104: ... the local regulations 11 2 Disposing of the charging station For environmentally friendly recycling and disposal of the device contact a certified electronic waste disposal company Dispose of the device and specific material such as capacitors in accordance with the applicable regulations in your country The device should be rendered inoperable before disposal Recycling considerations SICHARGE UC...

Страница 105: ...mer Support Center Phone 1 800 333 7421 Email recharge us siemens com Have the following information at hand when you call The type of the dispenser Article number Serial number You can find this information on the nameplate of the charging station The eMobility Team usa siemens com sichargeuc will also answer questions on products and services SECTION 12 Service and Support 105 ...

Страница 106: ...iant 276 W Ambient conditions Ambient temperature 25 C to 45 C 13 F to 113 F Humidity 5 95 no condensation Maximum operating altitude ft m 6 561 68 ft 2 000 m above sea level Mechanical specifications Operating environment Interior and exterior Cabinet protection without HMI NEMA 3R Cabinet protection with HMI NEMA 3R Cabinet material Steel powder coated Color Cabinet RAL 9010 Cream White Accents ...

Страница 107: ...mm 0 35 0 67 in 9 17 mm Ethernet cable diameter in mm 0 27 0 31 in 7 8 mm General specifications Charge control system Siemens controller Local user interface Siemens SIPLUS HMI TP700 User login via HMI Network connection Ethernet interface Communication protocol OCPP 1 6 J SON Maximum cable length between the charging station and the dispenser ft in 320 ft 100 m RJ45 w Cat5 or higher 640 ft 200 m...

Страница 108: ...pending on the charging voltage Figure 13 1 Charging current UC 150 charging station Type Charging station Dispenser Outer cable diameter in mm Description DC F11 F15 0 63 1 10 in 16 28 mm DC single conductor DC F12 F16 0 63 1 10 in 16 28 mm DC single conductor PE PE PE 0 51 0 82 in 13 21 mm PE single conductor L CB21 2 X23 TB1_1 0 35 0 67 in 9 17 mm AC cable N CB21 4 X24 TB1_1 0 35 0 67 in 9 17 m...

Страница 109: ...Operating Instructions SICHARGE UC Dispenser UL Power curve The following figure shows the power curve depending on the charging voltage Figure 13 2 UC 150 charging station power curve 9 109 ...

Страница 110: ...es UL2202 Standard for Electric Vehicle EV Charging System Equipment UL2231 Personnel Protection Systems for Electric Vehicle EV Supply Circuits Particular Requirements for Protection Devices for Use in Charging System Safekeeping location of the Declaration of Conformity SIEMENS AG keeps the EU Declaration of Conformity of the charging station available for the responsible authorities at the foll...

Страница 111: ...ese instructions APPENDIX A List of abbreviations Abbreviation Term AC Alternating Current CAN Controller Area Network CCS Combined Charging System DC Direct Current OCPP Open Charge Point Protocol HMI Human Machine Interface IGBT Insulated Gate Bipolar Transistor SOC State of Charge SW Width across flats 111 ...

Страница 112: ... 49 50 Storage 43 Transporting 44 Unpacking 32 Cleaning Cabinet 101 Charging cable 102 Touch screen 100 Commissioning 60 Connecting DC cable 56 Ethernet cable 58 Power supply cable 54 D Declaration of Conformity 110 Display 23 Disposing Packaging material 104 E Emergency stop Alarm message 88 Error handling 92 F Fall arrester 11 I Incoming inspection of the devices 30 Industrial Security 16 Instal...

Страница 113: ...ing cable 64 Power curve 109 Preparing the base area 39 41 Product overview 18 Q Qualified personnel 11 S Safety instructions 10 Connecting 52 Installation 47 Maintenance and service 95 Operation 62 Safety rules for electrical work 14 Safety sign 14 Selecting options 75 T Touch screen Cleaning 100 U Unpacking Charging station 32 113 ...

Страница 114: ...E T40014 00 4AUS This document contains a general description of available technical options only and its effectiveness will be subject to specific variables including field conditions and project parameters Siemens does not make representations warranties or assurances as to the accuracy or completeness of the content contained herein Siemens reserves the right to modify the technology and produc...

Отзывы: