OutdoorAP_Description.fm
Mounting the HiPath Wireless Outdoor APs
Mounting without an adapter (wall mounting only)
9034532, October 2009
HiPath Wireless Outdoor AP Installation Guide
17
To mount the HiPath Wireless Outdoor AP without an adapter (wall
mounting only):
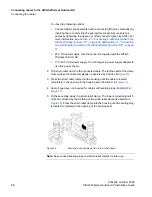
1. Lead the cables into the housing of the HiPath Wireless Outdoor AP (Position
A in
Figure 8
).
Figure 8
HiPath Wireless Outdoor AP wall mounting
2. Secure the HiPath Wireless Outdoor AP to the wall with three screws
(Position B
Figure 8
). The screws are not supplied with the device. The type
and length of the screws depend on the type of wall.
3.4.1.1 Option: Threaded holes on rear of housing
When a wall is extremely thin, it is often not possible to use wall plugs for the
screws. To allow wall mounting in this situation, four M4 threaded holes are
provided on the rear of the HiPath Wireless Outdoor AP. The drilling template is
a square with sides 100 mm long. The device can therefore be mounted on a wall
with bolts through the wall.


