background image

en

    Operating the appliance

12

Starting or interrupting operation

To start operation or to interrupt an operation which has 

started running, press the Start/Stop button. The 

cooling fan may continue to run after an operation is 

interrupted.
Press the On/Off button to delete all settings.
If you open the cooking compartment door during 

operation, operation is interrupted. Close the cooking 

compartment door to continue operation.

Filling the water tank

When you open the appliance door, you will see the 

water tank on the right-hand side. Before starting the 

operation, fill the water tank with water.
Ensure that you have correctly set the water hardness 

range. 

~

 "Basic settings" on page 17

Caution!

The appliance may become damaged due to the use of 

unsuitable liquids. 

Do not use distilled water, highly chlorinated tap water 

(> 40 mg/l) or other liquids.

Only use cold, fresh tap water, softened water or 

uncarbonated mineral water.

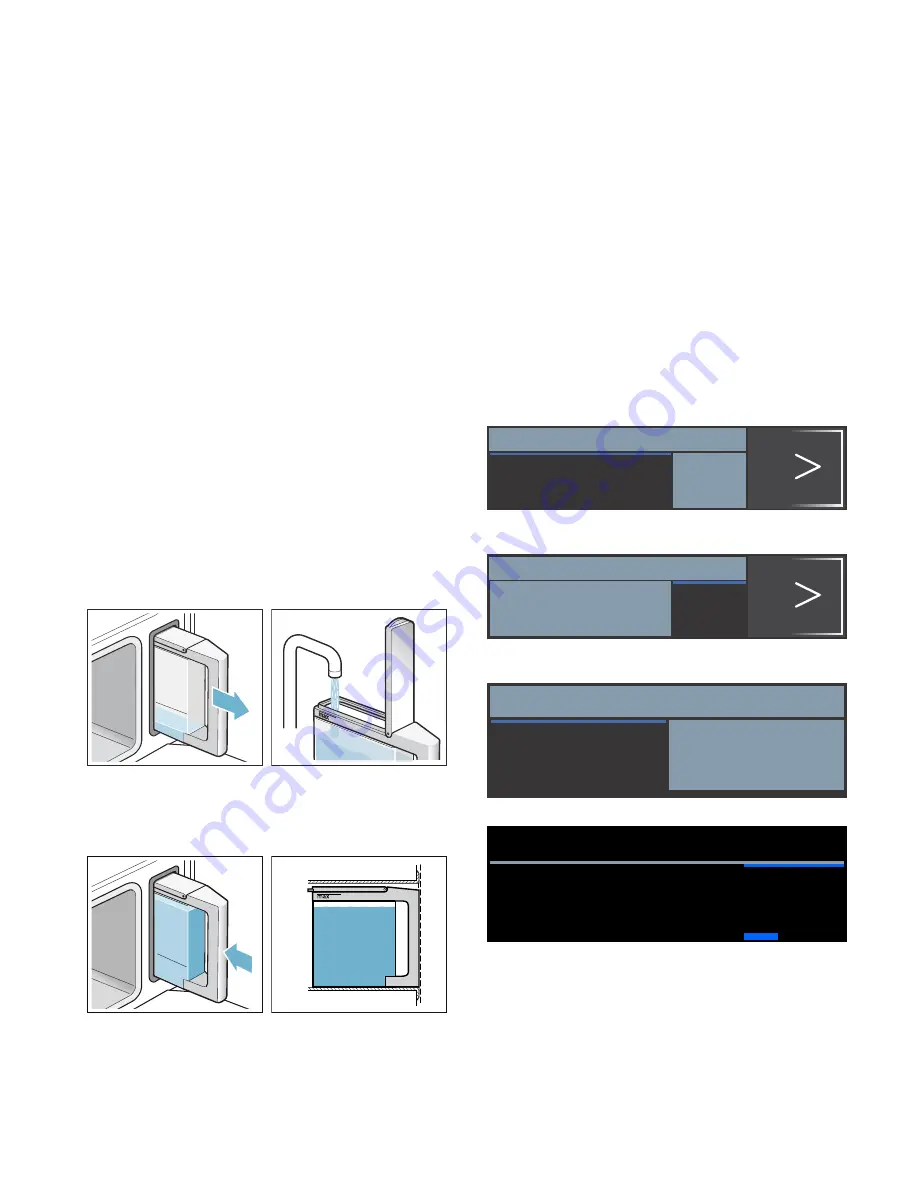
Fill the water tank before each use:

1.

Open the appliance door.

2.

Remove the water tank from the water tank recess 

(picture 

!

).

3.

Fill the water tank with cold water up to the "max." 

mark. (Picture 

"

).

4.

Close the tank cover 

until you feel it engage.

5.

Insert the filled water tank (picture 

#

).

6.

Check whether the water tank is pushed in flush with 

the water tank recess (picture 

$

).

7.

Close the appliance 

door.

The water tank has been filled. You can now start the 

operation.

Refilling the water tank

If the water tank is empty, the prompt to fill the water 

tank appears on the display. The operation is stopped.

1.

Carefully open the appliance door.

2.

Remove the water tank and fill it.

3.

Slide the water tank back in and close the appliance 

door.

4.

Start the operation.

The operation continues.

Setting the heating type and temperature

After the appliance is switched on, the suggested 

heating type appears with the temperature. You can 

start this setting immediately with the Start/Stop button.
For other settings, you can change the values as shown 

in the pictures.
Example: 15 minutes steaming at 90 °C

1.

Use the rotary selector to change the heating type.

2.

Press the arrow 

¿

 to switch to the temperature.

3.

Use the rotary selector to change the temperature.

4.

Switch to the cooking time using the 

0

 button.

5.

Use the rotary selector to change the cooking time.

6.

Press the Start/Stop button.

The set heating type, temperature and cooking time are 

shown in the display.

2

1

ƒ&

p

6WHDPLQJ

PLQV

ƒ&

p

6WHDPLQJ

PLQV

PLQ

V

7LPHU

PLQ

V

&RRNLQJWLPH

ƒ&

PLQV

p

6WHDPLQJ

Содержание CD634GB.1

Страница 1: ...5HJLVWHU RXU SURGXFW RQOLQH VLHPHQV KRPH FRP ZHOFRPH en Instruction manual Steam oven CD634GB 1 ...

Страница 2: ......

Страница 3: ...and setting food 15 Instructions for the dishes 15 Table 16 A Childproof lock 16 Activating and deactivating 16 Q Basic settings 17 Changing settings 17 List of settings 17 Changing the time 17 D Cleaning 18 cleaning agents 18 Descale 19 Removing and fitting the appliance door 20 Removing and installing the door panels 20 Cleaning the rails 21 3 Trouble shooting 22 Fault table 22 Replacing the coo...

Страница 4: ...ation Importantsafetyinformation Warning Risk of burns The appliance becomes very hot Never touch the interior surfaces of the cooking compartment or the heating elements Always allow the appliance to cool down Keep children at a safe distance Risk of serious burns Accessories and ovenware become very hot Always use oven gloves to remove accessories or ovenware from the cooking compartment Risk of...

Страница 5: ...anel Ovenware Ovenware must be heat and steam resistant Ovenware with areas of rust Do not use any ovenware which displays areas of rust Even the smallest spots of rust can lead to corrosion in the cooking compartment Dripping liquids When steaming with a perforated cooking container always insert the baking tray the universal pan or the solid cooking container underneath Dripping liquid is caught...

Страница 6: ...in the tables in the operating instructions Use dark black lacquered or enamelled baking tins They absorb heat particularly well Open the appliance door as infrequently as possible during operation It is best to bake several cakes one after the other The cooking compartment is still warm This reduces the baking time for the second cake You can place two cake tins next to each other in the cooking ...

Страница 7: ...isplay The display is structured so that the information can be read at a glance The value that you can currently set is in focus It is displayed in white lettering with a dark background Status bar The status bar is at the top of the display The time and set time functions are displayed here RQ RII PHQX VWDUW VWRS 6WHDPLQJ p Buttons The buttons to the left and right of the rotary selector have a ...

Страница 8: ...es on as soon as the operation is started When the operation has finished the lighting switches off Note You can set the interior lighting not to come on during the operation in the basic settings Cooling fan The cooling fan switches on and off as required The hot air escapes above the door Caution Do not cover the ventilation slots Otherwise the oven will overheat So that the cooking compartment ...

Страница 9: ...g compartment correctly for the tilt protection to work properly When inserting the wire rack ensure that the lug ƒ is facing downwards and the safety lug on the wire rack is at the rear and is facing upwards When inserting steam containers ensure that the lug is facing downwards Optional accessories You can buy optional accessories from the after sales service from specialist retailers or online ...

Страница 10: ...rs Setting the time 1 Use the rotary selector to set the current time 2 Touch the arrow Setting the date 1 Use the rotary selector to set the current day month and year 2 Touch the field The next setting appears Setting the water hardness 1 Turn the rotary selector to the right until your water hardness range appears 2 Touch the arrow to confirm A note appears in the display confirming that the in...

Страница 11: ... not stand too close to the appliance Open the appliance door carefully Keep children away Warning Risk of scalding The water in the evaporator dish is still hot even after the appliance has been switched off Do not empty the evaporator dish immediately after switching off the appliance Allow the appliance to cool down before cleaning it Switching the appliance on and off Before you are able to se...

Страница 12: ...tank cover until you feel it engage 5 Insert the filled water tank picture 6 Check whether the water tank is pushed in flush with the water tank recess picture 7 Close the appliance door The water tank has been filled You can now start the operation Refilling the water tank If the water tank is empty the prompt to fill the water tank appears on the display The operation is stopped 1 Carefully open...

Страница 13: ... time of up to one hour can be set exactly to the minute A cooking time over one hour can be set in five minute increments The maximum setting you can make is 23 hours and 59 minutes After a time setting option has elapsed a signal sounds Using the l button you can request information during operation which then appears briefly in the display Timer You can set the timer at any time even if the app...

Страница 14: ...se remember that easily spoiled foods must not be allowed to remain in the cooking compartment for too long Prerequisite The selected operation has not already begun A cooking time has been set The time setting options menu 0 is open Example in the picture You put the dish in the cooking compartment at 9 30 It takes 45 minutes to cook and will be ready at 10 15 but you would like it to be ready at...

Страница 15: ...okware When cooking in the perforated steam container also insert the solid steam container at level 1 Dripping liquid is caught Amount weight Do not fill the food more than 4 cm deep in the accessory The total weight must be within the specified weight range Cooking time The displayed temperature may change during the first few minutes as the heating up time depends on the temperature of the food...

Страница 16: ...ces approx 3 mm thick perforated solid steam container 3 1 Steam frozen mixed vegetables perforated solid steam container 3 1 Unpeeled boiled potatoes medium sized dia 4 5 cm perforated solid steam container 3 1 Basmati rice max 0 75 kg solid steam container 2 Brown rice max 0 75 kg solid steam container 2 Couscous max 0 75 kg solid steam container 2 Lentils max 0 55 kg solid steam container 2 Reh...

Страница 17: ...he time in the basic settings For example Changing from summer to winter time 1 Press the On Off button 2 Press the Menu button 3 Use the rotary selector to select Settings 4 Touch the arrow to move to Time of day 5 Use the rotary selector to change the time 6 Press the Menu button Save or Discard appears in the display Power cut Following a long power cut the settings for initial use are shown in...

Страница 18: ... wash Microfibre cloth The honeycomb microfibre cloth is particularly suitable for cleaning sensitive surfaces such as glass glass ceramic stainless steel or aluminium product no 460 770 also available from our online eShop It removes liquid and greasy deposits in one go Appliance exterior with aluminium front Use soapy water and dry with a soft cloth Mild window cleaning agent wipe over the alumi...

Страница 19: ... ml liquid descaler to make a descaling solution 2 Remove the water tank and fill it with descaling solution 3 Once the water tank has been filled with descaling solution push it back in again fully 4 Close the appliance door 5 Press the On Off button 6 Press the menu button 7 Turn the rotary selector until Descale appears 8 Press the Start Stop button to start descaling You can see the remaining ...

Страница 20: ...wo locking levers on the left and right figure 3 Close the appliance door as far as it goes With both hands grip the door on the left and right hand side and pull it up and out figure Fitting the appliance door Reattach the appliance door in the opposite sequence to removal 1 When attaching the appliance door ensure that both hinges are inserted straight into the opening figure Place both hinges a...

Страница 21: ...th screws back in on the left and right 6 Put the cover back in place and press on it until it clicks audibly into place figure 7 Close the appliance door Caution Do not use the cooking compartment again until the panels have been correctly fitted Cleaning the rails The rails can be removed for cleaning Warning Risk of burning due to hot components in the cooking compartment Wait until the cooking...

Страница 22: ...ent and fill the water tank The power supply has been disconnected or the appli ance has been switched off during the descaling pro cess Once the appliance is switched on again rinse it twice After switching on an operating mode a message is shown on the display which indicates that the temperature is too high The appliance has not cooled down sufficiently Allow the appliance to cool down and swit...

Страница 23: ...ged they must be replaced A new glass cover can be obtained from the after sales service Please specify the E number and FD number of your appliance Changing the door seal If the seal around the outside of the cooking compartment is faulty it must be replaced Replacement seals for your appliance can be obtained from the after sales service Please specify the E number and FD number of your applianc...

Страница 24: ...r your steam oven You can find out which heating type accessories temperature and cooking time are best to select Unless otherwise stated the information given applies to inserting accessories when the appliance is cold Accessories Use the accessories provided When steaming in the perforated steam container always insert the solid steam container underneath Dripping liquid is caught Ovenware When ...

Страница 25: ...sliced perforated solid Steaming 100 20 25 Leek sliced perforated solid Steaming 100 6 9 Sweetcorn whole perforated solid Steaming 100 25 35 Swiss chard shredded perforated solid Steaming 100 8 10 Green asparagus whole perforated solid Steaming 100 7 12 White asparagus whole perforated solid Steaming 100 10 15 Spinach perforated solid Steaming 100 2 3 Romanesco florets perforated solid Steaming 10...

Страница 26: ...d wrap in foil Food Amount Accessories Level Type of heat ing Tempera ture in C Cooking time in min Fillet of pork 0 5 kg solid 2 Steaming 100 16 20 Pork medallions approx 3 cm thick solid 2 Steaming 100 10 12 Smoked pork ribs sliced solid 2 Steaming 100 15 20 Sear first and wrap in foil Food Accessories Level Type of heat ing Tempera ture in C Cooking time in min Wiener sausages perforated solid ...

Страница 27: ... 100 10 15 Ocean perch fillet 0 15 kg each perforated solid 3 1 Steam 80 90 10 20 Sole rolls stuffed perforated solid 3 1 Steam 80 90 10 20 Food Amount Accessories Height Heating type Tempera ture in C Cooking time in min Food Accessories Height Heating type Tempera ture in C Cooking time in min Royale egg custard solid 2 Steam 90 15 20 Semolina dumplings perforated solid 3 1 Steam 90 95 7 10 Hard...

Страница 28: ...ck Prove dough When the Prove dough type of heating is used dough proves considerably more quickly than at room temperature You may select any shelf position you wish for the wire rack or place the wire rack carefully on the cooking compartment floor Caution Do not scratch the cooking compartment floor Place the dough bowl on the wire rack Do not cover the dough Extracting juice Before juicing pla...

Страница 29: ... products Observe the manufacturer s instructions on the packaging The cooking times indicated apply to dishes placed in a cold cooking compartment Food Accessories Height Heating type Tempera ture in C Cooking time in min Vegetables 1 litre preserving jars 2 Steam 100 30 120 Stone fruits 1 litre preserving jars 2 Steam 100 25 30 Pip fruits 1 litre preserving jars 2 Steam 100 25 30 Food Accessorie...

Страница 30: ...iances Test dishes in accordance with EN 60350 1 Food Accessories Level Type of heat ing Tempera ture in C Cooking time in min Broccoli Steam distribution perforated solid 3 1 Steaming 100 7 9 Broccoli Steam supply perforated solid 3 1 Steaming 100 7 9 Peas Maximum load perforated solid 3 1 Steaming 100 5 12 Spread out 2 0 kg peas evenly in the container ...

Страница 31: ...6 ...

Страница 32: ...0DQXIDFWXUHG E 6 DXVJHUlWH PE XQGHU 7UDGHPDUN LFHQVH RI 6LHPHQV 6 DXVJHUlWH PE DUO HU 6WU VLHPHQV KRPH FRP 0 QFKHQ 50 1 9001001146 9001001146 960707 ...

Отзывы: