15
4526
8
2020
-
SE IP 50
MC_0001
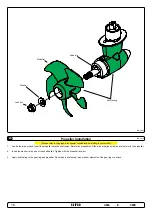
Gear Leg & Motor Bracket Installation
!
Please refer to the graphic for special considerations relating to your model
!
EN
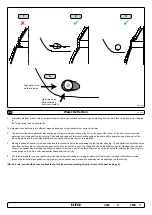
1. Mark the tunnel centreline and the boat’s centreline.
(NB: Install the gear leg and propeller as shown above for the thrust direction to
correspond with the control panel. Position gear leg with the P-mark facing port and the S-mark facing starboard.)
2. Use the gasket or template (recommended) to mark the hole centres and double-check the measurements. The centre hole MUST be placed using
the boat centreline as shown above.
(NB: All holes must be in-line with the tunnels’ centreline for correct installation, clearance between
the propeller and the tunnel is minimal.)
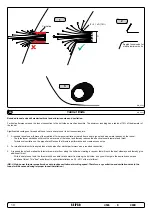
3. Smooth the surface of the tunnel. A rough surface will cause possible failure/movement of the gear leg. The motor bracket must rest steadily on the
tunnel.
4. Drill the main centre hole followed by the two screw-holes.
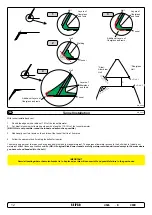
5. Place the gear leg (without the propeller) with the gasket on inside the tunnel. Place the propeller on the gear leg to ensure it is centred and rotates
freely with the same clearance from each blade to the tunnel wall. Place top motor bracket to measure the drive shaft has come through the motor
bracket at the correct height. Remove the gear leg and propeller for fi nal installation.
6. Apply appropriate sealant to both sides of the gasket and place on the gear leg. Place the gear leg in the tunnel (without the propeller).
7. Install the top motor bracket and gear leg gently together. Use appropriate sealant to ensure that no leakages occur.
(NB: See your sealant data
sheet for the correct application process.)
8. Fasten the gear leg and the motor bracket with the bolts provided. Fasten to torque as shown above.
MG_0027
Tunnel
centre line
Boats
centre line
Bow
Stern
1
STARBOARD
BOW
Tunnel
centre line
Boats
centre line
B
ØC
ØA
Measurement
Description
mm
inch
ØA
30
1.18
B
23 0.91
ØC
9
0.35
SE
*P*IP
50
SE
*P*IP
60
BOW
BOW
Place top motor
bracket and bolt plate
Measure the drive
shaft has come
through the motor
bracket at the correct
height with the
template supplied.
Gasket
Ensure propeller
turns without
obstruction
Motor bracket
Bolt plate
5
BOW
BOW
Apply MS Polymer
sealant or equal to
both sides of the
gasket
Motor bracket
IMPORTANT
Do not apply sealant
to the holes.
6 - 7
2 - 4
8
Fasten bolts
18Nm (13.28 lb/ft)
*P- Propositional
*IP- Ignition Protected
MC_0031
Bow Installation Considerations and Precautions
EN
• The thruster must NOT be installed in compartments that require ignition proof electric equipment. If necessary, make a separate compartment.
(NB: Ignition Protected systems are tested to be installed in areas with possible explosive gases in accordance with ISO 8846)
• The electro motor will generate some carbon dust so any storage compartments must be separated from the thruster to prevent nearby items
becoming dusty/ dirty.
(NB: IP version motors generate dust but are enclosed.)
• When installing the thruster electro motor in small compartments, ensure the compartment is well ventilated to allow for cooling of the electro motor.
• If the height of the room you are installing the thruster is limited, the thruster can be installed horizontally or at any angle in-between.
- If the electro motor is positioned more than 30 degrees off vertical, it must be supported separately.
- Beware of keeping installation within advised measurements. No part of the propeller or gear house must be outside the tunnel.
• Do not install the thruster in a position where you need to cut a stiff ener/ stringer/ support that may jeopardise the hull integrity without checking with
the boat builder this can be done safely.
• The electro motor, components and cables must be mounted so they remain dry at all times.
• We advise painting the gear house and propellers with anti-fouling.
(NB: Do not paint the anodes, sealing, rubber fi ttings or propeller shafts)
• Do not fi nish the inside of the tunnel with a layer of gel-coat/ topcoat or similar. There is only room for a thin coat of primer and two layers of anti-
fouling between the tunnel and the props.
• Don’t install the electro motor close to easily fl ammable objects or equipment as it will reach over 100°C before the temperature switch is activated.
• Do not store items close to the thruster motor. Any loose items near the thruster motor is a potential fi re hazard and can cause undesired short-
circuiting.
It is the installers responsibility
When installing Side-Power equipment to follow the outlined regulations/ classifi cation rules (electrical/ mechanical) according to
international or special national regulations. Instructions in this guide cannot be guaranteed to comply with global electric/ mechanic
regulations/ classifi cation rules.
To follow all health and safety laws in accordance with their local outlined regulations/ classifi cation rules.
Before installation, it is important that the installer reads this guide to ensure necessary acquaintance with this product.
The recommendations made in this manual are guidelines ONLY, and Sleipner Motor AS (Side-Power) strongly recommend that
before installation, advice is obtained from a naval architect familiar with the particular vessel and regulations/ classifi cations.
This manual is intended to support educated/ experienced staff and is therefore not suffi cient in all details for professional
installation.
(NB: These instructions are only general instruction. If you are not skilled to do this work, please contact professional
installers for assistance.)
All electrical work must be done by a licensed professional.
Faulty installation of Sleipner products will render all warranty given by Sleipner Motor AS void.
MC_0038
MC_0257
Thruster Installation Considerations and Precautions
EN
Before installation, it is important that the installer reads this guide to ensure necessary acquaintance with this product.
• The electro motor must be handled with care. Do not lift it by internal cable connections, main terminals or placed down on the drive shaft.
• The thruster power supply circuit must include the recommended sized fuse and a battery isolation switch.
• Never run the thruster out of water.
• It is important to follow the guidelines in this manual. Failure can result in severe damage to the thruster.
MC_0267
NEVER
Disassemble any part of the Ignition Protected stern thruster assembly. Tampering with the Ignition Protected stern thruster assembly or any attempt
to disassemble anything on this thruster assembly inside the boat can cause an explosion with severe consequences. If there is a problem with your
Ignition Protected stern thruster, please contact your dealer.
Содержание SE IP-140
Страница 26: ...26 4526 8 2020 SE IP 50 MC_0037 Notes EN ...
Страница 27: ...27 4526 8 2020 SE IP 50 MC_0037 Notes EN ...

