background image

117

User Manual

Analytical Index

A

A-Scope ................................................... 41

Activating Track Recording ......................... 27

Active Route ............................................. 24

Advanced Menu ........................................ 46

AIS ......................................................... 49

AIS Menu ................................................. 51

AIS Target ............................................... 51

Alarm ...................................................... 37

alphanumeric key ..................................... 13

ALT ......................................................... 69

Alternate Solution ............................... 45, 69

Altitude ................................................... 69

Anchor Alarm ........................................... 36

Antenna ................................................. 115

Apparent Wind Direction ............................ 69

Apparent Wind Speed ................................ 69

Arrival Alarm ............................................ 35

Arrival Time ............................................. 69

ASF ................................................... 45, 69

assistance ................................................ 12

Attention Areas ......................................... 43

Audible Alarm ........................................... 36

Auto Info ................................................. 45

Auto Off ................................................... 35

Auto(matic) Info ................................. 21, 29

Autopilot ........................... 91, 103, 108, 112

Autopilot Connection ..... 47, 91, 103, 108, 112

Autopilot Interface .......... 75, 81, 87, 93, 99,

100, 105, 109

AWD ....................................................... 69

AWS ........................................................ 69

Azimuth ................................................... 69

B

backlight ....................................... 13, 15, 67

Beacon .................................................... 69

Bearing ......................................... 49, 52, 69

bearing angles .......................................... 49

Boat Position ............................................ 19

Bottom Echo Profile ................................... 42

BRG .................................................. 46, 69

Buoy ....................................................... 69

Buoys ID ................................................. 43

BWC ........................................................ 45

C

C-CARD ........................................ 16, 67, 82

C-CARD Connector .................................... 67

C-CARD Test ............................................ 67

C-COM ............. 47, 79, 85, 92, 104, 108, 114

C-COM GSM Plus Connection ........ 47, 79, 85,

92, 104, 108, 114

C-Link ............................................... 48, 59

C-Staff .............................................. 49, 51

C-Weather Service .............................. 51, 53

Calibrate Compass .............................. 49, 51

Calibration ............................................... 51

Cartography 15, 75, 81, 88, 93, 100, 106, 109

Caution Notice .......................................... 15

CDI scale ................................................. 46

Chain ................................................ 45, 69

Chart Boundaries ...................................... 44

Chart Lock ............................................... 44

chart scale ............................................... 19

Clearing All Tracks .................................... 28

COG .................................................. 46, 69

Compass Calibration .................................. 49

Compute Correction ................................... 49

contrast ........................................ 13, 15, 67

Conventions ............................................. 11

Coordinates .............................................. 35

Correction Offset ....................................... 49

Course Line ........................................ 45, 70

Course Over Ground .................................. 69

Course To Steer ........................................ 70

CPA ......................................................... 50

Creating a Route ....................................... 24

Creating Event .......................................... 23

Creating Mark ........................................... 23

Creating Waypoint .................................... 23

Cross Track Error ...................................... 74

CTS ................................................... 46, 70

Currents Prediction .................................... 42

cursor ...................................................... 13

Cursor Window ......................................... 45

Customize Text Area ........................... 28, 45

D

Data Window Mode .............................. 45, 70

Datum ..................................................... 70

Deactivating Track Recording ...................... 27

Dead Reckoning ........................................ 70

Dedicated Keys ......................................... 13

Default .................................................... 70

Deleting destination .................................. 26

Deleting File ............................................. 38

Deleting MOB ........................................... 21

Deleting R/B ............................................ 20

Deleting Route ......................................... 25

Deleting User Point ................................... 23

Depth ...................................................... 36

Depth Alarm ............................................. 36

Depth Areas ............................................. 70

Depth from Trasducer ................................ 70

Depth Line ............................................... 70

Depth Lines & Soundings ........................... 70

destination .............................. 20, 26, 35, 70

DGPS ...................................................... 70

Differential GPS ........................................ 70

Diffusers .................................................. 44

Display ................... 75, 81, 87, 93, 100, 106

Display Menu ........................................... 45

Display Mode ...................................... 16, 42

display resolution ...................................... 68

Display Settings ........................................ 68

Displaying Track ....................................... 27

Distance .................................................. 70

Distress Call ............................................. 53

DPT ................................................... 46, 70

DRF ........................................................ 46

DSC ........................................................ 53

DSC Directory ........................................... 55

DST ........................................................ 70

Dynamic Nav-Aids ..................................... 40

E

Editing R/B .............................................. 20

Содержание COLOR MAX 15

Страница 1: ...nput COLOR MAX SEALINK I 7 Sunlight Readable WVGA Color Display S4igSW8wc Internal GPS Receiver Video Input COLOR MAX 6 5 6 Sunlight Readable Color Display S3egSW7c External GPS Receiver COLOR MAX PRO...

Страница 2: ...able from your local dealer Exposure of the display to UV rays may shorten the life of the liquid crystals used in your plotter This limitation is due to the current technology of the LCD displays Avo...

Страница 3: ...MULATION MODE 16 1 8 CONTROLLING THE DISPLAY 16 Changing Display Mode 16 Moving around the Chart and Changing Chart Scale 19 Finding Your Boat Position 19 Selecting Screen Amplifier 19 Selecting Map O...

Страница 4: ...etting Automatic Info 29 Selecting Automatic Info 29 Displaying Expanded Info page Full Info 29 Info on objects with Pictures 29 Info Tree and Expanded Info page 30 Quick Info on Lakes 30 Full Info on...

Страница 5: ...pth Settings 44 Land Settings 44 Chart Settings 44 Underwater Objects Settings 44 3 4 DISPLAY MENU 45 3 5 VIDEO INPUT MENU 45 3 6 NAV DISPLAY MENU 46 3 7 ADVANCED MENU 46 3 7 1 Input Output Setup menu...

Страница 6: ...Display 63 Graphical Representation on Map Display 63 Route Data Report 63 5 2 QUICK INFO 64 Route Navigation Quick Info on the Destination 64 Quick info on Single Destination 64 6 GPS 65 6 1 How GPS...

Страница 7: ...87 INSERTING REMOVING PROCEDURE 88 CHART PLOTTER DIMENSIONS 89 INSTALLATION AND REMOVING 89 EXTERNAL WIRING 90 TYPICAL CONNECTIONS 91 GPS Connection 91 Autopilot Connection 91 External NMEA Connection...

Страница 8: ...08 External Alarm Connection 108 C COM GSM PLUS Connection 108 EXPLORER II Plus 109 FEATURES FUNCTIONS 109 TECHNICAL SPECIFICATIONS 109 INSERTING REMOVING PROCEDURE 110 Inserting the C CARD 110 Removi...

Страница 9: ...ence with the menu names enclosed between inverted commas for example MENU MAP ENTER means press the MENU key using the cursor key select the Map menu and then press ENTER Any menu operation and funct...

Страница 10: ...rt plotter COLOR MAX PRO Introduction to the basic information on COLOR MAX PRO chart plotter its features and use Installation of the chart plotter COLOR MAX 15 Introduction to the basic information...

Страница 11: ...tered on ship s position ENTER places Marks Waypoints destination and selects R B confirms selection MENU opens the Map menu if pressed twice selects the Functions menu when in chart and data page kee...

Страница 12: ...sible data pages assignable to the soft key pressed Move the cursor key up down to place the selector on the desired item move the cursor key to the right or press ENTER to set the se lected item move...

Страница 13: ...els ENTER Now you return to the chart screen with the new backlight and contrast levels retained 1 4 SELECTING THE LANGUAGE It is possible to select the language in which you wish information to be di...

Страница 14: ...MENU MENU ADVANCED ENTER SIMULATION MODE ENTER SIMULATION MODE ENTER ON ENTER You might insert the Speed Heading date and time values MENU MENU ADVANCED ENTER SIMULATION MODE ENTER SPEED HEADING DATE...

Страница 15: ...17 User Manual Fig 1 8 Example of Charts and Text Area shown on the screen Fig 1 8a Example of Depth Graph page Fig 1 8b Example of Depth Graph Full page...

Страница 16: ...18 User Manual Fig 1 8c Example of Navigation Data page Fig 1 8d Example of 3D Road page Fig 1 8e Example of GPS Status page...

Страница 17: ...LEAR The Home function locks the cursor to the ship and updates the display as the ship moves To release the cursor from the Home Mode use the cursor key to move the cursor away from the ship s curren...

Страница 18: ...asure the Lat Lon coordinates between two points on the Chart page Inserting R B ENTER R B ENTER A dotted line and a circle appears on the screen A window containing the distance and bearing values is...

Страница 19: ...21 User Manual Selecting Auto Info on MOB Place the cursor on MOB symbol An information window appears showing the bearing and distance to the MOB position Deleting MOB MOB CONFIRM...

Страница 20: ...22 User Manual...

Страница 21: ...hart page Place the cursor on the desired User Point EDIT use the cursor key to modify Name Symbol Lat Lon not for Event Color ACCEPT The User Point appears on the selected position with the new symbo...

Страница 22: ...f it belongs to the active Route 2 2 ROUTES A Route is made by placing a series of Waypoints or by linking existing Marks Among the available Routes only one can be the Active Route that is shown on t...

Страница 23: ...possible to select a different color for any Route Deleting Route If in Route menu MENU MENU ROUTE ENTER DELETE ENTER ACCEPT The Route legs and Waypoints are deleted The Marks linked to the Route are...

Страница 24: ...UNCTION This functions allows you to place the destination point and immediately start navigating to it Navigation to Waypoint Place the cursor on the desired Waypoint ENTER GOTO ENTER or simply Place...

Страница 25: ...en Track points is best suited to navigate within a close or complex environ ment a greater time distance interval is best suited to a long voyage To select the interval at which the Track points are...

Страница 26: ...new window appears on the screen with the following options Track To Route Executes the function that converts the given Track into a Route MENU MENU TRACK ENTER TRACK TO ROUTE ENTER TRACK TO ROUTE EN...

Страница 27: ...ts only on points e g Rocks Buoys Lights Tide Stations and On All on all objects points lines and areas NOTE Choosing On All the Automatic Info will be shown most of the times the cursor is moved Sele...

Страница 28: ...elected object is shown on the lower part of the page By pressing CLEAR the page is closed If the information shown on the Lower part of the page exceeds the page size you may scroll the page using PA...

Страница 29: ...nfo on Lakes Fig 2 6d Example of Full Info page To see the Fishing object press MENU when the Fishing object is high lighted On the screen appears Fig 2 6e Example of picture associated to the Fishing...

Страница 30: ...point press EXP ALL NOTE Port Info icon is visible only if the Ports Services option is On see Par 4 1 Getting Tide Info By placing the cursor over the Tide Station icon Fig 2 7a Tide Info icon the c...

Страница 31: ...ide height value represents the variation relative to the Mean Lower Water value 2 8 FIND FUNCTION The Find function allows searching for the nearest Port Port Services Tide Sta tions Wrecks Obstructi...

Страница 32: ...show the Nearest Wrecks loaded in the C CARD MENU FIND ENTER WRECKS ENTER Choose the Wrecks you prefer and press ENTER or FIND to locate the selected Wreck on the map Finding Nearest Obstructions To s...

Страница 33: ...oordinates MENU FIND ENTER COORDINATES ENTER use the cursor to insert coordinates CLEAR Finding User Points To search the User Point by name MENU FIND ENTER USER POINTS ENTER use the cursor to insert...

Страница 34: ...ROUNDING ALARM ENTER The chart plotter scans a sector in front of the boat The direction is determined by the current boat heading You can select the length and its angle is 30 degrees The Grounding A...

Страница 35: ...o zero 2 10 USER C CARD The chart plotter allows to back up Marks Routes and Tracks to a User C CARD You can also restore the data to internal memory at a later time This allows virtually unlimited st...

Страница 36: ...function copies the content of the selected file from User C CARD to the internal memory of the chart plotter If the selected file contains Marks Events already present in the chart plotter memory th...

Страница 37: ...s Signals Buoys Beacons display Keypad Beep Enables or disables the single audio beeps emitted any time the chart plotter keypad is pressed If the incorrect key is pressed or the function required can...

Страница 38: ...IDS ENTER This function allows settings blinking lights on Nav Aids The blinking period and color of each Nav aid is read from the Nav Aid attributes available on the data cartridge When the ship is i...

Страница 39: ...t shown Icon The Safety Status Bar is not shown but a Warning alarm Icon is shown in the bottom right corner of the display when an item controlled by the DSI Data Safety Indicator is under an alarm c...

Страница 40: ...en the chart plotter is exposed to the sunlight The maps are much brighter than in the other modes and the depth areas are filled with white color so different depth areas are not easily distinguishab...

Страница 41: ...ation of Lights Signals Buoys and Beacons If No Sector is selected Nav Aids are shown Light Sectors are hidden Attention Areas Sets On Off the displaying of Attention Areas areas in which special atte...

Страница 42: ...nd it can be distinguished from the official chart objects from the Quick Info A dedicated icon is shown on the Quick Info window to indicate that the object queried is a VAD The same icon is also sho...

Страница 43: ...ng any Geodetic Datum reference from the over 100 available on the chart plotter Map Datum selection switches to the selected reference datum applying the datum offsets stored with the charts Fix Datu...

Страница 44: ...viation Indicator Scale among 0 2 0 5 1 0 2 0 4 0 10 0 Nm Navigation Page A new window appears with six items Select the item you want to change and press ENTER another window appears select the field...

Страница 45: ...preferred setting among the NMEA available settings NMEA 1200 N81 N NMEA 4800 N81 N NMEA 4800 N82 N NMEA 9600 N81 N NMEA 38400 N81 N and press ENTER to confirm C COM GSM Plus Connection To connect the...

Страница 46: ...COLOR MAX 5I COLOR MAX 5E COLOR MAX 15 COLOR MAX PRO Power I O Cable Wiring page Shows a window containing the Power I O cable wiring MENU MENU ADVANCED ENTER Input Output ENTER Cable Wiring ENTER Po...

Страница 47: ...n the chartplotter comparable with the value given by the compass of the boat In other words since the compass of the boat must be compensated due to the iron masses we use the same values given by th...

Страница 48: ...radio station It prima rily registers the boat information in the U S Coast Guard s national dis tress database for use in emergency situations Active Target Target located within the Activation Rang...

Страница 49: ...essage VMD type 1 2 3 and 5 Select the used serial port and transmission speed by following the procedure MENU MENU ADVANCED ENTER INPUT OUTPUT ENTER Port n Input ENTER AIS 38400 ENTER Where n Port 1...

Страница 50: ...ith the following options Download Copy From User C CARD Forecast Real Time View Type of Data Download MENU MENU C WEATHER SERVICE ENTER DOWNLOAD ENTER Allows to connect the software to the C MAP weat...

Страница 51: ...oad at the current date and time received from the GPS Real Time View Off the Weather data is not displayed The layer displayed is the one selected into the previous menu item Type of Data MENU MENU C...

Страница 52: ...creen it asks the user if he would like to view the call on the Chart page or exit the pop up screen By selecting the item VIEW ON CHART and press ENTER two options are shown GoTo Vessel Activates the...

Страница 53: ...ress Call Shows Position Request Distress Call page When Position Request page is active this message changes to Distress Call Directory MENU MENU ADVANCED ENTER DSC ENTER DIREC TORY ENTER Selects the...

Страница 54: ...s selected access the Fish Finder menu by pressing MENU For more information see the specific User Manual NOTE The Fish Finder display page is available only if the Fish Finder is connected and powere...

Страница 55: ...ne data rivers lakes terrestrial data major streets highways railways etc Nav Aids depth areas territorial water ar eas etc by reading them from a special data C CARDs contact your local dealer All un...

Страница 56: ...58 User Manual...

Страница 57: ...ate software versions that allow C Link function 4 1 HOW C LINK SYSTEM WORKS When the chart plotter is powered up it switches into the Stand Alone Mode In this work mode the chart plotter unit periodi...

Страница 58: ...60 User Manual...

Страница 59: ...o the Slave The Slave will be provided with a few dedicated pages to show the C Link Navigation Data received from the Master 5 1 OPERATIONS INTRODUCTIVE ELEMENTS It is important remark once more that...

Страница 60: ...be ignored by the other chart plotter SLAVE CHART PLOTTER Operating mode To select the Slave mode follow the procedure MENU MENU ADVANCED ENTER C LINK ENTER Secondary Station ENTER When Slave mode is...

Страница 61: ...n is not the external one Destination Name DST and BRG to Destination calculate XTE calculate TTG etc These values will be displayed all places where required and they will be used to format NMEA 0183...

Страница 62: ...Estimated Time to travel the Distance to Last Wpt calculated using Cruising Speed TTG To Next Wpt Estimated Time to travel the Distance to Next Waypoint calculated using Cruising Speed TTG to Last Wp...

Страница 63: ...transmitted signals the GPS receiver can determine its present position anywhere on earth and thanks to continuous updates calculate speed and course information 6 1 HOW GPS WORKS Currently the GPS co...

Страница 64: ...tion Fixing Accuracy HDOP The GPS fix accuracy is due to the locations of 3 satellites in the sky High accu racy is obtainable when the satellites are widely scattered in the sky on the contrary accur...

Страница 65: ...n will erase all Marks Routes stored Track plots and destinations It will also return all selections Input Data Format Autopilot selection etc to original default values Before this step you have the...

Страница 66: ...n Sets the resolution among 1024x768 800x600 640x480 default Horizontal Size Allows entering the actual horizontal size of the screen The value can be entered either in centimeters or inches the defau...

Страница 67: ...re selected the variation is computed automatically for every zone as soon as the chart is displayed Buoy A floating object moored to the sea bottom in a particular charted place as an aid to navigati...

Страница 68: ...way that has been made since the last known position was received This procedure is normally based on the last received GPS position Speed and Course or to the last received GPS position Log Speed and...

Страница 69: ...position 24 hours a day 365 days a year under any weather conditions HDG Heading The horizontal direction in which a ship actually points or heads in any mo ment see also COG HDOP Horizontal Dilution...

Страница 70: ...indicate that the desti nation is placed NMEA 0183 The NMEA 0183 Data Interface Standard was developed by the National Ma rine Electronics Association of America It is an international standard that...

Страница 71: ...The speed of the vessel relative to the water Spot Sounding It is the depth of the water in a specific and charted position It is represented on the map by its own value expressed in the current dept...

Страница 72: ...same point with time VMG Velocity Made Good It is the destination closing Velocity The VMG is calculated using the current speed of the vessel SOG and the difference between the current vessel course...

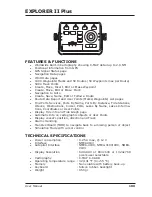
Страница 73: ...es Find Ports Services Ports By Name Ports By Distance Tide Stations Wrecks Obstructions Cursor POIs Lakes By Name Lakes Informa tions Coordinates or User Points Display Tide info and Tide Graph page...

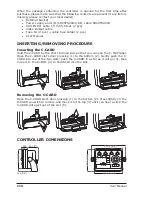
Страница 74: ...DGPS WAAS Receiver with cable 15 mt 45 feet COLOR MAX 5E INSERTING REMOVING PROCEDURE Inserting the C CARD Remove the front cover as explained in the following picture Hold the C CARD by the long inc...

Страница 75: ...LLOW SHIELD CABLE COLOR 10 35Vdc OUTPUT3 INPUT3 GND COMMON FUNCTION 1 2 3 4 5 6 PIN SMART GPS sensor POWER I O CONNECTOR POWER I O CONNECTOR CABLE COLOR BLACK RED WHITE GREEN GRAY YELLOW BROWN BLUE FU...

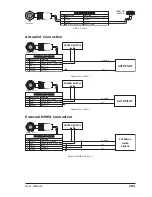
Страница 76: ...BROWN POWER I O CABLE POWER I O CABLE PIN CABLE COLOR FUNCTION 1 COMMON RX AUTOPILOT Autopilot Connection on Port 2 External NMEA Connection POWER SUPPLY 1 POWER I O EXTERNAL NMEA DEVICE EXTERNAL NMEA...

Страница 77: ...CABLE BLACK RED BLUE 1 2 8 1 Current MAX 300mA POWER SUPPLY External Alarm Connection C COM GSM Plus Connection POWER I O POWER I O CONNECTOR POWER I O CONNECTOR 1 2 3 4 5 6 7 8 PIN CABLE COLOR FUNCT...

Страница 78: ...80 User Manual...

Страница 79: ...By Name Ports By Distance Tide Stations Wrecks Obstructions Cursor POIs Lakes By Name Lakes Informa tions Coordinates or User Points Display Tide info and Tide Graph page Automatic Info on cartograph...

Страница 80: ...D Open the door hold the C CARD by the long side so that you can see the C MAP label and gently push the C CARD into the door slot 1 Close the door pushing the C CARD in as far as it will go to hold f...

Страница 81: ...QUICK DISCONNECT BRACKET CABLE DESCRIPTION WIRE COLOR BLACK RED WHITE GREEN YELLOW BROWN GRAY ORANGE PINK BLUE PWR GND COMMON POWER 10 35Vdc INPUT 1 COMMON OUTPUT 1 INPUT 2 OUTPUT 2 INPUT 3 OUTPUT 3 C...

Страница 82: ...GND SIGNAL RETURN WIRE COLOR FUNCTION GPS Connections on Port 3 Autopilot Connection NMEA0183 180 180CDX INPUT SIGNAL RETURN AUTOPILOT DEVICE FUNCTION BLACK RED WHITE GREEN YELLOW BROWN GRAY ORANGE P...

Страница 83: ...UTPUT 1 FUNCTION C COM GSM Plus CABLE WIRE COLOR BLACK RED WHITE GREEN YELLOW GND POWER SUPPLY C COM TX C COM TX C COM RX FUNCTION Connection for the Port 1 Beacon Receiver Connection COLOR MAX WIDE I...

Страница 84: ...86 User Manual...

Страница 85: ...ges Find Ports Services Ports By Name Ports By Distance Tide Stations Wrecks Obstructions Cursor POIs Lakes By Name Lakes Informa tions Coordinates or User Points Display Tide info and Tide Graph page...

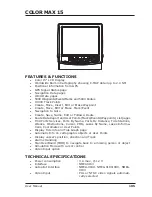
Страница 86: ...1 5 mt 5 9 feet AUX IN I O cable 1 5 mt 5 9 feet Video Input cable Chart plotter s protective cover Fuse 2 Amp fuseholder User Manual Flush mounting kit cutting template COLOR MAX SEALINK E Smart DGPS...

Страница 87: ...S 56 5mm 2 2 69 8mm 2 8 34 7mm 1 4 37 7mm 1 5 PROTECTIVE COVER 277 5mm 10 9 192 5mm 7 6 153 5mm 6 04 177 7mm 7 91 4mm 3 6 185 5mm 7 3 190 5mm 7 5 INSTALLATION AND REMOVING 59 5mm 2 3 14mm 0 6 154 8mm...

Страница 88: ...EN GRAY YELLOW BROWN BLUE PIN 1 2 3 4 5 6 7 8 WIRE COLOR PWR GND COMMON POWER OUTPUT 10 35 Vdc INPUT 4 COMMON OUTPUT 5 OUTPUT 4 INPUT 5 EXTERNAL ALARM OUTPUT 2 AUX IN I O CONNECTOR CABLE FUNCTION POWE...

Страница 89: ...CABLE GPS SENSOR CABLE POWER OUTPUT 10 35 Vdc GPS RX GPS TX GND COMMON RED GREEN BROWN BLACK YELLOW SHIELD WIRE COLOR FUNCTION GPS on Port 2 SMART GPS SENSOR GPS SENSOR CABLE GPS SENSOR CABLE POWER OU...

Страница 90: ...2 5 7 WIRE COLOR FUNCTION EXTERNAL NMEA DEVICE COMMON TX RX External NMEA on Port 2 External Alarm Connection POWER I O 1 2 8 PIN CABLE COLOR FUNCTION PWR GND COMMON PWR 10 35 Vdc OUTPUT EXTERNAL ALA...

Страница 91: ...Services Ports By Name Ports By Distance Tide Stations Wrecks Obstructions Cursor POIs Lakes By Name Lakes Informa tions Coordinates or User Points Display Tide info and Tide Graph page Automatic Inf...

Страница 92: ...le 15 mt 45 feet INSERTING REMOVING PROCEDURE Inserting the C CARD Hold the C CARD by the short inclined side so that you can see the C MAP label Gently push the C CARD into one of the two slots 1 pus...

Страница 93: ...ht Flush mount installation Bracket installation and removing To remove the chart plotter press the bracket button 1 as indicated in the pre vious figure and then eject to the top the chart plotter 2...

Страница 94: ...UTPUT1 INPUT2 OUTPUT2 INPUT3 OUTPUT3 SIGNAL common return FUNCTION SMART GPS SENSOR CABLE WIRE COLOR RED BROWN GREEN WHITE BLACK YELLOW SHIELD POWER 10 35 Vdc GPS NMEA0183 OUTPUT GPS NMEA0183 INPUT RT...

Страница 95: ...97 User Manual Connection for the Port 1 Beacon Receiver Connection To connect a Differential Beacon Receiver see previous figure GPS Connections on Port 3...

Страница 96: ...98 User Manual...

Страница 97: ...t and User Points Marks Waypoints List pages Find Ports Services Ports By Name Ports By Distance Tide Stations Wrecks Obstructions Cursor POIs Lakes By Name Lakes Informa tions Coordinates or User Poi...

Страница 98: ...ase contact your local dealer External bracket and I O cable 1 5 mt 5 9 feet AUX IN I O cable 1 5 mt 5 9 feet Video Input cable 2 pcs Video Output cable Chart plotter s protective cover Fuse 2 Amp fus...

Страница 99: ...8 4mm 6 2 40mm 1 6 53mm 2 1 128mm 5 329mm 13 221mm 8 7 230 5mm 9 1 140mm 5 5 261mm 10 3 45mm 1 8 264m m 10 4 INSTALLATION AND REMOVING GPS ANT AUX I O PWR I O VGA OUT VIDEO IN 1 VIDEO IN 2 OUT VIDEO I...

Страница 100: ...ECTOR CABLE GPS CONNECTOR CABLE VIDEO OUTPUT CONNECTOR 1 2 3 CAM CONNECTORS PIN OUT ON UNIT GND COMMON PWR 10 35Vdc SIGNAL VIDEO INPUT CONNECTOR PIN 1 2 3 FUNCTION TYPICAL CONNECTIONS GPS Connection S...

Страница 101: ...RED WHITE GREEN YELLOW PIN 1 2 3 4 6 WIRE COLOR FUNCTION AUTOPILOT COMMON RX Autopilot on Port 1 POWER I O POWER SUPPLY 1 POWER I O CABLE POWER I O CABLE PWR GND COMMON POWER INPUT 10 35 Vdc OUTPUT 2...

Страница 102: ...ABLE COLOR FUNCTION PWR GND COMMON PWR 10 35 Vdc OUTPUT EXTERNAL ALARM Open Collector POWER I O CABLE POWER I O CABLE BLACK RED BLUE 1 2 8 1 Current MAX 300mA POWER SUPPLY External Alarm Connection C...

Страница 103: ...s Marks Events Waypoints List pages Find Ports Services Ports By Name Ports By Distance Tide Stations Wrecks Obstructions Cursor POIs Lakes By Name Lakes Informa tions Coordinates or User Points Displ...

Страница 104: ...ler External bracket and I O cable 1 5 mt 5 9 feet AUX IN I O cable 1 5 mt 5 9 feet 2 pcs Video Input cable 2 pcs Video Output cable Chart plotter s protective cover Fuse 5 Amp fuseholder User Manual...

Страница 105: ...w PIN 1 2 3 FUNCTION BLACK RED WHITE WIRE COLOR PIN POWER OUTPUT 12 35 Vdc OUTPUT 3 INPUT 3 GND SIGNAL RETURN 1 2 3 4 5 6 RED GREEN BROWN NC NC BLACK YELLOW SHIELD WIRE COLOR FUNCTION GND NC RED GREEN...

Страница 106: ...RE COLOR FUNCTION Autopilot on Port 2 External NMEA Connection COMMON TX RX I O PORTA 1 2 1 EXTERNAL NMEA DEVICE PWR GND COMMON INPUT 1 INPUT 1 OUTPUT 1 BLACK WHITE GREEN YELLOW PIN 1 3 4 6 WIRE COLOR...

Страница 107: ...ance Tide Stations Wrecks Obstructions Cursor POIs Lakes By Name Lakes Informa tions Coordinates or User Points Display Tide info and Tide Graph page Automatic Info on cartographic objects or User Poi...

Страница 108: ...ort inclined side so that you can see the C MAP label Open the C CARD slot s door pressing 1 to the bottom 2 Gently push the C CARD into one of the two slots push the C CARD in as far as it will go 3...

Страница 109: ...NAL RETURN 1 2 3 4 5 6 RED GREEN BROWN NC NC BLACK YELLOW SHIELD WIRE COLOR FUNCTION 1 GND 2 VCC 3 R 4 G 5 B 6 HSYNC 7 VSYNC 8 N C 9 BRIGHTNESS CONTROL PIN FUNCTION GND COMMON POWER OUTPUT 10 35 Vdc I...

Страница 110: ...POWER INPUT 10 35 Vdc OUTPUT 2 INPUT 2 BLACK RED GRAY BROWN PIN 1 2 5 7 WIRE COLOR FUNCTION GPS SENSOR CABLE GPS SENSOR CABLE POWER OUTPUT 10 35 Vdc GPS RX GPS TX GND COMMON RED GREEN BROWN BLACK YELL...

Страница 111: ...OUTPUT 1 BLACK RED WHITE GREEN YELLOW PIN 1 2 3 4 6 WIRE COLOR FUNCTION COMMON TX RX External NMEA on Port 1 POWER I O POWER SUPPLY 1 POWER I O CABLE POWER I O CABLE PWR GND COMMON POWER INPUT 10 35 V...

Страница 112: ...POWER I O CONNECTOR POWER I O CONNECTOR 1 2 3 4 5 6 7 8 PIN CABLE COLOR FUNCTION BLACK RED WHITE GREEN GRAY YELLOW BROWN BLUE PWR GND COMMON PWR 10 35 Vdc Used by C COM Used by C COM OUTPUT2 Used by...

Страница 113: ...TPI is an industry standard thread used on a wide range of mounting brackets including the swivel joints commonly used for angled surfaces However due to the manufacturing process of these mounting b...

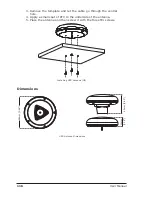
Страница 114: ...cable go through the central hole 4 Apply a small coat of RTV to the underside of the antenna 5 Place the antenna and then screw it with the three M3 screws Installing GPS Antenna III Dimensions 98mm...

Страница 115: ...15 75 81 88 93 100 106 109 Caution Notice 15 CDI scale 46 Chain 45 69 Chart Boundaries 44 Chart Lock 44 chart scale 19 Clearing All Tracks 28 COG 46 69 Compass Calibration 49 Compute Correction 49 con...

Страница 116: ...Heading 71 Hiding Showing Route 25 Home 19 Home mode 71 Horizontal Dilution Of Precision 71 I I O cable 82 88 Info on objects 29 Info Tree 30 Input Output menu 77 Input Output Setup menu 46 Inserting...

Страница 117: ...Speed Filter 49 Speed Over Ground 73 Speed Through Water 73 Spot Sounding 73 Static Navigation 49 Steering 73 Stopping Navigation 26 STR 73 Structure 42 Surface Clutter 42 Switching Off 15 Switching O...

Страница 118: ...dealer or service center are not warranted in any respect Transducer software update battery microphone magnetron and microwave components and water damage on water resistant VHF Radios are items excl...

Отзывы: