background image

Intraoral Scanner User Manual

|

58

|

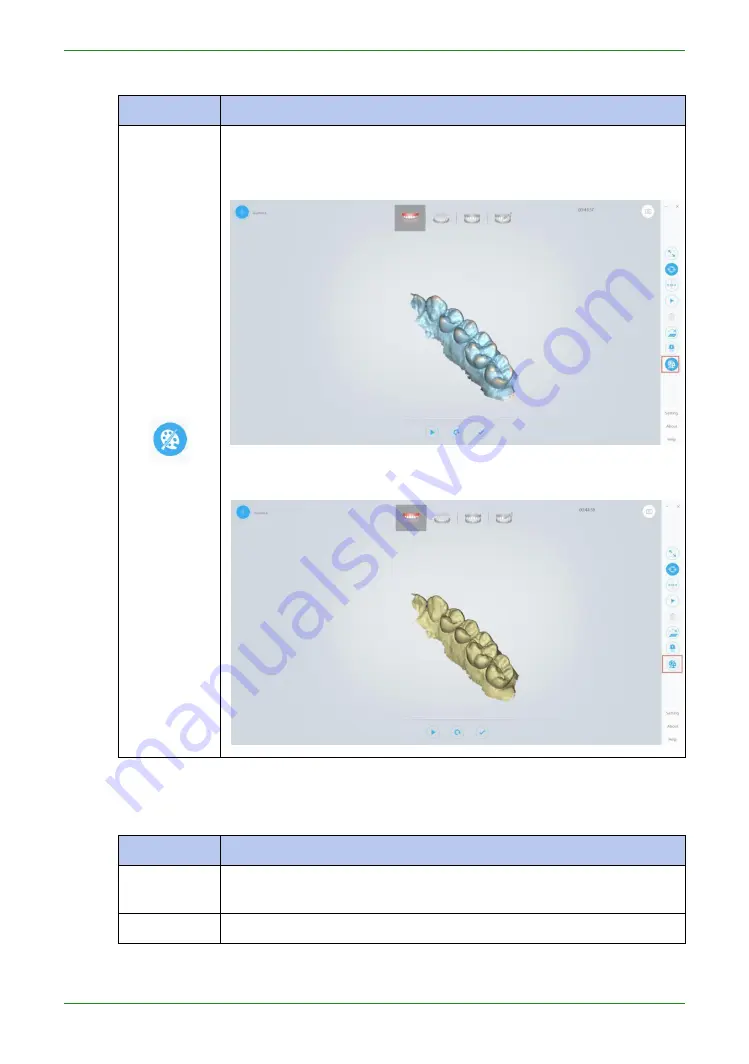
Table 6-6 Tools for editing

Tool icon

Description

Texture

The default setting is on. When the function is on, the real-time scan

is displayed in color.

When the function is off, the real-time scan is displayed in

monochrome.

Menu tools

Table 6-7 Menu tools

Functions

Description

About

View the version number of

IntraOralScan

, the serial number of the

supplied license dongle, and the remaining time left.

Help

Select to open the Help file.

Содержание Intraoral Scanner

Страница 1: ...symbols 7 On the device 7 On the carry box package 7 Compliance 9 FCC compliance statement 9 Electrical safety 9 EMC notice 10 Electromagnetic emissions 10 Interference immunity 11 Separation distances 15 Chapter 3 Overview 17 Benefits of the product 17 Carry box list 17 Scanner overview 19 Tip and scanner body 19 Scanner cradle 20 USB cable storage 21 Software overview 22 System requirements 22 I...

Страница 2: ...er interface 35 Work flow 36 Creating a project 36 Specifying job definition 36 Sharing data 37 Creating an account 37 Using private cloud 37 Importing DentalManager login accounts 37 Uploading the data 38 Downloading the data 39 Chapter 7 Using IntraOralScan 41 Introduction to IntraOralScan 41 Navigating IntraOralScan interface 41 Guidance 45 Scanning work flow and tools 47 2D view window 52 Edit...

Страница 3: ...level disinfection 64 Cleaning and steam sterilization 66 Attaching the scanner tip 67 Scanner storage 68 Storage for transport 68 Daily and long term storage 68 Chapter 9 Hardware specification 69 Specifications 69 Environmental requirements 70 ...

Страница 4: ......

Страница 5: ...ghts reserved No part of this publication may be reproduced transmitted transcribed stored in a retrieval system or translated into any language or computer language in any form or by any means electronic mechanical magnetic optical chemical manual or otherwise without the prior written permission of Shining3D Corporation All other logos products or company names mentioned in this User Manual may ...

Страница 6: ...t misuse the scanner and do not use or operate the software programs incorrectly The clinical environments where the scanner and the software programs can be used include dental clinics dental hospitals and dental laboratories Only trained medical personnel may use the scanner and the supplied software programs Installation use and operation of the scanner are subject to the law in the jurisdictio...

Страница 7: ...perly grounded wall outlets The device should not be used adjacent to or stacked with other equipment If adjacent or stacked use is necessary the device should be observed to verify normal operation in the configuration in which it will be used WEEE Disposal of Waste Electrical and Electronic Equipment and by users in private households in the European Union This symbol on the product or on the pa...

Страница 8: ...cific tasks properly preventing unnecessary errors This icon marks NOTE S additional information for particular situation This icon marks CAUTION S improper actions or conditions that may damage the product or injury and consequently void your warranty or service contract or lose the patient data or system data This icon marks WARNING S the safety instructions that you must precisely follow in ord...

Страница 9: ...ned in this chapter Operating the hardware and software without a proper awareness of safe use could lead to fatal damage to the hardware or permanent data loss Ensure that the connection is performed correctly by following the instructions given in Connecting the scanner on page 25 Use only medical grade devices with the scanner in the patient environment The hardware and software should only be ...

Страница 10: ... with care and avoid hitting or scratching the surfaces as it contains fragile components Dropping the scanner on the floor may cause permanent damage If you accidentally drop the scanner you MUST dispose of the scanner tip immediately and do not use the same tip again The mirror in the tip might shatter into small pieces and using it again poses the highest risk of causing serious injury to the u...

Страница 11: ...warning caution Indicates that the device complies with requirements for the BF type applied part according to IEC 60601 1 providing protection against electric shock On the carry box package Table 2 2 Labels and symbols on the carry box package Symbol Explanation General warning caution Indicates that the device complies with requirements for the BF type applied part according to IEC 60601 1 prov...

Страница 12: ...re Indicates that the transport package shall be kept dry Indicates correct upright position of the transport package Indicates the stack limits A maximum of 6 units of identical packages may be stacked Indicates temperature limits The product must be stored in the original shipping package in environments between 25 C and 60 C Indicates the humidity limits The product must be stored in the origin...

Страница 13: ...ng interference that may cause undesired operation Electrical safety Only trained medical personnel should operate this scanner The product complies with the following standards Electrical IEC 60601 1 2 2014 IEC 60601 1 2015 A1 2012 ed 3 1 IEC 60601 1 6 2013 Con Ed 3 1 Rev October 29 2013 IEC 62366 1 2015 IEC 62304 2006 AMD1 2015 Classification Type of protection against electric shock Class II Th...

Страница 14: ...netic tables The Intraoral Scanner is intended for use in the electromagnetic environment specified below The customer or user of the Intraoral Scanner should assure that it is used in such an environment Table 2 3 Guidance and manufacturer s declaration electromagnetic emissions Emission measurement Conformity Electromagnetic environment guidelines RF emissions CISPR 11 Group 1 The Intraoral Scan...

Страница 15: ...e ESD IEC 61000 4 2 8 kV contact 15 kV air 8 kV contact 15 kV air Floors should be wood concrete or ceramic tile If floors are covered with synthetic material a relative humidity of at least 30 is recommended Electrical fast transient burst IEC 61000 4 4 2 kV for power supply lines 1 kV for input output lines 2 kV for power supply lines 1 kV for input output lines Mains power quality should be tha...

Страница 16: ...commercial or hospital environment If the user of the Intraoral Scanner requires continued operation during power mains interruptions it is recommended that the Intraoral Scanner be powered from an uninterruptible power supply or a battery Power frequency 50 60 Hz magnetic field IEC 61000 4 8 30 A m 30 A m Power frequency magnetic fields should be at levels characteristic of a typical location in ...

Страница 17: ...smitter Recommended separation distance d 1 2 P IEC 61000 4 6 Radiated RF IEC 61000 4 3 6 Vrms 150 kHz to 80 MHz in ISM bandsc 3 V m 80 MHz to 2 7 GHz 6 Vrms 3 V m IEC 60601 1 2 2007 d 1 2 P 80 MHz to 800 MHz d 2 3 P 800 MHz to 2 5 GHz IEC 60601 1 2 2014 d 2 0 P 80 MHz to 2 7 GHz Where P is the maximum output power rating of the transmitter in watts W according to the transmitter manufacturer and ...

Страница 18: ...al Scanner is used exceeds the applicable RF compliance level above the Intraoral Scanner should be observed to verify normal operation If abnormal performance is observed additional measures may be necessary such as reorienting or relocating the Intraoral Scanner b Over the frequency range 150 kHz to 80 MHz field strengths should be less than 3 V m c The ISM industrial scientific and medical band...

Страница 19: ... 23 12 20 For transmitters rated a maximum output power not listed above the recommended separation distance d in meters m can be estimated using the equation applicable to the frequency of the transmitter where P is the maximum output power rating of the transmitter in watts W according to the transmitter manufacturer NOTE 1 At 80 MHz and 800 MHz the separation distance for the higher frequency r...

Страница 20: ...any part of the Intraoral Scanner including cables specified by the manufacturer Otherwise degradation of the performance of this equipment could result If higher IMMUNITY TEST LEVELS than those specified in IEC60601 1 2 Table 9 are used the minimum separation distance may be lowered Lower minimum separation distances shall be calculated using the equation specified in IEC60601 1 2 Chapter 8 10 ...

Страница 21: ... data in STL OBJ format to CAD CAM systems for different purposes of dental care Carry box list Check the carry box for the following items If any item is missing or damaged contact your place of purchase immediately 1 1 x Intraoral Scannerwith a USB 3 0 upstream cable length 2 meters 2 1 x scanner cradle 12 Vdc 1 67 A 3 1 x protection cap 4 2 x scanner tip 1 is already attached to the intraoral s...

Страница 22: ...rnal EMI EMC occurrences Non specified peripherals and cables in some cases can also increase leakage current or compromise the safety of the grounding scheme Using accessories or power supply units other than those specified may cause the warranty to void and result in increased emissions decreased EMI immunity of the device or even damages to the device and personal injuries Use of other accesso...

Страница 23: ...uced by the operation of scanner to be dissipated from the case 4 Intake vent Allows the ambient cool air to enter into the case to help cool down the heat produced by the operation of scanner NOTE When scanning do not hold the scanner in the way that covers or blocks the intake and exhaust vents Otherwise the scanner may become overheated 5 LED ring light Indicates the status of your scanner Blin...

Страница 24: ... the status of the cradle Solid green power on LED off power off 3 Power switch To receive power from the power outlet turn it on to stop receiving power from the power outlet turn it off 4 Power connector Connect the power plug from the supplied power adapter to this power connector and plug the power adapter to the power outlet 5 USB 3 0 downstream port For connecting the scanner cradle and the ...

Страница 25: ...it will automatically go into sleep mode To lower the temperature inside scanner body the cooling fan still operates for about 30 minutes after the scanner goes into standby or sleep mode Then it will stop spinning The scanner tip is being heated whenever power is supplied even if the scanner is in standby or sleep mode USB cable storage To prevent the USB cable from getting damaged by excessive b...

Страница 26: ...use these software programs see Using DentalManager on page 35 Using IntraOralScan on page 41 System requirements Before installing and running the supplied software programs your computer shall meet the following requirements Table 3 3 System requirements CPU Intel Core i7 7700 or higher Memory 16 GB or higher Hard drive 1 TB SATA Hard Drive 7200 RPM 6 0 Gb s or higher Graphic card GPU NVIDIA GTX...

Страница 27: ... up the scanner on page 25 for more necessary procedures to get started Follow the steps below to complete the installation of software programs 1 Insert the supplied 2 in 1 USB dongle into the USB port of your computer 2 Find the driver named IntraOralScanVX X X X exe and double click it 3 The IntraOralScan InstallShield Wizard window appears to start the installation 4 Specify a language from th...

Страница 28: ......

Страница 29: ... the areas of temperature extremes or in direct sunlight Prepare a flat surface e g your desk for the scanner and the cradle Do not place them on a slanted surface Before the installation is completed do not plug the power adapter into the wall outlet or turn on the scanner until you are instructed to do so Always return the scanner to the cradle when it is not in use Do not place the scanner in h...

Страница 30: ... the power connector on the cradle and plug the power adapter into a wall outlet 3 Connect the scanner cable to the USB 3 0 upstream port on the cradle 4 Connect the USB 3 0 downstream port on the cradle and your computer with the supplied USB 3 0 cable 5 Insert the supplied 2 in 1 USB dongle into the USB port of your computer This step is necessary for you to gain access to DentalManager 5 3 4 2 ...

Страница 31: ... any sharp bends in the cable after you disconnect the scanner See USB cable storage on page 21 for more details Calibrating the scanner Under these circumstances we recommend that you shall execute the calibration for the scanner to ensure the accuracy of scanned data The initial setup of the scanner is completed The scanner has been used for a period of time e g 2 weeks The scanner is accidental...

Страница 32: ...n the mirror of the tip when detaching as this may result in damage to the mirror Store the detached tip in a safe place e g a dental instrument tray for future use 7 Connect the on the supplied Calibrator and your computer with the supplied USB 3 0 cable 8 Gently slide the Calibrator onto the front end of the scanner as illustrated 9 Double click the shortcut icon of IntraOralCalibration Display ...

Страница 33: ...s normal that the calibration takes approximately 5 minutes 12 The following message appears once the calibration is completed Click OK to exit 13 Gently slide the Calibrator off the scanner CAUTION Make sure that the Calibrator is removed from the scanner after the calibration is done Otherwise the Calibrator may get very warm ...

Страница 34: ...Intraoral Scanner User Manual 30 14 Re attach the scanner tip to the scanner for later use or put the protection cap onto the scanner to prevent damage and dust ...

Страница 35: ...ll and move it to the opposite side of the mouth Dry the teeth thoroughly before starting a scan When scanning consider using the saliva ejector and tampons to keep the surfaces of teeth dry If necessary consider using the retractors to avoid excessive tissue from being scanned If necessary consider using tampons to help create space while working on narrow regions between teeth Scanner preparatio...

Страница 36: ...k the scan results on the screen to ensure the scanning is of good quality When scanning the scanner tip should be centered over the teeth and each movement should align with the cross hairs following the lower and upper dental arch shapes A complete scan data of a single area includes the surfaces of occlusal lingual buccal interproximal contacts of the adjacent teeth and 2 3 mm buccal gingiva A ...

Страница 37: ......

Страница 38: ...the scanner on page 25 4 Place the scanner in the cradle to secure it in place 5 When the LED ring light on the end of the scanner body lights up green the heater automatically turns on and detects the temperature It the temperature of the scanner tip is lower than the set point for anti fogging a notification message of pre heating and current temperature appears When the message disappears the w...

Страница 39: ...can It also exchanges data between the dental laboratories technicians and the dentists Navigating DentalManager interface To run DentalManager the following requirements must be met The supplied 2 in 1 USB dongle is plugged into the USB port of your computer The connection between the scanner and your computer is ready For details see Connecting the scanner on page 25 Double click the shortcut ic...

Страница 40: ...dentist s patient and technician s Then click Next to proceed Or select Load to open an existing project Specifying job definition Select the desired type of restoration and the tooth number the restoration site and then click Save When the Scan button is active click it to launch IntraOralScan and start the scan For details on IntraOralScan see Using IntraOralScan on page 41 ...

Страница 41: ... for accessing the host server must have been specified when you set up the FTP server Using private cloud Importing DentalManager login accounts To import an account file 1 In the DentalManager window click Setting 2 Click Private Cloud under Data Cloud 3 Click Apply 4 Re launch DentalManager 5 In the DentalManager window click Share Data 6 Click Account Manager in the top right corner of the win...

Страница 42: ...ly logged in click to close the window Uploading the data 1 After importing or saving an order or completing the scan specify a receiver 2 Click Start Update 3 After finishing uploading click Update List to display the information on the uploaded files A copy of the data uploaded to the cloud will automatically be compressed and saved on the local computer in the following location C DentalOrder F...

Страница 43: ... may view the files by category All Downloaded and Data Not Downloaded 2 After finishing downloading the download list is updated The downloaded data will automatically be extracted and saved in the folder with the name exactly the same as the UserName on the local computer in the following location C DentalOrder Ftp DownLoad ...

Страница 44: ......

Страница 45: ... Navigating IntraOralScan interface Double click the shortcut icon of IntraOralScan on your desktop then one of the following main screens appears a If no scanner is connected an error message appears to remind you to check and reconnect the scanner NOTE If the scanner is connected yet the error message appears remove then reconnect the scanner If IntraOralScan still cannot detect the scanner quit...

Страница 46: ...on 1 Guidance The Guidance walks you through to learn the basic scanning hints to perform a successful scan 2 Scanning work flow bar These icons provide a step by step guide to start the scan from the upper jaw the lower jaw and finally the full jaw of the 3D model When sufficient scan data is obtained the Design tool automatically provides an accurate alignment of the teeth and bite and measures ...

Страница 47: ... you can left click and drag the mouse pointer to move the image to the desired position Select Left click and drag the mouse pointer to draw margin lines on the tooth in order to specify the area of the model you wish to delete Delete After defining the area select this button to delete the specified data Remove redundant 3D proliferation The function is only available when you select Delete To r...

Страница 48: ...p To save the scanned data select this button to complete the scan task NOTE If you proceed to the next phase you will not be able to redo the previous acquisition 6 Menu Setting Configure the camera settings About View the version number of IntraOralScan Help Select to open the Help file 7 3D view window Displays the 3D real time preview or finished scan results NOTE When you are in the Guidance ...

Страница 49: ...esktop The initial screen appears as below Table 6 2 Overview of Guidance Displays Description The initial status of the Guidance icon When you select the Guidance button the icon changes to 1 Select to proceed to the next step Scan occlusal side 2 Check No longer show Help to stop displaying Guidance next time you launch IntraOralScan 3 Select X to exit ...

Страница 50: ...ect to proceed to the next step Scan occlusal side 2 Select to return to the previous step Adopt S curve to scan jaw 1 Select to return to the previous step Adopt S curve to scan jaw 2 Check No longer show Help to stop displaying Guidance next time you launch IntraOralScan 3 Select X to exit ...

Страница 51: ...r jaw and finally the full jaw Alternatively you may define the scanning work flow as first the lower jaw then the upper jaw and finally the full jaw Table 6 3 Scanning work flow and tools Work flow icon Tool icon Description Upper Jaw The Scan button The current working area is shown inside the square with green outline in the 3D view window If you re click Scan the button will change to indicati...

Страница 52: ...heck if any areas need to be re scanned To resume scanning select the button again The Reset button This button is only available when scanning is paused To clear the scanned data select this button The following message appears To clear all the scanned data select Yes to cancel the operation select No The Stop button When you finish scanning select this button to perform the post processing tasks...

Страница 53: ...ct the Scan button When the Rescan message appears select Yes to delete the scanned data and restart to scan Lower Jaw Scanning the lower jaw Read the work flow of Upper Jaw on page 47 to learn the use of tools When the scan of the lower jaw is done IntraOralScan automatically guides you to the next task scanning the full jaw If you wish to re scan the lower jaw select the icon of the lower jaw an...

Страница 54: ...ned data select this button then the following message appears To clear all scanned data select Yes to cancel the operation select No The Stop button When you finish scanning select this button to optimize the acquired data of the model including the upper jaw lower jaw and full jaw and then IntraOralScan will perform the post processing tasks When 3D data optimization and post processing tasks ar...

Страница 55: ... view window The timer shows 1 The total scanning time for the upper and lower jaws 2 The total time for scanning the full jaw data optimization process and post processing tasks Alignment Frames The number of the acquired 2D frames is displayed at the lower left corner of the 3D view window The default maximum number is 2500 When the number reaches 2499 IntraOralScan will stop scanning ...

Страница 56: ...cription The 2D view window button After activating IntraOralScan the 2D view window appears by default To close the window select this button The 2D view window displays the real time image of the model during scanning When the scanner pauses or stops scanning the 2D view window appears as below ...

Страница 57: ...2D view window to see more details or resume it to the default size The default 2D view window The enlarged 2D view window The Capture button Select to save the current captured image as a bitmap bmp file When you select the button the following message appears to notify that the current 2D image has been saved to the specified location ...

Страница 58: ...vailable the button is highlighted in white If the function is in use the button is highlighted in blue If the function is disabled the button is gray Table 6 6 Tools for editing Tool icon Description Fit View Select to restore the image of the scanned model to its original size Before selecting Fit View ...

Страница 59: ... mouse pointer to rotate the image to the desired orientation Move Left click and drag the mouse pointer to move the image to the desired position Select Left click and drag the mouse pointer to draw margin lines on the tooth you select The area with margin lines is displayed in red To remove the margin lines select the button highlighted ...

Страница 60: ...specified area the area in red The button is only available when you have selected an area Remove redundant 3D proliferation Select to automatically remove the redundant or unnecessary data from the scanned image Before selecting Remove redundant 3D proliferation After selecting Remove redundant 3D proliferation ...

Страница 61: ...matically detect and measure the undercut area of the tooth During the pause you may select this button to view the effects of blocking the undercuts of the tooth as shown below The green arrow indicates the insertion axis The blue shade indicates an undercut area To cancel the effects select the Undercut button again ...

Страница 62: ...ion is on the real time scan is displayed in color When the function is off the real time scan is displayed in monochrome Menu tools Table 6 7 Menu tools Functions Description About View the version number of IntraOralScan the serial number of the supplied license dongle and the remaining time left Help Select to open the Help file ...

Страница 63: ...on sterilized Follow the instructions prior to initial use Ensure you have completely disconnected the power supply and all connections from the scanner Follow the instructions given in this User Manual to pre clean disinfect and sterilize each part of the scanner Using other methods not approved by Shining3DCorporation will damage your scanner and void your warranty Using detergent disinfection s...

Страница 64: ...ilized the scanner body scanner cradle and scanner tip before each scan The caring methods for the scanner cradle scanner body and scanner tip are different and must be executed separately After disinfecting the scanner cradle you may proceed with the scanner body and finally the scanner tip See Scanner body care on page 61 and Scanner tip care on page 63 for details Ensure that the scanner body i...

Страница 65: ...care on page 60 for details Ensure that the scanner tip is detached from the scanner and the protection cap is put on the scanner when disinfecting the scanner body Follow the steps below to complete the disinfection 1 Disconnect the power of the Intraoral Scanner see Disconnecting the scanner on page27 2 Hold the scanner tip firmly with your thumb and forefinger on both sides and then gently slid...

Страница 66: ...bjects or other such tools which may result in scratches and damage to the scanner 6 Hold the scanner body with your hand 7 Use new cotton gauze moistened with 70 75 solution of ethanol to wipe the surface of scanner body CAUTIONS Avoid using detergent of any kind as some detergents or surfactants might penetrate into the surface of the scanner body Do not clean the intake and exhaust vents with a...

Страница 67: ...ly Cleaning the scanner tip is an essential step before effective disinfection or sterilization When inserting the scanner tip into the disinfectant solution be sure to follow the instructions on the disinfectant label and limit the time and depth that the tip is soaked within the minimum time recommended The scanner tip can be sterilized up to 20 times and must be disposed of afterwards For more ...

Страница 68: ...p blocks to the matching slots on the front end of the scanner body 4 Slide the protection cap onto the scanner to prevent damage and dust 5 Pay particular attention to inspect the mirror of the tip to ensure that the mirror is not cracked or broken and there is no scratch on it CAUTION If the mirror of the tip has cracks or scratches stop the cleaning process and contact your local distributor or...

Страница 69: ...oroughly before use CAUTIONS To avoid possible damage use the disinfection solution verified by Shining3D Corporation and specified here only Once a spill occurs follow disinfectant manufacturer s handling instructions 13 Immerse the cleaned tip into the disinfectant and leave it for at least 12 minutes at 25 C 25 C 12 min 14 Prepare a large container of sterile water e g 2 gallons 15 Take out the...

Страница 70: ...e scanner on page 27 2 Hold the scanner tip firmly with your thumb and forefinger on both sides and then gently slide the scanner tip off from the scanner as illustrated CAUTION Do not place your finger s on the mirror of the tip when detaching as this may result in damage to the mirror 3 Hold the supplied protection cap with the triangle mark facing upward Then align the protection cap blocks to ...

Страница 71: ... is not damaged during the cleaning process 12 Wrap the cleaned tip with a cloth cautiously 13 Place the wrapped tip in the autoclave and sterilize it at 121 C and with 1 5 atm pressure for at least 30 minutes 14 Dry the sterilized tip for 30 minutes with the autoclave program before opening the autoclave 15 Re attach the scanner tip see Attaching the scanner tip on page 67 Attaching the scanner t...

Страница 72: ...anner is clean and sterile before placing it in the original carry box package to avoid any possible contamination Place each part of the product e g the tip scanner body cradle power adapter in the original package carefully and prevent kinks of the cable Make sure that each cable is rolled up and tangle free before placing it in the original carry box Before closing the lid make sure no part of ...

Страница 73: ...d 11 mm x 11 mm Scan principle Non contact scanner with the DLP structured light Dimension Length 280 mm Width 40 mm Height 55 mm Weight 325 g without cable Output STL OBJ Connector USB 3 0 Power Input 5 Vdc 2 A Cradle Dimension Length 265 mm Width 82 mm Height 55 mm Weight 900 100 g Power Input 12 Vdc 1 67 A Product life 3 years ...

Страница 74: ...l requirements Operating and storage requirements Operating temperature 10 40 C Storage Transport temperature 25 C 60 C Operating altitude 3000 M Storage Transport Relative humidity 30 75 MTBF 14 600 hrs except DMD LED Air pressure 700 hPa 1060 hPa ...

Отзывы: