background image


AccuFab-L4D & L4K_User Manual_V3.2.20_June 2021

                                                20


restoring the XYZ angle to the initial value when loading when the coordinate value is zero. 


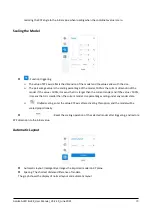
Scaling the Model 


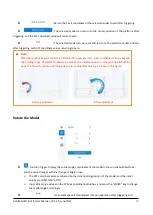
: Function triggering. 


The value of XYZ axis reflects the dimension of the model and the value varies with the size. 


The percentage value is the scaling percentage of the model, 100% is the current dimension of the 

model. If the value > 100%, it means that it is larger than the current model, and if the value < 100%, 

it means that it is smaller than the current model. Use percentage scaling under any model state. 


  Unified scaling, enter the value XYZ axis after activating this option, and the model will be 

scaled proportionally. 


: Reset the scaling operation of the selected model after triggering, and restore 

XYZ dimension to the initial value. 


Automatic Layout 


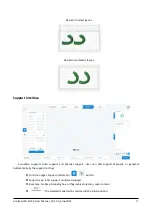
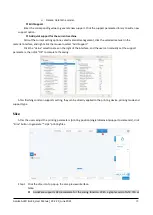
Automatic layout: Intelligently arranges the imported model on XY plane. 


Spacing: The shortest distance difference of models. 

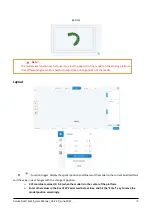
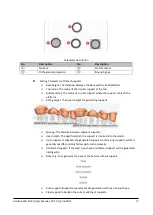
The graph shows the display of normal layout and automatic layout. 


Содержание AccuFab-L4D

Страница 1: ...AccuFab L4D L4K User Manual V3 2 20 ...

Страница 2: ...nt This equipment has been tested and found to comply with the limits for a Class B digital device pursuant to part 15 of the FCC Rules These limits are designed to provide reasonable protection against harmful interference in a residential installation This equipment generates uses and can radiate radio frequency energy and if not installed and used in accordance with the instructions may cause h...

Страница 3: ...duct We declare that the AccuFab 3D printer is independently developed by SHINING 3D TECH CO LTD with imported projection device independently designed software and hardware systems which provides reliable technical solutions for the application of the dental industry Supporting high quality digital model printing the Product is designed to assist clinics and dental Labs to quickly complete digita...

Страница 4: ...4 3 1 ACCUFAB PRINTER 4 3 1 1 Structure Preview 4 3 1 2 Technical Parameters 5 3 2 STANDARD ACCESSORIES 5 3 3 PREVIEW OF CURING BOX STRUCTURE 6 4 INSTALLATION 7 4 1 UNPACK THE PACKAGE 7 4 2 INSTALL THE PRINTER 7 4 3 ADD MATERIAL 8 4 4 NETWORK CONNECTION 9 4 4 1 Network Cable Connection 9 4 4 2 Wi Fi Connection 10 4 5 SOFTWARE UPDATE FUNCTION 11 4 6 ACCUWARE SOFTWARE 11 4 6 1 Installation 11 4 6 2 ...

Страница 5: ... Manual_V3 2 20_June 2021 4 5 1 TAKE OUT MODEL 31 5 2 CLEAN 32 5 2 1 Model 32 5 2 2 Build Platform 32 5 3 CURE MODEL 34 5 4 STRIPING SUPPORT 36 6 PRODUCT CARE AND MAINTENANCE 37 7 FAQS AND TROUBLESHOOTING 38 CONTACT US 40 ...

Страница 6: ... Response Hotline Warning No smoking eating or drinking in the workplace Keep the resin solvent properly and keep it away from children 1 3 Light Source During the printer and post curing box device operation the light source emits light with a wavelength of 405 nm which is harmful to your eyes Please avoid direct contact Do not open the chamber door during printing 1 4 Alcohol Ethanol Solvent Alc...

Страница 7: ... configuration I5 8500 Memory 8G and above Recommended configuration 16G Graphics Card GTX 750 Ti and above Recommended configuration GTX1050 2 3 Material Storage Resin Materials Temperature 10 C 30 C Storage Conditions Storage conditions Store in a cool and ventilated room and avoid direct sunlight Other instructions The storage container shall be kept closed at all times to avoid contact with fi...

Страница 8: ...t will affect the printing accuracy and printing success rate To guarantee the printing quality of the model keep the chamber door closed during operation or just finished the operation and do not touch the model resin tank platform or other parts of the device by hand ...

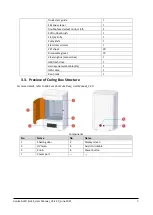
Страница 9: ...ter components No Name No Name 1 Light shield 2 Touch screen 3 Power button 4 USB port 5 Build platform bracket 6 Build platform 7 Resin tank Note Take proper protective measures as the surfaces of the build platform and resin tank is easy to wear Slight dirt and scratches on the surfaces will not cause printing failure Side view ...

Страница 10: ... mm Layer Thickness 0 025 mm 0 05 mm 0 075 mm 0 1 mm Material Compatibility Shining 3D material certified 3rd party material Printer Printer Dimensions 360 mm 360 mm 530 mm Weight 19 kg Operating Temperature 20 30 Operating Humidity 40 60 Power Requirements 100 V 240V AC 50 60 Hz 360 W Connectivity USB dongle Wi Fi Ethernet Printer Control 5 touchscreen Alerts Touchscreen alerts LED status indicat...

Страница 11: ...ectronic scissors 1 PET sheet 20 Disposable gloves 10 Cleaning box accessories 1 USB flash drive 1 Harness network cable 2m 1 USB cable 1 Resin tank 1 3 3 Preview of Curing Box Structure For more details refer to Fab Cure Post Cure Oven_User Manual_V2 0 Components No Name No Name 1 Shading door 2 Display screen 3 UV lamp 4 Acrylic turntable 5 Knob 6 Power button 7 Power port ...

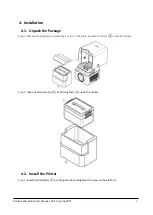
Страница 12: ...Package Step 1 Remove the package and place the printer on the table Remove the foam inside the printer Step 2 Take out accessory box from fixing foam inside the printer 4 2 Install the Printer Step 1 Insert build platform into the guide slot and tighten the screw on the platform ...

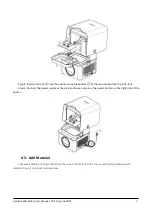
Страница 13: ...f the resin tank to lock the resin tank Step 3 Connect the power supply as the picture shows and press the power button on the right side of the printer 4 3 Add Material Shake well before pouring material into the resin tank Note that the resin level should be between the indicator lines of minimum and maximum ...

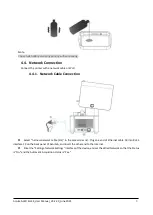
Страница 14: ... Wi Fi 4 4 1 Network Cable Connection Select harness network cable 2m in the accessories list Plug one end of Ethernet cable 18 into RJ 45 interface 19 on the back panel of AccuFab and insert the other end to the Internet Enter the Settings Network Settings interface of the device and set the Wired Network so that the Status is On and the Automatic Acquisition status is Yes ...

Страница 15: ...tus is Yes Select the network to display the connected WIFI signal If no WIFI is connected it will display None When accessing the network for the first time click Select Network status and the device will display the connectable WIFI signal Select the same WIFI as the computer where the software is located enter the WIFI password and click OK to confirm After the WIFI connection is successful ret...

Страница 16: ...d slicing software of AccuFab 3D printer is AccuWare model processing software independently developed by SHINING 3D hereinafter referred to as software which has the Office interface style and is easy to use and operate AccuFab 3D printer only supports slp4 format model printing files Before printing the 3D model file in STL format shall be arranged and sliced with AccuWare software and the slice...

Страница 17: ...nual_V3 2 20_June 2021 12 Step 5 After installation double click the desktop software icon shown in the figure to open the software Note For first time software start all machine types are selected by default 4 6 2 Interface ...

Страница 18: ...ssistance dongle material management import to machine software update About Note Selected devices are displayed by default on the machine list 5 View Model display from different perspectives 6 Main display area Model display preview 7 Printer information Device name model printing layer thickness and time estimation information 8 Import STL Open file a record of recently imported files drag STL ...

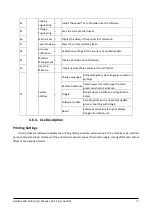
Страница 19: ...t Set support parameters for the model file and automatically generate support 14 Manual Support Set support parameters for the model file and manually generate the support 15 Slice Generate a slp4 path file for the data whose printing parameters have been set and set the path of exportation 16 View Default View View the model selection area from upper front 17 Front View View the model selection ...

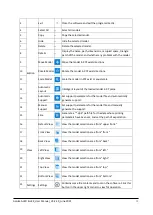
Страница 20: ...rom PC LAN 31 System Settings Change Language Chinese English system language conversion settings Remote Assistance TeamViewer technical support remote assistance shortcut entrance Dongle Dongle driver installation and registration access Software Update Accept update push and prompt update when connecting with dongle About Enter exit administrator rights display dongle information etc 4 6 4 Use D...

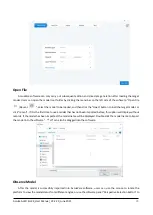
Страница 21: ...ad the target model or click recent If it is the first time to use a model that has not been imported before this option will display without records If the model has been imported the model name will be displayed Double click the model name to import the model into the software stl can also be dragged into the software Observe Model After the model is successfully imported into AccuWare software ...

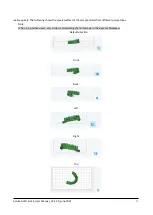
Страница 22: ...17 realize quickly The following shows the preview effect of the sample model from different perspectives Note When in 6 positive views only circles rotated along the normal axis in the view are displayed Default direction Front Back Left Right Top ...

Страница 23: ... change of position XYZ coordinate values 0 0 0 when the model is in the center of the platform Enter other values in the box of XYZ axis coordinate values and hit the Enter key to move the model position accordingly Note The model view function can help users to view the position of the model on the printing platform from different angles which is helpful to adjust the printing position of the mo...

Страница 24: ... and the value changes with the change of angle in use The XYZ coordinate values are based on the initial loading position of the model and the initial values are 0 00 0 00 0 00 Input other angle values on the XYZ axis coordinate value box and press the ENTER key to change the model angle accordingly It can reset the selected model s rotation operation after triggering and Note After the model is ...

Страница 25: ...means that it is larger than the current model and if the value 100 it means that it is smaller than the current model Use percentage scaling under any model state Unified scaling enter the value XYZ axis after activating this option and the model will be scaled proportionally Reset the scaling operation of the selected model after triggering and restore XYZ dimension to the initial value Automati...

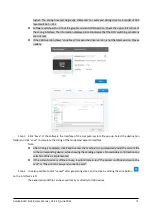
Страница 26: ...rts Auto support and Manual support User can add support Manually or generate Automatically by the support settings Function trigger Support interface or button Support type Inner support reinforced support Base type No base bounding box orthographic projection outer contour The selected model can be restored to the initial position ...

Страница 27: ...tform Lifting height The lowest height for generating supports Spacing The distance between adjacent supports Insert depth The depth at which the support is inserted into the model Inner support If checked the generated support contains inner support which is generally used for printing hollow parts such as jewelry Reinforced support If checked tree shaped reinforced support will be generated inte...

Страница 28: ...d Support Click the Value selection area on the right of the interface and the user can manually set the support parameters then click OK to complete the saving After finishing common supports setting they can be directly applied to the printing device printing mode and support type Slice After the users adjust the printing parameters printing position angle dimension support parameters click Slic...

Страница 29: ...of the computer system file pop up Select the destination folder and click save to complete the slicing of the model and export sliced files Note After slicing is complete click Send to enter the machine list automatically send the current file to the corresponding device while showing the sending progress No secondary confirmation and selection of files is implemented If the current device is off...

Страница 30: ...to Update After checking the setting module will be marked with a red dot when a new version of the software is available and the network is in normal condition Remote Assistance Note Users shall slice STL files into slp4 format files through AccuWare software and send them to the device Then they can be identified and printed by the device ...

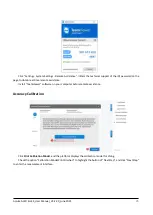
Страница 31: ...to obtain real time remote assistance Install TeamViewer software on your computer before remote assistance Accuracy Calibration Click Print Calibration Model and the platform displays the calibration model for slicing Check the option Calibration Model Print Finished to highlight the button of Next Step and click Next Step to enter the measurement interface ...

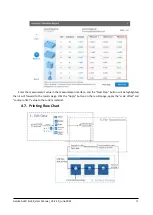
Страница 32: ...rement value in the measurement interface and the Next Step button will be highlighted then it will forward to the results page Click the Apply button on the results page apply the scale offset and contour offset value to the current material 4 7 Printing Flow Chart ...

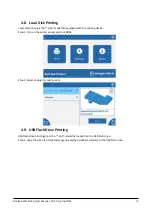
Страница 33: ...ed with the printing device Step 1 Turn on the printer power and click Print Step 2 Select an object model to print 4 9 USB Flash Drive Printing USB flash drive printing prints the slp4 model file loaded into the USB flash drive Step 1 Copy the slice file of slp4 format generated by AccuWare software to the USB flash drive ...

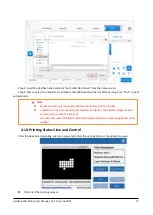
Страница 34: ...ly 4 10 Printing Status View and Control After the device starts printing users can view and control the printing status in the operation panel Print Start the printing process Note AccuFab printer only recognizes USB flash drive data in FAT32 format In addition to the slice file save path selected by the user the default storage location of sliced data is under the folder of computer document 3DD...

Страница 35: ...top Stop the printing process and cannot be recovered Back Cancel before printing Print progress bar Display the printing progress and printing status of the current layer Detail Info View the information of the model slice parameter Print preview area Display the cross sectional view of the current layer ...

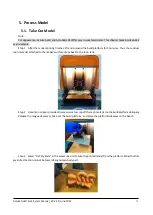
Страница 36: ... 5 minutes Thus the residual resin material attached to the model s surface drops back to the resin tank Step 2 Use silicon scraper provided in accessories to scrap off the resin material on the build platform obliquely Release the tongue depressor take out the build platform and place the platform sideways on the bench Step 3 Select Flat Pry Knife in the accessories list to take the printed model...

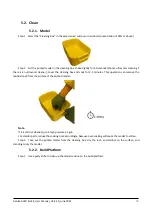
Страница 37: ... the cleaning box and soak for 2 3 minutes This operation can remove the residual resin from the surface of the printed model Note If it is still not cleaned use a high pressure air gun For smaller parts reduce the soaking time accordingly because over soaking will cause the model to soften Step 3 Take out the printed model from the cleaning box dry the resin and alcohol on the surface and standin...

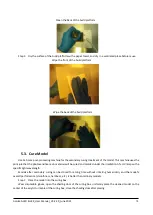
Страница 38: ...leaning platform with a putty knife Wear disposable gloves and judge whether the residue is clean Step 2 Use the soft glue brush with wet alcohol to clean up the residual resin on the surface of the build platform Clean the front of the build platform ...

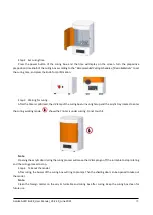
Страница 39: ...machine uses the principle that the photosensitive resin material will be cured and molded under the irradiation of a UV lamp with a specific light wavelength Models after secondary curing can be stored for a long time without irritating human skin and the model s overall performance smoothness hardness etc is better than ordinary models Step 1 Place the model into the curing box Wear disposable g...

Страница 40: ...rmed the UV lamp of the curing box turns on lights up and the acrylic tray rotates to enter the curing working mode shows the Printer is under cursing Do not touch it Note Opening the acrylic door during the curing process will cause the UV lamp to go off the turntable to stop rotating and the curing process to stop Step 4 Take out the model After curing the buzzer of the curing box will ring to p...

Страница 41: ...iption Before support stripping Remove support manually Support stripping finished Note Be careful to prevent scratches when using sharp tools such as utility knives Remove the build platform before replacing the resin tank to avoid the resin polluting the optical lens The exposure time parameters of different printing materials are different Adhere the utility knife to the build platform to avoid...

Страница 42: ...plashing resin on the guide rail or on the cover Alcohol in cleaning box Keep clean Once every two days during operation The wax pattern cannot be soaked in alcohol for too long which will cause the wax pattern to soften LCD panel Confirm whether it works normally Once per week Build platform leveling Confirm the leveling state Once every 30 days Guide rail and screw rod Keep lubricant Once every ...

Страница 43: ...r display screen crashed Program crashed Restart printer 8 Printing error Having error when printing slp4 file on the device Reprint restart the device AccuWare problems No Phenomenon Possible Reason Solution 1 Model shows red File size exceeds the build platform model needs recovery Adjust the model into the range of the platform repair the model with error 2 No selected model No selected model c...

Страница 44: ...t Please use repair function There are holes on the loaded model surface Select Cancel Repair 10 Repair failed Open the model interface and the model still displays red Failure of repair for too many holes on the surface of the model Multiple recoveries after saving ...

Страница 45: ...NG 3D Dental FCC Compliance Statement This device complies with Part 15 of the FCC Rules Operation is subject to the following two conditions 1 This device may not cause harmful interference and 2 this device must accept any interference received including interference that may cause undesired operation All Rights Reserved Shining 3D Tech Co Ltd reserves the right to own The publication may not be...

Отзывы: