Shindaiwa BP45 Скачать руководство пользователя страница 10

10

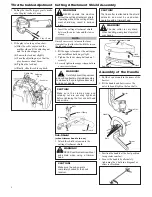
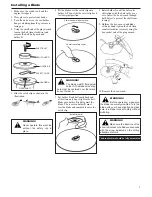
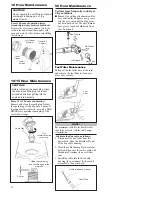
Installing Trimmer Head

To install a trimmer head

1.  Position the brushcutter with the head 

of the shaft bolt facing up.

2.  Remove the shaft bolt, bolt guard, 

Holder B and the retainer clip(s) from 

the output shaft.

IMPORTANT!

The shaft bolt, bolt guard, and retainer 

clips are not used with a trimmer head 

cutting attachment. Save these parts for 

future blade installation.

Holder B

Holder A

Gearcase Shaft

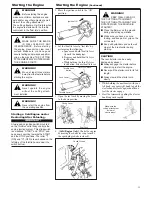
3.  Re-install Holder B on the output shaft. 
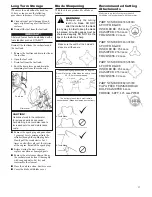
4.  Rotate the holder until the hole in the 

holder aligns with the notch on the 

gearcase flange. Using the hex wrench, 

lock the gearcase as shown.

5.  While holding the holder with the hex 

wrench, thread the trimmer head onto 

the gear-shaft and install securely using 

hand pressure. Turn counterclockwise 

to install.

6.  Remove the hex wrench.

The brushcutter can now be used as a 

grass trimmer

Hex Wrench

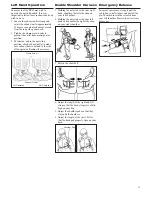
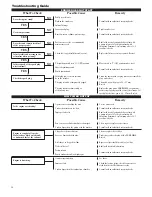
Filling The Fuel Tank

1.  Place the unit on a flat, level surface,  

and wipe any debris from around the 

fuel cap.

2.  Remove the fuel cap.
3.  Fill the tank with clean, fresh fuel.
4.  Replace the cap, and wipe away any 

spilled fuel before starting the engine.

IMPORTANT!

Mix only enough fuel for your immediate 

needs! If fuel must be stored longer 

than 30-days, it should first be treated 

with a stabilizer such as STA-BIL™ or 

equivalent product!

CAUTION!

Never attempt to mix fuel in the unit’s 

fuel tank. Always mix all fuels in a 

clean approved container.

  Use only fresh, clean unleaded gasoline 

with a pump octane rating of 87 or 

higher.

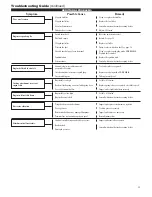
  Mixing fuel with a Premium 2-cycle 

mixing oil designed for use with high-

performance 2-cycle air-cooled engines.

  Refer to the following examples of 50:1 

fuel to oil mix quantities:

Gasoline                2-cycle mixing oil

liters   

     milliliters

2.5 l ............................. 50 ml

5 l  ................................100 ml

10 l ..............................200 ml

20 l ..............................400 ml

Mixing Fuel

WARNING!

Minimize the risk of fire, 

burns, and personal injury!



STOP

 engine before refueling.



ALWAYS 

allow the engine to cool 

before refueling



ALWAYS 

open the fuel cap slowly 

to allow any pressure build-up 

in the tank to release fuel vapor 

slowly.



ALWAYS 

transport and store fuels 

in  an approved container.



Avoid overfilling and wipe-up all 

spilled fuel. Move the engine at 

least 3 meters from the fueling 

point, storage area, and other 

readily flammable materials before 

restarting.



ALWAYS 

inspect the unit for fuel 

leaks before each use. During 

each refill, make sure there are no 

fuel leaks around the fuel cap and/

or tank. If a fuel leak is evident, 

stop using the unit immediately. 

Fuel leaks must be repaired before 

using the unit.



NEVER 

smoke or light any fires 

near the engine or fuel source.



NEVER 

place any flammable ma-

terial near the engine or muffler.



NEVER 

operate the engine without 

the muffler in good working condi-

tion.



ALWAYS 

move the unit to a place 

well away from a fuel storage area 

or other readily flammable materi-

als before starting the engine.

CAUTION!

Some gasolines contain alcohol as 

an oxygenate! Oxygenated fuels may 

cause increased operating tem-

peratures. Under certain conditions, 

alcohol-based fuels may also reduce 

the lubricating qualities of some mixing 

oils. Never use any fuel containing 

more than 10% alcohol by volume! 

Generic oils and some outboard motor 

oils may not be intended for use in 

high-performance air cooled 2-cycle 

engines, and should never be used in 

your Shindaiwa engine!

CAUTION!

This engine is designed to operate on 

a 50:1 mixture consisting of unleaded 

gasoline and a premium 2-cycle mixing 

oil only. Use of Non-approved mixing 

oils can lead to excessive maintenance 

costs and/or engine damage. 

Содержание BP45

Страница 1: ...ne is designed for cutting grass weed and brush Do not use this machine for other purposes Minimize the risk of injury to yourself and others Do not operate or service this machine unless you clearly...

Страница 2: ...delivering exceptionally high power with remarkably low displacement and weight As an owner operator you ll soon discover for yourself why Shindaiwa is simply in a class by itself IMPORTANT The infor...

Страница 3: ...e beyond the length speci ed for your unit ALWAYS keep the unit as clean as practical Keep it free of loose vegeta tion mud etc ALWAYS hold the unit rmly with both hands when cutting or trimming and m...

Страница 4: ...s is adjusted properly the unit should balance with the cutting attachment parallel to the ground Always operate with both hands rmly gripping the unit Wear close tting clothing to protect legs and ar...

Страница 5: ...e the unit with the cut ting attachment shield or other protective devices harness ignition switch blade retention clip etc removed ALWAYS make sure the cutting attach ment is properly installed and r...

Страница 6: ...chment and guard 9 7 kg Dimensions L x H x W mm 2 720 x 365 x 405 Fuel Tank Capacity 1 400 cm3 Fuel Oil Ratio 50 1 with a premium 2 cycle mixing oil Carburetor Type TK PC1OW Ignition Fully electronic...

Страница 7: ...the holder hole CAUTION Make sure the inserting direction of the exible pipe is correct as shown CAUTION Pull the exible pipe and make sure it is securely locked by the stopper knob Holder Flexible Pi...

Страница 8: ...obble CAUTION Make sure the clamp screw and retaining nut are securely tightened before tightening the four socket head cap screws CAUTION The line cutter is attached to the shield extension and must...

Страница 9: ...lade over the safety clip onto holder A Then slide the safety clip back to its original position WARNING The blade must t at against holderA Theblade smounting hole must be centered over the raised bo...

Страница 10: ...es Gasoline 2 cycle mixing oil liters milliliters 2 5 l 50 ml 5 l 100 ml 10 l 200 ml 20 l 400 ml Mixing Fuel WARNING Minimize the risk of re burns and personal injury STOP engine before refueling ALWA...

Страница 11: ...tinued 1 Move the ignition switch to the ON position Ignition ON 2 Set the throttle lever to fast idle by performing the following a Squeeze and hold throttle lever toward the handgrip b Depress and h...

Страница 12: ...ngine fails to start consult the troubleshooting guide provided Starting a Flooded Engine 1 Slide the ignition switch button to the STOP position 2 Disconnect the spark plug wire and remove the spark...

Страница 13: ...Exhaust Outlet LH Operation RH Operation Double Shoulder Harness 1 Holding the outer tube with your right hand shoulder the left side strap on your left shoulder 2 Holding the outer tube with your lef...

Страница 14: ...utter make sure the harness is adjusted correctly to the operator The shoulder harness is equipped with a quick release mechanism to assure that the unit can be released quickly from the operator in t...

Страница 15: ...w rpm can lead to premature clutch failure Trimming and Mowing Grass Hold the unit so the trimmer head is angled slightly into the area to be cut To ensure maximum trimmer line service life cut only w...

Страница 16: ...ode gap to 0 6 mm If the plug must be replaced use only a NGK BMR6A or equivalent spark plug of the correct heat range CAUTION Before removing the spark plug clean the area around the plug to prevent...

Страница 17: ...and clean it thoroughly with soap and water Let dry and reassemble the element Store the unit in a clean dust free area Cover the blade with blade cover Blade Sharpening WARNING Sharpen only the cutt...

Страница 18: ...lent resistor type spark plug of the correct heat range Set spark plug electrode gap to 0 6 0 7 mm Restart NO YES What To Check Possible Cause Remedy ENGINE DOES NOT START NO YES NO YES YES NO YES Is...

Страница 19: ...ce the fuel lter Consult with an authorized servicing dealer Adjust 2 500 min 1 Reset the switch and restart Refuel See page 10 Replace fuel lter Drain replace with clean fuel See page 10 Clean or rep...

Страница 20: ...sured sound power level 109dB A Guaranteed sound power level 110dB A Technical documentation is kept by K Maeda DIV Manager Engineering Research and Development DIV Shindaiwa Kogyo Co Ltd Head of ce 6...

Страница 21: ...21 Memo...

Страница 22: ...22 Memo...

Страница 23: ...23 Memo...

Страница 24: ...hindaiwa com Shindaiwa Kogyo Co Ltd Head Of ce 6 2 11 Ozuka Nishi Asaminami Ku Hiroshima 731 3167 Japan Telephone 81 82 849 2220 Fax 81 82 849 2481 2005 Shindaiwa Inc Part Number 62106 94310 Revision...

Отзывы: