background image

7

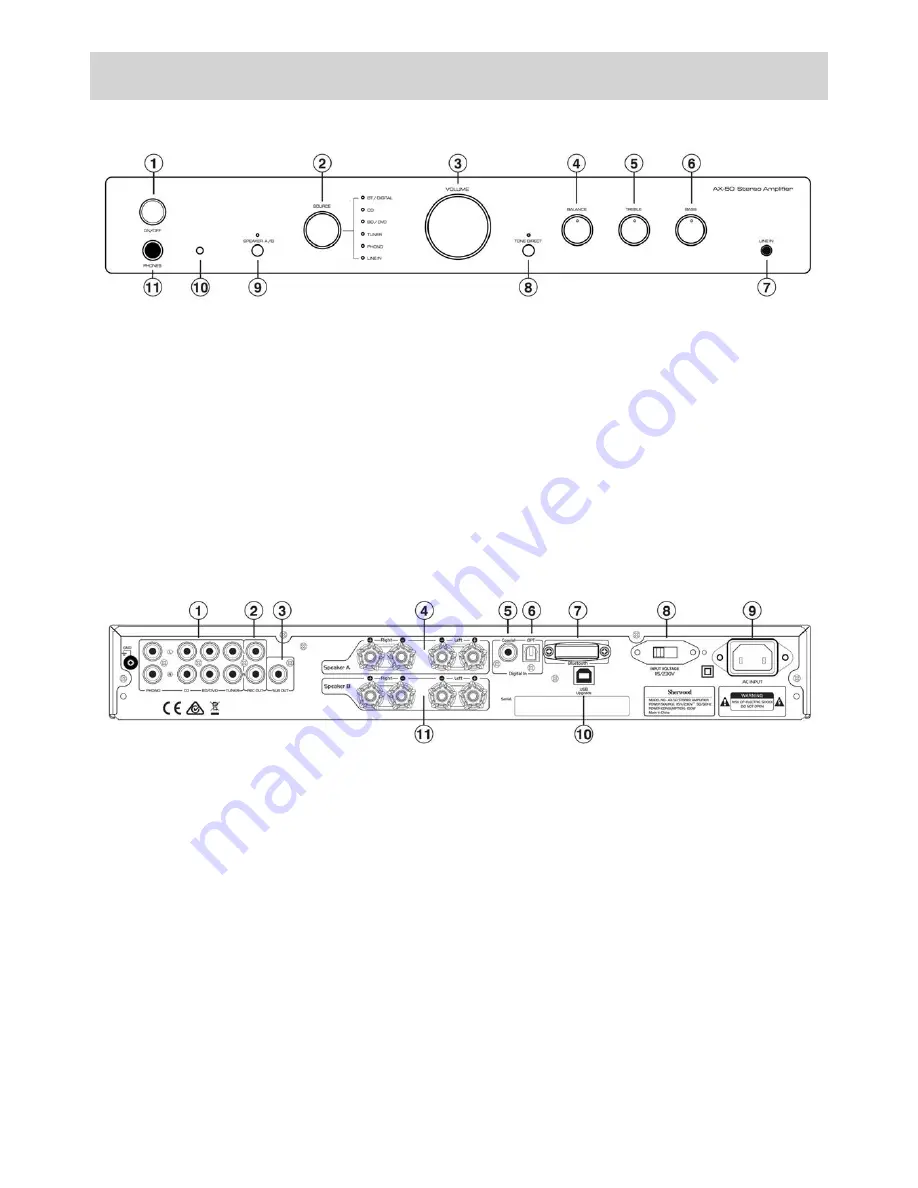
FRONT & REAR PANEL

1.  ON/OFF: 

 Press to turn the unit either into ON or STAND.

2.  SOURCE: 

 Press to select input source (BT, DIGITAL, CD, 

BD/DVD, TUNER, PHONO, LINE IN)

TO USE BT/ DIGITAL: 


Optical : LED - Orange color Coaxial : LED - Green color BT : 

LED - Red color

3.  VOLUME:

  Controls the volume level of all audio chan-

nels.

4.  BALANCE: 

Use to dial to balance the speaker level from 

Left to Right

5.  TREBLE:

  Use this dial for Treble adjustment

6.  BASS:

  Use this dial for Bass adjustment 

7.  LINE IN: 

 Use to connect LINE IN device

8.  TONE DIRECT: 

 Press to select TONE DIRECT mode

9.  SPEAKER A/B: 

 Use to select speaker A/B 

Speaker A:  LED - Green colour 

Speaker B:  LED - Red colour 

Speaker A+B:  LED - Orange colour 

None:  LED - Off

10.  REMOTE SENSOR: 

 Aim Remote Control at this

11.  PHONES: 

 Outputs audio signals for private listening 

with headphones

1.  ANALOGUE INPUTS:  

PHONO, CD, BD/DVD, TUNER


2.  REC OUT:  

This analog audio output is for connecting a 

recorder with an analog audio input

3.  SUB OUT:

  This is for connecting an Active Subwoofer

4. SPEAKER TERMINAL SET A:  

These terminal posts are for 

connecting L/R speakers for Speaker Set A (maximum 1 Pair

5.  Coaxial Digital:  

These coaxial digital audio inputs are for 

connecting components with coaxial digital audio out puts, 

such as CD and BD/DVD players

6.  Optical Digital:  

These optical digital audio inputs are for 

connecting components with optical digital audio outputs, 

such as CD and DVD/BD players

7.  BLUETOOTH:  

The Units Bluetooth module (Non Re

-

movable)

8.  115/230V:  

This switch is used to select between 115V 

or 230V.  

FOR AUSTRALIAN AND NEW ZEALAND CUS-

TOMERS - DO NOT CHANGE FROM THE DEFAULT 230V 

POSITION

9.  AC OUTLET:

  Socket for connecting the supplied IEC 

Mains Power Cord for connection to mains power

10.  USB UPGRADE: 

  For connection to a PC for upgrad

-

ing the units Firmware - For Authorized Service Personnel 

use only

11.  SPEAKER TERMINAL SET B:  

These terminal posts are 

for connecting L/R speakers for Speaker Set B (maximum 

1 Pair)

Rear Panel Connections:

Front Panel Controls:

Содержание AX-50

Страница 1: ...AX 50 STEREO INTEGRATED AMPLIFIER OPERATING INSTRUCTIONS ...

Страница 2: ...CONTENTS SAFETY INFORMATION 2 SAFETY INSTRUCTION 3 4 REMOTE CONTROL 5 6 FRONT REAR PANEL INFORMATION 7 CONNECTIONS 8 9 BASIC OPERATION 10 11 TROUBLESHOOTING 12 SPECIFICATIONS 13 WARRANTY SERVICE 14 ...

Страница 3: ...TANDARDS AS NZS EN 55013 EN 301 489 1 ELECTRICAL SAFETY PRODUCT To reduce the risk of Electrical Shock do not re move the top or back cover No User Serviceable Parts Inside Refer all servicing to qualified service personnel Do not expose this appliance to rain or moisture This lightning bolt with arrow head symbol within an equilateral triangle is intended to alert the user to the presence of unin...

Страница 4: ...ombination to overturn OUTDOOR ANTENNA GROUNDING If an outside antenna or cable system is connected to the product be sure the antenna or cable system is grounded so as to provide some protection against voltage surges and built up static charges Correct grounding should always be installed by an electrician POWER CORD PROTECTION The power supply cables should be routed so that they are not likely...

Страница 5: ...or other components or furniture to ensure proper ventilation WATER INGRESS This unit must not be exposed to dripping or splashing of liquids of any kind Also no ob jects filled with liquids such as vases should be placed anywhere near this unit in case of spillage FURTHER NOTES ON USE SAFETY INSTRUCTIONS Keep the unit free from water liquids moisture and dust Never allow foreign objects to fall i...

Страница 6: ...select SPEAKER Set A Press again to select SPEAKER Set B Press again to select both SPEAKER Sets A B 7 Press DIRECT to select TONE DIRECT mode 8 Press to select the Previous Track in BLUETOOTH mode 8 Press to select the Next Track in BLUETOOTH mode 9 Press SOURCE to select up between Input Sources BT DIGITAL CD BD DVD TUNER PHONO LINE IN 10 Press SOURCE to select down between Input Sources BT DIGI...

Страница 7: ...r can be controlled from your listening position Use the remote control unit within a range of about 7 meters 23 feet and within he angles of up to 30 degrees aiming at the remote sensor on the front panel of the Amplifier Precautions Concerning Batteries Be sure to insert the batteries with correct positive and negative polarities Use batteries of the same type Never use different types of batter...

Страница 8: ...ecting a recorder with an analog audio input 3 SUB OUT This is for connecting an Active Subwoofer 4 SPEAKER TERMINAL SET A These terminal posts are for connecting L R speakers for Speaker Set A maximum 1 Pair 5 Coaxial Digital These coaxial digital audio inputs are for connecting components with coaxial digital audio out puts such as CD and BD DVD players 6 Optical Digital These optical digital au...

Страница 9: ...your speakers Only connect speakers with an impedance of 8 ohms or more The amplifier s red speaker terminals are the positive terminals and the black terminals are the negative terminals The side of the speaker cable is marked to make it distinguishable from the side of the cable Con nect this marked side to the red terminals and the unmarked side is the black terminal Making The Speaker Cable Co...

Страница 10: ... Digital connection Optical Input Jacks This unit s optical digital input jack has a shutter type cover that opens when an optical plug is inserted and closes when it s removed Be sure to push plugs in all the way Caution To prevent shutter damage hold the optical plug straight when inserting and removing Turntable PHONO Connections This unit has one Input designed specifically for connecting ONLY...

Страница 11: ...t using Analogue RCA cables Stereo 2RCA 2RCA Subwoofer Pre Out This unit has a single Mono Subwoofer Pre Out Jack SUB OUT for connection to an Active Powered Subwoofer This jack will output a low frequency signal and it s level is automatically raised and lowered along with the main Volume control 1 Connect to an Active Powered Subwoofer using Analogue RCA cable Mono 1RCA 1RCA NOTE The SUB OUT Jac...

Страница 12: ...lly Input Source Selection Use the INPUT selector dial on the front panel or press the SOURCE UP DOWN buttons on the remote control to select your desired INPUT source Volume Adjustment Use the VOLUME dial on the front panel or press the VOL buttons on the remote control to adjust the volume Tone Control Settings You can adjust the bass and treble for the front speakers BASS Use this dial to boost...

Страница 13: ...d from speakers Power cords or lighting placed near this product Place this product away as far as possi ble from lighting or power leads Sound is only heard from one channel One of the input cords is disconnected Or the BALANCE control is set to one side Connect the input leads and adjust the BALANCE control to the center position Sound cuts off when listening or no sound even though power is ON ...

Страница 14: ...dB Tone Controls Bass Treble 100Hz 10kHz 6dB Bluetooth Version V2 1 Receiver Support EDR A2DP AVRCP Sampling Rate 48K 24Bit S N Ratio 95dB Transmission Distance 10 Meters Frequency Range 2402 2480 MHz General Standby Power Consumption 0 5W Power Requirements AC AC220V 240V 50Hz AUST NZ AC115V 60Hz USA SELECTABLE Power Consumption 220W Maximum Dimensions Main Unit 435mm x 280mm x 70mm W x D x H Wei...

Страница 15: ...ional to the terms of this warranty We reserve the right to make changes or improvements in design or manufacture without any obligation to change or improve previ ously manufactured product SHERWOOD shall not be responsible for incidental and or consequential damages or loss What Is Not Covered The cost of delivery and insurance in transit to the service centre It is your sole responsibility to a...

Страница 16: ...NOTES ...

Страница 17: ...AX 50 STEREO INTEGRATED AMPLIFIER Printed in China ...

Отзывы: