background image

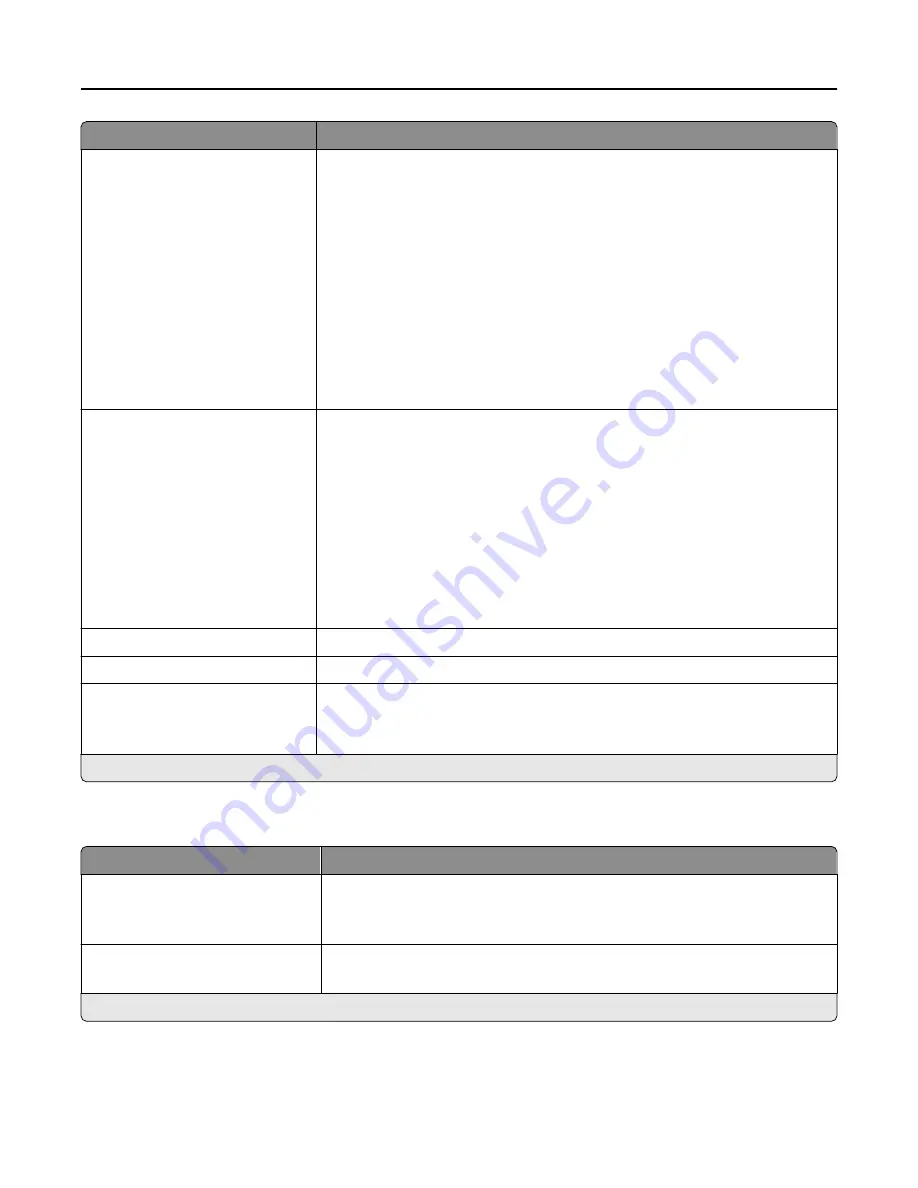
Menu item

Description

Log Action at Near Full

None*
E

mail Current Log

E

mail & Delete Current Log

E

mail & Delete Oldest Log

Post Current Log
Post & Delete Current Log
Post & Delete Oldest Log
Delete Current Log
Delete Oldest Log
Delete All But Current
Delete All Logs

Specify how the printer responds when the hard disk is nearly full.
Note: The value defined in Log Near Full Level determines when this action 

is triggered.

Log Action at Full

None*
E

mail & Delete Current Log

E

mail & Delete Oldest Log

Post & Delete Current Log
Post & Delete Oldest Log
Delete Current Log
Delete Oldest Log
Delete All But Current
Delete All Logs

Specify how the printer responds when hard disk usage reaches the maximum 

limit (100MB).

URL to Post Log

Specify where the printer posts job accounting logs.

E

mail Address to Send Logs

Specify the e

mail address to which the printer sends job accounting logs.

Log File Prefix

Specify the prefix for the log files.
Note: The current host name defined in the TCP/IP menu is used as the 

default log file prefix.

Note: An asterisk (*) next to a value indicates the factory default setting.

XPS

Menu item

Description

Print Error Pages

Off*
On

Print a test page that contains information on errors.

Minimum Line Width

1–30 (2*)

Set the minimum stroke width of any job printed in 1200 dpi.

Note: An asterisk (*) next to a value indicates the factory default setting.


Understanding the printer menus

77

Содержание MX-B557F

Страница 1: ...MX B557F MX B707F User s Guide Machine type s 7465 Models 496 896 ...

Страница 2: ...zing the home screen 16 Setting up Card Copy 16 Setting up Scan Center 16 Using Shortcut Center 17 Managing bookmarks 17 Managing contacts 18 Loading paper and specialty media 20 Setting the size and type of the specialty media 20 Configuring Universal paper settings 20 Loading the 550 sheet tray 20 Loading the 2100 sheet tray 23 Loading the multipurpose feeder 28 Linking trays 29 Paper support 30...

Страница 3: ...ing copies 43 Collating copies 43 Placing separator sheets between copies 43 Copying multiple pages onto a single sheet 44 Creating a copy shortcut 44 E mailing 45 Using the automatic document feeder and scanner glass 45 Configuring the SMTP server for e mail 45 Sending an e mail 46 Creating an e mail shortcut 46 Faxing 47 Setting up the printer to fax 47 Using the automatic document feeder and sc...

Страница 4: ...u map 60 Device 61 Print 73 Paper 81 Copy 84 Fax 87 E mail 91 FTP 97 USB Drive 101 Network Ports 106 Security 118 Reports 125 Help 126 Troubleshooting 126 Printing the Menu Settings Page 127 Securing the printer 128 Locating the security slot 128 Erasing printer memory 128 Erasing printer hard disk memory 128 Encrypting the printer hard disk 129 Restoring factory default settings 129 Statement of ...

Страница 5: ...ultipurpose feeder 148 Paper jam in the automatic document feeder 149 Paper jam in the 4 bin mailbox 151 Paper jam in the offset stacker or staple finisher 152 Paper jam in the staple hole punch finisher 154 Staple jam in the staple finisher 155 Staple jam in the staple hole punch finisher 158 Troubleshooting 161 Network connection problems 161 Hardware options problems 163 Issues with supplies 16...

Страница 6: ...ufacturer s authorized replacement CAUTION POTENTIAL INJURY Do not use this product with extension cords multioutlet power strips multioutlet extenders or UPS devices The power capacity of these types of accessories can be easily overloaded by a laser printer and may result in a risk of fire property damage or poor printer performance CAUTION POTENTIAL INJURY Do not use this product with an inline...

Страница 7: ...44 lb then it may require two or more people to lift it safely CAUTION POTENTIAL INJURY When moving the printer follow these guidelines to avoid personal injury or printer damage Make sure that all doors and trays are closed Turn off the printer and then unplug the power cord from the electrical outlet Disconnect all cords and cables from the printer If the printer has separate floor standing opti...

Страница 8: ...d and approved to meet strict global safety standards with the use of specific manufacturer s components The safety features of some parts may not always be obvious The manufacturer is not responsible for the use of other replacement parts Refer service or repairs other than those described in the user documentation to a service representative This product uses a printing process that heats the pr...

Страница 9: ... not place or use this product near water or wet locations Make sure that airflow in the room meets the latest revision of the ASHRAE 62 standard or the CEN Technical Committee 156 standard Provide a flat sturdy and stable surface Keep the printer Clean dry and free of dust Away from stray staples and paper clips Away from the direct airflow of air conditioners heaters or ventilators Free from dir...

Страница 10: ...your printer or MFP may require a caster base furniture or other feature to prevent instability causing possible injury For more information on supported configurations contact the place where you purchased the printer CAUTION TIPPING HAZARD To reduce the risk of equipment instability load each tray separately Keep all other trays closed until needed You can configure your printer by adding option...

Страница 11: ...Basic model 1 Automatic document feeder ADF tray 2 ADF bin 3 Standard bin 4 Multipurpose feeder 5 Standard 550 sheet tray 6 Control panel 7 ADF Learning about the printer 11 ...

Страница 12: ...h finisher Offset stacker When using optional trays Always use a caster base when the printer is configured with a 2100 sheet tray If the 2100 sheet tray is installed then you cannot use an optional 550 sheet tray A maximum of two optional 550 sheet trays may be configured with the printer The printer supports only one finisher at a time Note Some options may not be available For more information ...

Страница 13: ...d when connecting this product to the public switched telephone network For users in Australia the cord must be approved by the Australian Communications and Media Authority Warning Potential Damage To avoid loss of data or printer malfunction do not touch the USB cable any wireless network adapter or the printer in the areas shown while actively printing Use the To 1 Power cord socket Connect the...

Страница 14: ... which mode is selected 7 Clear all or Reset button Reset the default settings of a function such as copying faxing or scanning 8 Stop or Cancel button Stop the current job 9 Backspace button Move the cursor backward and delete a character in an input field 10 Indicator light Check the status of the printer 11 Volume buttons Adjust the volume of the headset or speaker 12 Headset or speaker port At...

Страница 15: ...r error message whenever the printer requires intervention to continue processing View more information on the printer warning or message and on how to clear it Note You can also access this setting by touching the top section of the home screen 7 USB Drive Print photos and documents from a flash drive Scan photos and documents to a flash drive 8 Job Queue Show all the current print jobs Note You ...

Страница 16: ... as 123 123 123 123 If you are using a proxy server then temporarily disable it to load the web page correctly 2 Click Apps Card Copy Configure Notes Make sure that Display Icon is enabled Make sure that E mail Settings and Network Share Settings are configured When scanning a card make sure that the scan resolution does not exceed 200 dpi for color and 400 dpi for black and white When scanning mu...

Страница 17: ... a bookmark name 3 Select an Address protocol type and then do one of the following For HTTP and HTTPS type the URL that you want to bookmark For HTTPS make sure to use the host name instead of the IP address For example type myWebsite com sample pdf instead of typing 123 123 123 123 sample pdf Make sure that the host name also matches the Common Name CN value in the server certificate For more in...

Страница 18: ...ddress field Notes View the printer IP address on the printer home screen The IP address appears as four sets of numbers separated by periods such as 123 123 123 123 If you are using a proxy server then temporarily disable it to load the web page correctly 2 Click Address Book 3 From the Contacts section add a contact Note You can assign the contact to one or more groups 4 If necessary specify a l...

Страница 19: ...n click a contact name and then edit the information From the Contact Groups section click a group name and then edit the information 4 Apply the changes Deleting contacts or groups 1 Open a web browser and then type the printer IP address in the address field Notes View the printer IP address on the printer home screen The IP address appears as four sets of numbers separated by periods such as 12...

Страница 20: ...iguring Universal paper settings 1 From the home screen touch Settings Paper Media Configuration Universal Setup 2 Configure the settings Loading the 550 sheet tray CAUTION POTENTIAL INJURY To reduce the risk of equipment instability load each tray separately Keep all other trays closed until needed 1 Remove the tray Note To avoid paper jams do not remove trays while the printer is busy 2 Adjust t...

Страница 21: ... fan and align the paper edges before loading 4 Load the paper stack with the printable side facedown and then make sure that the side guides fit snugly against the paper Loading paper and specialty media 21 ...

Страница 22: ...staple finisher is installed or not Without an optional staple finisher With an optional staple finisher One sided printing One sided printing Two sided printing Two sided printing When loading prepunched paper make sure that the holes on the long edge of the paper are against the right side of the tray One sided printing Two sided printing Loading paper and specialty media 22 ...

Страница 23: ...tray 6 From the control panel set the paper size and paper type to match the paper loaded Loading the 2100 sheet tray CAUTION TIPPING HAZARD To reduce the risk of equipment instability load each tray separately Keep all other trays closed until needed 1 Pull out the tray 2 Adjust the guides Loading A5 size paper a Pull up and slide the width guide to the position for A5 Loading paper and specialty...

Страница 24: ...ngth guide to the position for A5 until it clicks into place c Remove the A5 length guide from its holder d Insert the guide into its designated slot and then press until it clicks into place Loading paper and specialty media 24 ...

Страница 25: ...e width guide to the correct position for the size of the paper being loaded b If the A5 length guide is still attached then remove it If the guide is not attached then proceed to step d on page 26 c Place the A5 length guide in its holder Loading paper and specialty media 25 ...

Страница 26: ...align the paper edges before loading 4 Load the paper stack with the printable side facedown Load letterhead depending on whether an optional staple finisher is installed or not Without an optional staple finisher With an optional staple finisher One sided printing One sided printing Loading paper and specialty media 26 ...

Страница 27: ...aper make sure that the holes on the long edge of the paper are against the right side of the tray One sided printing Two sided printing 5 Insert the tray Note Press down the paper stack while inserting the tray 6 From the control panel set the paper size and paper type to match the paper loaded Loading paper and specialty media 27 ...

Страница 28: ...ading 3 Flex fan and align the paper edges before loading 4 Load paper with the printable side faceup Load letterhead depending on whether an optional staple finisher is installed or not Without an optional staple finisher With an optional staple finisher One sided printing One sided printing Loading paper and specialty media 28 ...

Страница 29: ...ress field Notes View the printer IP address on the printer home screen The IP address appears as four sets of numbers separated by periods such as 123 123 123 123 If you are using a proxy server then temporarily disable it to load the web page correctly 2 Click Settings Paper Tray Configuration 3 Set the same paper size and paper type for the trays that you are linking 4 Save the settings 5 Click...

Страница 30: ...7 mm 7 2 x 10 1 in X Oficio Mexico 216 x 340 mm 8 5 x 13 4 in Statement 140 x 216 mm 5 5 x 8 5 in X Executive 184 x 267 mm 7 3 x 10 5 in X Letter 216 x 279 mm 8 5 x 11 in Legal 216 x 356 mm 8 5 x 14 in Folio 216 x 330 mm 8 5 x 13 in Universal 105 x 148 mm 4 1 x 5 8 in to 216 x 356 mm 8 5 x 14 in X 7 3 4 Envelope Monarch 98 x 191 mm 3 9 x 7 5 in X X 1 A5 long edge feed LEF is recommended over A5 sh...

Страница 31: ... in X X 1 A5 long edge feed LEF is recommended over A5 short edge feed SEF 2 Envelopes wider than 101 6 mm 4 5 in may crease This paper type must be tested for acceptability Paper sizes supported by the output options or finishers Paper size Offset stacker 4 bin mailbox Staple finisher Staple hole punch finisher Stack Staple Stack Staple Hole punch A4 210 x 297 mm 8 3 x 11 7 in A5 LEF 210 x 148 mm...

Страница 32: ... 356 mm 8 5 x 14 in X Folio 216 x 330 mm 8 5 x 13 in Universal 105 x 148 mm 4 1 x 5 8 in to 216 x 356 mm 8 5 x 14 in X X X X X 7 3 4 Envelope Monarch 98 x 191 mm 3 9 x 7 5 in X X X X X X 9 Envelope 98 x 225 mm 3 9 x 8 9 in X X X X X X 10 Envelope 105 x 241 mm 4 1 x 9 5 in X X X X X X DL Envelope 110 x 220 mm 4 3 x 8 7 in X X X X X X C5 Envelope 162 x 229 mm 6 4 x 9 in X X X X X X B5 Envelope 176 x...

Страница 33: ...ted by the printer Paper type Standard or optional 550 sheet tray Optional 2100 sheet tray Multipurpose feeder Two sided printing Plain paper Card stock X Transparency1 X X Labels X X Bond Envelope X X Rough envelope X X Letterhead Preprinted Colored paper X Light X Heavy X Rough Cotton X Custom type x X 1 To prevent transparencies from sticking together print up to 20 pages only Print the succeed...

Страница 34: ...ored paper X X X X X X Light X X X X X X Heavy X X X X X X Rough Cotton X X X X X X Custom type x X X X X X X Supported paper weights Paper weights supported by the printer Paper type and weight Standard or optional 550 sheet tray Optional 2100 sheet tray Multipurpose feeder Two sided printing Plain paper or Bond1 60 176 g m grain long 16 47 lb bond 1 Grain short is preferred for paper over 176 g ...

Страница 35: ... bond X Integrated forms 75 135 g m 20 36 lb bond X Envelopes3 60 105 g m 16 28 lb bond X 1 Grain short is preferred for paper over 176 g m 47 lb 2Pressure sensitive area must enter the printer first 3 28 lb bond envelopes are limited to 25 cotton content Paper weights supported by the output options or finishers Paper type and weight Offset stacker 4 bin mailbox Staple finisher Staple hole punch ...

Страница 36: ...in long 110 lb bond X X X X Card stock 176 g m grain long 65 lb bond X X X X X X Card stock 163 g m grain long 90 lb bond X X X X Transparency 138 146 g m grain long 37 39 lb bond X X X X Paper labels 180 g m 48 lb bond X X X X X X Integrated forms 140 175 g m 37 47 lb bond X X X X X X Integrated forms 75 135 g m 20 36 lb bond X X X X X X Envelopes 60 105 g m 16 28 lb bond X X X X X X Paper suppor...

Страница 37: ...m the Google PlayTM store and is enabled in the mobile device 1 From your AndroidTM mobile device open a document or select a document from your file manager 2 Tap Print 3 Select a printer and then tap Printing from a mobile device using AirPrint The AirPrint software feature is a mobile printing solution that allows you to print directly from Apple devices to an AirPrint certified printer Notes M...

Страница 38: ...twork on page 132 1 From your mobile device launch a compatible application or select a document from your file manager 2 Depending on your mobile device do one of the following Tap Print Tap Print Tap Print 3 Select a printer and then adjust the settings if necessary 4 Print the document Printing from a flash drive 1 Insert the flash drive Notes If you insert the flash drive when an error message...

Страница 39: ...n while actively printing reading or writing from the memory device Supported flash drives and file types Flash drives Notes The printer supports high speed USB flash drives with full speed standard USB flash drives must support the File Allocation Table system FAT16 32 Many flash drives are tested and approved for use with the printer For more information contact the place where you purchased the...

Страница 40: ...on Set the expiration time that the printer prints a copy before printing the remaining copies Note Verify jobs print one copy to check if it is satisfactory before printing the remaining copies Reserve Job Expiration Set the expiration time that the printer stores print jobs Note Reserve held jobs are automatically deleted after printing Require All Jobs to be Held Set the printer to hold all pri...

Страница 41: ...t 1 From the home screen touch Settings Reports Print Print Fonts 2 Touch PCL Fonts or PS Fonts Canceling a print job From the printer control panel 1 From the home screen touch Job Queue Note You can also access this setting by touching the top section of the home screen 2 Select the job to cancel From the computer 1 Depending on the operating system do either of the following Open the printers f...

Страница 42: ...n media such as magazine clippings Place the document facedown in the corner with the arrow Making copies 1 Load an original document into the ADF tray or on the scanner glass Note To avoid a cropped image make sure that the original document and output have the same paper size 2 From the home screen touch Copy and then specify the number of copies If necessary adjust the copy settings 3 Copy the ...

Страница 43: ... screen touch Copy Paper Setup 3 Adjust the settings 4 Copy the document Reducing or enlarging copies 1 Load an original document into the ADF tray or on the scanner glass 2 From the home screen navigate to Copy Scale specify a scale value Note Changing the size of the original document or output after setting Scale restores the scale value to Auto 3 Copy the document Collating copies 1 Load an or...

Страница 44: ...ment into the ADF tray or on the scanner glass 2 From the home screen touch Copy Pages per Side 3 Adjust the settings 4 Copy the document Creating a copy shortcut 1 From the home screen touch Copy 2 Configure the settings and then touch 3 Create a shortcut Copying 44 ...

Страница 45: ...n media such as magazine clippings Place the document facedown in the corner with the arrow Configuring the SMTP server for e mail From the control panel 1 From the control panel touch Settings E mail E mail Setup 2 Configure the settings From the Embedded Web Server 1 Open a web browser and then type the printer IP address in the address field Notes View the printer IP address on the printer home...

Страница 46: ...lso enter the recipient using the address book or shortcut number 3 If necessary configure the output file type settings 4 Send the e mail Using the shortcut number 1 From the control panel press and then enter the shortcut number using the keypad 2 Send the e mail Creating an e mail shortcut 1 From the home screen touch E mail 2 Configure the settings and then touch 3 Create a shortcut E mailing ...

Страница 47: ...le actively sending or receiving a fax Configuring the SMTP server for fax From the control panel 1 From the control panel touch Settings Fax Fax Server Setup Fax Server E mail Settings 2 Configure the settings Note To use the SMTP server setting for e mail enable Use E mail SMTP Server From the Embedded Web Server 1 Open a web browser and then type the printer IP address in the address field Note...

Страница 48: ...ectrical or cabling connections such as the power cord fax feature or telephone during a lightning storm CAUTION SHOCK HAZARD To avoid the risk of electrical shock do not use the fax feature during a lightning storm CAUTION POTENTIAL INJURY To reduce the risk of fire use only a 26 AWG or larger telecommunications RJ 11 cord when connecting this product to the public switched telephone network For ...

Страница 49: ...set Auto Answer to On or manually set Auto Answer to Off If you want to receive faxes automatically then set the printer to pick up on a specified number of rings Setup 2 Printer is sharing the line with an answering machine Note If you subscribe to a distinctive ring service then make sure that you set the correct ring pattern for the printer Otherwise the printer does not receive faxes even if y...

Страница 50: ...t the printer to pick up calls two rings after the answering machine For example if the answering machine picks up calls after four rings then set the printer Rings to Answer setting to 6 Setting up fax in countries or regions with different telephone wall jacks and plugs CAUTION SHOCK HAZARD To avoid the risk of electrical shock do not set up this product or make any electrical or cabling connect...

Страница 51: ...n Communications and Media Authority The standard wall jack adopted by most countries or regions is RJ11 If the wall jack or equipment in your facility is not compatible with this type of connection then use a telephone adapter An adapter for your country or region may not come with your printer and you may need to purchase it separately There may be an adapter plug installed in the telephone port...

Страница 52: ...ble to the line port of the printer 2 Connect the other end of the cable to the RJ11 adapter and then connect the adapter to the wall jack 3 If you want to connect another device with a non RJ11 connector to the same wall jack then connect it directly to the telephone adapter Faxing 52 ...

Страница 53: ... port is for telephones Connect the printer to any of the N ports 1 Connect one end of the telephone cable to the line port of the printer 2 Connect the other end of the cable to the RJ11 adapter and then connect the adapter to an N port 3 If you want to connect a telephone and answering machine to the same wall jack then connect the devices as shown Faxing 53 ...

Страница 54: ...touch Settings Device Preferences Date and Time Configure 2 In the Time Zone menu select Custom 3 Configure the settings Using the automatic document feeder and scanner glass Automatic document feeder ADF Scanner glass Use the ADF for multiple page or two sided documents Load an original document faceup For multiple page documents make sure to align the leading edge before loading Make sure to adj...

Страница 55: ... and then enter the recipient number 4 If necessary configure other fax settings 5 Send the fax job Scheduling a fax 1 Load the original document into the ADF tray or on the scanner glass 2 From the home screen navigate to Fax To enter the fax number Done 3 Touch Send Time configure the settings and then touch Done 4 Send the fax Creating a fax destination shortcut 1 From the home screen touch Fax...

Страница 56: ...reen touch Settings Reports Fax 2 Touch Fax Job Log or Fax Call Log Blocking junk faxes 1 From the home screen touch Settings Fax Fax Setup Fax Receive Settings Admin Controls 2 Set Block No Name Fax to On Holding faxes 1 From the home screen touch Settings Fax Fax Setup Fax Receive Settings Holding Faxes 2 Select a mode Forwarding a fax 1 From the home screen touch Settings Fax Fax Setup Fax Rece...

Страница 57: ...r glass for single page documents book pages small items such as postcards or photos transparencies photo paper or thin media such as magazine clippings Place the document facedown in the corner with the arrow Scanning to an FTP server 1 Load the original document into the ADF tray or on the scanner glass 2 From the home screen touch FTP and then enter the needed information 3 If necessary configu...

Страница 58: ...adjust the settings if necessary Note If the USB Drive screen does not appear then touch USB Drive on the home screen 4 Scan the document Warning Potential Damage To avoid loss of data or printer malfunction do not touch the flash drive or the printer in the area shown while actively printing reading or writing from the memory device Scanning 58 ...

Страница 59: ...destinations select Fax 3 Select a fax destination Note To create a fax destination touch Create Fax 4 Scan the document Sending scanned documents to a computer 1 Load an original document into the ADF tray or on the scanner glass 2 From the home screen touch Scan Profiles Scan To Computer 3 Select the scan profile where you want to save the document Scanning 59 ...

Страница 60: ...l E mail Setup E mail Defaults Web Link Setup FTP FTP Defaults USB Drive Flash Drive Scan Flash Drive Print Network Ports Network Overview Wireless Ethernet TCP IP SNMP IPSec 802 1x LPD Configuration HTTP FTP Settings ThinPrint USB Restrict external network access Google Cloud Print Wi Fi Direct Security Login Methods Schedule USB Devices Security Audit Log Login Restrictions Confidential Print Se...

Страница 61: ... may not appear or may require special hardware be installed to appear Displayed information Display Text 1 IP Address Display Text 2 Date Time Custom Text 1 Custom Text 2 Specify the information to appear on the home screen Date and Time Configure Current Date and Time Manually Set Date and Time Date Format MM DD YYYY Time Format 12 hour A M P M Time Zone UTC 5 00 Network Time Protocol Enable NTP...

Страница 62: ...playing prompts Express Scanning Off On Set the initial scanning speed point to the fastest speed Output Lighting Off On Enable the integrated output light or indicator light of an optional output bin Audio Feedback Button Feedback On Volume 5 Enable audio feedback for button presses panel interactions paper loaded prompts and error notifications Adjust the feedback volume Screen Timeout 5 300 sec...

Страница 63: ...Side Off 2 Portrait pages 4 Portrait pages 2 Landscape pages 4 Landscape pages Specify the scanning behavior based on the original document Copy Darkness 1 9 5 Determine the darkness of the scanned text images Note An asterisk next to a value indicates the factory default setting Remote Operator Panel Menu item Description External VNC Connection Don t Allow Allow Connect an external Virtual Netwo...

Страница 64: ...s menu item appears only in some printer models ADF Loaded Beep Off On Enable a sound when loading paper into the ADF Alarm Control Off Single Continuous Set the number of times that the alarm sounds when the printer requires user intervention Supplies Show Supply Estimates Show estimates Do not show estimates Show the estimated status of the supplies Supplies Cartridge Alarm Off Single Continuous...

Страница 65: ... e mail to a group of pre defined e mail addresses when certain events occur on the printer Error Prevention ADF Multifeed Sensor Off On Detect when the ADF picks more than one sheet of media at once Error Prevention Jam Assist Off On Set the printer to flush blank pages or pages with partial prints automatically after a jammed page has been cleared Error Prevention Auto Continue Off On 5 seconds ...

Страница 66: ...he memory before printing it Jam Content Recovery Jam Recovery Off On Auto Set the printer to reprint jammed pages Jam Content Recovery Scanner Jam Recovery Job level Page level Specify how to restart a scan job after resolving a paper jam Note An asterisk next to a value indicates the factory default setting Power Management Menu item Description Sleep Mode Profile Print from Sleep Mode Stay awak...

Страница 67: ...scription Duplicate Key Strike Interval 0 5 seconds 0 Set the interval during which the printer ignores duplicate key presses on an attached keyboard Key Repeat Initial Delay 0 25 5 seconds 1 Set the initial length of delay before a repeating key starts repeating Note Appears only when a keyboard is attached to the printer Key Repeat Rate 0 5 30 30 Set the number of presses per second for a repeat...

Страница 68: ...numerates as a USB Simple device single interface or as a USB Composite device multiple interfaces USB Configuration USB Speed Full Auto Set the USB port to run at full speed and disable its high speed capabilities Tray Configuration Size Sensing Tray x Sensing Off On Set the tray to sense automatically the paper size loaded into it Tray Configuration Tray Linking Automatic Off Set the printer to ...

Страница 69: ...Use current Set the printer to resolve paper or envelope related change prompts Reports Menu Settings Page Event Log Event Log Summary HealthCheck Statistics Print reports about printer menu settings status and event logs Printer Emulations PPDS Emulation Off On Set the printer to recognize and use the PPDS data stream Printer Emulations PS Emulation Off On Set the printer to recognize and use the...

Страница 70: ...r less use the high frequency screens Print Configuration Print Density 1 5 3 Copy Density 1 5 3 Adjust the toner density when printing or copying documents Print Configuration A4 Fuser Compress Clip Set the fuser behavior when printing on a letter size paper Device Operations Quiet Mode Off On Set the printer to operate in Quiet Mode Note Enabling this setting slows down the overall performance o...

Страница 71: ...Operations Enable Optional Parallel Port Off On Enable the optional parallel port Scanner Configuration Scanner Manual Registration Print Quick Test Print a Quick Test target page Note Make sure that the margin spacing on the target page is uniform all the way around the target If it is not then the printer margins must be reset Scanner Configuration Scanner Manual Registration Front ADF Registrat...

Страница 72: ...setting Out of Service Erase Menu item Description Out of Service Erase Memory Last Sanitized Hard Disk Last Sanitized Show information on when the printer memory or hard disk was last sanitized Note Hard Disk Last Sanitized appears only when a hard disk is installed Out of Service Erase Sanitize all information on nonvolatile memory Erase all printer and network settings Erase all apps and app se...

Страница 73: ...aximum length is 63 characters Contact Personalize the printer name The maximum length is 63 characters Export Configuration File to USB Export the configuration file to a flash drive Export Compressed Logs to USB Export the compressed log files to a flash drive Print Layout Menu item Description Sides 1 Sided 2 Sided Specify whether to print on one side or both sides of the paper Flip Style Long ...

Страница 74: ...side 12 pages per side 16 pages per side Print multiple page images on one side of a sheet of paper Pages per Side Ordering Horizontal Reverse Horizontal Vertical Reverse Vertical Specify the positioning of multiple page images when using the Pages per Side menu Pages per Side Orientation Auto Landscape Portrait Specify the orientation of multiple page images when using the Pages per Side menu Pag...

Страница 75: ...termine what the printer does with downloaded resources such as fonts and macros when it receives a job that requires more than the available memory Notes When set to Off the printer retains downloaded resources only until memory is needed Resources associated with the inactive printer language are deleted When set to On the printer preserves all the permanent downloaded resources across all langu...

Страница 76: ...b Accounting Menu item Description Job Accounting Off On Set the printer to create a log of the print jobs that it receives Note This menu item appears only when a flash memory or hard disk is installed Accounting Log Frequency Daily Weekly Monthly Specify how often the printer creates a log file Log Action at End of Frequency None E mail Current Log E mail Delete Current Log Post Current Log Post...

Страница 77: ...urrent Delete All Logs Specify how the printer responds when hard disk usage reaches the maximum limit 100MB URL to Post Log Specify where the printer posts job accounting logs E mail Address to Send Logs Specify the e mail address to which the printer sends job accounting logs Log File Prefix Specify the prefix for the log files Note The current host name defined in the TCP IP menu is used as the...

Страница 78: ... the minimum stroke width of any job printed in 1200 dpi Lock PS Startup Mode Off On Disable the SysStart file Font Priority Resident Flash Disk Establish the font search order Notes Resident sets the printer to search its memory for the requested font before searching the flash memory or printer hard disk Flash Disk sets the printer to search the flash memory or printer hard disk for the requeste...

Страница 79: ...entation of text and graphics on the page Lines per Page 1 255 Specify the number of lines of text for each page printed through the PCL data stream Notes This menu item activates vertical escapement that causes the selected number of requested lines to print between the default margins of the page 60 is the U S factory default setting 64 is the international factory default setting PCL5 Minimum L...

Страница 80: ...to a value indicates the factory default setting HTML Menu item Description Font Name Times Set the font to use when printing HTML documents Font Size 1 255 12 Set the font size to use when printing HTML documents Scale 1 400 100 Scale HTML documents for printing Orientation Portrait Landscape Set the page orientation for HTML documents Margin Size 8 255 mm 19 Set the page margin for HTML document...

Страница 81: ...dicates the factory default setting Paper Tray Configuration Menu item Description Default Source Tray x 1 Multipurpose Feeder Manual Paper Manual Envelope Set the paper source for all print jobs Paper Size Type Tray x Multipurpose Feeder Manual Paper Manual Envelope Specify the paper size or paper type loaded in each paper source Substitute Size Off Letter A4 All Listed Set the printer to substit...

Страница 82: ...nches Millimeters Specify the unit of measurement for the universal paper Note Inches is the U S factory default setting Millimeters is the international factory default setting Portrait Width 3 52 inches 8 5 76 1321 mm 216 Set the portrait width of the universal paper Portrait Height 3 52 inches 14 76 2 1321 mm 356 Set the portrait height of the universal paper Feed Direction Short Edge Long Edge...

Страница 83: ... Landscape 2 scans per side Off On Assign a scan size name and configure the scan settings Media Types Menu item Description Plain Card Stock Transparency Recycled Labels Vinyl Labels Bond Envelope Rough Envelope Letterhead Preprinted Colored Paper Light Heavy Rough Cotton Custom Type X Specify the texture weight and orientation of the paper Understanding the printer menus 83 ...

Страница 84: ...or based on the original document Separator Sheets None Between Copies Between Jobs Between Pages Specify whether to insert blank separator sheets when printing Separator Sheet Source Tray x 1 Multipurpose Feeder Specify the paper source for the separator sheet Pages per Side Off 2 Portrait pages 4 Portrait pages 2 Landscape pages 4 Landscape pages Specify the number of page images to print on one...

Страница 85: ...ader Right Header Left Footer Middle Footer Right Footer Specify the header or footer information on the scanned image Overlay Confidential Copy Draft Urgent Custom Off Specify the overlay text to print on each copy Custom overlay Type the text for the Custom choice in Overlay menu Note An asterisk next to a value indicates the factory default setting Advanced Imaging Menu item Description Color D...

Страница 86: ...ust the shadow detail in the original document Scan Edge to Edge Off On Scan the original document from edge to edge Sharpness 1 5 3 Adjust the sharpness of the scanned image Note An asterisk next to a value indicates the factory default setting Admin Controls Menu item Description Transparency Separators Off On Insert a blank sheet between transparencies Allow Priority Copies Off On Interrupt a p...

Страница 87: ...dicates the factory default setting Fax Fax Defaults Fax Mode Menu item Description Fax Mode Fax Fax Server Disabled Select a fax mode Note An asterisk next to a value indicates the factory default setting Fax Setup Menu item Description General Fax Settings Fax Name Fax Number Fax ID Fax Number Memory Use Equal Cancel Faxes Allow Fax Number Masking Off Digits to Mask Enable Line Connected Detecti...

Страница 88: ...e to Edge Off Sharpness 3 Temperature 0 Admin Controls Automatic Redial 5 Redial Frequency 3 minutes Enable ECM On Enable Fax Scans On Driver to Fax Off Allow Save as Shortcut On Max Speed 33600 Custom Job Scanning Off Scan Preview Off Adjust ADF Skew Off Enable Color Fax Scans Off by Default Auto Convert Color Faxes to Mono Faxes On Confirm Fax Number Off Dial Prefix Dialing Prefix Rules Configur...

Страница 89: ...e On Enable Caller ID On Block No Name Fax Off Banned Fax List Answer On All Rings Auto Answer On Fax Forwarding Print Forward to Confirmation E mail Max Speed 33600 Configure the fax receive settings Fax Cover Page Fax Cover Page Off by Default Include To field Off Include From field Off From Include Message field Off Message Include Logo Off Include Footer x Footer x Configure the fax cover page...

Страница 90: ...gs Speaker Settings Speaker Mode On until Connected Speaker Volume Low Ringer Volume On Cancel outgoing faxes before they are transmitted or cancel incoming faxes before they finish printing Note An asterisk next to a value indicates the factory default setting Fax Server Setup Menu item Description General Fax Settings To Format Reply Address Subject Message Enable analog receive Off Configure th...

Страница 91: ...set up error Off Configure the fax server e mail settings Fax Server Scan Settings Image Format PDF pdf Content Type Text Content Source Black and White Laser Fax Resolution Standard Darkness 5 Orientation Portrait Original Size Mixed Sizes Use Multi Page TIFF On Configure the fax receive settings Note An asterisk next to a value indicates the factory default setting E mail E mail Setup Menu item ...

Страница 92: ...erver SMTP Server Authentication No authentication required Login Plain NTLM CRAM MD5 Digest MD5 Kerberos 5 Set the authentication type for the SMTP server Device Initiated E mail None Use Device SMTP Credentials Specify whether credentials are required for device initiated e mail User Initiated E mail None Use Device SMTP Credentials Use Session User ID and Password Use Session E mail address and...

Страница 93: ...Version A 1a Highly Compressed Off Secure Off Archival PDF A Off Configure the PDF settings of the scanned document Notes Archival Version and Archival PDF A are supported only when PDF Version is set to 1 4 Highly Compressed appears only when hard disk is installed Content Type Text Text Photo Photo Graphics Improve the output result based on the content type of the original document Content Sour...

Страница 94: ...al document when scanning on both sides of the document Note An asterisk next to a value indicates the factory default setting Advanced Imaging Menu item Description Color Balance Cyan 0 Magenta 0 Yellow 0 Adjust the color intensity for cyan magenta and yellow Color Dropout Color Dropout None Default Red Threshold 128 Default Green Threshold 128 Default Blue Threshold 128 Specify which color to dr...

Страница 95: ... the scanned image Scan Edge to Edge Off On Scan the original document from edge to edge Sharpness 1 5 3 Adjust the sharpness in the scanned image Temperature 4 to 4 0 Generate a bluer or redder output of the original document Blank Pages Blank Page Removal Remove Blank Page Sensitivity 5 Set the sensitivity of scans in relation to blank pages in the original document Note An asterisk next to a va...

Страница 96: ...ned Text Photo Default 5 95 75 Set the text and photo quality in the content being scanned Photo Default 5 95 50 Set the photo quality of the content being scanned Adjust ADF Skew Off On Set the printer to adjust the skewed images from documents that are scanned from the ADF Transmission Log Print log Do Not Print Log Print Only For Error Print a transmission log for e mail scans Log Paper Source ...

Страница 97: ...Message and Filename fields to their default values after sending an e mail Note An asterisk next to a value indicates the factory default setting Web Link Setup Menu item Description Server Specify the credentials of the server that is hosting the images that are included in the e mail Login Password Path File Name Web Link FTP FTP Defaults Menu item Description Format PDF pdf TIFF tif JPEG jpg X...

Страница 98: ... Film Magazine Newspaper Press Other Improve the output result based on the content source of the original document Color Black and White Gray Color Auto Set the printer to capture file content in color or in mono Resolution 75 dpi 150 dpi 200 dpi 300 dpi 400 dpi 600 dpi Set the resolution of the scanned image Darkness 1 9 5 Adjust the darkness of the scanned image Orientation Portrait Landscape S...

Страница 99: ... color to drop during scanning and adjust the dropout setting for that color Auto Color Detect Color Sensitivity 5 Area Sensitivity 5 FTP Bit Depth 1 bit Configure the auto color detection setting JPEG Quality Best for content 5 95 Set the JPEG quality of the scanned image Contrast Best for content 0 1 2 3 4 5 Specify the contrast for the scanned image Background Removal Background Detection Conte...

Страница 100: ...n relation to blank pages in the original document Note An asterisk next to a value indicates the factory default setting Admin Controls Menu item Description Text Default 5 95 75 Set the quality of text on the scanned image Text Photo Default 5 95 75 Set the quality of text and photo on the scanned image Photo Default 5 95 50 Set the quality of photo on the scanned image Use Multi Page TIFF On Of...

Страница 101: ...DF Skew Off On Set the printer to adjust the skewed images from documents that are scanned from the ADF Note An asterisk next to a value indicates the factory default setting USB Drive Flash Drive Scan Menu item Description Format JPEG jpg PDF pdf TIFF tif XPS xps TXT txt RTF rtf DOCX doc CSV csv Specify the file format for the scanned image PDF Settings PDF Version 1 5 Archival Version A 1a Highl...

Страница 102: ...olor or in mono Resolution 75 dpi 150 dpi 200 dpi 300 dpi 400 dpi 600 dpi Set the resolution of the scanned image Darkness 1 9 5 Adjust the darkness of the scanned image Orientation Portrait Landscape Specify the orientation of the original document Original Size Mixed Sizes Set the paper size of the original document Sides Off Long edge Short edge Specify the orientation of the original document ...

Страница 103: ...Color is set to Gray JPEG Quality Best for content 5 95 Set the JPEG quality of the scanned image Contrast Best for content 0 5 Specify the contrast for the scanned image Background Removal Background Detection Content based Level 0 Remove the background color or image noise from the original document Notes Content based removes the background color from the original document Fixed removes image n...

Страница 104: ...anning of multiple TIFF images in one TIFF file TIFF Compression LZW JPEG Specify the compression type for TIFF files Custom Job Scanning Off On Set the printer to scan the first set of original documents using the specified settings and then scan the next set with the same or different settings Note This menu item appears only when a hard disk is installed Scan Preview Off On Show a scan preview ...

Страница 105: ... 6 pages per side 9 pages per side 12 pages per side 16 pages per side Print multiple page images on one side of a sheet of paper Pages per Side Ordering Horizontal Reverse Horizontal Reverse Vertical Vertical Specify the positioning of multiple page images when using Pages per Side menu Pages per Side Orientation Auto Landscape Portrait Specify the orientation of multiple page images when using P...

Страница 106: ...rk Status on Printer Off On Show the network status on the display Speed Duplex Show the speed of the currently active network card IPv4 Show the IPv4 address All IPv6 Addresses Show all IPv6 addresses Reset Print Server Reset all active network connections to the printer Note This setting removes all network configuration settings Network Job Timeout Off On 90 seconds Set the time before the prin...

Страница 107: ...abled Configure the wireless connection using the control panel Wi Fi Protected Setup Start Push Button Method Start PIN Method Establish a Wi Fi network and enable network security Enable Wi Fi Direct On Off Enable Wi Fi Direct capable devices to connect to the printer Compatibility 802 11b g n 2 4GHz 802 11a b g n ac 2 4GHz 5GHz 802 11a n ac 5GHz Specify the standard for the Wi Fi network Wirele...

Страница 108: ...utomatically to PostScript emulation when a print job requires it regardless of the default printer language Note When this setting is disabled the printer does not examine incoming data and uses the default printer language specified in the Setup menu Job Buffering Off On Temporarily store print jobs on the hard disk before printing Note This menu item appears only when a hard disk is installed M...

Страница 109: ...b requires it regardless of the default printer language Note When this setting is disabled the printer does not examine incoming data and uses the default printer language specified in the Setup menu Job Buffering Off On Temporarily store jobs on the hard disk before printing Note This menu item appears only when a hard disk is installed Mac Binary PS Auto On Off Set the printer to process Macint...

Страница 110: ...h Order Specify a list of domain names to locate the printer and its resources that reside in different domains on the network Enable DDNS Off On Update the Dynamic DNS settings DDNS TTL Specify the current DDNS settings Default TTL DDNS Refresh Time Enable mDNS Off On Update the multicast DNS settings WINS Server Address Specify a server address for Windows Internet Name Service WINS Enable BOOTP...

Страница 111: ...00000 Kilobits second Enable TLSv1 0 Off On Enable the TLSv1 0 protocol Enable TLSv1 1 Off On Enable the TLSv1 1 protocol SSL Cipher List Specify the cipher algorithms to use for the SSL or the TLS connections Note An asterisk next to a value indicates the factory default setting SNMP Note This menu appears only in network printers or printers that are attached to print servers Menu item Descripti...

Страница 112: ...only in network printers or printers that are attached to print servers Menu item Description Enable IPSec Off On Enable Internet Protocol Security IPSec Base Configuration Default Compatibility Secure Set the IPSec base configuration DH Diffie Hellman Group Proposal modp2048 14 modp3072 15 modp4096 16 modp6144 17 Set the IPSec base configuration Note This menu item appears only when Base Configur...

Страница 113: ...nter Certificate Authenticated Connections Host x Address subnet Note An asterisk next to a value indicates the factory default setting 802 1x Note This menu appears only in network printers or printers that are attached to print servers Menu item Description Active Off On Let the printer join networks that require authentication before allowing access Note An asterisk next to a value indicates th...

Страница 114: ...iption Enable HTTP Server Off On Access the Embedded Web Server to monitor and manage the printer Enable HTTPS Off On Enable Hypertext Transfer Protocol Secure HTTPS to encrypt data transferring to and from the print server Force HTTPS Connections On Off Force the printer to use HTTPS connections Enable FTP TFTP Off On Send files using FTP TFTP Local Domains Specify domain names for HTTP and FTP s...

Страница 115: ...cified in the Setup menu PS SmartSwitch Off On Set the printer to switch to PostScript emulation when a print job received through a USB port requires it regardless of the default printer language Note When this setting is disabled the printer does not examine incoming data and uses the default printer language specified in the Setup menu Job Buffering Off On Temporarily store jobs on the hard dis...

Страница 116: ... Menu item Description Registration Register Register the printer to the Google Cloud Print server Options Enable Google Cloud Print Off On Print directly from your Google account Options Enable Local Discovery Off On Allow the registered user and other users on the same subnet to send jobs to the printer locally Options Enable SSL Peer Verification Off On Verify authenticity of the peer certifica...

Страница 117: ...lidate users on a Wi Fi connection Show PSK on Setup Page Off On Show the PSK on the Network Setup Page Group Owner IP Address Specify the IP address of the group owner Auto Accept Push Button Requests Off On Accept requests to connect to the network automatically Note Accepting clients automatically is not secure Note An asterisk next to a value indicates the factory default setting Understanding...

Страница 118: ...ofiles Cancel Jobs at the Device Change Language Internet Printing Protocol IPP Initiate Scans Remotely B W Print Network Folder Print Network Folder Scan Hard Disk Print Hard Disk Scan Control access to the printer functions Note Some menu items appear only when a hard disk is installed Administrative Menus Security Menu Network Ports Menu Paper Menu Reports Menu Function Configuration Menus Supp...

Страница 119: ...Password PIN Create local accounts and specify their access to the printer functions administrative menus printer management options and applications Default Login Methods Note This menu appears only when you configure the settings in the Local Accounts menu Menu item Description Control Panel User Name Password User Name Password PIN Specify the default login method to access the control panel Br...

Страница 120: ...s 2 Mail System 3 System Daemons 4 Security Authorization Messages 5 Messages Generated Internally by Syslogs 6 Line Printer Subsystem 7 Network News Subsystem 8 UUCP Subsystem 9 Clock Daemon 10 Security Authorization Messages 11 FTP Daemon 12 NTP Subsystem 13 Log Audit 14 Log Alert 15 Clock Daemon 16 Local Use 0 local0 17 Local Use 1 local1 18 Local Use 2 local2 19 Local Use 3 local3 20 Local Use...

Страница 121: ...rator when the log becomes full and begins to overwrite the oldest entries Log Full Behavior Wrap Over Older Entries E mail Log Then Delete All Entries Resolve log storage issues when the log fills its allotted memory E mail Full Alert Off On Send e mail notification to the administrator when the log fills its allotted memory Full Alert Level 1 99 90 E mail Log Exported Alert Off On Send e mail no...

Страница 122: ...gin before the user is logged off automatically Note An asterisk next to a value indicates the factory default setting Confidential Print Setup Menu item Description Max Invalid PIN 2 10 Set the number of times an invalid PIN can be entered Notes A value of zero turns off this setting When the limit is reached the print jobs for that user name and PIN are deleted Confidential Job Expiration Off 1 ...

Страница 123: ...4 Hours 1 Week Set the expiration time that the printer stores print jobs for printing later Require All Jobs to be Held Off On Set the printer to hold all print jobs Keep duplicate documents Off On Set the printer to print other documents with the same file name without overwriting any of the print jobs Note An asterisk next to a value indicates the factory default setting Disk Encryption Note Th...

Страница 124: ...iption Protected Features Show Hide Show all the features that Function Access Control FAC protects regardless of the security permission that the user has Note Hide displays only FAC protected features that the user has access Print Permission Off On Let the user log in before printing Default Print Permission Login User Name Password User Name Set the default login for Print Permission Security ...

Страница 125: ... profiles that are stored in the printer Asset Report Print a report that contains the printer serial number and model name Print Menu item Description Print Fonts PCL Fonts PS Fonts Print samples and information about the fonts that are available in each printer language Print Directory Print the resources that are stored in the flash drive or hard disk Note This menu item appears only when a fla...

Страница 126: ...nnection Guide Provides information about connecting the printer locally USB or to a network Copy Guide Provides information about making a copy and configuring the settings E mail Guide Provides information about sending an e mail and configuring the settings Fax Guide Provides information about sending a fax and configuring the settings Information Guide Provides information about the printer Me...

Страница 127: ...Printing the Menu Settings Page From the home screen touch Settings Reports Menu Settings Page Understanding the printer menus 127 ...

Страница 128: ...From the home screen touch Settings Device Maintenance Out of Service Erase 2 Select the Sanitize all information on nonvolatile memory check box and then touch ERASE 3 Select Start initial setup wizard or Leave printer offline and then touch Next 4 Start the operation Erasing printer hard disk memory 1 From the home screen touch Settings Device Maintenance Out of Service Erase 2 Select the Saniti...

Страница 129: ...e memory The printer uses standard random access memory RAM to buffer temporarily user data during simple print and copy jobs Non volatile memory The printer may use two forms of non volatile memory EEPROM and NAND flash memory Both types are used to store the operating system printer settings network information scanner and bookmark settings and embedded solutions Hard disk memory Some printers m...

Страница 130: ...tored data Crushing Physically compresses the hard disk to break component parts and render them unreadable Milling Physically shreds the hard disk into small metal bits Note To guarantee that all data are completely erased destroy physically each hard disk where data is stored Securing the printer 130 ...

Страница 131: ...ences Audio Feedback 2 Select the volume Note If Quiet Mode is enabled then audible alerts are turned off Configuring the fax speaker settings 1 From the home screen touch Settings Fax Fax Setup Speaker Settings 2 Do the following Set the Speaker Mode to Always On Set the Speaker Volume to High Activate the Ringer Volume Networking Connecting the printer to a Wi Fi network 1 From the home screen n...

Страница 132: ...IN 3 Open a Web browser and then type the IP address of your access point in the address field Notes View the printer IP address on the printer home screen The IP address appears as four sets of numbers separated by periods such as 123 123 123 123 If you are using a proxy server then temporarily disable it to load the Web page correctly 4 Access the WPS settings For more information see the docume...

Страница 133: ... then unplug the power cord from the electrical outlet 2 Remove paper from the standard bin and multipurpose feeder 3 Remove any dust lint and pieces of paper around the printer using a soft brush or vacuum 4 Wipe the outside of the printer with a damp soft lint free cloth Notes Do not use household cleaners or detergents as they may damage the finish of the printer Make sure that all areas of the...

Страница 134: ...2 Using a damp soft lint free cloth wipe the following areas ADF glass ADF glass pad Scanner glass Scanner glass pad Maintaining the printer 134 ...

Страница 135: ...3 Open door E 4 Using a damp soft lint free cloth wipe the following areas ADF glass pad in door E ADF glass in door E 5 Close door E and then close the scanner cover Maintaining the printer 135 ...

Страница 136: ...ge contact the place where you purchased the printer Configuring supply notifications 1 Open a web browser and then type the printer IP address in the address field Notes View the printer IP address on the printer home screen The IP address appears as four sets of numbers separated by periods such as 123 123 123 123 If you are using a proxy server then temporarily disable it to load the web page c...

Страница 137: ...2 Remove the used toner cartridge 3 Unpack the new toner cartridge and then shake it to redistribute the toner Maintaining the printer 137 ...

Страница 138: ...onnect them before moving the printer If the printer has a caster base then carefully roll it to the new location Use caution when passing over thresholds and breaks in flooring If the printer does not have a caster base but is configured with optional trays or output options then remove the output options and lift the printer off the trays Do not try to lift the printer and any options at the sam...

Страница 139: ... the printer stays idle before it enters Hibernate mode Notes For Hibernate Timeout to work set Hibernate Timeout on Connection to Hibernate The Embedded Web Server is disabled when the printer is in Hibernate mode Adjusting the brightness of the printer display 1 From the home screen touch Settings Device Preferences Screen Brightness 2 Adjust the setting Conserving supplies Print on both sides o...

Страница 140: ... stack height is below the maximum paper fill indicator Do not slide paper into the tray Load paper as shown in the illustration Make sure that the paper guides are positioned correctly and are not pressing tightly against the paper or envelopes Push the tray firmly into the printer after loading paper Use recommended paper Use only recommended paper or specialty media Do not load paper that is wr...

Страница 141: ...re set correctly on the computer or printer control panel Store paper according to manufacturer recommendations Identifying jam locations Notes When Jam Assist is set to On the printer flushes blank pages or pages with partial prints after a jammed page has been cleared Check your printed output for blank pages When Jam Recovery is set to On or Auto the printer reprints jammed pages Clearing jams ...

Страница 142: ... locations 1 Automatic document feeder 2 Standard finisher or output option bin 3 Door A 4 Multipurpose feeder 5 Trays 6 Door C 7 Finisher or output option rear door Door H Door N Door P Clearing jams 142 ...

Страница 143: ...hat all paper fragments are removed 3 Insert the tray Paper jam in door A 1 Open door A Warning Potential Damage To prevent damage from electrostatic discharge touch any exposed metal frame of the printer before accessing or touching interior areas of the printer Clearing jams 143 ...

Страница 144: ...l Damage Do not expose the imaging unit to direct light for more than 10 minutes Extended exposure to light may cause print quality problems Warning Potential Damage Do not touch the photoconductor drum Doing so may affect the quality of future print jobs Clearing jams 144 ...

Страница 145: ...4 Pull out the duplex unit 5 Remove the jammed paper Note Make sure that all paper fragments are removed 6 Insert the duplex unit Clearing jams 145 ...

Страница 146: ...ht be hot To reduce the risk of injury from a hot component allow the surface to cool before touching it Warning Potential Damage To prevent damage from electrostatic discharge touch any exposed metal frame of the printer before accessing or touching interior areas of the printer 2 Remove the jammed paper from any of the following areas Clearing jams 146 ...

Страница 147: ...at all paper fragments are removed Fuser area Below the fuser area Duplex area 3 Close the door Paper jam in the standard bin Remove the jammed paper Note Make sure that all paper fragments are removed Clearing jams 147 ...

Страница 148: ...the multipurpose feeder 1 Remove paper from the multipurpose feeder 2 Remove the jammed paper Note Make sure that all paper fragments are removed 3 Flex fan and align the paper edges before loading Clearing jams 148 ...

Страница 149: ...tray 2 Open door D Warning Potential Damage To prevent damage from electrostatic discharge touch any exposed metal frame of the printer before accessing or touching interior areas of the printer 3 Remove the jammed paper Note Make sure that all paper fragments are removed 4 Close door D Clearing jams 149 ...

Страница 150: ...5 Open the scanner cover 6 Open door E 7 Remove the jammed paper Note Make sure that all paper fragments are removed 8 Close door E and then close the scanner cover Clearing jams 150 ...

Страница 151: ... in door N 1 Open door N 2 Remove the jammed paper Note Make sure that all paper fragments are removed 3 Close the door Paper jam in the mailbox bin Remove the jammed paper Note Make sure that all paper fragments are removed Clearing jams 151 ...

Страница 152: ...Paper jam in the offset stacker or staple finisher Paper jam in door H 1 Open door H 2 Remove the jammed paper Note Make sure that all paper fragments are removed Clearing jams 152 ...

Страница 153: ...3 Close the door Paper jam in the offset stacker or staple finisher bin Remove the jammed paper Note Make sure that all paper fragments are removed Clearing jams 153 ...

Страница 154: ... door P 1 Open door P 2 Remove the jammed paper Note Make sure that all paper fragments are removed 3 Close the door Paper jam in the staple hole punch finisher bin Remove the jammed paper Note Make sure that all paper fragments are removed Clearing jams 154 ...

Страница 155: ...Staple jam in the staple finisher 1 Open door F Clearing jams 155 ...

Страница 156: ...2 Remove the staple cartridge holder 3 Remove the loose staples Clearing jams 156 ...

Страница 157: ... bracket Note If the staples are at the rear of the cartridge then shake the cartridge downward to bring the staples near the metal bracket 5 Insert the staple cartridge holder until it clicks into place 6 Close the door Clearing jams 157 ...

Страница 158: ...Staple jam in the staple hole punch finisher 1 Depending on the staple jam location open either door F or door G 2 Remove the staple cartridge holder Clearing jams 158 ...

Страница 159: ...he loose staples 4 Press the staples against the metal bracket Note If the staples are at the rear of the cartridge then shake the cartridge downward to bring the staples near the metal bracket Clearing jams 159 ...

Страница 160: ...5 Insert the staple cartridge holder until it clicks into place 6 Close the door Clearing jams 160 ...

Страница 161: ... address field Step 3 Check if you are using a supported browser Internet Explorer version 11 or later Microsoft Edge Safari version 6 or later Google ChromeTM version 32 or later Mozilla Firefox version 24 or later Is your browser supported Go to step 4 Install a supported browser Step 4 Check if the network connection is working Is the network connection working Go to step 5 Contact your adminis...

Страница 162: ...Note The flash drive does not work when it is inserted into the rear USB port Is the flash drive inserted into the correct port Go to step 3 Insert the flash drive into the correct port Step 3 Check if the flash drive is supported For more information see Supported flash drives and file types on page 39 Is the flash drive supported Go to step 4 Insert a supported flash drive Step 4 a Check if the ...

Страница 163: ...eplace the flash memory contact your dealer Issues with supplies Replace cartridge printer region mismatch Install the correct toner cartridge Non Printer Manufacturer supply The printer has detected an unrecognized supply or part installed in the printer Your printer is designed to function best with genuine supplies and parts made by the printer manufacturer Use of third party supplies or parts ...

Страница 164: ...e print job Does the envelope seal when printing Go to step 2 The problem is solved Step 2 a Make sure that the paper type is set to Envelope From the control panel touch Settings Paper Tray Configuration Paper Size Type select a paper source b Send the print job Does the envelope seal when printing Contact your dealer The problem is solved Collated printing does not work Action Yes No Step 1 a Fr...

Страница 165: ...ment Do the trays link correctly The problem is solved Go to step 2 Step 2 a From the home screen touch Settings Paper Tray Configuration Paper Size Type b Set the paper size and paper type to match the paper loaded in the linked trays c Print the document Do the trays link correctly The problem is solved Go to step 3 Step 3 a Make sure that Tray Linking is set to Automatic For more information se...

Страница 166: ...r Size Type b Set the correct paper size and type c Print the document Do paper jams occur frequently Go to step 3 The problem is solved Step 3 a Load paper from a fresh package Note Paper absorbs moisture due to high humidity Store paper in its original wrapper until you are ready to use it b Print the document Do paper jams occur frequently Contact your dealer The problem is solved Jammed pages ...

Страница 167: ...gate to Settings Troubleshooting Print Quality Test Pages For non touch screen printer models press to navigate through the settings Action Yes No Step 1 a Check if the printer is using a genuine and supported toner cartridge Note If the cartridge is not supported then install a supported one b Print the document Is the print dark Go to step 2 The problem is solved Troubleshooting 167 ...

Страница 168: ...g on the printer control panel Navigate to Settings Paper Tray Configuration Paper Size Type b Print the document Is the print dark Go to step 4 The problem is solved Step 4 Check if the paper has texture or rough finishes Are you printing on textured or rough paper Go to step 5 Go to step 6 Step 5 a Replace textured paper with plain paper b Print the document Is the print dark Go to step 6 The pr...

Страница 169: ...lines not printed correctly Go to step 2 The problem is solved Step 2 a Adjust the print quality settings 1 From the control panel navigate to Settings Print Quality Pixel Boost Fonts 2 Adjust Toner Darkness to 7 From the control panel navigate to Settings Print Quality Toner Darkness b Print the document Are fine lines not printed correctly Contact your dealer The problem is solved Folded or wrin...

Страница 170: ...The problem is solved Step 3 a Depending on your operating system specify the paper type from the Printing Preferences or Print dialog Notes Make sure that the setting matches the paper loaded You can also change the setting on the printer control panel Navigate to Settings Paper Tray Configuration Paper Size Type b Print the document Is the paper folded or wrinkled Contact your dealer The problem...

Страница 171: ...ts Go to step 3 The problem is solved Step 3 a Depending on your operating system specify the paper type from the Printing Preferences or Print dialog Notes Make sure that the setting matches the paper loaded You can also change the setting on the printer control panel Navigate to Settings Paper Tray Configuration Paper Size Type b Print the document Does gray background appear on prints Contact y...

Страница 172: ...gs Paper Tray Configuration Paper Size Type b Print the document Are the margins correct The problem is solved Contact your dealer Light print Note Before solving the problem print the Print Quality Test Pages From the control panel navigate to Settings Troubleshooting Print Quality Test Pages For non touch screen printer models press to navigate through the settings Action Yes No Step 1 a Check i...

Страница 173: ...lso change the setting on the printer control panel Navigate to Settings Paper Tray Configuration Paper Size Type b Print the document Is the print light Go to step 4 The problem is solved Step 4 Check if the print resolution is set to 600 dpi a From the control panel navigate to Settings Print Quality Print Resolution b Print the document Is the print light Go to step 5 The problem is solved Step...

Страница 174: ... b Print the document Is the print mottled Go to step 2 The problem is solved Step 2 Check the printer for leaked toner contamination Is the printer free of leaked toner Go to step 3 Contact your dealer Step 3 Check the status of the imaging unit From the control panel navigate to Status Supplies Supplies Is the imaging unit near end of life Contact your dealer Contact your dealer Paper curl Actio...

Страница 175: ...aper a Remove paper flip it over and then reload paper b Print the document Is the paper curled Go to step 4 The problem is solved Step 4 a Load paper from a fresh package Note Paper absorbs moisture due to high humidity Store paper in its original wrapper until you are ready to use it b Print the document Is the paper curled Contact your dealer The problem is solved Print crooked or skewed Note B...

Страница 176: ...dealer The problem is solved Solid black pages Note Before solving the problem print the Print Quality Test Pages From the control panel navigate to Settings Troubleshooting Print Quality Test Pages For non touch screen printer models press to navigate through the settings Action Yes No a Check if the printer is using a genuine and supported toner cartridge Note If the toner cartridge is not suppo...

Страница 177: ... one b Print the document Are text or images cut off Contact your dealer The problem is solved Toner easily rubs off Note Before solving the problem print the Print Quality Test Pages From the control panel navigate to Settings Troubleshooting Print Quality Test Pages For non touch screen printer models press to navigate through the settings Action Yes No Step 1 a Check if the printer is using a g...

Страница 178: ...the Print Quality Test Pages From the control panel navigate to Settings Troubleshooting Print Quality Test Pages For non touch screen printer models press to navigate through the settings Action Yes No Step 1 a Check if the printer is using a genuine and supported toner cartridge Note If the cartridge is not supported then install a supported one b Print the document Do horizontal light bands app...

Страница 179: ...ocument Do vertical light bands appear on prints Contact your dealer The problem is solved Vertical white lines Note Before solving the problem print the Print Quality Test Pages From the control panel navigate to Settings Troubleshooting Print Quality Test Pages For non touch screen printer models press to navigate through the settings Action Yes No Step 1 a Check if the printer is using a genuin...

Страница 180: ...y Test Pages For non touch screen printer models press to navigate through the settings Action Yes No a Check if the printer is using a genuine and supported toner cartridge Note If the toner cartridge is not supported then install a supported one b Print the document Do vertical dark bands appear on prints Contact your dealer The problem is solved Vertical dark lines Note Before solving the probl...

Страница 181: ...streaks appear on prints Go to step 3 The problem is solved Step 3 a Depending on your operating system specify the paper type from the Printing Preferences or Print dialog Notes Make sure that the setting matches the paper loaded You can also change the setting on the printer control panel Navigate to Settings Paper Tray Configuration Paper Size Type b Print the document Do vertical dark lines or...

Страница 182: ...lem is solved Vertical dark streaks with print missing Contact your dealer Repeating defects Contact your dealer Confidential and other held documents do not print Action Yes No Step 1 a From the control panel check if the documents appear in the Held Jobs list Note If the documents are not listed then print the documents using the Print and Hold options b Print the documents Are the documents pri...

Страница 183: ...enter a PIN d Print the documents Are the documents printed The problem is solved Go to step 4 Step 4 a Delete some held jobs to free up printer memory b Print the documents Are the documents printed The problem is solved Contact your dealer Slow printing Action Yes No Step 1 Make sure that the printer cable is securely connected to the printer and to the computer print server option or other netw...

Страница 184: ... setting matches the paper loaded You can also change the setting on the printer control panel Navigate to Settings Paper Tray Configuration Paper Size Type Heavier paper prints more slowly Paper narrower than letter A4 and legal may print more slowly b Print the document Is the printer printing slow Go to step 6 The problem is solved Step 6 a Make sure that the printer settings for Media Texture ...

Страница 185: ...printer b Print the document Is the document printed The problem is solved Go to step 2 Step 2 a Check if the printer is on b Resolve any error messages that appear on the display c Print the document Is the document printed The problem is solved Go to step 3 Step 3 a Check if the ports are working and if the cables are securely connected to the computer and the printer For more information see th...

Страница 186: ...2 Check if the electrical outlet is turned off by a switch or breaker Is the electrical outlet turned off by a switch or breaker Turn on the switch or reset the breaker Go to step 3 Step 3 Check if the printer is on Is the printer on Go to step 4 Turn on the printer Step 4 Check if the printer is in Sleep or Hibernate mode Is the printer in Sleep or Hibernate mode Press the power button to wake th...

Страница 187: ...p 2 Load the correct paper size and paper type Step 2 a Depending on your operating system specify the paper size and paper type from the Printing Preferences or Print dialog Note You can also change the settings on the printer control panel From the home screen touch Settings Paper Tray Configuration Paper Size Type b Make sure that the settings match the paper loaded c Print the document Is the ...

Страница 188: ...check if it is working properly If you are using the On Hook Dial feature then turn up the volume to check if you hear a dial tone Can you hear a dial tone Go to step 5 Go to step 4 Step 4 Check the telephone wall jack a Connect the analog telephone directly to the wall jack b Listen for a dial tone c If you do not hear a dial tone then use a different telephone cable d If you still do not hear a ...

Страница 189: ... to an analog connection on the PBX If none exists then consider installing an analog telephone line for the fax machine Can you send or receive a fax The problem is solved Go to step 6 Step 6 Temporarily disconnect other equipment and disable other telephone services a Disconnect other equipment such as answering machines computers modems or telephone line splitters between the printer and the te...

Страница 190: ...faxes The problem is solved Contact your dealer Can send but not receive faxes Action Yes No Step 1 Make sure that the paper source is not empty Can you receive faxes The problem is solved Go to step 2 Step 2 Check the ring count delay settings From the home screen touch Settings Fax Fax Setup Fax Receive Settings Rings to Answer Can you receive faxes The problem is solved Go to step 3 Step 3 If t...

Страница 191: ...e Settings Admin Controls b In the Max Speed menu select a lower transmission speed Is the fax print quality satisfactory The problem is solved Contact your dealer Scanning problems Cannot scan from a computer Action Yes No Step 1 a Turn off the printer wait for about 10 seconds and then turn it back on b Resend the scan job Can you send the scan job The problem is solved Go to step 2 Step 2 a Mak...

Страница 192: ...uality Action Yes No Step 1 a Clean the scanner glass and the ADF glass with a damp soft lint free cloth If your printer has a second ADF glass inside the ADF then also clean that glass For more information see Cleaning the scanner on page 133 b Make sure that the document or photo is loaded facedown on the upper left corner of the scanner glass c Copy the document or photo Is the copy quality sat...

Страница 193: ... scan job Is the scan job successful The problem is solved Go to step 3 Step 3 a Make sure that the Append time stamp or the Overwrite existing file check box is selected in the destination configuration settings b Resend the scan job Is the scan job successful The problem is solved Scanner does not close Action Yes No Remove obstructions that keep the scanner unit open Did the scanner unit close ...

Страница 194: ...n the document Is the scanner responding The problem is solved Contact your dealer Adjusting scanner registration 1 From the home screen touch Settings Device Maintenance Configuration Menu Scanner Configuration Scanner Manual Registration 2 In the Print Quick Test menu touch Start 3 Place the Print Quick Test page on the scanner glass and then touch Flatbed Registration 4 In the Copy Quick Test m...

Страница 195: ...art 6 Compare the Copy Quick Test page with the original document Note If the margins of the test page are different from the original document then adjust Horizontal Adjust and Top Margin 7 Repeat step 5 and step 6 until the margins of the Copy Quick Test page closely match the original document Contacting your dealer Before contacting your dealer make sure to have the following information Print...

Страница 196: ...nges will be incorporated in later editions Improvements or changes in the products or the programs described may be made at any time GOVERNMENT END USERS The Software Program and any related documentation are Commercial Items as that term is defined in 48 C F R 2 101 Computer Software and Commercial Computer Software Documentation as such terms are used in 48 C F R 12 212 or 48 C F R 227 7202 as ...

Страница 197: ... 此符號表示該表面或元件會發熱 請當心 為避免被發熱表面或元件燙傷的危險 請先讓該表面或元件冷卻之後再觸摸 Hinweis zum GS Zeichen Modell 496 896 Gerätetyp 7465 Noise emission levels The following measurements were made in accordance with ISO 7779 and reported in conformance with ISO 9296 Note Some modes may not apply to your product 1 meter average sound pressure dBA Printing One sided 54 7465 496 56 7465 896 Two sided 53 7465 496 55 7465 896 Scanni...

Страница 198: ...t for the exemption set in Schedule II of the Rules Product disposal Do not dispose of the printer or supplies in the same manner as normal household waste Consult your local authorities for disposal and recycling options Taiwan waste dry cell batteries recycle logo notice According to Article 15 of the Waste Disposal Act in the announcement of Taiwan EPA the producing or the importing manufacture...

Страница 199: ... battery notice Taiwan RoHS information 限用物質含有情況標示 適用於印表機 雷射印表機 多功能複合機或多功能印表機 Applies to Printer Laser Printer Multifunction Machine or Multifunction Printer 型號 型式 請參閱 注意事項 章節或 控管資訊 章節 Type designation Type Please see the Notices section or the Regulatory information section 單元 限用物質及其化學符號 鉛 Pb 汞 Hg 鎘 Cd 六價鉻 Cr 6 多溴聯苯 PBB 多溴二苯醚 PBDE 電路板 電源供應器 電源線 連接器 機械組件 軸 滾軸 機械組件 馬達 機械組件 其他 液晶 LED 顯示面板 Notices 19...

Страница 200: ... present ENERGY STAR Products that have earned the ENERGY STAR are designed to protect the environment through superior energy efficiency The products that meet the ENERGY STAR guidelines carry the ENERGY STAR logo The products without the logo may not meet the ENERGY STAR guidelines Temperature information Operating temperature and relative humidity 15 6 to 32 2 C 60 to 90 F and 15 to 80 RH 1 1 t...

Страница 201: ... certified as a Class I laser product conforming to the requirements of IEC 60825 1 2014 Class I laser products are not considered to be hazardous The laser system and printer are designed so there is never any human access to laser radiation above a Class I level during normal operation user maintenance or prescribed service conditions The printer has a non serviceable printhead assembly that con...

Страница 202: ... Mode Timeout Factory default Sleep Mode Timeout for this product in minutes 15 By using the configuration menus the Sleep Mode Timeout can be modified between 1 minute and 120 minutes If the print speed is less than or equal to 30 pages per minute then you can set the timeout only up to 60 minutes Setting the Sleep Mode Timeout to a low value reduces energy consumption but may increase the respon...

Страница 203: ...vironmental benefits and the amount of energy consumption may carry the ENERGY STAR logo in case they have been registered with an ENERGY STAR program Regulatory notices for telecommunication terminal equipment This section contains regulatory information pertaining to products that contain the analog facsimile card Regulatory Type Model Number LEX M14 002 Notice to users of the US telephone netwo...

Страница 204: ...quipment connected to the telephone line ensure the installation of this equipment does not disable your alarm equipment If you have questions about what will disable alarm equipment consult your telephone company or a qualified installer The Telephone Consumer Protection Act of 1991 makes it unlawful for any person to use a computer or other electronic device including fax machines to send any me...

Страница 205: ... speeds for which it is designed Telecom will accept no responsibility should difficulties arise in such circumstances The decadic or pulse dialing on this device is unsuitable for use on the Telecom network in New Zealand For correct operation the total of all the Ringer Equivalence Numbers RENs of all parallel devices connected to the same telephone line may not exceed 5 The REN of this device i...

Страница 206: ...t requires a Swiss billing tone filter to be installed on any line which receives metering pulses in Switzerland Utilisation de ce produit en Suisse Cet appareil nécessite l utilisation d un filtre de tonalité de facturation suisse devant être installé sur toute ligne recevant des impulsions de comptage en Suisse Verwendung dieses Produkts in der Schweiz Für dieses Produkt muss ein schweizerischer...

Страница 207: ...ded to be operated indoors and away from windows to provide maximum shielding High power radars are allocated as primary users i e priority users of the bands 5250 5350MHz and 5650 5850MHz These radars could cause interference and or damage to LE LAN devices Industrie Canada Canada Selon la réglementation d Industrie Canada l émetteur radio ne fonctionne qu avec une antenne dont le type et le gain...

Страница 208: ...dio or television interference caused by using other than recommended cables or by unauthorized changes or modifications to this equipment Unauthorized changes or modifications could void the user s authority to operate this equipment Note To assure compliance with FCC regulations on electromagnetic interference for a Class A computing device use a properly shielded and grounded cable such as Lexm...

Страница 209: ...s relating to radio equipment A declaration of conformity to the requirements of the Directives is available upon request from Lexmark International Technology Hungária Kft 8 Lechner Ödön fasor Millennium Tower III 1095 Budapest HUNGARY Compliance is indicated by the CE marking Restrictions This radio equipment is restricted to indoor use only Outdoor use is prohibited This restriction applies to ...

Страница 210: ... gain is 20dBm for both bands Information for China RoHS program Part name Toxic and hazardous substances or elements Lead Pb Mercury Hg Cadmium Cd Hexavalent Chromium Cr VI Polybrominated biphenyl PBB Polybrominated diphenylether PBDE Circuit boards X O O O O O Power supply X O O O O O Power cords X O O O O O Connectors X O O O O O Mechanical assemblies shafts rollers X O O O O O Mechanical assem...

Страница 211: ...nts may have a different EFUP and so are marked to reflect such The Environmentally Friendly Use Period is valid only when the product is operated under the conditions defined in the product manual Taiwan NCC RF notice statements NCC 型式認證設備注意事項 台灣低功率射頻電機設備之使用注意事項 依據低功率電波輻射性電機管理辦法 第十二條 經型式認證合格之低功率射頻電機 非經許可 公司 商號或使用者均不得擅自變更頻率 加大功 率或變更原設計之特性及功能 第十四條 低功率射頻電機之使用不得影響飛航安全及干擾合法通信 經發現有干擾現象時 應立即停用 並 改善至無干擾時...

Страница 212: ...compatibility safety of electrical equipment designed for use within certain voltage limits and on the restrictions of use of certain hazardous substances in electrical and electronic equipment A declaration of conformity to the requirements of the Directives is available upon request from Lexmark International Technology Hungária Kft 8 Lechner Ödön fasor Millennium Tower III 1095 Budapest HUNGARY...

Страница 213: ...omatic document feeder 149 in door A 143 in door H 152 in door N 151 in mailbox bin 151 in the duplex unit 146 in the fuser 146 in the multipurpose feeder 148 in the offset stacker bin 152 in the staple finisher 155 in the staple finisher bin 152 in the staple hole punch finisher 154 in the staple hole punch finisher bin 154 in trays 143 clearing staple jam in the staple hole punch finisher 158 co...

Страница 214: ...ory default settings restoring 129 fax configuring the SMTP server 47 forwarding 56 holding 56 setting the schedule to send 55 fax darkness adjusting 56 fax destination shortcut creating 55 fax log viewing 56 fax resolution changing 55 fax setup country or region specific 50 standard telephone line connection 48 fax speaker configuring the settings 131 fax troubleshooting cannot receive faxes 190 ...

Страница 215: ...cess 116 Schedule USB Devices 119 Security Audit Log 120 Setup 75 Shortcuts 125 SNMP 111 Solutions LDAP Settings 124 TCP IP 109 ThinPrint 115 Tray Configuration 81 Troubleshooting 126 Universal Setup 82 USB 115 Visible Home Screen Icons 73 Web Link Setup 97 Wireless 107 Wi Fi Direct 116 XPS 77 menu map 60 Menu Settings Page printing 127 mobile device printing from 37 38 moving the printer 9 138 mu...

Страница 216: ... printer configurations 10 printer display adjusting the brightness 139 printer hard disk encrypting 129 printer hard disk memory 129 printer is not responding 186 printer memory erasing 128 printer menus 60 printer messages Defective flash detected 163 Non Printer Manufacturer supply 163 Not enough free space in flash memory for resources 163 Replace cartridge printer region mismatch 163 Unformat...

Страница 217: ...drives 39 supported paper sizes 30 supported paper types 33 supported paper weights 34 T telecommunication notices 206 temperature around the printer 200 toner cartridge ordering 136 replacing 136 toner darkness adjusting 187 tray linking does not work 165 trays loading 20 troubleshooting cannot open Embedded Web Server 161 printer is not responding 186 troubleshooting copy partial copies of docum...

Страница 218: ...lass 42 45 54 57 copying 42 V verify print jobs 40 printing 40 vertical dark lines 180 viewing a fax log 56 volatile memory 129 erasing 128 W white lines 179 wireless network connecting the printer to 131 Wi Fi Protected Setup 132 wireless networking 131 Wi Fi Direct 132 printing from a mobile device 38 Wi Fi network deactivating 133 Wi Fi Protected Setup wireless network 132 wrinkled paper 169 In...

Отзывы: