background image

23

English

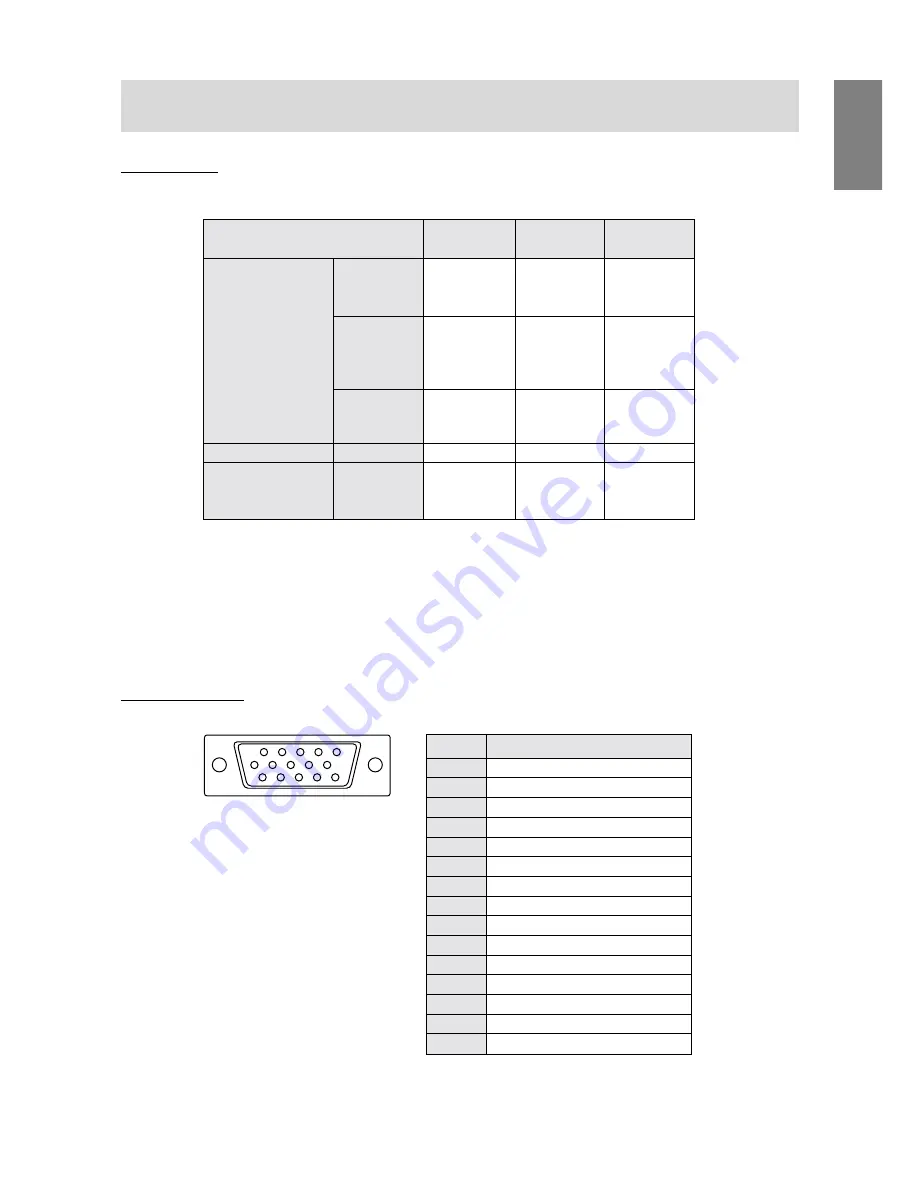
Signal timings

Notes:

All are compliant only with non-interlace.

Frequencies for the Power Macintosh series are reference values.

If the monitor is receiving timing signals that are not compatible, [OUT OF TIMING] will appear. Follow
your computer’s instruction manual to set the timing to be compatible with the monitor.

If the monitor is not receiving any signal (synch signal), [NO SIGNAL] will appear.

The connector pin

Display mode

Hsync (kHz)

Vsync (Hz)

Dot frequency

(MHz)

31.5kHz

60Hz

25.175MHz

640x480

37.9kHz

72Hz

31.5MHz

37.5kHz

75Hz

31.5MHz

VESA

35.1kHz

56Hz

36.0MHz

800x600

37.9kHz

60Hz

40.0MHz

48.1kHz

72Hz

50.0MHz

46.9kHz

75Hz

49.5MHz

48.4kHz

60Hz

65.0MHz

1024x768

56.5kHz

70Hz

75.0MHz

60.0kHz

75Hz

78.75MHz

US text

720x400

31.5kHz

70Hz

28.3MHz

Power Macintosh

640x480

35.0kHz

66.7Hz

30.5MHz

series

832x624

49.7kHz

74.6Hz

57.3MHz

1024x768

60.2kHz

75Hz

80.0MHz

5

4

3

2

1

15

14

13

12

11

10

9

8

7

6

(Mini D-sub connector with 15 pins)

Number

Function

1

Red video signal input

2

Green video signal input

3

Blue video signal input

4

N.C.

5

N.C.

6

For red video signal GND

7

For green video signal GND

8

For blue video signal GND

9

DDC + 5V

10

N.C.

11

GND

12

DDC data

13

For H-sync signal input

14

For V-sync signal input

15

DDC clock

Specifications

Содержание LL-T1501A

Страница 1: ... T1501A OPERATION MANUAL BEDIENUNGSANLEITUNG MODE D EMPLOI MANUALE D USO MANUAL DE FUNCIONAMIENTO Figure shown is LL T1511A Die Abbildung zeigt das Modell LL T1511A Le modèle illustré ici est le LL T1511A La figura illustrata è LL T1511A La ilustración muestra el modelo LL T1511A ...

Страница 2: ... monitor on and off 12 Connecting the monitor to a computer PC etc 12 Connecting the monitor to a power source 12 Turning the power on 12 Turning the power off 15 Connecting a USB device 15 Adjusting the screen display 16 Automatic screen adjustment 16 Adjusting the backlight 17 Manual screen adjustment 18 Monitor care and repair 21 Monitor care 21 Storage 21 Troubleshooting 21 Specifications 22 I...

Страница 3: ...cate the receiving antenna Increase the distance between the equipment and receiver Connect the equipment into an outlet on a circuit different from that to which the receiver is connected Consult the dealer or an experienced radio TV technician for help Use nothing but the included cables and AC cord to insure compliance with FCC regulation for Class B computing equipment Declaration of Conformit...

Страница 4: ...volve This product meets the requirements for the TCO 99 scheme which provides for international and environmental labelling of personal computers The labelling scheme was developed as a joint effort by the TCO The Swedish Confederation of Professional Employees Svenska Naturskyddsforeningen The Swedish Society for Nature Conservation and Statens Energimyndighet The Swedish National Energy Adminis...

Страница 5: ...ystem and is toxic in high doses The relevant TCO 99 requirement states that batteries the colour generating layers of display screens and the electrical or electronics components must not contain any cadmium Mercury Mercury is sometimes found in batteries relays and switches It damages the nervous system and is toxic in high doses The relevant TCO 99 requirement states that batteries may not cont...

Страница 6: ...δηγια 93 68 ΕΟΚ Este equipamento obedece às exigências das directivas 89 336 CEE e 73 23 CEE na sua versão corrigida pela directiva 93 68 CEE Este aparato satisface las exigencias de las Directivas 89 336 CEE y 73 23 CEE modificadas por medio de la 93 68 CEE Denna utrustning uppfyller kraven enligt riktlinjerna 89 336 EEC och 73 23 EEC så som komplette ras av 93 68 EEC Dette produktet oppfyller be...

Страница 7: ...letter E or by the safety earth or coloured green or green and yellow The wire which is coloured BLUE must be connected to the terminal which is marked with the letter N or coloured black The wire which is coloured BROWN must be connected to the terminal which is marked with the letter L or coloured red Ensure that your equipment is connected correctly if you are in any doubt consult a qualified e...

Страница 8: ... contact with strong shocks or vibrations Causing the monitor to fall or topple over may damage it Do not use in places where the monitor will be subject to direct sunlight near heating equipment or anywhere else where there is likelihood of high temperature as this may lead to generation of excessive heat and outbreak of fire The Power Cord Do not damage the power cord nor place heavy objects on ...

Страница 9: ...ange when in power saving mode 3 buttons When the On Screen Display OSD Menu is displayed These buttons are used to increase or decrease the value of a selected option When the OSD Menu is not displayed These buttons are used to adjust backlight brightness 4 SELECT button Selects the menu option to be adjusted 5 MENU button This button is used to pop up select and close the OSD Menu 6 BRIGHT butto...

Страница 10: ...ed so that it cannot be transported The theft prevention hole works in conjunction with Kensington Micro Saver Security Systems USB port Upstream 1 Port A USB ready computer or self powered USB hub can be connected here Main power switch I Turns the monitor on O Turns the monitor off USB port Downstream 2 ports A USB device can be con nected here Side view Product description Note Never block the ...

Страница 11: ...the computer or OS it may be neces sary to use the computer to operate the installation of monitor set up information etc If so follow the steps below to install the monitor set up information Notes Depending on the computer type command names and methods may differ Please follow the computer s own operation manual while reading this This explanation assumes that the floppy disk drive is A drive I...

Страница 12: ...en Models is displayed click on Have Disk confirm that Copy manufacturer s files from is A and click OK 5 Confirm that the monitor details are selected then click Next Next and Finish If the Add New Hardware Wizard appears repeat the installation commands beginning from 2 above 6 Remove the Monitor Settings Adjustment Disk from the A drive If the Add New Hardware Wizard has not ap peared This expl...

Страница 13: ...n of the driver Ad vanced and click Next 3 Check Display a list of all the drivers in a specific location so you can select the driver you want then click Next 4 When Models is displayed click on Have Disk confirm that Copy manufacturer s files from is A and click OK 5 Select the monitor details from the list then click Next Next and Finish If the Add New Hardware Wizard appears repeat the install...

Страница 14: ...rovided USB upstream port To the computer or another USB hub s downstream port USB down stream port Notes Please use a USB cable that has a length of less than 3 metres Before connecting ensure that the shape of the USB cable connector is correct For information regarding the USB function such as set up please refer to the operation manual of the computer to be connected Some computers OS and othe...

Страница 15: ... UNLOCKED will appear on the screen and the lock will be removed Note When the lock is in place all buttons other than the power button are disabled Automatic screen adjustment Options in MENU 1 ADJUSTMENT can be ad justed automatically Clock Phase H POS V POS Note When setting up this monitor for the first time or after having changed an aspect of the current system perform an automatic screen ad...

Страница 16: ...re set brightness modes Fine adjustment For LL T1501A Adjustments can be made in the following way Fine adjustment Adjusting the backlight according to surroundings LL T1511A only The backlight brightness can be set to change automatically for use in different surroundings Carry out the commands without the On Screen Display OSD Menu displayed If the OSD Menu is displayed press the BRIGHT button Y...

Страница 17: ...ssing the button darker or the button lighter 3 Press the MENU button The BRIGHT button will disappear Note The BRIGHT bar automatically disappears several seconds after the last command Manual screen adjustment Fine adjustments can be made using On Screen Display OSD Menu provided MENU 1 ADJUSTMENT Clock Phase H POS horizontal positioning and V POS vertical positioning MENU 2 GAIN CONTROL BLACK L...

Страница 18: ...To choose a menu option SELECT button To go to MENU 3 MENU button Auto Gain Control function The Auto Gain Control adjusts contrast and black level based on the brightest color of the image displayed If you are not using the Adjustment Pattern it is necessary to have an area of 5 mm x 5 mm of white displayed and if not adjustments may not be possible In such case OUT OF ADJUST will appear and sett...

Страница 19: ... options can be selected the display may not change To choose a menu option SELECT button When adjustment complete MENU button OSD H POSITION OSD horizontal position The position of the OSD display can be moved to the left and right buttons OSD V POSITION OSD vertical position The position of the OSD display can be moved up and down buttons 400 LINES degree of resolution You can specify the horizo...

Страница 20: ...wards it still does not work please contact the shop where you purchased the monitor or your nearest Sharp authorized Service Center No image appears on the monitor Power LED is not lit Is the power cord connected properly p 12 No image appears on the monitor Power LED is lit Is the computer connected properly p 12 Is the computer turned on Does the computer s signal timing correspond to monitor s...

Страница 21: ...e colors 16 19 million colors max Video signal Analog RGB 0 7Vp p 75Ω Sync signals H Sync TTL level V Sync TTL level Input terminal 15 pin Mini D sub connector Plug Play function VESA DDC1 DDC2B Power management VESA DPMS based Temperature of operating environment 5 35 C Power supply 100 240V Power consumption 23W max 3W power saving mode Dimensions W x D x H 362 mm x 185 mm x 343 mm Weight Approx...

Страница 22: ...Hz 37 5kHz 75Hz 31 5MHz VESA 35 1kHz 56Hz 36 0MHz 800x600 37 9kHz 60Hz 40 0MHz 48 1kHz 72Hz 50 0MHz 46 9kHz 75Hz 49 5MHz 48 4kHz 60Hz 65 0MHz 1024x768 56 5kHz 70Hz 75 0MHz 60 0kHz 75Hz 78 75MHz US text 720x400 31 5kHz 70Hz 28 3MHz Power Macintosh 640x480 35 0kHz 66 7Hz 30 5MHz series 832x624 49 7kHz 74 6Hz 57 3MHz 1024x768 60 2kHz 75Hz 80 0MHz 5 4 3 2 1 15 14 13 12 11 10 9 8 7 6 Mini D sub connect...

Страница 23: ...andard for carrying out Plug Play functions on the monitor or PC It transfers information such as degree of resolution between the monitor and PC You can use this function if your PC is DDC compliant and if it is set so that it can detect the Plug Play monitor There are many varieties of DDC due to the differ ences between systems This monitor works with DDC1 and DDC2B Specifications DPMS mode Scr...

Страница 24: ...he arm should be compatible with the VESA standard and there must be a gap of at least 75 mm x 75 mm between the screw holes on the section to be attached The arm must not fall off or break off after being attached to the monitor If an arm is attached a USB hub cannot be used This is because the arm is installed inside the monitor stand Please be careful not to hurt your fingers or injure yourself...

Страница 25: ...nd is specially made for use with this monitor Once having removed the stand never attempt to attach it to another device Once having removed the screws store them together with the stand and if the stand is ever re attached be sure to use the original screws Using different screws could lead to malfunc tion Information The screws used to attach the arm should be M4 screws with a length of 4 6 mm ...

Страница 26: ......

Страница 27: ...R SHARP CORPORATION 2001 SHARP CORPORATION Printed in China 624315080010 0LTHG15080010 1 ...

Отзывы: