background image

E – 16

MANUAL COOKING

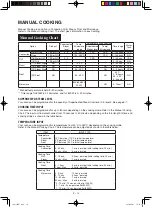
Convection

Convection has 2 functions,  Oven and Water Oven, and 

each function has 2 options, With Preheat or Without Preheat.

You can cook with one or two layers. Refer to online 

cookbook, ensure the suitable menus and follow to 

SHARP instructions.

Water Level:


1 or more (for Water Oven only)

Food Position: 

Lower

Cooking with Preheat

* Suppose you want to cook 1 layer for 45 minutes   

on Water Oven 2 at 160°C. 

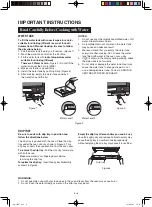
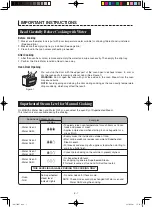
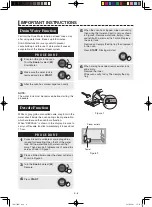
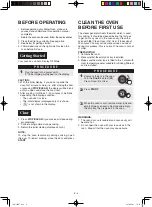
WARNING:

The oven door, outer cabinet and oven cavity will 

become hot. Use thick oven gloves when adding or 

removing foods to prevent burns.

NOTES:

1.  If the oven door is not opened after preheating, the 

oven will hold the preheat temperature for 20 minutes. 

After that, the display will return to the initial one and 

you have to reprogram from the step 1. 

2.  You can change the oven temperature during cooking. 

See page E-20.

3.  You can change the Superheated Steam Level during 

cooking. See page E-20.

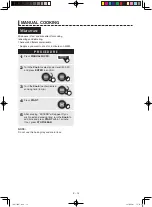
Cooking without Preheat

* Suppose you want to cook 2 layers for 45 minutes on 

Oven at 160°C 

P R O C E D U R E

Turn the 

Knob

 to select desired superheated 

steam level (2: 

 ), 

then press 

ENTER


to confirm.

2

Turn the 

Knob

 to enter 

desired temperature 

(160°C), then press 

START

 to preheat.

3

Turn the 

Knob

 to enter desired 

cooking time (45 min.)

4

5

When preheat is over, place food in the oven. 

Close the door.

6

1

No food in the oven.

* Depending on the menu, 

  only accessories should be put.

Press 

MANUAL COOK

.

Press 

START

.

7

P R O C E D U R E

2

Turn the 

Knob

 to enter desired temperature  

(160°C) and press 

ENTER

 to confirm.

4

Turn the 

Knob

 to enter desired 

cooking time (45 min.)

5

Press 

START

.

6

7

1

Press 

MANUAL COOK

.

Turn the 

Knob

 to select desired layer (2 tray) 

without flashing “PREHEAT”,  

then press 

ENTER


to confirm.

3

After cooking, “EXTEND” will appear. If you 

wish to extend cooking time, turn the 

Knob 

to 

add time and press 

START

 within 1 minute. 

If not, press 

STOP/CLEAR

.

After the oven has cooled, remove and empty 

the water tank, wipe oven cavity. Then empty 

the drip tray. 

8

Turn the 

Knob

 to select “PREHEAT” and 

desired layer (1 tray), 

then press 

ENTER


to confirm.

Confirm flashing “CONVEC 

OVEN” and “ 

 ”, then press 

ENTER

.

After cooking, “EXTEND” will appear. If you 

wish to extend cooking time, turn the 

Knob 

to 

add time and press 

START

 within 1 minute. 

If not, press 

STOP/CLEAR

.

After the oven has cooled, remove and empty 

the water tank, wipe oven cavity. Then empty 

the drip tray. 

(AX-1700R).indb   16

2019/08/01   15:32:13

Содержание HEALSLO AX-1700R

Страница 1: ...AX 1700R 使用說明書 水波爐 WATER OVEN OPERATION MANUAL Recipes available from here https iclub sharp co jp m Direct with your smart phone AX 1700R indb 1 2019 08 01 15 32 11 URL and Black square are dummy ...

Страница 2: ...10 MANUAL COOKING E 14 頁數 目錄 Page 頁數 OTHER CONVENIENT FEATURES E 20 CLEANING AND CARE E 22 TROUBLESHOOTING CHART E 24 SERVICE CALL CHECK E 27 SPECIFICATIONS E 27 COOKING GUIDES E 28 AUTOMATIC COOKING CHART E 31 重要安全須知 C 1 安裝事宜 C 3 各部位名稱 C 4 控制板 C 5 重要須知 C 6 操作之前 C 9 首次使用之前請清潔烤爐 C 9 自動烹調 C 10 自選烹調 C 14 其它簡便功能指南 C 20 清洗及注意事項 C 22 故障查閱指南表 C 24 維修前檢查 C 27 規格 C 27 烹調指南 C 28 自動烹調食譜 C 31 AX 1700R indb 2 ...

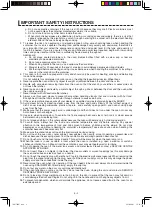
Страница 3: ... must not be heated in sealed containers since they are liable to explode 14 Microwave heating of beverages can result in delayed eruptive boiling therefore care must be taken when handling the container 15 Eggs in their shell and whole hard boiled eggs should not be heated on microwave modes since they may explode even after microwave heating has ended To cook or reheat eggs which have not been s...

Страница 4: ... cover including microwave plastic wrap etc and carefully open popcorn and oven cooking bags away from the face 11 Make sure that the power supply cord is undamaged and that it does not run under the oven or over any hot surfaces or sharp edges 12 Use care when opening door To avoid burns from escaping heat and steam let hot air or steam escape before removing or replacing food 13 Do not place any...

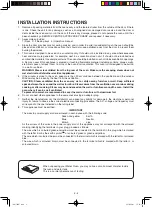
Страница 5: ...indow may be broken by the heat from the ventilation CAUTION Steam ventilated from the oven may wet or dirty nearby furniture or wall Keep sufficient space between the oven and the wall or furniture Steam comes from the ventilation cover or door during cooking or after cooking Steam may be condensed on the wall or furniture around the oven Install the oven where it can be well ventilated To preven...

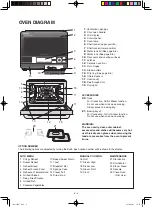
Страница 6: ... Steam function Do not use when microwave cooking Always place on baking tray 21 Baking tray x2 For Convection Grill or Steam function Do not use when microwave cooking AUTO MENU 1 Crispy Reheat 2 Steam Reheat 3 Reheat Bread 4 Reheat Frozen Food 5 Reheat as Temprerature 6 Grilled Chicken 7 Deep Fried Chicken 8 Grilled Fish 9 Steamed Vegetables 10 Baked Sweet Potato 11 Toast 12 Breakfast Set 13 Spo...

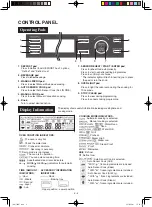
Страница 7: ...e display shows useful information including cooking time and cooking mode 4 5 6 7 8 9 1 2 3 Automatic cooking is selected Manual cooking is selected Defrost Defrost Low COOKING MODE INDICATORS Water Oven Oven Water Grill Grill Steam High Steam Low Steam Proof Proof Microwave TIME AMOUNT INDICATORS Hour Minute Second Layer ACCESSORY INFORMATION INDICATORS Rack Baking tray Upper position Lower posi...

Страница 8: ...eck the water tank is put correctly 5 Do not drop or damage the water tank Heat may cause the water tank to change shape Do not use a damaged water tank Contact a SERVICE CENTRE APPROVED BY SHARP DRIP TRAY Be sure to cook with drip tray in position and follow the directions below The drip tray is packed with the oven Place the drip tray under the oven door as shown in Figure 4 This drip tray colle...

Страница 9: ...rheated Steam Level for Manual Cooking On MANUAL Water Oven and Water Grill you can select the quantity of Superheated Steam This function is also available during the cooking Superheated Steam Level Examples Display Water Oven 3 Water Grill 3 To quickly raise oven temperature for such items as frozen foods and pieces of meat Applies ample steam when starting to cook baguette for a crispy finish W...

Страница 10: ...mmediately It takes about 1 hour P R O C E D U R E 1 Place a folded towel under the steam outlets as shown in Figure 2 2 5 When rinsing has ended remove water tank and empty Remove the towel Wipe oven cavity to dry Then empty the drip tray 6 Pure citric acid available at some drugstores is used for descaling Open the lit of the water tank Fill the water tank with water over the 1 mark Then dissolv...

Страница 11: ... during cooking 3 Return the initial display displayed only 0 NOTE To stop the oven temporarily during cooking open the door To restart cooking close the door and press START The steam generator heats the water which is used for cooking It should be cleaned before the first use to get rid of any odour in the oven cavity Clean the oven with 25 Clean Oven First Use It takes about 20 minutes You may ...

Страница 12: ...al temperature shape qual ity Check the food after cooking Sensor Reheat automatically reheats all the food shown in the Sensor Reheat Menu Guide on page E 31 SPECIAL NOTE for SENSOR REHEAT 1 Wipe off any moisture from the outside of cooking containers and the interior of the oven with a dry cloth or paper towel prior to reheating 2 Place food in the center of the oven floor 3 Never use Sensor Reh...

Страница 13: ...ND will appear If you wish to extend defrosting time turn the Knob to add time and press START within 1 minute If not press STOP CLEAR After defrosting remove and empty the water tank wipe oven cavity Then empty the drip tray Option Pad Display Doneness 1 Defrost 1 For immediate cooking 2 Defrost Low 2 For harder texture to divide food partly Water Level 1 or more Suppose you want to defrost 200 g...

Страница 14: ... level Accessory Food position Cooking time min No Frozen With Frozen 1 Grill Up to 1 kg 1 or more Baking tray Rack Upper 20 25 25 30 2 Bake Baking tray 20 30 25 30 3 Stir Fry Baking tray 15 20 20 25 4 Steam Up to 800 g 2 MAX Baking tray Rack 15 20 20 25 Additional 2 choices are available depending on having frozen ingredients or not For no frozen ingredient press AUTO SENSOR COOK once For having ...

Страница 15: ...Set 13 Sponge Cake 14 Cream Puff 15 Dried Food Refer to Auto Menu Guide on page E 34 38 and online cookbook ensure the suitable menus and follow to SHARP instructions For Menus except for Menu No 5 Suppose you want to grill fish for 4 servings P R O C E D U R E 1 Turn the Knob until desired menu number 8 4 appears Press START 2 3 After cooking EXTEND will appear If you wish to extend cooking time ...

Страница 16: ...er Tank Superheated Steam level Temp Microwave Convection Water Oven YES or NO 0 3 100 250 C YES YES 0 1h35min YES Oven YES or NO 100 250 C YES 0 1h35min NO Grill 16 Water Grill YES or NO 0 3 YES 0 45min YES 16 Grill YES or NO 0 45min NO Steam 17 Steam High NO 100 C 0 30min YES 18 Steam Low NO 70 95 C NO 0 45min YES Proof 19 Steam Proof NO 35 45 C NO 0 2 hours YES 20 Proof NO 30 45 C NO 30 C 0 8 h...

Страница 17: ...rm 2 Press MANUAL MICRO 3 Turn the Knob to enter desired cooking time 5 min MANUAL COOKING Microwave Press START 4 After cooking EXTEND will appear If you wish to extend cooking time turn the Knob to add time and press START within 1 minute If not press STOP CLEAR 5 Suppose you want to cook for 5 minutes on 500W NOTE Do not use the baking tray and metal rack AX 1700R indb 15 2019 08 01 15 32 13 ...

Страница 18: ...s ENTER to confirm 2 Turn the Knob to enter desired temperature 160 C then press START to preheat 3 Turn the Knob to enter desired cooking time 45 min 4 5 When preheat is over place food in the oven Close the door 6 1 No food in the oven Depending on the menu only accessories should be put Press MANUAL COOK Press START 7 P R O C E D U R E 2 Turn the Knob to enter desired temperature 160 C and pres...

Страница 19: ...Grill and desired superheated steam level 2 2 Press START to preheat 3 Turn the Knob to enter desired cooking time 20 min 4 5 When preheat is over place food in the oven Close the door 6 1 No food in the oven Depending on the menu only accessories should be put Press START 7 P R O C E D U R E 2 Turn the Knob to enter desired cooking time 20 min 4 5 Press START 1 Turn the Knob to select Grill 16 wi...

Страница 20: ...net and oven cavity will become hot Use thick oven gloves when adding or removing foods to prevent burns NOTE While the oven cavity temperaure is too high you cannot use Steam Low The display will show U 04 P R O C E D U R E 2 Turn the Knob to enter desired cooking time 20 min 4 5 Press START 1 Turn the Knob to select Steam Low 18 then press ENTER to confirm 3 Turn the Knob to enter desired temper...

Страница 21: ... If you wish to extend cooking time turn the Knob to add time and press START within 1 minute If not press STOP CLEAR Remove and empty the water tank wipe oven cavity Then empty the drip tray Proof This function proofs dough without steam The water tank is not necessary Food Position Lower Suppose you want to proof for 2 hours 30 minutes on Proof 30 C NOTES 1 While the oven cavity temperaure is to...

Страница 22: ...ER The Superheated Steam Level can be changed during cooking in Manual Operations with Water Oven and Water Grill To change press MANUAL COOK Then turn the Knob to select desired Superheated Steam Level and then press ENTER NOTE This function is invalid during preheating and the extension cooking Superheated Steam Level Adjustment End of Cooking Reminder At end of cooking the oven will signal and ...

Страница 23: ...king tray NOTE for towel 1 Wring water out of towels 2 Fold the towels and stack them on the metal rack Or roll up and put them side by side on the rack with less than10 layers Test organization General Incorporated Association Kyoto Biseibutsu Kenkyusho Test method Live bacteria measurement Sterilization method Removal by heat using water vapor Test results More than 99 0 of bacteria eliminated T...

Страница 24: ...with 17 Steam High for 10 minutes without food See page E 18 in the operation manual 3 After the steaming wipe the dirt in the oven interior with a dry soft cloth while the oven is still warm For removal of the ODOUR STEAM CLEAN Carry out Steam Clean function below It is not a self cleaning function It will take approximately 20 minutes for the cleaning cycle PREPARATION 1 Make sure to wipe the ov...

Страница 25: ...ng dry Do not use harsh cleaners sharp metal scrapers or stiff brushes to prevent damage to the surface Water Tank and Water Tank Lid After cooking wash in a mild soap or detergent solution with a soft damp cloth or sponge rinse and polish dry Do not wash in the dishwasher Do not use harsh cleaners sharp metal scrapers or stiff brushes on the water tank and water tank lid Drip Tray Empty drip tray...

Страница 26: ...n is too hot to use Defrost Auto Menu menu No 5 18 Steam Low 19 Seam Proof 20 Proof or 21 Sterilization Remove food from oven and allow to cool until the message clears U 11 Remove water tank If the water tank is in the oven 22 Drain Water function will not start Remove the water tank before starting Drain Water U 15 The water in the water circuit inside the oven is flozen The oven may not operate...

Страница 27: ... functioning properly Disconnect the power cord wait for a minute then reconnect Electrical power supply is interrupted during cooking The programmed cooking time and mode will be cancelled Continue to cook with manual mode Oven light is off during PROOF mode Normal operation to prevent bread dough from drying on the surface Oven light is off during operating in option No 22 25 This is normal oper...

Страница 28: ...high temperature High temperatures may cause expansion of the oven s components This is normal Smoke Aroma When using the oven for the first time it may smoke or smell See page E 9 for step by step instructions for cleaning the oven before the first use The oven cavity smells after cooking See For removal of the ODOUR on page E 22 for step by step instructions for removing the aroma When a lot of ...

Страница 29: ...nd the fuse are functioning properly CONTACT YOUR NEAREST SERVICE CENTRE APPROVED BY SHARP IMPORTANT If the display shows nothing even if the power supply plug is properly connected the Auto Display Off Mode may be in operation Open and close the oven door to operate the oven See Getting Started on page E 9 NOTES 1 If time in the display is counting down very rapidly check Demonstration Mode Pleas...

Страница 30: ...automatic and manual choices Water Oven Water Grill Superheated Steam is combined with Convection Grill heating which can roast or bake foods and allow excess fats to be removed These foods retain moisture Meats and poultry are brown juicy and flavourful Oven Grill Oven Grill browns bakes broils and crisps a wide variety of foods Cookies cakes breads muffins biscuits and rolls can be baked on one ...

Страница 31: ...frosting Some microwave safe plastics are not suitable for cooking foods with high and sugar content Follow manufacturer s directions Silicone containers YES YES YES Cannot use the grill function with the water grill Use a silicon container capable of withstanding temperatures more than 30 C higher than the set oven temperature The temperature near the steam and hot air outlet is higher than the s...

Страница 32: ... dogs sausages and oysters so that steam escapes Cook eggs in shells This prevents explosion which may damage the oven or injure yourself Cook hard soft boiled eggs Overcook oysters Dry nuts or seeds in shells Popcorn Use specially bagged popcorn for the microwave oven Listen while popping corn for the popping to slow to 1 2 seconds Pop popcorn in regular brown bags or glass bowls Exceed maximum t...

Страница 33: ...C 1 4 pieces 1 piece 90 g Do not cover Select MORE s after pressing START Tempura initial temp 8 20 C 0 1 0 4 kg Put kitchen paper on the plate then put food in the single layer on it Do not cover Grilled Chicken Skewers initial temp 8 20 C 2 6 skewers up to 150 g Do not cover Pilaf initial temp 8 20 C 0 1 0 4 kg Do not cover After cooking stir Fried Noodles initial temp 8 20 C 0 1 0 2 kg Add a li...

Страница 34: ... wrapper Shield thin end with foil Put the plastic wrap in the centre of the oven floor then place the food on it Do not cover For Defrost select LESS t after pressing START For Defrost Low with 400 g or more select MORE s after pressing START Foods not listed in the Guide can be defrosted manually using 200W power level setting NOTE After the cooking with Convection or Oven function the oven floo...

Страница 35: ... Water Oven 1 or more 2 Bake Up to 1 kg Place food on baking tray and then cook Grill fish gratin and other familiar dishes Prepare a more balanced meal by adding your favorite vegetables and cooking them at the same time See the online cookbook Water Oven 1 or more 3 Stir Fry Up to 1 kg Spread out on baking tray and cook You can cook stir fried using the baking tray as a frying pan See the online...

Страница 36: ...ox 90 g Put food on rack in baking tray uncovered For food at 8 20 C select LESS after pressing START 2 Steam Reheat Water Level 2 MAX Food Position Upper Steam Steamed Buns initial temp 18 C 8 20 C 1 4 pieces 1 piece 70 120 g Put food on rack in baking tray uncovered When reheating bigger bun 120 g select MORE s after pressing START Chinese Steamed Dumplings initial temp 18 C 8 20 C 5 12 pieces u...

Страница 37: ...ial temp 18 C 8 20 C 100 400 g 1 4 slices Put food on rack in baking tray uncovered For 300 g or more select MORE s after pressing START 3 2 Baguette initial temp 18 C 8 20 C 30 240 g 1 8 slices Use baguettes sliced less than 4 cm in thick Put food on rack in baking tray uncovered When reheating 90 g or less select LESS after pressing START When reheating 2 pieces of Savoury Buns 200 g select MORE...

Страница 38: ...e the food in the centre of the oven floor After cooking stir Fried Rice initial temp 18 C 200 450 g Prepare food as mentioned on the package Break up the food before cooking Cover with plastic wrap Place the food in the centre of the oven floor After cooking stir Chinese Steamed Dumplins initial temp 18 C 5 12 pieces up to 160 g Prepare food as mentioned on the package Splinkle water to the food ...

Страница 39: ...ner size Width 12cm or more Hight less than 5 cm Place the food in the centre of the oven centrev NOTES Do not reheat any beverages with this function Reheat with BEVERAGE See page E 11 Do not reheat buns contained chocolate or cream Recommended Temperature Soup 80 90 C Rice 60 70 C Savoury Buns 50 60 C Rice Ball 40 50 C Butter 20 C Ice Cream 10 C Microwave 6 Grilled Chicken 2 or 4 serves See the ...

Страница 40: ... baking rack on the upper position in the oven For Spinach Aspragus Select LESS t after pressing START For Radish Pumpkin Carrot Select MORE s after pressing START Steam 10 Baked Sweet Potato 1 4 pieces 1 piece 250 g See the online cookbook Water Oven 11 Toast 2 or 4 slices See the online cookbook Water Oven 12 Breakfast Set 2 or 4 serves See the online cookbook Water Oven 13 Sponge Cake 1 2 layer...

Страница 41: ... AX 1700R indb 39 2019 08 01 15 32 15 ...

Страница 42: ...rain Water 23 Steam Clean 24 Descale 25 Clean Oven First Use OPTION NUMBER The following options are selected by turning the Knob Each option number will be shown in the display 自動菜單 1 香脆加熱 2 純蒸加熱 3 麵包加熱 4 冷凍食品加熱 5 加熱溫度 6 烤雞 7 炸雞 8 烤魚 9 蒸蔬菜 10 焗蕃薯 11 多士 12 早餐套餐 13 海綿蛋糕 14 泡芙 15 風乾食物 自選烹調 16 燒烤 17 高溫蒸氣 18 低溫蒸氣 19 蒸氣發酵 20 發酵 保養 21 除菌 22 排水 23 蒸氣清潔 24 除垢 25 清潔水波爐 首次使用 選項號碼 The following options are s...

Отзывы: