background image

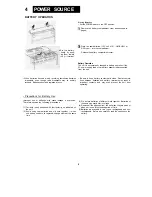
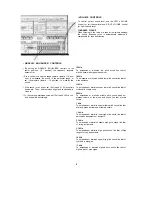
HOUR button: Hour digits advance

one at a time if the button is
pressed. If the button is pressed
for more than two seconds,
hour digits advance continuous-
ly.

MINUTE button: Minute digits

advance one at a time if the

button is pressed. If the button
is pressed for more than two

seconds, minute digits advance
continuously with five minutes

increment.

Press the ADJUST button with a pencil or ball-point

pen at the moment another time piece shows the  " 0 0 "
second reading.

Set the TIMER/CLOCK/SLEEP Selector to the CLOCK
position.

While pressing the ADJUST button with a pencil or ball-
point pen, at first, press the HOUR button to set hour
digits for current time. Then press the MINUTE button
to set minute digits.

4

CLOCK SETTING

BUILT-IN CLOCK/TIMER

TIMER BATTERY

• Set a timer battery before placing the main batteries.
• Replace the battery once a year.

Lay the unit face down on a soft cloth so as not to

damage the unit. Then, remove the battery compart-

Set a new battery — UM/SUM-3, R6 or equivalent —
into the timer battery compartment.

• If the battery is placed with reversed polarity, the

timer display may be damaged.

3

Содержание GF-800Z

Страница 1: ......

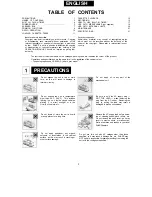
Страница 2: ...e the same for all units regardless of the cabinet colour The photograph shows GF 800Z D a dark grey model PRECAUTIONS Do not expose the unit to rain or mois ture as this will result in damage to internal circuitry Do not expose the unit to temperature higer than 60 C 140 F This includes leaving the unit inside closed vehicles placing it in direct sunlight or in the vicinity of heaters etc Do not ...

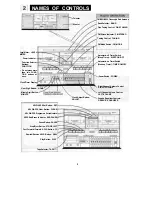
Страница 3: ...or Buttons FUNCTION Do not press more than two FUNC TION buttons at once Clock Timer Display Hour Digit Button HOUR Minute Digit Button MINUTE Right Channel Volume Control RIGHT VOLUME Left Channel Volume Control LEFT VOLUME Graphic Equalizer Controls GRAPHIC EQUALIZER Clock Adjust Button ADJUST APLD APPS Set Button SET APLD APPS Clear Button CLEAR APLD APPS Programme Set Indicators APPS End Pause...

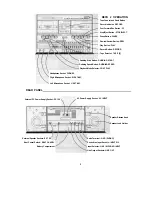
Страница 4: ...ts LINE OUT Speaker Release Knob Speaker Lead Holder DECK 2 OPERATION Tape Counter and Reset Button Record Indicator RECORD Fast Forward Cue Button FF Stop Eject Button STOP EJECT Pause Button PAUSE Rewind Review Button REW Play Button PLAY Record Button RECORD Tape Selector TAPE 2 Dubbing Start Button DUBBING START Dubbing Speed Button DUBBING SPEED Playback Mode Selector CONT PLAY Headphones Soc...

Страница 5: ...cond reading Set the TIMER CLOCK SLEEP Selector to the CLOCK position While pressing the ADJUST button with a pencil or ball point pen at first press the HOUR button to set hour digits for current time Then press the MINUTE button to set minute digits 4 CLOCK SETTING BUILT IN CLOCK TIMER TIMER BATTERY Set a timer battery before placing the main batteries Replace the battery once a year Lay the uni...

Страница 6: ...ce Be sure to keep battery contact parts clean Dust accumula tions between batteries and battery terminals may result in imperfect contacts and may even prevent the unit from operating Improper use of batteries may cause leakage or explosion Therefore observe the following precautions 1 Correctly insert batteries with their polarity as indicated on the unit 2 Avoid using new batteries and old ones...

Страница 7: ...n order to conserve battery power Remove the batteries when using the AC power for a long time AC PLUG ADAPTOR In areas or countries where an AC outlet as shown in illustration 3 is used connect the unit using the AC plug adaptor supplied with the unit as illustrated The AC plug adaptor is not included in areas where the AC wall outlet and AC supply plug can be directly connected See illustrations...

Страница 8: ...he speakers maximum input power is 26W Do not connect the speakers to an amplifier with a maximum output power of more than 26W as this may damage the speakers Caution Do not short circuit the EXT SP External Speaker outputs or leads positive and negative polalities at both right and or left speakers since it may damage the audio output circuit of the amplifier 7 Connecting speakers with less than...

Страница 9: ...qualizer circuit for high speed operation will be actuated and the high range of the tape will be reduced MECHANICAL NOTES NOTE FOR SOFT TOUCH MECHANISM When the batteries are too weak the unit will not function by pressing the PLAY button or REC button and then the PLAY button or REC button can not be returned com pletely by pressing the STOP EJECT button In that case change the batteries or use ...

Страница 10: ...on trols downward accordingly 100Hz To emphasize or diminish low pitch sound like that of electric base pipe organ or bass drum 180Hz To emphasize or diminish middle low pitch sound like that of slide trombone 310Hz To emphasize or diminish upper low pitch sound like that of violoncello or bass voice 550Hz To emphasize or diminish middle pitch sound which ex presses volume of the music and sound l...

Страница 11: ... is not transmitting a stereo programme at that time If stereo reception is unsatisfactory set the FM MODE switch to the MONO position Adjust volume and sound quality refer to instructions on page 9 ADJUSTING THE A N T E N N A Adjust the aerial appropriately to obtain the best reception on the band selected FM BROADCASTS Raise and extend the telescopic rod aerial Adjust the position and length of ...

Страница 12: ...tch the following cassette tapes Normal and low noise tapes Sharp SD Maxell UD Metal tape Sharp MX Maxell MX Cassette Tape Selection Use only well known brands of tape Use of C 120 120 minutes cassettes is not recommended The extreme thinness of this tape may result in breakage or other problems Stretched tapes will run at uneven speed and will distort anything recorded on them NOTES FOR STORING C...

Страница 13: ... CONT PLAY switch to the position Press the PLAY button of the Deck to be played finally Playback of the Cassette Deck to be played finally will begin when the Cassette Deck played first has ended SIMULTANEOUS PLAYBACK Set the CONT PLAY switch to the 1 or 2 position Press the PLAY buttons of Deck 1 and Deck 2 simultane ously The stereo audio reproduction from both cassettes will be mixed and repro...

Страница 14: ... APLD operation in progress press the CLEAR button and the deck will return to the playing mode 5 When Deck 1 reaches the desired space between selec tions it will automatically release the button or button and start playback of the desired selec tion APLD Pause Control If it is desired to stop the tape at the beginning of the selec tion press the II PAUSE button prior to performing the APLD opera...

Страница 15: ...pe contains soft classical music solo performance modern jazz etc с The recorded signal on the tape is of low strength d The recorded programme items are separated by less than a three second spaces during which there occurs no signal e The recorded programme items are separated by spaces which are not free of noise or stray signals Avoid leaving the unit in the vicinity of powerful magnetic field...

Страница 16: ...the OFF position DIGITAL TAPE COUNTER function only with Deck 2 Press the RESET button at the side of the counter to reset it to 000 The counter will advance while recording or playback and it provides a useful eference during these operations BEAT CANCEL SWITCH on rear panel BEAT CANCEL When AM SW1 or SW2 radio reception is hampered by interference set the BEAT CANCEL switch on the back of the un...

Страница 17: ...on Press the TAPE button of the FUNCTION selector Set the DUBBING SPEED selector to either the NORMAL or HIGH speed position The NORMAL position permits to dub at the normal speed The HIGH position permits to dub at twice the normal speed Do not change the setting of the DUBBING SPEED selector during dubbing Press the DUBBING START button The button of Deck 1 button and button of Deck 2 are automa...

Страница 18: ...his operation the radio can be turned on auto matically at desired time To record radio programmes Press the RECORD button To playback a cassette tape Press the button of Deck 1 or 2 6 The unit starts playing or recording radio programmes or reproducing the tape automatically at desired time 7 The unit is turned off automatically at 64 minutes after desired time If the unit has to be turned off wi...

Страница 19: ...ot press the button Do not set the period of time shorter than cassette recording time Be sure to set the time which is long enough to stop the tape by auto stop and then turn the unit off by the timer Set the SLEEP switch to the ON position Then the timer starts counting down Set the POWER switch to the OFF position The unit will be turned off after the period set is lapsed The SLEEP timer can be...

Страница 20: ...e stop mode 1 Connect two microphone plugs to the MIC right hand socket R and the MIC left hand socket L In the event that a microphone is connected only to the right or left socket sound from the microphone will be recorded from that channel alone 2 Press the TAPE button of the FUNCTION selector 3 Perform steps 2 to the end of the instruction for RECORD ING FROM THE BUILT IN RADIO on page 15 MIXI...

Страница 21: ...it with leads having plugs suit able for fitting into each set of sockets 2 Prepare the unit for radio operation refer to page 10 or cassette playback refer to page 1 2 3 Adjust the volume controls of the amplifier to suitable levels RECORDING FROM AMPLIFIER 1 Connect the amplifier output TAPE REC TAPE OUT etc to the PHONO LINE INPUT of the unit with leads that have plugs suitable for fitting into...

Страница 22: ... 210 mm 8 1 4 Weight 8 8kg 19 4lbs without batteries TAPE RECORDER Tape Compact cassette tape Frequency response 30Hz 14 000Hz normal tape 30Hz 16 000Hz CrO2 tape 30Hz 17 000Hz metal tape Signal noise ratio 55 dB Deck 1 playback 50 dB Deck 2 recording Input impedance External mic 600 ohms Phono line in 50 kohms 50 kohms Loaded impedance Headphones 8 ohms 32 ohms External speakers 8 ohme 16 ohms Li...

Отзывы: