background image

E-20

DVD Explanation

CD-DV650W

CD-DV850W

ENGLISH

Preparing to watch a DVD (DVDs)

To watch DVD video images on the TV:
1 Turn on the TV.
2 Set the TV to “AV”, “VIDEO”, etc.
3 Turn on the unit and start play.

See page 31 for playing disc.

Note:

There is no audio signal supplied to the TV.

H

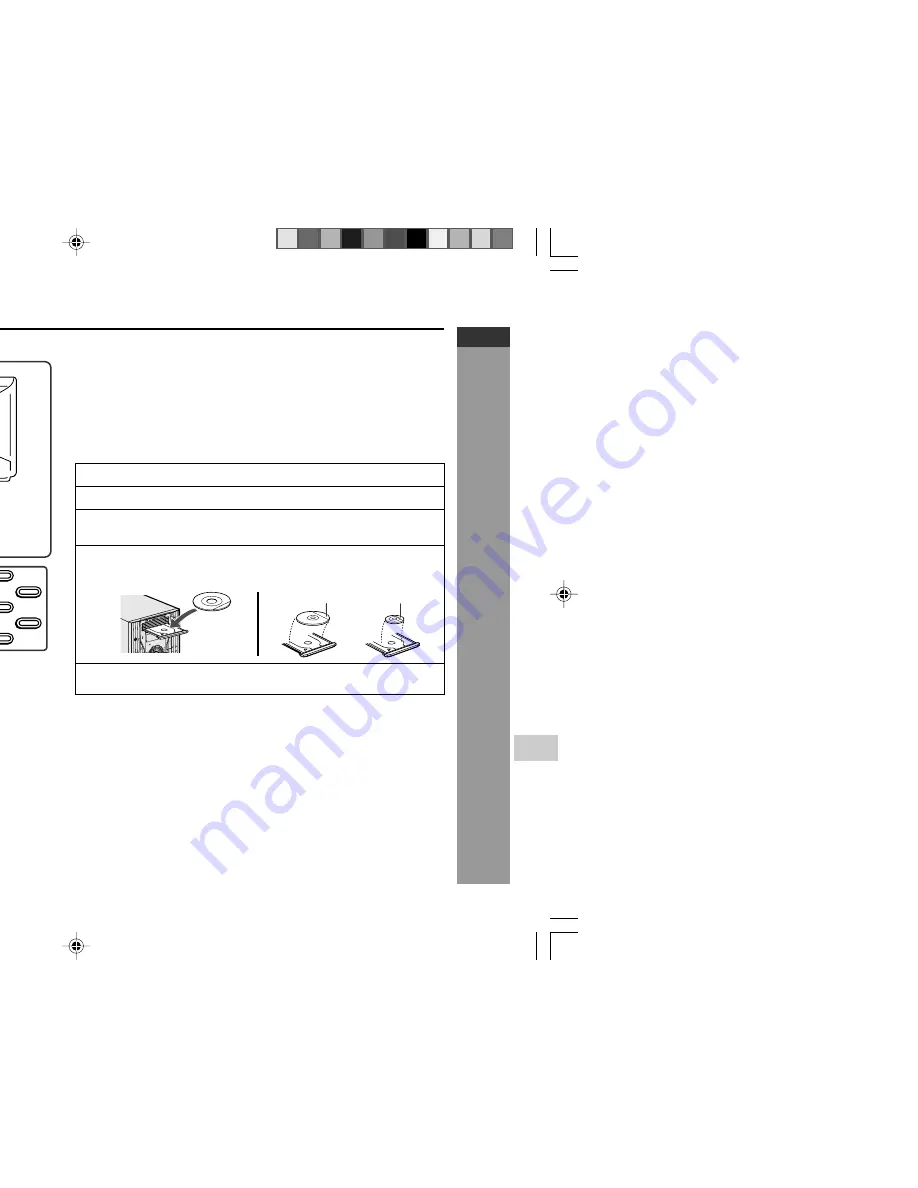
Loading a DVD (DVDs)

1

Press the ON/STAND-BY button to turn the power on.

2

Press the DVD/CD button.

3

Press the 

1 button and within 5 seconds, press the OPEN/

CLOSE button to open the disc tray 1.

4

Place the DVD on the disc tray 1, label side up.

I

Be sure to place 8 cm (3") DVD(s) in the middle of the disc
positions.

5

Press the OPEN/CLOSE


button to close the disc tray.

Caution:

I

Do not place two discs in one disc tray.

I

Do not play discs with special shapes (heart, octagon, etc.). It
may cause malfunctions.

I

Do not push the disc tray whilst it is moving.

I

If the power fails whilst the tray is open, wait until the power is
restored.

I

If the disc tray is stopped with force, “ER-CD20” will appear on
the display for 3 seconds and the unit will not function. If this occurs,
press the ON/STAND-BY button to enter the power stand-by mode
and then turn the power on again.

I

If TV or radio interference occurs during CD operation, move the
unit away from the TV or radio.

I

If a disc is damaged, dirty or loaded upside down, the disc will
skip or not play.

12 cm (5")

8 cm (3")

S-VIDEO INPUT

VIDEO IN

DVD MINI SYSTEM

CD-DV650

DV

D/C

D

Video cable
(Supplied)

To TV with external
terminals

S-Video cable
(commercially available)

DVD 

MINI 

SYST

EM

CD-DV650W

CD-DV650W_18-20

3/21/07, 3:01 PM

20

Содержание CD-DV650W

Страница 1: ...SHARP CORPORATION 72 72 72 CD DV650W DVD MINI SYSTEM CD DV650 MIC MIC LEVEL MIN MAX 1 2 DVD MINI SYSTEM CD DV850 MIC MIC LEVEL MIN MAX 1 2 CD DV850W 4 2 07 6 38 PM ...

Страница 2: ...ive sound pressure from earphones and headphones can cause hearing loss CAUTION I This product is classified as a CLASS 1 LASER product I Use of controls adjustments or performance of procedures other than those specified herein may result in hazardous radiation exposure As the laser beam used in this DVD player is harmful to the eyes do not attempt to disassemble the cabinet Refer servicing to qu...

Страница 3: ...op aerial 1 FM aerial 1 Accessories Please confirm that the following accessories are included Video cable 1 Yellow Note Only the above accessories are included y any right enerating istribution a Internet g content ations and act discs mory cards uired For raunhofer ase read r SHARP 0W Main 0W Main he model 3 7 07 7 18 PM ...

Страница 4: ... Tape Playback Listening to a cassette tape TAPE 1 54 Listening to a cassette tape TAPE 2 55 56 H Tape Recording Recording to a cassette tape 56 61 H Advanced Features Timer and sleep operation 62 65 Enhancing your system 66 67 H References Troubleshooting chart 68 69 Maintenance 70 Specifications 70 72 Page 4 5 9 10 14 15 16 17 18 19 20 21 23 24 25 25 26 27 28 29 30 31 32 33 34 37 38 39 40 40 3 8...

Страница 5: ...osure to high volume levels Do not turn the volume on to full at switch on and listen to music at moderate levels Excessive sound pressure from earphones and headphones can cause hearing loss H Care of DVD Video CD CD discs DVD Video CD CD discs are fairly resistant to damage however mistracking can occur due to an accumulation of dirt on the disc surface Follow the guidelines below for maximum en...

Страница 6: ...one Socket 66 12 Game Video Input Sockets 66 13 Disc Number Select Buttons 20 31 42 14 Disc Direct Play Button 20 31 57 58 15 Disc Tray Open Close Button 20 31 42 16 DVD Video CD CD MP3 WMA Play Tape 1 Play Tape 2 Forward Play Button 31 44 54 55 17 Memory Set Button 17 47 53 62 18 Tape 2 Record Pause Button 57 58 19 DVD Video CD CD MP3 WMA or Tape Stop Button 31 55 20 Extra Bass Demo Mode Button 1...

Страница 7: ... Indicator 9 Extra Bass Indicator 10 Memory Indicator 11 DVD Angle Indicator 12 DVD Chapter Indicator 13 DVD Title Indicator 14 WMA Indicator 15 Virtual Surround Indicator 16 Tape Record Indicator 17 Timer Recording Indicator 18 Timer Play Indicator 19 Sleep Indicator 20 Tape Forward Play Indicator 21 FM Stereo Mode Indicator 22 FM Stereo Receiving Indicator 23 Daily Timer Indicator 24 Tuner Recei...

Страница 8: ...erial Socket 10 11 10 Span Selector Switch 14 11 Video Output Socket 12 67 12 Speakers Terminals 11 10 9 11 12 8 7 4 4 5 H Speaker system 1 Tweeter 2 Woofer 3 Bass Reflex Duct 4 Speaker Wire Speaker grilles are removable Make sure nothing comes into contact with the speaker diaphragms when you remove the speaker grilles H Speaker system CD DV850W 1 Tweeter 2 Super Tweeter 3 Woofer 4 Bass Reflex Du...

Страница 9: ...track up Tape Fast Wind and Tuner Preset Up Time Up Button 33 44 46 15 DVD Video CD CD MP3 WMA Tape Stop Button 31 47 16 DVD Video CD CD MP3 WMA Tape Play Button 31 47 17 Shift Button 21 46 18 Volume Up or Down Buttons 16 19 On Stand by Button 15 16 20 Echo Level Up Down Buttons 50 21 DVD Direct Button 34 22 DVD Menu Button 40 23 Return Button 21 34 24 CD Random Button 46 25 Cursor Up Button 24 47...

Страница 10: ...e control with shift button Reference page 1 Karaoke Button 50 51 2 DVD Setup Button 21 24 3 DVD Sound Button 35 4 DVD Picture Button 37 5 DVD Video CD CD A B Repeat Button 38 6 DVD Gamma Button 36 3 30 07 2 20 PM ...

Страница 11: ...E 10 Preparation for Use CD DV650W CD DV850W ENGLISH AM loop aerial Left speaker wall socket page 13 Black Red 6 3 21 07 2 49 PM ...

Страница 12: ...I Use speakers with an impedance of 6 ohms or more as lower impedance speakers can damage the unit I Do not mistake the right and the left channels The right speaker is the one on the right side when you face the unit I Do not let the bare speaker wires touch each other I Do not allow any objects to fall into or to be placed in the bass reflex ducts I Do not stand or sit on the speakers You may be...

Страница 13: ...TV screen H TV monitor connection If the TV monitor has a video input connect it to the VIDEO OUT socket on the rear of the unit TV To video input socket Video cable Yellow Yellow H Connecting a TV with an S video cable S VIDEO OUT TV To S video input socket S video cable not supplied 3 21 07 2 49 PM ...

Страница 14: ... see page 14 Notes I The unit will start the tape initialisation when plugged in to the AC socket During this process initialising sound will be heard and the unit cannot be turned on Wait until the process is finished I Unplug the AC power lead from the wall socket if the unit will not be in use for a prolonged period of time AC Plug Adaptor In areas or countries where a wall socket as shown in i...

Страница 15: ...ASS DEMO button The demonstration mode will be cancelled and the display will disappear To return to the demonstration mode When the unit is in the power stand by mode press the X BASS DEMO button Note When the power is on the X BASS DEMO button can be used to select the extra bass mode H Demonstration mode The first time the unit is plugged in the unit will enter the demonstration mode You will s...

Страница 16: ...e sensor on the unit to strong light may interfere with operation Change the lighting or the direction of the unit I Keep the remote control away from moisture heat shock and vibrations H Test of the remote control Check the remote control after checking all the connections have been made correctly See pages 10 14 Point the remote control directly at the remote sensor on the unit The remote contro...

Страница 17: ...ical music For pop music Vocals are enhanced For jazz FLAT MODE 1 MODE 2 MODE 3 MODE 4 MODE 5 H Equaliser When the EQUALIZER button is pressed the current mode setting will be displayed To change to a different mode press the EQUALIZER button repeatedly until the desired sound mode appears For Tuner Tape and other than DVD VCD disc For DVD VCD disc only UM For Game Video Mode The sound is not modi...

Страница 18: ...in 10 seconds press the 5 3 or 2 4 button to display the time The time display will appear for about 10 seconds Note The CLOCK will appear or time will flash to confirm the time display when the AC power supply is restored after a power failure or unplugging the unit If incorrect readjust the clock as follows To readjust the clock Perform Setting the clock from step 1 If the CLOCK does not appear ...

Страница 19: ...s I 2 channel L R PCM audio I Dolby Digital I 2 channel MPEG audio I 5 1 channel MPEG audio I DTS audio External decoder is required H DVD R DVD RW Playback I DVD R disc that has been recorded in Video Mode I DVD RW disc that has been recorded in Video Mode I Make sure the DVD R DVD RW disc has been finalised after recording process before playback on this unit I Further information about Video Mo...

Страница 20: ... 2 Track 3 Track 4 Track 5 1 English 2 Japanese Type of subtitles recorded Video format Disc with multiple camera angles Number of recorded audio tracks 1 English 2 Japanese Icons used on DVD discs Sample Icons es only pictures Playing the disc normous sound g headphone ard Select other fit to standard may be different ays indicator RW o layer 3 format sion mp3 may ded in the MP3 with the wma roso...

Страница 21: ...LOSE button to close the disc tray Caution I Do not place two discs in one disc tray I Do not play discs with special shapes heart octagon etc It may cause malfunctions I Do not push the disc tray whilst it is moving I If the power fails whilst the tray is open wait until the power is restored I If the disc tray is stopped with force ER CD20 will appear on the display for 3 seconds and the unit wi...

Страница 22: ... NTSC settings NTSC Select this setting when you have an NTSC TV or an NTSC compatible Multi System TV connected to the unit PAL Select this setting when you have a PAL TV connected to the unit To exit the setup screen and return to the startup screen press the SET UP button whilst pressing down the SHIFT button or the RETURN button Notes I When you playback the PAL discs either setting of PAL can...

Страница 23: ...Display 3 Press the ENTER button and then use the cursor 3 or 4 button to select TV TYPE 4 Use the cursor 2 or 3 button to select 4 3 LB 4 3 PS or 16 9 To exit the setup screen and return to the startup screen press the SET UP button whilst pressing down the SHIFT button or the RETURN button Note If you select 16 9 whilst a 4 3 TV is connected playing a 16 9 disc will produce a vertically stretche...

Страница 24: ...button and then use the cursor 3 or 4 button to select VOUT 4 Use the cursor 1 or 2 button to select CVBS Y C or Pr Y Pb To exit the setup screen and return to the startup screen press the SET UP button whilst pressing down the SHIFT button or the RETURN button Notes I The progressive scan mode cannot be changed in resume play I CVBS Y C cannot be selected if TV SCAN is in PROGRESSIVE mode I TV SC...

Страница 25: ...ecification screen 4 Use the 0 9 buttons to enter a 4 digit password I The default password is set as 0000 Please enter this password when the first time you receive this unit 5 Press the ENTER button to select level 6 Use the cursor 1 2 button to change the parental level I Level 1 for most restrictive viewing Level 8 for adult viewing The smaller the number the greater the level of restriction I...

Страница 26: ...e the cursor 2 or 3 button to select STREAM or PCM STREAM Use this setting for a digital connection of a receiver amplifier equipped with a Dolby Digital decoder PCM Use this setting for a digital connection to the PCM digital input socket of a DAT or MD or for a digital connection to a receiver amplifier that does not have a Dolby Digital decoder To exit the setup screen and return to the startup...

Страница 27: ...n press the SET UP button whilst pressing down the SHIFT button Notes I You cannot open the setup screen whilst a playback operation is in progress If a disc is playing stop playback first I If you make a mistake when entering the number press CLEAR DISPLAY button to erase it and then enter a new number Selecting a language from others H OSD language setting 1 Whilst a disc is stopped press the SE...

Страница 28: ...ortuguese 8185 qu Quechua 8277 rm Rhaeto Romance 8278 rn Kirundi 8279 ro Romanian 8285 ru Russian 8287 rw Kinyarwanda 8365 sa Sanskrit 8368 sd Sindhi 8371 sg Sango 8372 sh Serbo Croatian 8373 si Singhalese 8375 sk Slovak 8376 sl Slovenian 8377 sm Samoan 8378 sn Shona 8379 so Somali 8381 sq Albanian 8382 sr Serbian 8383 ss Siswat 8384 st Sesotho 8385 su Sundanese 8386 sv Swedish 8387 sw Swahili 846...

Страница 29: ...c Stop Play Appears when display mode is on Pause Appears when display mode is on Slow Appears when display mode is on Fast Forward Appears when display mode is on Fast Reverse Appears when display mode is on When resume function can be used 1 5 NO D I S C UNKNOWN D A 1 5 NOW LOADING C 0 1 8 3 1 5 0 2 3 4 0 RESUME se 00 03 19 00 04 00 DVD 001 028 00 03 19 00 04 00 DVD 001 028 1 00 03 19 00 04 00 D...

Страница 30: ... size on a normal screen TV 16 9 Select this mode to view on a wide screen TV Select a mode to optimise DVD or video CD images on a TV INTERLACE Select this for a non progressive scan TV use a video cable S video cable or component video cable PROGRESSIVE Select this for a progressive scan TV use a component video cable This function can be set when VOUT is set Pr Y Pb only Select the correct colo...

Страница 31: ...imum STD Dynamic Range Control set to standard MIN Dynamic Range Control set to minimum Off Dynamic Range Control not setting The audio processing setting can be reset to a factory condition by pressing the ENTER button Select a digital output signal format Stream Select this when connecting the unit to a Dolby Digital DTS surround amplifier PCM Select this to output in PCM format You can output a...

Страница 32: ...down or if the region number of the disc you are using is one that is not supported by this unit If the above indicator appears reload the disc or replace it with another one I A safety feature automatically sets the unit to the power stand by mode if you set the volume level too high whilst playing certain types of discs If this happens lower the volume level and restart playback I The unit also ...

Страница 33: ...during auto playback I If you remove a disc and then load another one Notes I After you press the H button to stop playback you can press the H button again and 0 button to start playback from the beginning of the disc I This operation may not be performed with certain types of discs I Resume may not be performed during menu playback H Slow motion play 1 Whilst a disc is playing press the SLOW but...

Страница 34: ...1 5 seconds whilst a disc is playing I The disc begins fast scan at x 2 speed 1 I Three speeds are available Each time the 4 1 PRESET X or PRESET W button is pressed the speed of fast scan changes in the sequence shown on the right I You can also press the 4 1 or button on the remote control for the same operation 2 Press the 0 button to return to normal playback Notes I On some discs the fast sca...

Страница 35: ...on that of the chapters recorded on the disc 1 Press the DIRECT button to select TITLE SEARCH 2 Use the 0 9 buttons to select the title number to which you want to skip 3 Press the ENTER button The image changes to the beginning of the specified title Notes I The number of titles you can enter depends on that of the titles recorded on a disc you play I The direct title skip function is not perform...

Страница 36: ...PS 1 Press SOUND button whilst pressing down the SHIFT on the remote control Function control screen appear 2 Each time SHIFT SOUND button is pressed the audio format recorded in the disc will change Notes I This function can only be used for discs on which the sound has been recorded in multiple formats I With certain types of discs you can change the audio using the disc menu see page 29 H Virtu...

Страница 37: ...t altering the brightness of the brighter portions thereby making the entire image easier to see Use the following procedure to change the setting between ON and OFF and the level for the gamma setting STEPS 1 Press the GAMMA button whilst pressing down the SHIFT button during playback The Function control screen appear 2 Every time GAMMA button is pressed the setting will change as G 1 G 2 G 3 OF...

Страница 38: ...4 button to shift the view and display the part you want I Whilst an image is zoomed you can zoom out the image by pressing RETURN button The image can zoom out until 5 for VCD DVD and zoom out until 15 for JPEG ZOOM indicator z 1 Press the 1 button Press the 4 button Press the 2 button Press the ZOOM button Press the 3 button I When you press the CLEAR DISPLAY button the zoom operation is cancell...

Страница 39: ...pressing down the SHIFT button I This displays A repeat indicator I This registers the start point A 2 When playback reaches the end point of the scene press the button whilst pressing down the SHIFT button again I This starts A B repeat from the start point A to the end point B I To cancelA B repeat press theA B button whilst pressing down the SHIFT button again This clears the A B indicator from...

Страница 40: ...not be programmed I To continue programme into same title or chapter use direct search button 1 to 0 to select and press ENTER button I Programme cannot be executed during playback or in pause mode I To discontinue the programme press MEMORY SET MEMORY button I To play the same programme again press MEMORY SET MEMORY button and then press PLAY button I Chapter from different title cannot be progra...

Страница 41: ...itle item on the disc menu 3 Press the ENTER button to display the subtitle language selection screen 4 Use the cursor 3 4 1 or 2 button to select the desired subtitle language 5 Press the ENTER button to register your selection and display the subtitles in the language you have set Repeat the above procedure to make other settings audio channel DTS MPEG audio etc Notes I The procedure shown here ...

Страница 42: ...e video output format NTSC or PAL according to your TV or VCR Refer page 21 TV output setting of MDs and the playback of up watch from the ets m 5 e al 74 min on 2 0 P B C ding on the disc ures can be perations as shown above P B C CDs ayed on the interactive other software menu play ay high reso res played 3 21 07 3 07 PM ...

Страница 43: ...ress the OPEN CLOSE button to open the disc tray 1 4 Place discs on the disc tray label side up I Be sure to place 8 cm 3 discs in the middle of the disc positions 5 Press the OPEN CLOSE button to close the disc tray 6 To select the disc you want to listen to first press one of the s 1 s 5 buttons and within 5 seconds press 0 button to start playback I Playback will begin from track 1 on the disc ...

Страница 44: ...ion move the unit away from the TV or radio I If a disc is damaged dirty or loaded upside down the disc will skip or not play back H To play without activating the playback control function Video CD with P B C only You can play a video CD with P B C without activating the playback control function In this case the menu screen will not appear and the disc will be played in the same way as a video C...

Страница 45: ...tray 1 4 Place the CD on the disc tray 1 label side up I Be sure to place 8 cm 3 discs in the middle of the disc positions 5 Press the OPEN CLOSE button to close the disc tray 1 will appear 6 You can place discs on the trays 2 5 by following steps 3 5 7 Press the 0 button to start playback 12 cm 5 8 cm 3 CD play indicator Total number of tracks on the CD whose number is flashing Total playing time...

Страница 46: ...ds during playback For fast reverse Press and hold down the 5 3 PRESET X button for more than 1 5 seconds during playback I Three speeds are available Each time the 5 3 PRESET X or 2 4 PRESET W button is pressed the speed of fast scan changes in the following sequence Notes I Normal playback will resume when the 0 button is pressed I You can locate the desired portion on a single disc only I When ...

Страница 47: ...below sequence Press the button repeatedly on the remote control To cancel repeat play Press the button repeatedly to extinguish the Note WMA MP3 and DVD discs will be skipped for All disc repeat mode H A B repeat 1 When play reaches the start point of sound press the button whilst pressing down the SHIFT button I This displays A repeat indicator I This registers the start point A 2 When play reac...

Страница 48: ...s will not be cleared I During programme playback random play is not possible I Once programmed the contents will be memorised When the unit is stopped and then the 0 button is pressed however normal CD playback will be resumed To play back the memorised programme press the 0 button after press the MEMORY SET MEMORY button I To exit the programming procedure halfway through press the MEMORY SET ME...

Страница 49: ... Press the 3 button B For example to choose 30 1 Press the 3 button 2 Press the 0 button Selected file number after press ENTER button 3 Press the ENTER button to start playback Playback of the selected track is started When the end of last file is reached the next disc will automatically be started To stop playback Press the button Notes I The selected file can be started simply by pressing the d...

Страница 50: ... an Audio CD and will play the tracks of that format only I Noise may be heard during playback of an MP3 disc which recorded at a very high speed I During stop or playback of an MP3 WMA disc the file name of currently selected track can be displayed in OSD by pressing TOP MENU button in remote control I During stop of an MP3 disc the file properties of currently selected track can be displayed in ...

Страница 51: ... ECHO or button on the remote control to increase or decrease the microphone echo Notes I When you sing too loud through the microphone your voice may be distorted depending on the devices connected If this happens lower the microphone volume I If an extremely sensitive microphone is used howling may be generated I Unidirectional microphone is more appropriate for vocal use I The volume of both mi...

Страница 52: ...up I Discs on which vocal has been recorded on the left channel and music on the right may not play properly H Recording of mixed sound to a cassette tape You can record mixed sound from the microphone and CD TUNER TAPE 1 or GAME VIDEO 1 Perform steps 1 3 in Playing karaoke on page 50 2 Press the DVD CD TUNER BAND TAPE 1 V 2 or GAME VIDEO button to select the audio source 3 To record mixed sound f...

Страница 53: ...nd the tuner will stop at the first receivable broadcast station Notes I When radio interference occurs auto scan tuning may stop automatically at that point I Auto scan tuning will skip weak signal stations I To stop the auto tuning press the TUNING button again To receive an FM stereo transmission Press the TUNER BAND button to display the ST indicator I j will appear when an FM broadcast is in ...

Страница 54: ...ESET X or W button for more than 0 5 seconds The preset number will flash and the programmed stations will be tuned in sequentially for 5 seconds each 2 Press the PRESET X or W button again when the desired station is located H To erase entire preset memory 1 Press the ON STAND BY button to enter the stand by mode 2 Whilst pressing down the I6 button and the X BASS DEMO button press the TUNING W b...

Страница 55: ... you 5 Press the 0 button to start playback Tape playback To stop playback Press the H H button Note You cannot fast forward or rewind the cassette in the TAPE 1 compartment Auto power on function When you press any of the following buttons the unit turns on I TAPE 1 V 2 button main unit and remote control The unit turns on and the TAPE function is activated I 0 button main unit and remote control...

Страница 56: ...o rewind it press the 5 3 PRESET X 5 3 button Caution I To remove the cassette press the H H button and then open the compartment I Before changing from one tape operation to another press the H H button I If a power failure occurs during tape operation the tape head will remain engaged with the tape and the cassette door will not open In this case wait until the power is restored e TAPE 2 wer on ...

Страница 57: ...nit I The volume and sound controls can be adjusted with no effect on the recorded signal Variable Sound Monitor I For recording use only normal tapes Do not use metal or CrO2 tapes Erase prevention tab of cassette tapes I When recording on a cassette tape make sure that the erase prevention tabs are not removed Cassettes have removable tabs that prevent accidental recording or erasing I To protec...

Страница 58: ...corded 5 Press the 0 button to start DVD playback If the disc you are using supports auto start it starts to play automatically even if you do not press the 0 button as soon as you close the disc tray 6 Press the I6 button Recording will be paused 7 When DVD playback reaches the desired point press the 0 button to start recording To stop recording Press the button I It will stop the tape only Anot...

Страница 59: ... tape on which recording cannot be performed 3 Press the DVD CD button and load the desired disc 4 Press one of the s 1 s 5 buttons to select the disc to be recorded and press PLAY button to start playback 5 Press the I6 button Recording will be paused 6 Select the desired track number by pressing the Direct Search 0 9 buttons on the remote control 7 Press the 0 button to start recording To stop r...

Страница 60: ... Recording will be paused 5 Press one of the s 1 s 5 buttons to select the desired disc 6 Within 5 seconds press the DIRECT PLAY button to start recording I Recording starts from side A I Recording is started from the selected CD When the playback of the last track is finished or the end of the tape is reached the CD and the cassette will stop automatically I CD playback will start approximately 7...

Страница 61: ...the I6 button Recording will be paused 4 Press the 0 button to start recording To interrupt recording Press the I6 button To resume recording press the same recording button you pressed in step 4 Other buttons do not allow resuming To stop recording Press the H button Note If you hear a whistling noise whilst recording an AM station move the AM loop aerial H Erasing recorded tapes 1 Press the TAPE...

Страница 62: ...he tape to be erased into the TAPE 2 cassette compartment with the side to be erased facing towards you 2 Press the TAPE 1 V 2 button until TAPE 2 appears on the display 3 Press the I6 button 4 Press the 0 button to start erasing Note Make sure that the TAPE 1 is not in use 3 21 07 3 11 PM ...

Страница 63: ...ction 2 For timer playback Load a cassette or discs to be played For timer recording Load a cassette for recording in the cassette compartment 1 Press the ON STAND BY button to turn the power on 2 Press the CLOCK TIMER button 3 Within 10 seconds press the 4 1 or button to select ONCE or DAILY and press the MEMORY SET MEMORY button Set the unit to the correct time if ONCE or DAILY does not appear S...

Страница 64: ...ER I When you select the tuner select a station by pressing the 5 3 or 2 4 button and then press the MEMORY SET MEMORY button I If a station has not been programmed NO P SET will be displayed and timer setting will be cancelled 10 Adjust the volume using the VOLUME control and then press the MEMORY SET MEMORY button Do not turn the volume up too high 11 Press the ON STAND BY button to enter the po...

Страница 65: ...conds press the 5 3 or 2 4 button to select ONCE or DAILY and press the MEMORY SET MEMORY button 3 Within 10 seconds press the 5 3 or 2 4 button to select ONCE OFF or DAILY OFF and press the MEMORY SET MEMORY button Timer will be cancelled the setting will not be cancelled Reusing the memorised timer setting The timer setting will be memorised once it is entered To reuse the same setting perform t...

Страница 66: ...ning to the radio and wake up to CD in the next morning Sleep and timer recording For example you can fall asleep listening to the CD and record radio programmes whilst sleeping 1 Set the sleep time see left steps 1 5 2 Whilst the sleep timer is set set the timer playback or recording steps 2 10 pages 62 63 Caution When using the cassette deck be sure the tape length is long enough to perform both...

Страница 67: ...it turns on and GAME function is activated I 0 button main unit and remote control The unit turns on and playback of the last function starts DVD CD TAPE TUNER GAME H To record on a tape from Game VCR etc 1 Insert a cassette in the TAPE 2 cassette compartment 2 Press the GAME VIDEO button 3 Press the I6 button 4 Press the 0 button 5 Play the game system VCR etc H Headphones I Do not turn the volum...

Страница 68: ...ercially available leads nued To the digital input socket Optical digital lead not supplied To video input socket MD recorder DTS MPEG audio processor or amplifier Video cable Yellow TV Yellow 3 21 07 3 12 PM ...

Страница 69: ...own Does the disc dissatisfy the standards Is the disc distorted or scratched Is the unit located near excessive vibrations Is the disc very dirty Has condensation formed inside the unit H Remote control Symptom The remote control does not operate Possible cause Is the AC power lead of the unit unplugged Is the battery polarity wrong Are the batteries dead Is the distance or angle incorrect Does t...

Страница 70: ...button until CLEAR AL appears Caution This operation will erase all data stored in memory including clock timer settings tuner preset and CD programme H Condensation Sudden temperature changes storage or operation in an extremely humid environment may cause condensation inside the cabinet CD pickup tape heads etc or on the transmitter on the remote control Condensation can cause the unit to malfun...

Страница 71: ...s Main Unit H General CD DV650W Power source AC 110 127 220 230 240 V 50 60 Hz Power consumption 110 W Dimensions Width 260 mm 10 1 4 Height 330 mm 13 Depth 326 mm 12 7 8 Weight 7 4 kg 16 3 lbs H General CD DV850W Power source AC 110 127 220 230 240 V 50 60 Hz Power consumption 140 W Dimensions Width 260 mm 10 1 4 Height 330 mm 13 Depth 326 mm 12 7 8 Weight 8 9 kg 19 6 lbs H Amplifier CD DV650W Ou...

Страница 72: ... PCM DVD o 10 T H D 10 T H D 0 9 T H D hms s H Tuner Frequency range FM 88 108 MHz AM 531 1 602 kHz H Cassette deck Frequency 50 14 000 Hz normal tape response Signal noise ratio 50 dB recording playback Wow and flutter 0 3 WRMS 3 30 07 2 28 PM ...

Страница 73: ...850W Type 3 way type speaker system Supert Tweeter 5 cm 2 tweeter 16 cm 6 5 16 woofer Maximum input 300 W power Rated input power 150 W Impedance 6 ohms Dimensions Width 200 mm 7 7 8 Height 330 mm 13 Depth 231 mm 9 1 8 Weight 3 6 kg 7 9 lbs each 3 21 07 2 43 PM ...

Страница 74: ...U P DOWN CD DV650W CD DV850W DVD MINI SYSTEM ...

Отзывы: