background image

Using the Touch Panel

The product uses a touch panel, operated with your finger.


In the following cases, the touch panel may not work even if you touch it. 
These may also cause a malfunction.


Operation with a gloved finger


Operation with the tip of a fingernail


Operation with foreign object placed on the operation pad


Operation with a protective film or sticker applied


Operation with water droplets or condensation on the display


Operation using wet or sweaty fingers


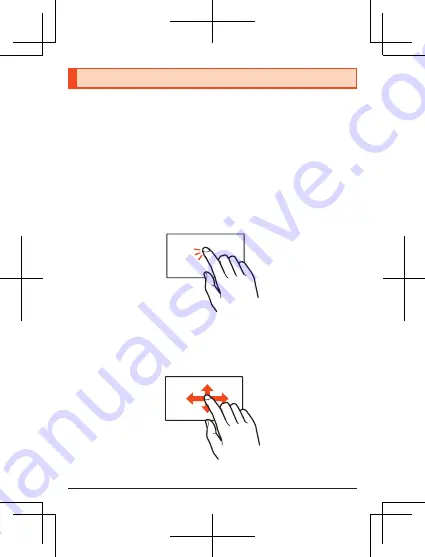
Tap

Touch the screen and immediately release your finger.


Select items or icons displayed on the screen.


Slide/Swipe

Keep touching the screen, and move your finger to the desired direction or position.


Scroll the screen or switch pages by tracing your finger in the desired 
direction.

28

Содержание Au Speed Wi-Fi NEXT W07

Страница 1: ...ON OKINAWA CELLULAR TELEPHONE COMPANY Manufactured by SHARP CORPORATION The company names and product names appearing in this manual are trademarks or registered trademarks of their respective holders For exemptions refer to Notes on Usage available on the au homepage ...

Страница 2: ...設定 Wireless LAN Initialization sticker Japanese はじめてガイド Quick Start Guide Japanese ご利用にあたっての注意事項 保証書 Notes on Usage Warranty Japanese Used to insert remove the au Nano IC Card 04 LE The following items are not included au Nano IC Card 04 LE USB Type C cable AC adapter Cradle Please purchase the specified charger sold separately For details refer to 周辺機器 Peripheral Devices in the 取扱説明書 詳細版 Full Ins...

Страница 3: ...criptions are based on the screen display and operations of the product with au Nano IC Card 04 LE installed Illustrations and screens shown in this manual may look different from those on the actual product In some cases minor details or a part of a screen may be omitted Menu items hierarchies and icons used in this manual may differ depending on the functions used and upon usage conditions In th...

Страница 4: ...able Also data communication using Internet access using WiMAX 2 LTE or UMTS systems is available on devices connected to the product Connecting via Wireless LAN Wi Fi You can connect wireless LAN Wi Fi supported devices such as PCs smartphones tablets etc to this product to carry out data communications Up to 10 devices supporting wireless LAN Wi Fi can be connected to the product at the same tim...

Страница 5: ...ou can connect this product to a PC with a USB Type C cable commercially available for data communication Additionally you can also use the USB connection at the same time as Wi Fi connections Wi Fi Wi Fi Wireless base station 4 ...

Страница 6: ...ailable You can also use the wired LAN connection at the same time as wireless LAN Wi Fi connections Using the specified AC adapter sold separately plug the cradle sold separately into the outlet For details on the specified AC adapter sold separately refer to 周辺機器 Peripheral Devices in the 取扱説明書 詳細 版 Full Instruction Manual Japanese Wi Fi Wi Fi LAN cable commercially available AC adapter sold sep...

Страница 7: ...xed monthly charges are required with usage charges being combined with fees for usage within Japan making payment easy Customers with new accounts can use these overseas from the day following purchase However customers who have purchased this product from an online shop can use it from 2 days after starting communications within Japan Please check with the au website or Customer Center for detai...

Страница 8: ...u can use the product to perform data communication with wireless base station via WiMAX 2 LTE or UMTS systems You can select from the following communication modes to use WiMAX 2 LTE UMTS High Speed Mode High Speed Plus Area Mode During international roaming By default the product is set to High Speed Mode Note that additional charges may be applied depending on your billing plan if you switch it...

Страница 9: ...uct over wireless LAN Wi Fi by displaying a QR code on the product screen and reading it with the camera on the smartphone or other device WPS connections are also supported to allow you to connect your smartphone to the product via wireless LAN Wi Fi using a WPS key If the wireless LAN Wi Fi supported device supports the WPS push button method you can easily set the SSID and security method requi...

Страница 10: ...nes is restricted follow the instructions given by the respective airlines Be very aware of people nearby When in town do not use in locations that obstruct passers by Looking at your product screen while walking is very dangerous Do not use this product while walking or suddenly stop to use it When using this product on the bullet train or in hotel lobbies move to a location that will not bother ...

Страница 11: ...estored to the factory default settings by pressing this button with the SIM eject pin sample when the power to the product is on B au IC Card tray C f Power key Turn the screen on off Hold down to turn the power on off and to reboot D Internal antenna E Internal antenna Wi Fi antenna 10 ...

Страница 12: ...remove it by yourself To forcibly turn the power off refer to Turning the Power Off Forcibly zP 25 Internal antenna and Wi Fi antenna The antenna is built into the product Do not cover the antenna with your hand during use Doing so may impact signal quality au IC Card Pulling out or applying excessive force on the au IC Card tray may cause damage IMEI plate A plate with the sticker IMEI label show...

Страница 13: ...ide without text and pull out the IMEI plate Do not fully pull out the IMEI plate Catch Catch au IC Card tray underside au IC Card tray underside au IC Card tray Hole of the IMEI plate IMEI plate Note that pulling out the IMEI plate forcibly or applying force to it may damage the plate If the IMEI plate comes fully out carefully return the IMEI plate while taking care not to insert it too far in I...

Страница 14: ...er off f hold down for at least 2 seconds Power off Reboot f hold down for at least 2 seconds Reboot Turn screen on f while the screen is off Turn screen off f while the screen is on Forcibly power off f hold down for at least 8 seconds RESET button Reset the product to the factory default Use the SIM eject pin sample to hold down for at least 2 seconds YES 13 ...

Страница 15: ...remove An error message will be displayed if the au IC Card is not correctly inserted or if the au IC Card has a malfunction Be careful not to lose the au IC Card after it is removed Also do not insert an au IC Card that is inserted into a conversion adapter Doing so might cause a malfunction When inserting removing the au IC Card ensure that any USB Type C plugs such as the TypeC Common AC Adapte...

Страница 16: ...h the display side of the product turned up Inserting the au IC Card A Insert the tip of the SIM eject pin sample into the au IC Card tray hole Push the tool firmly straight in until the au IC Card tray comes out Pushing this other than straight in may cause damage or malfunction SIM eject pin sample B Pull out the au IC Card tray 15 ...

Страница 17: ...perly seated within may result in damage Notches IC metal side D Insert the au IC Card tray fully into the product straight and horizontally with the display side facing up Push the areas indicated with securely and make sure there is no space between the product and the au IC Card tray Inserting removing the au IC Card tray Do not insert the au IC Card into the product directly Place the au IC Ca...

Страница 18: ...g the au IC Card tray into the main unit insert the card tray slowly and horizontally with the display side facing up and confirm that there are no space between the main unit and the au IC Card tray Do not insert the au IC Card tray the other way around Doing so might cause damage to the au IC Card tray Removing the au IC Card A Using the SIM eject pin sample pull out the au IC Card tray When pul...

Страница 19: ...old separately plugged in may result in repeated charge discharge cycles in a short time Frequent repeated charging shortens the internal battery life Do not charge for a long time with the power left turned on If the product is left turned on after charging is complete the internal battery charge level decreases In these cases charge again with the specified charger sold separately However depend...

Страница 20: ...ter 02 sold separately power plug into an 100V AC outlet B Insert the USB Type C plug of the TypeC Common AC Adapter 02 sold separately into the external connection jack of the product in the direction of the arrow 100V AC outlet TypeC Common AC Adapter 02 sold separately External connection jack USB Type C plug C When charging is completed pull out the USB Type C plug of the TypeC Common AC Adapt...

Страница 21: ...is explains connecting the cradle sold separately and the TypeC Common AC Adapter 02 sold separately and charging the product For details on the specified AC adapter sold separately refer to the 取扱説明書 詳細版 Full Instruction Manual Japanese A Insert the TypeC Common AC Adapter 02 sold separately power plug into an 100V AC outlet B Insert the USB Type C plug of the TypeC Common AC Adapter 02 sold sepa...

Страница 22: ...ection jack on the product facing down connect the product straight onto the USB Type C plug for charging on the cradle sold separately Check if the product and cradle sold separately are properly aligned There may be damage if the product and cradle are not properly aligned when connecting and disconnecting the product External connection jack USB Type C plug for charging 21 ...

Страница 23: ...cradle sold separately Do not use a voltage converter for overseas travel to charge the battery Note that inserting or removing the equipment forcibly may cause damage to the power supply USB Type C connection jack and USB Type C plug for charging or result in a malfunction If the power lamp is off check if the cradle sold separately is correctly connected to the outlet with the specified AC adapt...

Страница 24: ...e PC while the product is turned on the USB connection function will start and the PC will automatically connect to the Internet Note that data communications may result in charges being incurred External connection jack USB plug USB Type C plug USB Type C cable commercially available Charging over USB may take longer than when using the specified AC adapter sold separately If the USB Type C cable...

Страница 25: ...ype C cable commercially available A On the home screen Mobile Charge B Scroll up C 50 30 Charging will stop when the remaining battery capacity reaches the selected percentage D Supply E You can charge your smartphone or other device by connecting it to this product using a USB Type C cable commercially available 24 ...

Страница 26: ...oduct The product will turn off and then restart A f hold down for at least 2 seconds B Reboot Turning the Power Off Forcibly Turn off the product forcibly when the screen becomes unresponsive or will not turn off A f hold down for at least 8 seconds Note that settings and other content may be deleted if the power is turned off forcibly Do not use this except when the product cannot be operated 25...

Страница 27: ...A f while the screen is off B Slide to the right Configuring Initial Settings When you turn on the power to the product for the first time the initial settings screen is displayed when the screen is unlocked A In ソフトウェア更新 Software Update select はい Yes or いいえ No for 自動更新 Auto Update The home screen appears Switching the Display Language to English A On the home screen 設定 Settings B Language Setting...

Страница 28: ...ip of the SIM eject pin sample into the RESET button hole B Hold down the RESET button for at least 2 seconds C YES SIM eject pin sample Resetting the product will clear all settings with the exception of the PIN code Prior to resetting we recommend that you back up all data of this product For details on backing up refer to the 取扱説明書 詳細版 Full Instruction Manual Japanese 27 ...

Страница 29: ...oreign object placed on the operation pad Operation with a protective film or sticker applied Operation with water droplets or condensation on the display Operation using wet or sweaty fingers Tap Touch the screen and immediately release your finger Select items or icons displayed on the screen Slide Swipe Keep touching the screen and move your finger to the desired direction or position Scroll th...

Страница 30: ...書 詳細版 Full Instruction Manual Japanese C Client List Check the number of devices currently connected to the product D Wi Fi Guide Connect devices supporting wireless LAN Wi Fi to the product by following the instructions on the screen For details refer to Connecting via Wireless LAN Wi Fi zP 36 E Mobile Charge Configure settings for mobile charging For details refer to Mobile Charging zP 24 F Abou...

Страница 31: ...ming High Speed Mode High Speed Plus Area Mode will be displayed to the right of the icon if the product is currently communicating When there is no service OUT is displayed The network name is displayed to the right of the icon When there is no au IC Card inserted No SIM is displayed Internet connection disconnection indicator Software update running DFS check indicator Mobile charge indicator to...

Страница 32: ...because the device is not in Japan Displayed when switching to 5 GHz mode when overseas The WiFi 5GHz is unavailable Please turn to 2 4GHz Displayed when 5 GHz mode cannot be used The WiFi 5GHz is unavailable Displayed when 5 GHz mode cannot be used 5GHz is not available because no SIM detect Displayed when switching to 5 GHz mode when there is no au IC Card inserted Connector is too hot Please un...

Страница 33: ...fter 30 minutes Displayed after turning the product on when radar is detected when using the DFS function Communication is restricted because the device is hot If the temperature continues higher it may shut down Displayed when the main unit becomes hot This process needs to be rebooted Rebooting Displayed when the product needs to reboot 32 ...

Страница 34: ...Basic Operation To Return to the Previous Screen Tap at the top left of the screen To Return to the Home Screen Tap at the top right of the screen 33 ...

Страница 35: ... To Select Items Tap the items to select If are displayed tap to select 34 ...

Страница 36: ...n this ON Enter Numbers The number keyboard is displayed depending on the entry field A Entry field Numbers can be entered at the position of the cursor B Keyboard Keyboard for entering numbers C Delete key Delete the number to the left of the cursor 35 ...

Страница 37: ...ord set on this product You can check the network names SSID and security key password for this product on the 無線LAN初期設定 Wireless LAN Initialization sticker Japanese included with the product or using SSID Information Furthermore the network names SSID set as the factory default for this product are indicated with SPWN_S31_XXXXXX_a and SPWN_S31_ XXXXXX_b XXXXXX are the last 6 characters of the MAC...

Страница 38: ...LAN Wi Fi supported device supports the WPS push button method you can easily set the SSID and security method required for the connection Refer to the instruction manual for your wireless LAN Wi Fi supported device to determine if it supports the WPS push button method To use WPS you must set Security Encryption Mode on the product to WPA2 PSK AES or WPA WPA2 PSK AES TKIP Use on this product A f ...

Страница 39: ... Use on this product C On the home screen Wi Fi Guide WPS D Start WPS 38 ...

Страница 40: ...successful is displayed on the product Connecting to the Device by Searching for the Access Point You can manually connect your device supporting wireless LAN Wi Fi to this product if it does not support WPS or if the WPS connection does not work Use on this product A f power key for at least 2 seconds The product power will turn on Wi Fi functionality will turn ON and will be displayed The produc...

Страница 41: ...int If you turn ON the Wi Fi function on your device supporting wireless LAN Wi Fi and select the menu item with a label similar to Connect to access point or Search the list of nearby access points will be displayed Operating methods will differ depending on the device supporting wireless LAN Wi Fi For details refer to the instruction manual for your device supporting wireless LAN Wi Fi E Select ...

Страница 42: ...es PCs smartphones tablets etc supporting wireless LAN Wi Fi below Wi Fi devices via wireless LAN Wi Fi entry of the network name SSID and the security key password is required The network name SSID and security key password are printed on the 無線 LAN初期設定 Wireless LAN Initialization sticker Japanese default settings The sticker is needed to connect the product to Wi Fi devices after you purchased t...

Страница 43: ...re for Android 10 Use on this product A f power key for at least 2 seconds The product power will turn on Wi Fi functionality will turn ON and will be displayed The product will automatically connect to the Internet with the default settings will be displayed if the product successfully connects to the Internet B On the home screen Wi Fi Guide QR Code Connection A QR code will be displayed on the ...

Страница 44: ...ice will be connected to the product As for the model of Android 9 Pie and earlier the QR code reader installed on your Android smartphone may not be able to automatically perform Wi Fi settings Install the QR code reader from the link below http k tai sharp co jp support a w07 peripherals qrapl html Japanese 43 ...

Страница 45: ...r The default setting for Host IP Address is 192 168 128 1 The setting tool Home screen will be displayed C Click Login enter password click Login Enter uppercase and lowercase characters correctly The default password is the last 6 digits of the IMEI information international mobile equipment identity number You can check the IMEI information international mobile equipment identity number by oper...

Страница 46: ...tes Be aware that any items that were entered will be deleted About Device You can check information about the product such as the phone number of the au IC Card inserted in the product and the IMEI information international mobile equipment identity number A On the home screen About Device 45 ...

Страница 47: ...tware Update When the confirmation screen is displayed check the content and select OK No updates is available at this time will be displayed if the software does not require updating You can also use the same operations to update the software from the setting tool For details refer to the 取扱説明書 詳細版 Full Instruction Manual Japanese Cautions in Usage When connecting the product to the Internet for ...

Страница 48: ...re update fails it may become impossible to operate the product If this happens bring it to an au shop or Toyota store not accepted by some shops Fully charge the battery before performing an update Update will fail if the battery capacity is low or will drop to low levels during update Check signal status Software update may fail if performed in a location where the signal is weak Even if a softw...

Страница 49: ...duct Check if the product is correctly connected to the PC with a USB Type C cable commercially available Disconnect the USB Type C cable commercially available from the PC restart the PC and then reconnect the cable Make sure a USB hub or conversion plug is not used Using a USB hub or conversion plug may prevent the product from working normally Operations are not possible on the keys touch panel...

Страница 50: ...rging the product may become warm and charging may stop Charge again after the temperature of the product has dropped The product does not turn on Is the internal battery charged Has f been held down Operation not possible Screen frozen Powering off not possible You can turn the power off forcibly by holding down f for at least 8 seconds Turn on again after waiting briefly Power turns off unexpect...

Страница 51: ...e au product that you have been using and that has been collected by the replacement mobile phone delivery service will after refurbishment and repair be used as a replacement terminal Furthermore parts replaced in au after sales service are collected and recycled by the Company Accordingly these parts cannot be returned to the customer If the product has been processed modified or analyzed includ...

Страница 52: ...issues including damage theft and loss For details on the monthly pricing and services provided refer to the au website https www au com mobile service kosho funshitsu Japanese Subscription to this service is only available at the time of purchase of an au device If you cancel your subscription recommencing subscription will not be possible until the next time you purchase an au device If you chan...

Страница 53: ...ion is suspected or in case of theft or loss contact an au shop or Toyota store Main specifications and peripheral devices For details of main specifications and the peripheral devices please refer to the 取扱説明書 詳細版 Full Instruction Manual Japanese on the au website https www au com support service mobile guide manual Japanese 52 ...

Страница 54: ...ging peripherals etc nano IC card au Nano IC Card 04 non au Nano IC Cards non au Nano IC Cards can be used after SIM unlocking the device Frequency range of supported bands in EU WCDMA FDD Ⅰ Tx 1922 4 to 1977 6 MHz Rx 2112 4 to 2167 6 MHz WCDMA FDD Ⅷ Tx 882 4 to 912 6 MHz Rx 927 4 to 957 6 MHz LTE Band 1 Tx 1922 5 to 1977 5 MHz Rx 2112 5 to 2167 5 MHz LTE Band 3 Tx 1710 7 to 1784 3 MHz Rx 1805 7 t...

Страница 55: ...duct to an au Shop or follow the local disposal regulations Charge battery in ambient temperatures between 5 C and 35 C outside this range battery may leak overheat and performance may deteriorate European RF Exposure Information Your mobile device is a radio transmitter and receiver It is designed not to exceed the limits for exposure to radio waves recommended by international guidelines These g...

Страница 56: ...ne away from the head The tests are carried out in accordance with international guidelines for testing FCC Notice This device complies with part 15 of the FCC Rules Operation is subject to the following two conditions 1 This device may not cause harmful interference and 2 this device must accept any interference received including interference that may cause undesired operation Changes or modific...

Страница 57: ... more of the following measures 1 Reorient relocate the receiving antenna 2 Increase the separation between the equipment and receiver 3 Connect the equipment into an outlet on a circuit different from that to which the receiver is connected 4 Consult the dealer or an experienced radio TV technician for help and for additional suggestions Warning The user is cautioned that changes or modifications...

Страница 58: ...cal body worn operations with the back of the device kept 1 0 cm from the body To maintain compliance with FCC RF exposure requirements use accessories that maintain a 1 0 cm separation distance between the user s body and the back of the device The use of belt clips holsters and similar accessories should not contain metallic components in its assembly The use of accessories that do not satisfy t...

Страница 59: ...general subscriber phones In case above numbers are not available call toll free 0120 977 033 except Okinawa 0120 977 699 Okinawa Corporate Customer Center For corporate contractors For general information toll free Business hours 9 00 to 19 00 Weekday 9 00 to 18 00 Saturday Sunday Holiday Except during the year change period From au mobile phones 0077 7 113 113 0077 7 111 157 Business hours 24 ho...

Отзывы: