background image

6-3

6

KEY OPERATOR PROGRAMS

Using the key operator programs

Use the following procedure to use the key operator programs.

NOTE

When using the key operator programs for the first time, register a key operator code number (password required for using
the key operator programs). (See steps 3 and 5 below or see steps 3 and 5 on page 7-5.)

 When using the operation panel with touch panel, see page xxxx.

When using the operation panel on the main unit:

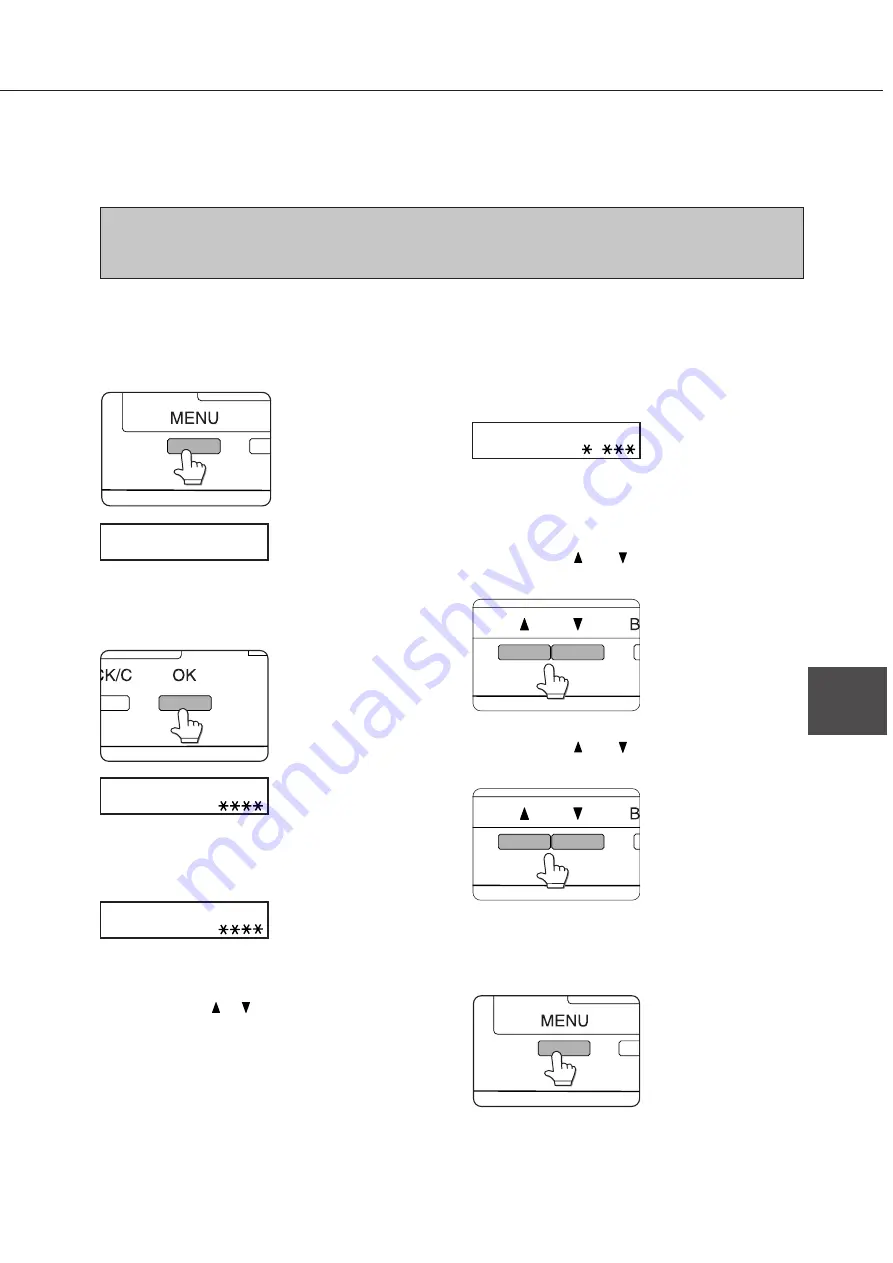
1

Press the [MENU] key.

Press the [MENU] key
repeatedly until the
message "KEY
OPERATOR PROGRAMS"
appears.

KEY OPERATOR PROGRAMS

2

Press the [OK] key.

If the [OK] key is pressed,
the message shown to the
left will appear.

3

Enter the fifth digit of the password and press
the [OK] key.

For the factory default
setting of the key operator
code number (password),
see page xxxx.

If you press the [OK] key to
register the fifth digit after
entering it using the   or   key
on the operation panel, "0" will
appear at the fourth digit. If you
press the [BACK/C] key, you can
correct the entered number.

4

Use the same procedure as step 3 to enter the
password from the fourth digit to the first digit
and then press the [OK] key.

KEY OPERATOR CODE

O

Use the same procedure as
above (fifth digit) to enter the
fourth digit to the first digit.

5

Press the [ ] or [ ] key to select the desired
program and press the [OK] key.

<Example>

For registration of a key
operator code number,
select "KEY OPERATOR
CODE CHANGE" and
press the [OK] key.

6

Press the [ ] or [ ] key to select the desired
item.

For settings of each
program, see the details of
classification of setting
items (hierarchical
structure) and
supplementary explanation
of key operation on and
after page xxxx.

7

To exit the program, press the [MENU] key.

KEY OPERATOR CODE

O

KEY OPERATOR CODE

O

Содержание AR-M350 Imager

Страница 1: ...Operation Manual for printer operation and general information on multi functions LASER PRINTER Multi function printer ...

Страница 2: ......

Страница 3: ... or heater 4 Be sure to allow the required space around the machine for servicing and proper ventilation A small amount of ozone is produced within the copier INSTALLATION REQUIREMENTS Improper installation may damage this product Please note the following during initial installation and whenever the machine is moved 23 5 8 60cm 23 5 8 60cm 23 5 8 60cm 11 13 16 30cm during operation The emission l...

Страница 4: ...n connecting this machine to a computer be sure turn off this machine and the computer in advance 8 When opening or closing the covers or paper trays for misfeed removal or loading paper take care not to get your fingers caught in the covers or trays 9 Do not print anything which is prohibited from printing by law The following items are normally prohibited from printing by national law Other item...

Страница 5: ...he product Refer all servicing to qualified personnel For North America SAFETY PRECAUTIONS This Digital Equipment is rated Class 1 and complies with 21 CFR 1040 10 and 1040 11 of the CDRH standards This means that the equipment does not produce hazardous laser radiation For your safety observe the precautions below Do not remove the cabinet operation panel or any other covers The equipment s exter...

Страница 6: ...TT ÄN I DENNA BRUKSANVISNING SPECIFICERATS KAN ANVÄNDAREN UTSÄTTAS FÖR OSYNLIG LASERSTRÅLNING SOM ÖVERSKRIDER GRÄNSEN FÖR LASERKLASS 1 CAUTION VORSICHT ADVARSEL ADVERSEL VARNING VARO INVISIBLE LASER RADIATION WHEN OPEN AND INTERLOCKS DEFEATED AVOID EXPOSURE TO BEAM Laserstrahl UNSICHTBARE LASERSTRAHLUNG WENN ABDECKUNG GEÖFFNET UND SICHERHEITSVERRIEGELUNG ÜBERERÜCKT NICHT DEM STRAHL AUSSETZEN USYNL...

Страница 7: ...line be sure to use the supplied connection cable Connect the connecting cable so that the terminal near the core is inserted to the line connector of the facsimile expansion kit Insert the other terminal not the core side to the socket of the telephone line Fax power switch When using this product as a facsimile keep always the fax power switch on that is located on the facsimile expansion kit at...

Страница 8: ...OMPUTER SOFTWARE FORWINDOWS INSTALLING PRINTER DRIVERS AND PRINTER UTILITIES REMOVING PRINTER DRIVERS AND PRINTER UTILITIES INSTALLING PRINTER DRIVERS USING THE PLUG PLAY FUNCTION OR ADD PRINTERWIZARD Before installation SETTING THE PRINTER DRIVER Setting print conditions under Windows selecting and setting print conditions REMOTE OPERATIONTHROUGH NETWORK Environment required for accessing Web scr...

Страница 9: ...line of the finisher Quick reference table for stapling Using the finisher functions Staple jam removal and staple cartridge replacement Misfeed removal in the finisher Troubleshooting SADDLE STITCH FINISHER Part names and functions Specification Outline of the finisher Quick reference table for stapling Printed image and saddle stitch Using the finisher functions Staple jam removal and staple car...

Страница 10: ......

Страница 11: ... panel 1 11 Touch panel 1 15 LOADING PAPER 1 18 Loading paper in paper tray 1 1 18 Changing the paper size in paper tray 1 1 18 Paper available in paper trays 1 19 Paper available in the bypass tray multi purpose drawer 1 19 Method of setting paper size and type 1 20 Loading paper in the multi purpose drawer 1 22 Specifications 1 22 Loading paper in the stand 3 x 500 sheet paper drawer 1 23 Specif...

Страница 12: ...though the peripheral units are basically optional some units may be provided as standard components depending on the model 1 A multi function controller board required to extend the product to a multi function printer that can be used as a copier facsimile and a network scanner is provided as a standard component 2 A print server card required to extend the product to a network printer is provide...

Страница 13: ... as image data on a computer a network scanner expansion kit peripheral unit is needed in addition to the network printer environment Duplex module This is a unit that allows printing onto two sides of paper A single duplex module and a duplex module bypass tray are supplied In this manual both units are written as duplex module with some exception and description is made mainly for the duplex mod...

Страница 14: ...eeding Print onto special paper Two sided print Touch panel operation Offset stack of printed sheets Stapling of printed sheets Scanner rack Center stapling of printed sheets Punching of printed sheets Mail bin stack of printed sheets PostScript3 compatibility Telephone call Peripheral units required at the minimum for using the facsimile feature Network printer Job retention function Pamphlet pri...

Страница 15: ...is product has the following two power save modes that conform the Energy Star guidelines to conserve natural resources and to help reduce environmental pollution Preheat mode The machine will enter the preheat mode once the time set with a key operator program has elapsed without any operation In this mode the fuser is maintained at a lower heat level thereby saving power Auto power shut off mode...

Страница 16: ...arge paper such as 11 x 17 and 8 1 2 x 14 A3 and A4 Operation panel See page xxxx Front cover Open to add toner and remove misfeeds Main switch See page xxxx Press to turn power on and off Paper tray 1 Stand 3 x 500 sheet paper drawer 1 See page xxxx Stand MPD 2000 sheet paper drawer 1 See page xxxx Multi purpose drawer 1 See page xxxx 1 and are peripheral units For description of these units see ...

Страница 17: ...unit is hot Take care in removing misfed paper Developer cartridge See page xxxx Container that contains developer The cartridge must be removed and replaced with a new one at the time of replacement Toner cartridge See page xxxx Container that contains toner When toner is exhausted the cartridge must be removed and replaced with a new one Photoconductive drum A photoconductor is applied to the su...

Страница 18: ...1 8 Part names and functions of peripheral units PART NAMES AND FUNCTIONS ...

Страница 19: ... tray is equivalent to the multi purpose drawer The lower tray holds approximately 2000 sheets of 20 lbs 80 g m2 paper Multi purpose drawer Holds paper Up to 500 sheets of 20 lbs 80 g m2 paper can be loaded Also special papers such as envelopes standard sizes only and Japanese postcard can be set Stand 3 x 500 sheet paper drawer This is a paper feed unit that contains three paper trays The upper t...

Страница 20: ...the image storing capacity for the printer and copier features not for the facsimile feature Also this unit is required for using the job retention function see page xxxx with which print data received for the printer feature is held temporarily instead of immediate output Facsimile expansion kit Kit required for using the facsimile feature Additional fax memory 8 MB Network scanner expansion kit ...

Страница 21: ...s and execution of printing held by the retention function page xxx Press also to return to the menu screen from the setting screen of each menu group keys Press to select each menu or function or to set a number BACK C key Use this key to return to the previous screen in each menu selection to cancel and delete the current job or to delete a reserved job that has been selected OK key Press to reg...

Страница 22: ...page xxxx Paper runs out Load paper See page xxxx Print hold If the job retention function is used from your computer print data will be stored in the printer as a hold job The job retention function can be used only if the printer is equipped with a hard disk drive as a peripheral unit See page xxxx Configuration settings The printer configuration settings are used for basic printer settings See ...

Страница 23: ... the BACK C key Printing will resume To delete print data of a reserved job that waits for printing Print data transmitted from computers will be stored in this printer up to 99 jobs and will be output sequentially To delete print data of a reserved job before starting printing press the or key to display the desired data in the message display If you press the BACK C key at this time a confirmati...

Страница 24: ... data is being received Also lights up when printing is being performed IMAGE SEND key LINE indicator DATA indicator Press to switch the display to the network scan fax mode See page xxxx of the facsimile operation manual COPY key Press to switch the display to the copy mode See page xxxx JOB STATUS key Press to display the current job status See page xxxx CUSTOM SETTINGS key Use to adjust the con...

Страница 25: ...print data is displayed here up to 100 jobs The job retention function can be used only if the printer is equipped with a hard disk drive as a peripheral unit Display switching keys Use to switch the page of the print hold job list If the list is not contained in a page succeeding pages are prepared Use these keys to switch the display CUSTOM SETTINGS key Use to switch the display to the printer c...

Страница 26: ...b data will be printed if possible If paper runs out during printing another job data will not be printed If you wish to change the paper size because you cannot prepare the specified size paper immediately you can change the size by touching the current job key to select it and touch the DETAIL key described in Mode switching key Use to switch the job list between JOB QUEUE and COMPLETE JOB QUEUE...

Страница 27: ... the initial setting of each setting screen the function will be registered when you touch the OK key without additional operation Example 2 MULTI SHOT DUAL PAGE COPY When using the copier feature or the facsimile feature the functions shown below which can be set by only touching the relevant key in the special feature screen can be canceled by touching the key again canceling highlighted display...

Страница 28: ... type referring to Method of setting paper size and type page xxxx 5 Loading of paper in paper tray 1 is now complete Loading paper in paper tray 1 1 Pull out paper tray 1 If paper remains in the tray remove it 2 Adjust the guide plates A and B in the tray to the length and width of the paper The guide plates A and B are slidable Adjust them to the paper size to be loaded while squeezing their loc...

Страница 29: ...lbs 205 g m 2 28 lbs 105 g m 2 28 lbs 105 g m 2 1 5 1 2 x 8 1 2 or A5 105 x 148 mm g m Weight of a sheet of paper of 1 m 2 2 NOTES Do not use paper that is not included in the range described above Improper fusing fusing strength of toner to paper is weak and toner comes off if rubbed and misfeeds may occur Envelope Standard envelope sizes are only the following four Monarch MON Commercial 10 C10 ...

Страница 30: ...e OK key 6 Ensure that the desired paper type for printing is selected If TRAY 1 is selected the message shown to the left will appear in the initial condition If the desired paper type for printing is not selected press the or key on the operation panel When you wish to print onto special paper however the paper tray must be TRAY 2 or BYPASS 7 Press the OK key 8 Ensure that the desired paper size...

Страница 31: ...the or key to switch the screen 4 Select the paper type and the paper size If TRAY 1 has been selected in step 3 TRAY 1 TYPE SIZE SETTING TYPE SIZE PLAIN LETTER HEAD A4 B5 PRE PRINTED RECYCLED COLOR PRE PUNCHED 8 X11 CUSTOM SETTINGS OK The paper type and paper size with highlighted display are selected If the desired paper type and paper size are not selected select the desired type and size by to...

Страница 32: ...opes or postcards on which printing has been performed with a thermal transfer printer or an ink jet printer Paper on which printing has been performed with a thermal transfer printer with a ribbon cassette particularly may cause printed characters to come off or may cause smudges on printouts LOADING PAPER Note on setting postcards Smooth out curled postcards before printing Crumpling misfeeds or...

Страница 33: ...aper is the same as for paper tray 1 in the main unit See the description page xxxx NOTE If the paper size or paper type is changed when paper is set in a tray of the stand 3 x 500 sheet paper drawer the tray settings in the custom settings must be changed Be sure to change the setting referring to Method of setting paper size and type on page xxxx Specifications Name Stand 3 x 500 sheet paper dra...

Страница 34: ...per size and type on page xxxx LOADING PAPER 1 Pull out the large capacity tray Gently pull the tray out until it stops 2 Press down the right and left paper feed tables until they stop 3 Load paper onto the right and left paper feed tables Load paper onto the right paper feed table Load paper onto the left paper feed table 4 Gently push the large capacity paper tray into the printer Push the tray...

Страница 35: ...y the user are paper toner cartridge and staple cartridge for the finisher For best copying results be sure to use only Sharp Genuine Supplies which are designed engineered and tested to maximize the life and performance of Sharp copiers Look for the Genuine Supplies label on the toner package Proper storage GENUINE SUPPLIES 1 Store the supplies in a location that is clean and dry at a stable temp...

Страница 36: ......

Страница 37: ... 2 3 INSTALLING PRINTER DRIVERS USING THE PLUG PLAY FEATURE OR ADD PRINTER WIZARD 2 4 Before installation 2 4 SETTING THE PRINTER DRIVER 2 5 Setting print conditions under Windows selecting and setting print conditions 2 5 REMOTE OPERATION THROUGH NETWORK 2 6 Environment required for accessing Web pages 2 6 Accessing Web pages and displaying help 2 6 Items and outline of menu frame of Web pages 2 ...

Страница 38: ...is printer 36 pin DDK 57LE 40360 730B D29 female connector or equivalent connector 1 18 36 19 Parallel interface connector For the specifications of the parallel interface connector on the computer see the computer 2 Using this machine as a network printer For using this machine as a network printer a print server card is needed See the operation manual supplied with the print server card Printer ...

Страница 39: ...d Select the check boxes of the desired drivers and utilities and click the Next button If you click the README display button the information of the specified software will be displayed When installing the Printer Administration Utility and the Printer Status Monitor read the README display and check to see if the computer system requirements are satisfied NOTE The Printer Administration Utility ...

Страница 40: ...cal printer see Using this machine as a local printer on page 2 2 and that the CD ROM drive is designated as drive R The procedure may differ depending on the system environment 1 Start Windows 98 2 Insert the supplied CD ROM into the CD ROM drive If your computer is configured for auto start on the CD ROM the software license agreement will appear Click Cancel to close the screen 3 On the Start m...

Страница 41: ...creens under Windows NT 4 0 are used in the description below 1 On the Start menu select Settings and then Printers The Printer window will appear 2 Right click the installed printer driver and select Document Defaults This example is the screen displayed by selecting AR P350PCL5e 3 Set each item 4 Click the OK button NOTE For the setting concerning peripheral units such as the duplex module finis...

Страница 42: ...mproper input abc abc abc abc abc lt gt 16 Accessing Web pages and displaying help Use the following procedure to access the Web pages If the help button under the menu frame is clicked the help screen for description of various function settings that can be operated remotely from the Web pages for this product through the network will appear For the setting of each function see this detailed desc...

Страница 43: ...set Setting of Fax Destination Control Sets the fax destination Fax numbers of recipients and communication mode as well as information for destination control destination name index name for front panel display etc are set Setting of i Fax transmission Destination Control Sets the Internet fax destination information E mail addresses of destination and file types as well as information for destin...

Страница 44: ...tion location are set To use the network scanner you must set up E mail DNS Setup This screen displays the settings of E mail DNS Setup and provides a link to the screen E mail DNS Setup Basic setting screen for transmitting E mail E mail server system administrator address DNS server etc are set Sender of E mail Setup Sender of E mail transmission of the network scanner is set This item will be s...

Страница 45: ...d before print This print mode can reduce the possibility of missing printout If print start operation is made in this mode from the computer print data will not be output immediately and will be stored in the printer as a hold job Print start operation can be made on the operation panel of the printer as needed Also you can delete the data without executing printing See step 8 on page xx 4 Proof ...

Страница 46: ...y 5 Enter the fifth digit of the password and press the OK key needed only if a password has been set Be sure to enter the number that has been entered on the computer If no password has been set operation of steps 5 and 6 is not needed Proceed to step 7 If you press the OK key to register the fifth digit after entering it using the or key on the operation panel 0 will appear at the fourth digit I...

Страница 47: ...word has been set ENTER PIN VIA THE 10 KEY CANCEL Be sure to enter the password that has been entered on the computer If no password has been set operation of step 4 is not needed Each time a number is entered will change to 4 Select execution of printing cancellation of printing or data retention after printing PRIN NUMBER OF PRINTS 1 199 PR 1 Deletion or retention of data after printing can be s...

Страница 48: ...ccount number entry screen will be displayed by clicking Job control in the Main tab of the printer driver When an invalid account number is entered or no account number is entered if key operator program Cancel jobs of invalid accounts has been set printing will not be performed To perform printing in any case disable program Cancel jobs of invalid accounts In this case the number of printed page...

Страница 49: ...nditions Page MAKING CONFIGURATION SETTING 3 2 Operation procedure common to all printer configuration settings items that can be set from the operation panel 3 2 Main program settings 3 4 PCL settings 3 4 PostScript settings 3 4 CUSTOM SETTINGS 3 5 Operation procedure common to all custom settings items that can be set from the operation panel 3 5 Setting items 3 7 ...

Страница 50: ...key repeatedly until CONDITION SETTING appears Any print jobs held in the printer and any job currently transmitted to the printer will be printed in the former print conditions 2 Press the OK key 3 Press the or key to display the desired setting item 4 Press the OK key 5 Press the or key to display the desired setting For the details of each setting item see the description on and after page xxxx...

Страница 51: ...its setting screen CONDITION SETTINGS MAIN PROGRAM SETTINGS PostScript SETTINGS PCL SETTINGS For details of each setting item see the description on and after the next page Depending on the setting item additional item setting keys may be displayed or page switching keys may be displayed If a check box is displayed for an item the item can be set by touching the key to display a check mark in the ...

Страница 52: ...GAL FOOLSCAP LETTER EXECUTIVE INVOICE A3 B4 A4 B5 and A5 Standard paper type The paper type to be used for printing in the normal conditions is set Printing will be performed onto the specified type paper unless otherwise specified Default setting PLAIN Plain paper pre printed paper recycled paper letter head paper pre punched paper or color paper can be set Standard output tray The output tray to...

Страница 53: ...r programs RSetting programs are provided for key operators administrators of this machine If this product is equipped with a scanner module as a peripheral unit this key will appear in the CUSTOM SETTINGS menu screen For settings see Key Operator s Guide See page xxxx 1 Can be set if this product is equipped with a scanner module as a peripheral unit 2 Can be set if this product is equipped with ...

Страница 54: ... item can be set by touching the key to display a check mark in the box 3Touch the desired setting on the setting screen of the desired item and touch the OK key TRAY SETTINGS TRAY 1 TRAY 2 TRAY 3 PLAIN AUTO INCH RECYCLED AUTO INCH TYPE SIZE PRINT COPY FAX OK 1 2 PLAIN 8 X11 1 2 CUSTOM SETTINGS To set another item repeat steps 2 and 3 4To finish the setting operation touch the EXIT key 6Press the ...

Страница 55: ...rator program DISABLETEST PAGE PRINTING page xx the printer test pages cannot be printed Clock The date and time of the built in clock of this product are set This setting is needed for date and time information in E mail delivery of information of this product see page xxxx date print function in the copy mode see page xxxx timer operations in the fax mode see page xxxx and date and time informat...

Страница 56: ......

Страница 57: ...ce etc Page MISFEED REMOVAL 4 2 General misfeed removal procedure 4 2 Misfeed removal guidance 4 3 Misfeed in the paper feed area 4 4 Misfeed in the transport area fusing area and exit area 4 6 Misfeed in the duplex module 4 7 TROUBLESHOOTING 4 8 USER MAINTENANCE 4 12 Cleaning the scanner module 4 12 ...

Страница 58: ...s pressed when a misfeed has occurred the approximate misfeed locations will be displayed Use the following procedure to check the misfeed locations and refer to the corresponding misfeed removal procedure 1 Press the INFORMATION key 2 Press the or key on the operation panel Each time the key is pressed the misfeed removal procedure will be displayed sequentially The messages in the table below sh...

Страница 59: ...dule page xxxx Misfeed in the bypass tray page xxxx Misfeed in the saddle stitch finisher page xxxx Misfeed in the multi purpose drawer page xxxx NOTE Facsimile reception data is always stored in the memory temporarily When a misfeed has occurred the received data will not be printed After misfed paper is removed received data will be automatically printed When removing misfed paper take care not ...

Страница 60: ...ully and remove it 3 If misfed paper is not found in step 2 pull out paper tray 1 and remove the misfed paper Be careful not to tear the misfed paper during removal 4 Gently close the paper tray Push back the paper tray all the way into the machine 5 Gently close the duplex module If the machine is not equipped with the duplex module close the side cover similarly After closing the duplex module c...

Страница 61: ...aper drawer For misfeed removal in the upper tray follow the procedure of Misfeed in the multi purpose drawer shown to the left to remove the misfed paper For misfeed removal in the lower large capacity tray follow the procedure below 1 Follow steps 1 to 3 of Misfeed in the multi purpose drawer shown to the left 2 If misfed paper is not found in step 1 refer to Misfeed in paper tray 1 steps 1 and ...

Страница 62: ...B Turn roller rotating knob B in the direction of the arrow to remove the misfed paper CAUTION The fusing unit is hot Take care in removing paper Do not touch the metal portion Fusing unit open tab If the misfed paper is inside the fusing area turn down the fusing unit open tab to your side to open the fusing unit and remove the misfed paper If paper is misfed in the exit area Remove the misfed pa...

Страница 63: ...ule Gently remove the misfed paper taking care not to tear the paper If paper is misfed at the lower part of the duplex module Gently remove the misfed paper taking care not to tear the paper 4 Close the cover of the duplex module and return the exit tray 5 Gently close the duplex module After closing the duplex module confirm that the misfeed message is cleared and that the normal display appears...

Страница 64: ...layed ERROR indicator lit at the same time on the operation panel of the main unit Toner runs out Replace the toner cartridge immediately page xxxx Message indicating a paper misfeed displayed ERROR indicator lit at the same time on the operation panel of the main unit Remove misfed paper page xxxx Is the correct interface cable properly connected between the printer and your computer Ensure that ...

Страница 65: ...the printer and select Auto in the paper selection of the printer driver Printer resident font cannot be selected from application software when the PPD file of an optional PS3 expansion kit is used in Windows not NT environment Printer write error occurs when using the printer as a local printer Only one set has been output when more than one set has been specified A notice page has been output N...

Страница 66: ... sure to set the paper size referring to Method of setting paper size and type when you change the paper size in a tray page xxxx Paper curled or damp Do not use curled or crimped paper If you do not use paper for a long time store paper in the wrapper in a dry location Paper curled and misfed in the duplex module or finisher Paper may be curled when output depending on the paper type and quality ...

Страница 67: ...setting postcards 10 1 2 x 7 1 4 executive paper or custom size paper in a paper tray or in the bypass tray be sure to set the paper shorter side into the feed slot If not part of images may not be printed 7 If the tray to be used is open when a print job is sent to the printer part of images may not be printed Be sure to start printing after ensuring that all the trays are closed 8 If the setting...

Страница 68: ...an NOTE When cleaning do not use thinner benzene or similar volatile cleaning agents Cleaning the scanner module If the document glass cover or original scanning portion of the scanner module is dirty scanned image may be soiled or black stripes may appear on image Keep them always clean If black stripes appear on images obtained by scanning sheet originals that have been fed from the feeder wipe ...

Страница 69: ...feature 5 7 Setting in the printer driver 5 7 Misfeed in the mail bin stacker 5 8 FINISHER 5 9 Part names 5 9 Specifications 5 9 Finisher functions 5 10 Using the finisher functions 5 11 Staple cartridge replacement and staple jam removal 5 12 Misfeed in the finisher 5 14 Troubleshooting concerning the finisher 5 15 Stapling quick reference list 5 16 SADDLE STITCH FINISHER 5 17 Part names 5 17 Spe...

Страница 70: ... xxx mm W x xxx mm D x xxx mm H Weight Duplex module Approx xxx lbs xx kg Duplex module bypass tray Approx xxx lbs xx kg 1 Duplex module bypass tray only For use of the bypass tray see Paper available in the bypass tray multi purpose drawer on page xxxx Name Exit tray Exit system Print face down Paper capacity 100 sheets 8 1 2 x 11 or A4 size 20 lbs or 80 g m2 Paper size Max 11 x 17 or A3 Min 5 1 ...

Страница 71: ...e sure to set them shorter edge into the feed slot as shown in the illustration When using plain paper other than SHARP recommended paper or special paper other than postcards and SHARP recommended transparency film be sure to feed it one sheet at a time If you set more than one sheet a paper misfeed may occur When adding paper first remove remaining paper combine it with the paper to be added and...

Страница 72: ...printer driver see NOTE on page 2 5 Depending on the combination of paper selection and functions the desired setting may not be possible For details of setting items see the printer driver help The details of the functions are described DUPLEX MODULE Setting copy functions in accordance with your purpose When using the duplex module including the bypass tray and the exit tray in the copy mode set...

Страница 73: ... number of sheets exceed the limit Paper guides properly set Paper size and type set properly Does the number of sheets exceed the limit Paper guides properly set Use a paper type adequate for two sided printing See page xx Use a paper size adequate for two sided printing See page xx Open the Configuration tab in the printer driver setting and check the check box of Duplex Module See NOTE on page ...

Страница 74: ...ripheral units cannot be installed together with the mail bin stacker For combination of the peripheral units see the list of combination of peripheral units on page xx Specifications Name Mail bin stacker Number of trays 8 Top tray and seven mail bins Exit system Print face down Tray type Top tray normal tray Mail bins mail bin tray Paper capacity Top tray 250 sheets 8 1 2 x 11 or A4 size 20 lbs ...

Страница 75: ...bin Open the Paper tab and select a mail bin for delivery at Output The top tray can be selected NOTES For the settings above installation of peripheral units must have been set properly in the properties of the printer driver see NOTE on page 2 5 Depending on the combination of paper selection and functions the desired setting may not be possible For details of setting items see the printer drive...

Страница 76: ...over 1Open the top cover Top cover Slide the tab in the direction of the arrow in the illustration to open the cover 2Remove the misfed paper Be careful not to tear the misfed paper during removal After removing the paper press down on the top cover to close it 3 If the misfed paper is not found in step 2 open the front cover 4 Turn the roller rotating knob in the direction of the arrow to remove ...

Страница 77: ...Top tray same as the specifications of paper for feeding in the main unit Lower tray Paper limit detection Provided in both the top tray and the lower tray Offset function Provided in the lower tray only offset amount 1 2 inch 30 mm Paper size for stapling 8 1 2 x 11 A4 and B5 Stapling capacity 30 sheets 20 lbs or 80 g m2 Stapling position Three types one at rear one at front two at center Referen...

Страница 78: ...o the offset tray The stapling positions orientation paper size for stapling and stapling capacity are shown below Stapling positions Rear corner of printouts Center left two positions of printouts Front corner of printouts Portrait orientation Landscape orientation Available paper sizes 8 1 2 x 11 A4 and B5 Stapling capacity Up to 30 sheets for any available sizes Same as above Same as above Avai...

Страница 79: ...ORT key See page xx If this function is selected sorted copies will be stapled and delivered to the offset tray not offset stacked SORT key See page xx If this function is selected each set of copies will be sequentially delivered Icon display The icon of the selected function sort staple sort or group is displayed OFFSET key See page xx If this function is selected checked the offset function wil...

Страница 80: ... 5 Insert a new staple cartridge into the staple box aligning the arrow of the staple cartridge with that of the staple box NOTES Do not remove the fixing tape before inserting the staple cartridge Ensure that the staples are securely fixed Push the cartridge until it clicks in place 6 Remove the tape that fixes the staples by pulling it straight 7 Insert the staple box Push the staple box until i...

Страница 81: ... staples remain a staple jam may occur 12 Return the lever to its original position 13 Insert the staple box Push the staple box until it clicks into place 14 Unlock the staple unit lever and return the staple unit to face down 15 Close the front cover NOTE Execute test printing in the staple sort mode to ensure that stapling is performed properly FINISHER ...

Страница 82: ...irection of the arrow as shown in the illustration to open the top cover 3 Remove the misfed paper Be careful not to tear the misfed paper during removal After removing the paper press down on the top cover to close it 4 Open the finisher Hold the knob and open the finisher 5 Remove the misfed paper Be careful not to tear the misfed paper during removal 6 Open the paper guide and remove the misfed...

Страница 83: ...played Message requesting check for the staple unit displayed Message requesting adding staples displayed Different size paper included Paper heavily curled Check the stapling position setting See page xx Close all covers See pages xx and xx Remove all paper from the stapler compiler following the procedure described in step 1 on page xx Remove jammed staples See page xx Replace the staple cartrid...

Страница 84: ...t be stapled Pre punched paper transparency film heavy paper label envelope postcard Image data or original Result First page front side Second page reverse side Two sides Portrait orientation printing Left binding Top binding Right binding Left binding Top binding Right binding One position stapling Two position stapling One position stapling Two position stapling One position stapling Landscape ...

Страница 85: ...es Stapler section Open the front cover and pull out this section to replace the staple cartridge or to remove jammed staples Specifications Name Saddle stitch finisher Number of trays 2 Exit system Print face down Tray type Upper tray offset tray Lower tray saddle stitch book tray Paper capacity Upper tray 1 000 sheets 8 1 2 x 11 or A4 size 20 lbs or 80 g m2 or 500 sheets 8 1 2 x 14 or B4 size or...

Страница 86: ...t mode Name Saddle stitch finisher Stapling position Upper tray two types one at rear one at front Lower tray 4 47 64 120 mm pitch from the center of paper Reference paper position Center Power supply Drawn from the power supply unit peripheral unit See page xx Dimensions xx x x W x xx x x D x xx x x H xxx mm W x xxx mm D x xxx mm H Weight Approx xxx lbs xx kg Name Punch module Number of punch hol...

Страница 87: ...r sizes 11 x 17 8 1 2 x 14 8 1 2 x 13 8 1 2 x 11 A3 B4 A4 A4R and B5 Stapling capacity Up to 50 sheets for 8 1 2 x 11 A4 and B5 and up to 25 sheets for other sizes Same as above Same as above Saddle stitch N A Available paper sizes 11 x 17 8 1 2 x 11 R A3 B4 and A4R Stapling capacity Up to xx sheets for any sizes Punch function only if a punch module is installed If the saddle stitch finisher is e...

Страница 88: ... paper selection and functions the desired setting may not be possible For details of setting items see the printer driver help The details of the functions are described Using the finisher functions in the copy mode If you touch the OUTPUT key on the copy mode basic screen a screen for selecting the sort group staple functions and selecting an exit tray will appear GROUP key See page xx If this f...

Страница 89: ... the basic screen OFFSET key See page xx If this function is selected checked the offset function will be enabled If the check mark is cleared the offset function will be disabled If the staple sort function is selected the check mark of the offset function will be automatically cleared SADDLE STITCH key See page xx Printed paper will be stapled at the center and folded in two with the center down...

Страница 90: ...er 4Open the saddle stitch section cover when the saddle stitch function is used 5Remove the misfed paper 6Close the saddle stitch section cover 7Open the saddle stitch section cover when the saddle stitch function is used 8Turn roller rotating knob A in the direction of the arrow to move the staple unit to your side Blue Roller rotating knob C 10Close the front cover NOTE Execute test printing in...

Страница 91: ...the stapler section 14Close the front cover NOTE Execute test printing in the staple sort mode to ensure that stapling is performed properly Punch scrap disposal 1Pull the knob and slide the saddle stitch finisher away from the main unit 2Pull out the punch scrap collecting container and remove the punch scraps Be careful not to scatter punch scraps Put them in a plastic bag or the like for dispos...

Страница 92: ...mark reaches the position indicated in the illustration only if a punch module is installed as a peripheral unit 5Remove the misfed paper Be careful not to tear the misfed paper during removal 6Close the top cover 7Open the front cover 8Turn roller rotating knob C until a blue indication is seen when the stapling function has been used 9Remove the misfed paper from the stapler compiler when the st...

Страница 93: ...ing removal 12Turn roller rotating knob D in the direction of the arrow 13Turn roller rotating knob D in the direction of the arrow Be careful not to tear the misfed paper during removal 14Close the saddle stitch section cover 15Push the saddle stitch finisher to the main unit Roller rotating knob D ...

Страница 94: ...he paper tray or the bypass tray turn it upside down and load it again Check the punch position and set it again See page xxxx Dispose of punch scraps See page xxxx Punching cannot be performed onto different size paper Paper may be curled heavily depending on the paper type and quality Remove paper from the paper tray or the bypass tray turn it upside down and load it again Set the pamphlet copy ...

Страница 95: ...ne position stapling Two position stapling Two position stapling One position stapling One position stapling One position stapling Left binding with two position stapling cannot be made Right binding with two position stapling cannot be made Top binding with two position stapling cannot be made Two position stapling along the shorter edge cannot be made Two position stapling along the shorter edge...

Страница 96: ...age reverse side Two sides Two sides Two sides Two sides Right binding Left binding Portrait orientation printing Landscape orientation printing NOTES Required settings for the illustration above are shown below Available paper sizes are 11 x 17 8 1 2 x 14 8 1 2 x 13 8 1 2 x 11 A3 B4 A4 and B5 stapling capacity is up to 50 sheets for 8 1 2 x 11 A4 and B5 and up to 25 sheets for other sizes Portrai...

Страница 97: ...ation of the key operator programs for use by the key operator Please read this chapter thoroughly for proper use of these programs Page KEY OPERATOR PROGRAMS 6 2 Key operator program list 6 2 Using the key operator programs 6 3 Description of setting programs 6 7 ...

Страница 98: ... timer xxxx Preheat mode xxxx Toner save Toner save in printer mode xxxx Auto power shut off xxxx Operation panel settings Auto clear setting xxxx Message display time xxxx Language setting xxxx Beep setting xxxx Disabling of job priority operation xxxx Device settings Disable duplex unit xxxx Disable stapler unit xxxx Disable paper desk drawers xxxx Disable finisher xxxx Disable mail bin stacker ...

Страница 99: ...ator code number password see page xxxx If you press the OK key to register the fifth digit after entering it using the or key on the operation panel 0 will appear at the fourth digit If you press the BACK C key you can correct the entered number 4Use the same procedure as step 3 to enter the password from the fourth digit to the first digit and then press the OK key KEY OPERATOR CODE O Use the sa...

Страница 100: ...vel If a mistake is made in selection of a number press the BACK C key to correct it If you press the OK key to complete program setting will be added to the message The display in shows the factory default setting NOTE To exit the key operator program press the MENU key on the operation panel Key operator code entry BACK C OK BACK C OK BACK C OK BACK C OK BACK C OK BACK C OK BACK C OK AUDITOR SET...

Страница 101: ...DJUST DISABLE PAPER DESK DRAWERS NO HEXADECIMAL DUMP MODE OFF PDL FOR NETWORK PORT AUTO PDL FOR PARALLEL PORT AUTO I O TIMEOUT 20 sec PORT SWITCHING PER JOB RESTORE CONFIGURATION RESTORE FACTORY DEFAULTS STORE CURRENT CONFIGURATION RESTORE CONFIGURATION IP ADDRESS SETTING 000 000 000 000 IP GATEWAY 000 000 000 000 IP SUBNET MASK 000 000 000 000 IP ADDRESS SETTING ENABLE NetWare YES ENABLE TCP IP Y...

Страница 102: ...y For details of each program see the description on and after the next page 6Press the CUSTOM SETTINGS key Supplementary explanation of key operation for key operator programs when using the operation panel with touch panel 20 1 999 SEC KEY OPERATOR PROGRAMS NETWORK SETTING IP ADDRESS SETTING 1 2 ENABLE NetWare ENABLE TCP IP OK ENABLE NetWare ENABLE NetBEUI If XXX is displayed as an item the sett...

Страница 103: ...l When using the facsimile feature and network scanner feature the original transmission count can be displayed or printed 1 Reset account Resetting account This program is used to reset audit accounts When using the operation panel with touch panel When using the facsimile feature and the network scanner feature this program can be used to reset the original transmission count 1 Account number co...

Страница 104: ...at the maximum This program is used to disable this function If the auto power shut off mode is disabled the auto power shut off time setting described above will be ignored If you wish to disable the auto power shut off mode for some reasons use this program NOTE Since we would like you to fully understand the purpose of this mode we suggest that you enable this mode and set the most appropriate ...

Страница 105: ...Even if this function is disabled however the setting will not be applied to the fax mode Message display time This program is used to adjust the time that messages are displayed for messages that automatically disappear When using the operation panel on the main unit The time can be set to 3 seconds 6 seconds 9 seconds or 12 seconds When using the operation panel with touch panel The time can be ...

Страница 106: ...used to disable use of the mail bin stacker when it malfunctions Saddle stitch adjust This program is used to adjust the stapling position folding position when using the saddle stitch function by installing a saddle stitch finisher The value can be adjusted in 0 1 mm increments within 3 0 mm from the reference position for each paper size Max 3 mm Min 3 mm Position adjusted to the plus direction ...

Страница 107: ...hter density and a larger value indicates a darker density Disable notice page printing This program is used to disable notice page printing For notice page printing see Notice page printing appendix Disable test page printing This program is used to disable test page printing If this program is set printer test page printing in custom settings page xxxx cannot be executed A4 letter auto select If...

Страница 108: ...s used to print the data from the computer NOTE It is recommended to set AUTO default setting unless an error due to this setting occurs frequently PDL for network port Network port emulation switching This program is used to specify a printer language to emulate for printing when the printer is connected to a computer through a network port The setting items are the same as those of PDL for paral...

Страница 109: ...l set also the program Enable TCP IP below EnableTCP IP When using this product in a network that uses the TCP IP protocol set this program Also set the IP address using the program IP address setting above Enable NetWare When using this product in a network that uses the NetWare protocol set this program Enable EtherTalk When using this product in a network that uses the EtherTalk protocol set th...

Страница 110: ...erator programs pages xx to xx in the printer s nonvolatile memory To recall the stored settings use the program Restore configuration below 1 Restore configuration Use this program to recall the configuration settings that have been stored in the printer s nonvolatile memory using the program Store current configuration above NOTE If this program is executed when the setting of Enable TCP IP Enab...

Страница 111: ... chapter describes detailed information of this product such as specifications Page PRINTER SPECIFICATIONS 7 2 Specifications 7 2 List of principal printer functions 7 3 LIST OF COMBINATION OF PERIPHERAL UNITS 7 4 PRINT AREA 7 6 ...

Страница 112: ... interface P1284B connector Network interface 10 Base T 100 Base TX To extend this product for the network feature Print Server Card is needed as a peripheral unit Warm up time 95 seconds or less Continuous print speed AR P350 35 pages min AR P450 45 pages min First print time Max 6 seconds Resolution 600 x 600 dpi Print color Black Orientation Portrait landscape Power supply Local voltage 10 For ...

Страница 113: ...ndows 1 999 Yes Yes Yes Long short 2 4 4 5 Z reverse Yes always 136 fonts 7 Bitmap Type1 TrueType Yes N A N A N A N A N A N A Yes 3 sizes 4 6 Yes N A N A 600 dpi Yes N A Yes Yes N A Yes Horizontal Yes N A PPD Macintosh 1 999 Yes Yes N A Long short 2 4 6 8 Z Yes 35 fonts N A Yes N A Yes N A N A N A N A Yes N A Yes Yes Yes 600 dpi N A N A Yes Yes N A Yes Yes Yes N A 1 In the models without a hard di...

Страница 114: ...se drawer Stand 3 x 500 sheet paper drawer Stand MPD 2000 sheet Duplex module bypass tray Duplex module Upper exit tray extension Multi function controller board Fax memory 8 MB B W scanner module DSPF Saddle stitch finisher Finisher Mail bin stacker Exit tray Punch unit PS3 expansion kit Facsimile expansion kit Print server card Hard disk drive Power supply unit Upper exit tray extension Multi fu...

Страница 115: ...b fax jobs and other jobs The number of print hold jobs is 100 and an additional print hold job is instructed Different size paper is included in a print job and a size that cannot be delivered to the specified exit tray is included Printed paper is delivered partly to the specified exit tray and partly to an non specified exit tray Some functions that have been disabled with key operator programs...

Страница 116: ...140 216 4 132 3 5 Com 10 envelope 105 241 4 97 3 5 C5 envelope 162 229 4 154 3 5 Monarch envelope 98 191 4 90 3 5 DL envelope 110 220 4 102 3 5 ISO B5 envelope 176 250 4 168 3 5 In case of landscape orientation in mm Paper size A B C D E A3 420 297 4 412 3 5 B4 364 257 4 345 3 5 A4 297 210 4 289 3 5 B5 257 182 4 242 3 5 A5 210 148 4 202 3 5 Japanese postcard 148 100 4 140 3 5 Ledger 432 279 4 424 ...

Страница 117: ......

Страница 118: ......

Страница 119: ...e to read the installation requirements and cautions sections of the Operation manual for printer operation and general information Be sure to keep all operation manuals handy for reference including this manual the Operation manual for printer operation and general information and operation manuals for any optional equipment which has been installed cover1 p65 4 17 01 9 50 AM 1 ...

Страница 120: ...cover1 p65 2 04 01 19 17 2 ...

Страница 121: ...on and general information General information required for loading paper adding toner misfeed removal and operation of peripheral devices are described in that manual Separate manuals are provided for the operation of network scanning and facsimile functions Refer to the Operation manual for scanner and Operation manual for facsimile for these descriptions copy 1_Ep P65 2 04 01 19 17 1 ...

Страница 122: ...S 15 REDUCTION ENLARGEMENT ZOOM 16 Automatic selection auto image 16 Manual selection 17 SPECIAL PAPERS 18 SPECIAL MODES 19 Common operation procedure for using the special functions 19 Margin shift 20 Erase 21 Dual page copy 22 Pamphlet copy 23 Job build 24 Multi shot 25 JOB PROGRAM MEMORY 26 Storing a job program 26 Recalling a job program 27 Deleting a stored job program 27 INTERRUPTING A PRINT...

Страница 123: ... of the originals Document feeder tray page 7 Set the originals here for automatic feeding Operation panel next page Use for operation of copier network scanner and facsimile features and for printer configuration operations Document cover Document scanning windows Sheet type originals are scanned here Document glass All originals which cannot be copied from the document feeder tray must be copied...

Страница 124: ...t the number of copies and to make numerical entries for setting operations C key clear key Press to clear a copy quantity entry If this key is pressed while the automatic document feeder is being used any originals in progress will be automatically output CA key clear all key Press to clear all selected settings and return the machine to the initial settings for the currently selected mode Before...

Страница 125: ... key are described on page 19 Paper size display The display shows the location of the paper trays the size of the paper in the trays and the approximate amount of paper loaded in each tray The approximate amount of paper in a tray is indicated by For changing the paper size in a tray refer to page 1 16 of the Operation manual for printer operation and general information Original size display The...

Страница 126: ...t the interior of the document feeder or the document glass may be soiled To prevent incorrect original size detection original misfeeds or smudges on copies use the following as a guide for feeding originals Transparency film tracing paper carbon paper thermal paper or originals printed with thermal transfer ink ribbon should not be fed through the document feeder Originals to be fed through the ...

Страница 127: ...e tip of the scale mark at the left rear corner of the glass as shown in the illustrations When using the automatic document feeder 1 Ensure that there is no original on the document glass 2 Adjust the original guides to the size of the originals 3 Place the originals face down in the document feeder tray Set the originals all the way into the feed slot Do not exceed the maximum height line marked...

Страница 128: ...er than 8 1 2 x 11 or A4 is selected rotation cannot be done Example This function operates in the auto paper select or auto image mode Rotation copying can be disabled with a key operator program See page 33 Orientation of original Orientation of paper Copy after rotation Face down Face down Place originals in the document feeder tray or on the document glass so that the top of the original is po...

Страница 129: ... be highlighted 5 Touch the OK key OK 0 6 Ensure that paper of the same size as the originals is automatically selected Note COPY RATIO AUTO PAPER SELECT 100 81 2 11 X The selected tray will be highlighted or the message LOAD xxxxxx PAPER will appear If the message ap pears load paper in a pa per tray or the bypass tray with paper of the required size Even if the message above is displayed copy in...

Страница 130: ... number of copies Up to 999 can be set Use the C clear key to cancel an entry if a mistake has been made 9 Press the START key If the C key is pressed while originals are being scanned scanning will stop If copying had already started copying and scanning will stop after the original in progress is output to the original exit area In these cases the copy quantity will be reset to 0 If scanning has...

Страница 131: ...in the document feeder tray page 7 2 Touch the 2 SIDED COPY key 2 SIDED COPY OUTPUT 3 Select the desired duplex copy mode BIN CHA The illustration to the left shows the screen displayed when a duplex module is installed Original Copy NORMAL COPYING 4 Touch the OK key BINDING CHANGE OK Follow step 6 on page 9 to step 9 on page 10 The image to be copied onto the second side of 2 sided copies can be ...

Страница 132: ...5 are not needed 3 Ensure that paper of the same size as the original is automatically selected Note COPY RATIO AUTO PAPER SELECT 100 81 2 11 X The selected tray will be highlighted or the message LOAD xxxxxx PAPER will appear If the message appears load paper in a paper tray or the bypass tray with paper of the required size Even if the message above is displayed copying can be performed onto the...

Страница 133: ...ced in the document feeder tray a sort icon will appear on the touch panel and the sort copy mode will be automatically selected In this case copies will be delivered as shown in the upper illustration to the left For output in the group mode as shown in the lower left illustration the group mode must be selected on the output setting screen Output mode sort copy and group copy Example Five sets o...

Страница 134: ...he 2 SIDED COPY key 2 SIDED COPY OUTPUT 3 Touch the 1 sided to 2 sided copy key Original Copy NORMAL COPYING The image to be copied onto the second side of 2 sided copies can be inverted so that the resultant 2 sided copies are in the correct orientation for binding at the top For top binding touch the BINDING CHANGE key on the 2 sided copy selection screen 4 Touch the OK key BINDING CHANGE OK Fol...

Страница 135: ...l to be copied PHOTO TEXT TEXT PHOTO NOTE Exposure mode selection TEXT This mode is useful for producing dark text copies with minimum background TEXT PHOTO This provides the best balance for copying an original which contains both text and photos This mode is also useful for copying printed photographs PHOTO This mode provides the best copies of photographs with fine details 3 Adjust the exposure...

Страница 136: ...in the AB system 2 Touch the PAPER SELECT key and then select the desired paper size TRANSPA 81 2 11 X 81 2 11 X 11 17 x 1 2 3 PLAIN PLAIN When the desired paper size key is touched the paper size will be highlighted and the paper size setting window will be closed If paper of the desired size is not loaded in any tray load paper of the required size in a paper tray and enter the paper size 3 Touc...

Страница 137: ... 14 x 11 17 x 81 2 11 x 11 17 x 81 2 14 x 81 2 11 x 81 2 14 x 81 2 11 x 51 2 81 2 x 51 2 81 2 x If the message IMAGE IS LARGERTHANTHE COPY PAPER appears image loss will occur In this case either continue with image loss or change the copy paper size or copy ratio 4 Ensure that the desired paper size has been automatically selected based on the selected copy ratio or select another size as needed P...

Страница 138: ...ss page 7 2 Load the special paper in the bypass tray or in the multi purpose drawer For the paper loading instructions see Loading paper in the bypass tray page 5 3 of the Operation manual for printer operation and general information or Loading paper in the multi purpose drawer page 1 21 of the Operation manual for printer operation and general information 3 Touch the PAPER SELECT key and then s...

Страница 139: ...r modes requiring setting screens start on the next page The dual page copy and job build functions do not require setting screens MARGIN SHIFT SPECIAL MODES PAMPHLET COPY ERASE JOB BUILD MULTI SHOT DUAL PAGE COPY OK Margin shift page 20 Erase page 21 Dual page copy page 22 Pamphlet copy page 23 Job build page 24 Multi shot page 25 When using the multi shot function set the original select the des...

Страница 140: ...ted to the right Image shifted to the left Original Image shifted to the right Image shifted to the left Margin Margin or Margin Margin 3 Set the shift amount as needed and touch the OK key inch 1 2 0 1 SIDE 2 OK OK CANCEL SIDE 1 inch 3 8 0 1 Use the key and the keys to set the shift amount The shift amount can be set from 0 to 1 in 1 8 increments 0 mm to 20 mm in 1 mm increments for the AB system...

Страница 141: ...s and eliminates the shadow at the center of copies 1 Touch the ERASE key on the SPECIAL MODES screen JOB BUILD ERASE The erase setting screen will appear 2 Select the desired erase mode ERASE EDGE ERASE CENTER ERASE EDGE CENTER ERASE Select one of the three erase modes The selected key will be highlighted 3 Adjust the amount of erase and touch the OK key inch 1 2 0 1 EDGE CANCEL OK Use the and ke...

Страница 142: ...on the document glass Center line of original Index This page is copied first 81 2 x11 or A4 Dual page copy Book original When copying book originals When copying a thick book press down lightly on the document cover 4 Ensure that 8 1 2 x 11 or A4 size paper is selected COPY RATIO PAPER SELECT AUTO 100 81 2 11 x If 8 1 2 x 11 or A4 size paper is not selected touch the PAPER SELECT key to select 8 ...

Страница 143: ...ill be selected automatically based on the original size and the paper size See steps 2 and 3 on page 16 7 Make all other desired settings such as exposure or the number of copies and press the START key 8 When using the automatic document feeder Copying will start after all originals have been scanned The next step is not needed When using the document glass Replace the original with the next ori...

Страница 144: ...D key will be highlighted 2 Touch the OK key on the special modes screen while JOB BUILD is highlighted OK ERASE JOB BUILD DUAL PAGE COPY MULTI SHOT 3 Place the first section originals in the document feeder tray page 7 Originals Page 1 50 sheets Page 51 50 sheets Divide the originals in sections of 50 sheets and scan the originals starting from the first page of section A and then scan section B ...

Страница 145: ...ch the MULTI SHOT key on the SPECIAL MODES screen MULTI SHOT The multi shot setting screen will appear 2 Select the number of originals to be copied onto one sheet of copy paper on the multi shot selection screen 2in1 4in1 The orientation of copy paper and the image of the originals may be rotated as needed 3 Select the layout LAYOUT Select the order in which the originals will be arranged on the ...

Страница 146: ...y from 1 to 10 on the storage register screen 1 6 RECALL ESS PROGRAM NUMBER PROGRAMS STORE 2 3 4 7 8 9 Highlighted storage register numbers are registers which already have programs stored If a highlighted number is selected a screen will appear with selections for deleting the selected program storing replacing the selected program with a new one or canceling to go back to the STORE DELETE screen...

Страница 147: ...rogram to be deleted 5 10 3 8 4 9 EXIT STORE DELETE If a number key for which no job program has been stored is selected the screen will change to the screen of step 4 on the previous page for storing a program The message TO STORE SELECT AND PRESS OK TO DELETE PRESS CANCEL will appear When CANCEL is pressed the screen will return to the selection screen shown to the left 3 Touch the DELETE key RE...

Страница 148: ...ed in step 2 the INTERRUPT touch key will be replaced by the CANCEL key as shown in the illustration To cancel interrupt copying at any time touch the CANCEL key 3 Make all other desired settings such as exposure paper size and number of copies and then press the START key When using the document glass replace the original with the next original and press the START key Repeat this operation until ...

Страница 149: ...splayed on the touch panel 1 Open the document feeding area cover and remove any misfed originals Document feeding area cover 2 Close the document feeding area cover Close the cover securely so that cover clicks into place 3 Open the document cover and turn the green rotating knob in the direction of the arrow to remove any misfed originals 4 Close the document cover A message may appear indicatin...

Страница 150: ...rder of originals correct Is a message requesting cancelation of job displayed Is a message indicating memory is full displayed Check Solution or cause If the indicator is not on the machine may be warming up Warm up should be completed in approximately 80 seconds Adjust the exposure in the manual mode See page 15 The exposure level in the AUTO mode can be adjusted using a key operator program Con...

Страница 151: ...ng system from the document feeder One sided scanning from the document glass Original feed system Automatic continuous feeding Original exit system Face down output Original transport system DSPF sheet through type reference position center document glass reference position is left rear Original setting direction Face down Original sizes 5 1 2 x 8 1 2 to 11 x 17 or A5 to A3 Original weight 14 to ...

Страница 152: ...status settings 33 Exposure adjustment 33 Rotation copy setting 33 Auto paper selection setting 33 600dpi x 600dpi scanning mode 33 Quick scan from document glass 33 Device control Original size detector setting 34 Disabling of document feeder 34 Using the key operator programs To use of the key operator programs follow the procedures described in the Key Operator s Guide on page 6 Also read Suppl...

Страница 153: ...9 indicates darker density on the touch panel Rotation copy setting If this program is set the image of originals will rotate when the orientation of the originals does not match that of the copy paper Rotation copy will function only if the auto paper select or auto image mode has been selected NOTE For copying from 5 1 2 x 8 1 2 or A5 size originals onto 5 1 2 x 8 1 2R or A5R paper this program ...

Страница 154: ...nd no original size will be displayed Disabling of document feeder This program is used to prevent use of the automatic document feeder when the scanner module malfunctions In this case scanning can still be done off the document glass KEY OPERATOR PROGRAMS Detectable original sizes Group Documentfeedertray forautomaticdocumentfeeding Document glass 11 x 17 8 1 2 x 14 1 INCH 1 8 1 2 x 11 8 1 2 x 1...

Страница 155: ...cover4 p65 2 04 01 19 18 1 ...

Страница 156: ...INSE2077FCZZ Operation manual for copier PRINTED IN CHINA SHARP ELECTRONICS CORPORATION Sharp Plaza Mahwah New Jersey 07430 2135 SHARP CORPORATION P350 P450 3500 3501 3551 4500 4501 4551 cover4 p65 2 04 01 19 18 2 ...

Страница 157: ...ctions of the Operation manual for printer operation and general information Be sure to keep all operation manuals handy for reference including this manual the Operation manual for printer operation and general information and operation manuals for any optional equipment which has been installed 350LP 450LP 350M 450M 3500 3501 3551 4500 4501 4551 Operation manual for facsimile SHARP CORPORATION P...

Страница 158: ...ed and found to comply with the limits for a Class A digital device pursuant to part 15 of the FCC Rules These limits are designed to provide reasonable protection against harmful interference when the equipment is operated in a commercial environment This equipment generates uses and can radiate radio frequency energy and if not installed and used in accordance with the instruction manual may cau...

Страница 159: ...please consult your dealer or your nearest Sharp customer assistance center When the lithium battery dies a message will appear in the display and the unit will no longer function Other information If a thunderstorm occurs we recommend that you unplug the power cord from the power outlet Information will be retained in memory even if the power cord is unplugged INTRODUCTION Thank you for purchasin...

Страница 160: ...ORED JOB 2 6 CANCELING A FAX TRANSMISSION 2 6 RECEIVING FAXES 2 7 RECEIVING A FAX 2 7 CHAPTER 3 USINGCONVENIENTFUNCTIONS1 ADVANCED TRANSMISSION METHODS Page SENDING THE SAME DOCUMENT TO MULTIPLE DESTINATIONS IN A SINGLE OPERATION BROADCAST TRANSMISSION 3 2 USING BROADCAST TRANSMISSION 3 3 AUTOMATIC TRANSMISSION AT A SPECIFIED TIME TIMER TRANSMISSION 3 4 SETTING UP A TIMER TRANSMISSION 3 4 TRANSMIS...

Страница 161: ...S AND PROGRAMS 6 2 STORING ONE TOUCH DIAL KEYS 6 3 EDITING AND DELETING ONE TOUCH KEYS 6 5 PROGRAMMING A GROUP KEY 6 6 EDITING AND DELETING GROUP KEYS 6 7 STORING A PROGRAM 6 8 EDITING AND DELETING PROGRAMS 6 8 Page STORING A GROUP INDEX 6 9 PROGRAMMING EDITING AND DELETING F CODE MEMORY BOXES 6 10 PROGRAMMING AN F CODE MEMORY BOX 6 10 SETTING FOR F CODE POLLING MEMORY BOXES NUMBER OF TRANSMISSION...

Страница 162: ...ervice temporarily If possible They will notify you in advance If advance notice is not practical you will be notified as soon as possible You will also be advised of your right to file a complaint with the FCC Your telephone company may make changes in its facilities equipment operations or procedures that could affect the operation of your equipment If this happens the telephone company will pro...

Страница 163: ...TANT SAFETY INFORMATION If any of your telephone equipment is not operating properly you should immediately remove it from your telephone line as it may cause harm to the telephone network The AC power outlet shall be installed near the equipment and shall be easily accessible Never install telephone wiring during a lightning storm Never install telephone jacks in wet locations unless the jack is ...

Страница 164: ...S AU CANADA AVIS L étiquette de l Industrie Canada identifie le matériel homologué Cette étiquette certifie que le matériel est conforme à certaines normes de protection d exploitation et de sécurité des réseaux de télécommunications Industrie Canada n assure toutefois pas que le matériel fonctionnera à la satisfaction de l utilisateur Avant d installer ce matériel l utilisateur doit s assurer qu ...

Страница 165: ...LATION 1 2 A LOOK AT THE OPERATION PANEL 1 3 FAX MODE CONDITION SETTING SCREEN 1 4 ORIGINALS 1 6 ORIGINALS THAT CAN BE FAXED 1 6 LOADING A DOCUMENT 1 7 USING THE AUTO DOCUMENT FEEDER 1 7 USING THE DOCUMENT GLASS 1 7 CHECKING THE SIZE OF A LOADED ORIGINAL 1 8 MANUALLY SETTING THE SCANNING SIZE 1 8 SELECTING RESOLUTION AND EXPOSURE SETTINGS 1 9 SELECTING THE RESOLUTION 1 9 SELECTING THE EXPOSURE 1 1...

Страница 166: ...mmed in the unit refer to page 3 15 of Operation manual for printer operation and general information If the date and time are wrong please correct them It is important to set the correct date and time because they are used for such features as Timer Transmission page 3 4 Program the sender s name and sender s number Refer to page 8 4 to program the name and fax number of the user of this product ...

Страница 167: ...ub addresses passcodes and numerical settings One digit is cleared each time you press the key When an original is being scanned this key can also be used to cancel scanning CA key Use to cancel a transmission or programming operation When the key is pressed the operation is canceled and you return to the initial screen next page When sending a fax this key is also used to cancel an image setting ...

Страница 168: ...an auto dial number one touch dialing or group dialing SUB ADDRESS key page 4 3 Touch this key to enter a sub address or passcode ADDRESS REVIEW key When performing a broadcast transmission touch this key to check your selected destinations Your selected destinations will appear as a list and the list can be edited Two sided scanning and verification stamp icon display pages 2 5 and 5 2 Icons appe...

Страница 169: ...stom settings refer to pages 6 3 and 6 9 Frequently used one touch key destinations can be stored on the FREQUENT USE card for convenient access One touch key display This shows the one touch keys that have been stored on the selected index card The key type is indicated by the icon at the right One touch keys in which a fax number is stored are indicated by a icon The display is initially set to ...

Страница 170: ...cannot be scanned Far edge Near edge Bottom edge Top edge Area that cannot be scanned 0 2 or less at top edge and 0 2 or less at bottom edge Near edge far edge 0 2 or less Faxed document width Receiving machine s paper width Reduced size Ratio 11 x17 8 1 2 x14 8 1 2 x14 1 0 64 Area ratio 11 x17 8 1 2 x11 8 1 2 x11 R 1 0 5 Area ratio 8 1 2 x14 8 1 2 x11 8 1 2 x11 R 1 0 78 Area ratio A document can ...

Страница 171: ...Do not place any objects under the original size detector plate Closing the document glass cover with an object underneath may damage the original size detector plate and prevent correct detection of the document size 3 Align the edges of the document pages and then insert the stack in the document feeder so that the first page is face down Insert the stack into the auto document feeder until it s...

Страница 172: ...nce again 4 Touch the outer OK key REDIAL OK OK KER L A4 You will return to the initial screen Pressing the inner OK key in the step above returns you to step 2 5 The selected size appears in the top half of the ORIGINAL key ORIGINAL STANDARD RESOLUTION A4 If you loaded a long original If you loaded a long up to 31 5 original in the auto document feeder touch the LONG SIZE key in step 3 above NOTE...

Страница 173: ...ator program Refer to page 8 3 When using the automatic document feeder the resolution setting cannot be changed once scanning has begun Even if you send a document using Fine Super fine or Ultra fine resolution some receiving fax machines may not be able to print the document at the same resolution Resolution settings Standard Touch this key if your original consists of normal sized characters li...

Страница 174: ...Touch the outer OK key OK OK LIGHT You will return to the initial screen Dark Select this setting if your original consists Original mostly of dark characters Auto This setting automatically adjusts the ex posure for light and dark parts of the origi nal Light Select this setting if your original consists Original mostly of faint characters Exposure settings NOTE When using the document glass to s...

Страница 175: ...ber On hook dialing This feature allows you to dial without lifting an extension phone connected to the machine Press the SPEAKER key listen for the dial tone through the speaker and then dial To speak with another person you must lift the extension phone connected to the machine when they answer Faxes must be sent manually when using on hook dialing Refer to page 5 3 On hook dialing is not possib...

Страница 176: ......

Страница 177: ...s such as sending faxes Page SENDING A FAX 2 2 BASIC PROCEDURE FOR SENDING FAXES 2 2 TRANSMISSION BY AUTO DIALING 2 5 TRANSMITTING A TWO SIDED DOCUMENT 2 5 PRIORITY TRANSMISSION OF A STORED JOB 2 6 CANCELING A FAX TRANSMISSION 2 6 RECEIVING FAXES 2 7 RECEIVING A FAX 2 7 ...

Страница 178: ...et the document size Refer to page 1 8 4 If needed adjust the resolution setting Refer to page 1 9 AUTO 8 X11 1 2 ORIGINAL STANDARD RESOLUTION 5 If needed adjust the exposure setting Refer to page 1 10 POLLING EXPOSURE DUAL PAGE SCAN SPECIAL MODES SRANDARD RESOLUTION 6 Dial the fax number The number that you entered appears in the message display If it is not correct press the C key and re enter t...

Страница 179: ... the job as explained on page 2 6 If the machine makes two beeps during or at the end of transmission and an error message appears in the message display refer to page 7 3 to fix the problem If the power is turned off or a power failure occurs while a document is being scanned in the auto document feeder the machine will stop and a document jam will occur After power is restored remove the documen...

Страница 180: ... send only the pages already scanned by touching the SEND key The page that was being scanned when the memory became full will be cleared from memory If the memory becomes full while scanning the first page of a document the transmission job is automatically canceled The number of jobs that can be stored will depend on the number of pages in each job and the transmission conditions The number of s...

Страница 181: ...to dialing one touch dialing or group dialing instead of entering a full fax number with the numeric keys follow the steps below To use an auto dial destination you must first program the full fax number and name of the destination Refer to page 1 11 for information on auto dialing and pages 6 3 6 6 for information on programming auto dial destinations 1 Perform steps 1 through 5 of Basic Procedur...

Страница 182: ...ve an urgent transmission job and multiple transmission jobs have already been stored you can give priority to the urgent job so that it will be transmitted immediately after the job currently being executed This is done from the job status screen For details on using the job status screen refer to page 1 14 of Operation manual for printer operation and general information 1 Press the JOB STATUS k...

Страница 183: ...o talk with the other person If received data cannot be printed If the machine runs out of paper or toner or a paper jam occurs print and copy jobs that are in progress will be held in memory until printing becomes possible The jobs are automatically printed when printing capability is restored When received data is held in memory the DATA light next to the IMAGE SEND key blinks You can also use t...

Страница 184: ......

Страница 185: ...3 2 USING BROADCAST TRANSMISSION 3 3 AUTOMATIC TRANSMISSION AT A SPECIFIED TIME TIMER TRANSMISSION 3 4 SETTING UP A TIMER TRANSMISSION 3 4 TRANSMISSION AND RECEPTION USING THE POLLING FUNCTION 3 5 USING THE POLLING FUNCTION 3 6 USING POLLING MEMORY 3 7 OWN NUMBER SENDING 3 9 FAXING A DIVIDED ORIGINAL DUAL PAGE SCAN 3 10 PROGRAMMING FREQUENTLY USED OPERATIONS 3 11 USING A PROGRAM 3 11 TRANSFERRING ...

Страница 186: ...ents to the same group of destinations it is convenient to program those destinations into a group key A group key is a one touch key in which multiple destinations are programmed The procedure for programming group keys is explained on page 6 6 When using a group key to send a fax the destinations programmed in the group key are counted as broadcasting destinations For example if five destination...

Страница 187: ... when successively dialing fax numbers with the numeric keys Example XXXX NEXT ADDRESS XXXX Dial Dial Cannot be omitted XXXX NEXT ADDRESS One touch NEXT ADDRESS One touch Dial Can be omitted Can be omitted If desired you can use the key operator program to set the machine so that the NEXT ADDRESS key must always be pressed refer to page 8 3 4 Touch the ADDRESS REVIEW key to display the list of des...

Страница 188: ...t the day of the week Touch the key or the key until the desired day is selected DAY OF THE WEEK IMER The initial setting is no selection If you select this setting the transmission will be performed as soon as the specified time arrives SETTING UP A TIMER TRANSMISSION 4 Select the time Touch the key or the key until the desired time appears 30 CANCEL TIME HH mm Select the time in 24 hour format E...

Страница 189: ...ion allows your machine to call a sending machine and initiate reception of a document loaded in that machine A timer setting can also be established to have the operation take place at night or another specified time refer to the previous page The other machine Document data previously scanned into memory Your machine Polling ask other machine to send document Document data is automatically sent ...

Страница 190: ...orming serial polling an auto dial key that includes a sub address or passcode page 4 2 cannot be selected 4 When you have finished entering the destination s press the START key JOB STORED appears in the screen Your machine prints the document after receiving it from the sending machine Manual polling A document should not be loaded in the machine when the following operation is performed Manual ...

Страница 191: ...and then the MEMORY BOX key MEMORY BOX PROGRAM OK SPECIAL MODES STANDARD RESOLUTION To cancel the operation touch the CA key 3 Touch the DATA STORE key POLLIN DATA STORE PRINT 4 Touch the PUBLIC BOX key PUBLIC BOX This specifies that the document will be scanned into the Public Box 5 Set the original size resolution exposure and other scanning conditions as needed 6 Press the Start key The documen...

Страница 192: ...c Box an icon will appear to the right of the PUBLIC BOX key To check the stored data you can print it out 1 Touch the SPECIAL MODES key in fax mode and then touch the MEMORY BOX key MEMORY BOX PROGRAM OK SPECIAL MODES STANDARD RESOLUTION 2 Touch the PRINT DATA key POLLING MEMORY ORE PRINT DATA 3 Touch the PUBLIC BOX key PUBLIC BOX Touching the CANCEL key will return you to the screen of step 2 4 ...

Страница 193: ... transmission If desired you can use the key operator program to omit the page number refer to page 8 6 Position of sender s information The key operator program can be used to select whether the sender s information is added outside the original data or inside the data page 8 7 The initial factory setting is outside the data Outside scanned data Inside scanned data None of the transmitted image i...

Страница 194: ...ES STANDARD RESOLUTION 2 Touch the OK key OK REDIAL AKER You will return to the initial screen 3 Place the original on the document glass page 1 7 and perform the transmission operation If you have more originals to scan after pressing the Start key and scanning the first original change originals and repeat scanning until all originals have been scanned When finished press the READ END key that a...

Страница 195: ...n Resolution and exposure Auto dial keys one touch or group keys are used to store the destination fax number A full number cannot be entered using the numeric keys When storing a broadcast transmission or serial polling operation in a program up to 300 destination fax numbers can be stored USING A PROGRAM 1 In fax mode load the document page 1 7 Do not load a document if you are performing a poll...

Страница 196: ...emory box page 4 6 cannot be transferred The result of transfer is indicated on an activity report page 7 3 USING THE TRANSFER FUNCTION Program the fax number of the transfer destination Use the key operator program to program the number of the transfer destination page 8 8 Only one fax number can be programmed The transfer function cannot be used unless a number is programmed Transferring receive...

Страница 197: ...t to you Page TRANSMISSION BETWEEN MACHINES SUPPORTING F CODES 4 2 MEMORY BOXES AND SUB ADDRESSES PASSCODES REQUIRED FOR F CODE TRANSMISSION 4 2 ENTERING A SUB ADDRESS AND PASSCODE FOR A MEMORY BOX IN THE OTHER MACHINE 4 3 CREATING A MEMORY BOX FOR F CODE TRANSMISSION 4 3 F CODE POLLING MEMORY 4 4 USING F CODE POLLING MEMORY 4 4 PROCEDURE FOR F CODE POLLING 4 5 F CODE CONFIDENTIAL TRANSMISSION 4 6...

Страница 198: ...MEMORY Sub address location in memory Select any number up to 20 digits Box name used to manage boxes in your machine Select a name of up to 18 characters Passcode key Select any number up to 20 digits Not required 1115 Product Planning Dept The Public Box is used for normal serial polling page 3 5 When communication occurs involving a memory box the communication will only take place if the sub a...

Страница 199: ... address and passcode have been programmed into the one touch key the following steps are not needed 2 Touch the SUB ADDRESS key CONDITION SETTINGS SUB ADDRESS ADDRESS REVIEW A slash appears at the end of the fax number If you make a mistake press the C key to clear the mistake 3 Use the numeric keys to enter the sub address of the other machine s memory box max 20 digits If you make a mistake pre...

Страница 200: ...as a passcode for F code polling memory The sub address and passcode of the polling memory box are always used for polling security The receiving machine bears the expense phone charges of the transmission USING F CODE POLLING MEMORY In order for another machine to retrieve a document from your machine you must first scan the document into the F code polling memory box You can check scanned docume...

Страница 201: ...nd passcode PWD of the other machine s F code polling memory box Serial polling selecting multiple fax machines to be polled using a group key or by touching the NEXT ADDRESS key is not possible with F code polling 1 In fax mode touch the SPECIAL MODES key and then the POLLING key POLLING EXPOSURE DUAL PAGE SCAN SPECIAL MODES STANDARD RESOLUTION The POLLING key is highlighted and the polling icon ...

Страница 202: ...al transmission NOTES This machine does not support Sharp s previous confidential transmission function which uses the programmed sender s fax number and ID code Refer to pages 6 10 through 6 13 for the procedures for creating editing and deleting F code confidential memory boxes Take care not to forget the print PIN programmed in the F code confidential memory box If you forget the passcode consu...

Страница 203: ...NDARD RESOLUTION The memory box menu appears To cancel the operation press the CANCEL key 2 Touch the PRINT DATA key CONFIDENTIAL RECEPTION DATA PRINT DATA 3 Touch the memory box key that has the document data you wish to print MEMORY BOX CONFIDENTIAL RECEPTION SLA SCANNER TEAM MARKETING GROUP SELECT MEMORY BOX A mark appears to the right of memory boxes that have received document data A memory b...

Страница 204: ... the document is called the relay request machine and the machine that has a memory box containing the end receiving machines and which relays the received document to those machines is called the relay machine The relay machine also prints the document sent by the relay request machine For example corporate headquarters in Seattle wants to send the same document to branch offices in San Francisco...

Страница 205: ...ving machines are programmed using auto dial keys one touch keys or group keys If you need to program an end receiving machine that has not been programmed in a one touch key program the number in a one touch key first and then create the memory box USING THE F CODE RELAY REQUEST FUNCTION your machine requests a relay broadcast First ask the operator of the other F code machine to create an F code...

Страница 206: ......

Страница 207: ...se of the fax machine such as connecting an extension phone Page STAMPING SCANNED ORIGINALS VERIFICATION STAMP FUNCTION 5 2 TURNING ON THE VERIFICATION STAMP FUNCTION 5 2 CONNECTING AN EXTENSION PHONE 5 3 CONNECTING AN EXTENSION PHONE 5 3 SENDING A FAX AFTER TALKING ON THE PHONE MANUAL TRANSMISSION 5 3 USING AN EXTENSION PHONE TO RECEIVE A FAX 5 4 RECEIVING A FAX AFTER TALKING MANUAL RECEPTION 5 5...

Страница 208: ... The STAMP key is only displayed if the verification stamp unit has been installed When touched the key is highlighted 4 Touch the OK key OK STAMP L ED T You will return to the initial screen 5 Make sure that the verification stamp icon appears to the right of the ORIGINAL key AUTO 8 X11 1 2 ORIGINAL STANDARD RESOLUTION When this icon appears the edge of each original will be stamped as it is scan...

Страница 209: ...d exposure NOTE If you have loaded the original on the document glass you can only send one page by manual transmission 2 Lift the extension phone Or you can press the SPEAKER key page 1 11 3 Dial the number of the other party or touch a one touch key CORPO TPS SHARP CORPORATION You can also dial using the keypad on the extension phone You cannot use a group key or a one touch key that includes a ...

Страница 210: ...x transmission NOTES The reception mode is initially set to AUTO If you have not connected an extension phone keep the reception mode set to AUTO If you hear beeps during reception or at the end of reception and an error message appears in the display refer to page 7 3 Changing the reception mode to MANUAL CONNECTING AN EXTENSION PHONE 1 Press the CUSTOM SETTINGS key 2 Touch the RECEIVE MODE key L...

Страница 211: ... on the extension phone you can activate fax reception from the extension phone This is called remote reception After speaking or when you hear a fax tone through the extension phone perform the following procedure with the extension phone still lifted NOTE The following procedure is not possible if you are on a pulse dial line and your extension phone cannot produce tone signals To find out wheth...

Страница 212: ......

Страница 213: ...MMING A GROUP KEY 6 6 EDITING AND DELETING GROUP KEYS 6 7 STORING A PROGRAM 6 8 EDITING AND DELETING PROGRAMS 6 8 STORING A GROUP INDEX 6 9 PROGRAMMING EDITING AND DELETING F CODE MEMORY BOXES 6 10 PROGRAMMING AN F CODE MEMORY BOX 6 10 SETTING FOR F CODE POLLING MEMORY BOXES NUMBER OF TRANSMISSIONS 6 11 SETTING FOR F CODE CONFIDENTIAL TRANSMISSION MEMORY BOXES PRINT PIN 6 12 SETTING FOR F CODE REL...

Страница 214: ...TROL key KEY OPERATOR PRO ADDRESS CONTROL REC 3 Touch the DIRECT ADDRESS PROGRAM key DIRECT ADDRESS PROGRAM CUSTOM INDEX The DIRECT ADDRESS PROGRAM menu appears 4 Touch the desired key and perform the programming operation Refer to the pages indicated below for the operation you wish to perform CUSTOM SETTINGS DIRECT ADDRESS PROGRAM INDIVIDUAL GROUP STORE OK PROGRAM AMEND DELETE INDIVIDUAL key Sto...

Страница 215: ...ne touch key in the FREQUENT USE index If you touch the wrong key simply touch the correct key 7 Touch the OK key 8 Touch the FAX No key P CORPORATION FAX No MODE The fax number entry screen appears 9 Use the numeric keys to enter the fax number To insert a pause between digits of the number touch the PAUSE key The pause appears as a hyphen Refer to page 8 4 to set the duration of the pause If you...

Страница 216: ...age 6 15 for the procedure for entering characters 14Check the transmission settings The initial transmission settings are TRANSMISSION SPEED 33 6 kbps and INTERNATIONAL CORRESPONDENCE MODE NONE To change either of the settings touch the MODE key S INITIAL 0666211221 3456 987654 AX No 33 6 kbps NON MODE If you do not wish to change the settings this step is not necessary After touching the MODE ke...

Страница 217: ...d then change or delete the key STORING EDITING AND DELETING AUTO DIAL KEYS AND PROGRAMS 1 Touch the AMEND DELETE key AMEND DELETE 2 Touch the one touch key you wish to edit or delete DIRECT ADDRESS AMEND DELETE SELECT ADDRESS TO AMEND DELETE EXIT SHARP CORPORATION FREQUENT USE ABCD EFGHI JKLMN OPQRST UVWXYZ ABC GROUP CORPO TPS SHARP GROUP SHARP DIGITAL DOCU SLA SCANNER TEAM CLIFF QUIROGA DANIEL E...

Страница 218: ...not programmed in a one touch key first program the destination in a one touch key and then store it in the group key STORING EDITING AND DELETING AUTO DIAL KEYS AND PROGRAMS 4 To check the destinations that you have stored in the group touch the ADDRESS REVIEW key OPQRST UVWXYZ ABC GROUP ADDRESS REVIEW A list of your selected destinations is displayed You can delete a displayed destination by tou...

Страница 219: ...END DELETE SELECT ADDRESS TO AMEND DELETE EXIT SHARP CORPORATION FREQUENT USE ABCD EFGHI JKLMN OPQRST UVWXYZ ABC GROUP CORPO TPS SHARP GROUP SHARP DIGITAL DOCU SLA SCANNER TEAM CLIFF QUIROGA DANIEL ERNY CHARLER WATTS PROGRAM To edit a group key follow steps 3 and 4 To delete a group key follow steps 5 and 6 When you have finished editing or deleting touch the EXIT key 3 Touch the key of the item y...

Страница 220: ...an store up to 300 destinations in a program however you cannot directly enter fax numbers with the numeric keys A destination must be programmed in an auto dial key one touch key or group key before it can be stored in a program 4 Touch the OK key 5 Your settings are displayed Make sure they are correct PROGRAM PROGRAM NAME SETTINGS ADDRESS 2 ADDRESSES HALF TONE SUPER FINE DARK ORIGINAL REGISTRAT...

Страница 221: ...OM SETTINGS key and then touch the ADDRESS CONTROL key refer to steps 1 and 2 on page 6 2 2 Touch the CUSTOM INDEX key DIRECT ADDRESS PROGRAM CUSTOM INDEX 3 Touch an index key USER 1 to USER 6 You can enter a name for the selected index CUSTOM SETTINGS CUSTOM INDEX SELECT THE KEY TO BE CUSTOM NAMED OK USER 1 USER 2 USER 3 USER 4 USER 5 USER 6 When touched the letter entry screen appears 4 Enter a ...

Страница 222: ...S PASS CODE VIA THE 10 KEY PAD THEN PARESS OK 214341434 PASS CODE SUB ADDRESS PASS CODE The characters and cannot be used in a sub address If you enter an incorrect digit press the C key and re enter the correct digit If you do not wish to enter a passcode proceed to step 9 7 To set a passcode touch the PASS CODE key OK CANCEL THE 10 KEY PAD THEN PRESS OK PASS CODE A slash appears after the sub ad...

Страница 223: ...ages F code polling memory this page F code confidential transmission next page F code relay broadcast transmission page 6 13 SETTING FOR F CODE POLLING MEMORY BOXES NUMBER OF TRANSMISSIONS You can select whether to have document data that was scanned into an F code polling memory box automatically cleared after one transmission or to leave the document data in the box and allow an unlimited numbe...

Страница 224: ...orget the passcode consult your Sharp dealer 1 Touch the PRINT PIN key SUB ADDRESS BOX NAME FAX INFORMATION 55112233 481221 PRINT PIN 2 Use the numeric keys to enter a 4 digit number F CODE MEMORY BOX CONFIDENTIAL PRINT PIN ENTER THE PRINT PIN VIA THE 10 KEY PAD THEN PRESS OK No 003 EXIT OK CANCEL NEXT If you make a mistake press the C key All digits will be cleared so you will need to re enter th...

Страница 225: ...XES EDITING AND DELETING A MEMORY BOX 1 Press the CUSTOM SETTINGS key and then touch the ADDRESS CONTROL key refer to steps 1 and 2 on page 6 2 2 Touch the F CODE MEMORY BOX key 3 Touch a memory box key POLLING MEMORY CONFIDENTIAL or RELAY BROADCAST on the bottom line AMEND DELETE 4 Touch the memory box key that you wish to edit or delete MEMORY BOX AMEND DELETE SELECT MEMORY BOX TO AMEND DELETE P...

Страница 226: ...VIDUAL LIST GROUP LIST PROGRAM LIST MEMORY BOX LIST PROCESSING PRINT DATA appears in the message display and printing begins To cancel printing touch the CANCEL key NOTES The list is printed before other print jobs are printed If you attempt to print a list when no data exists a warning message will appear PRINTING PROGRAMMED INFORMATION You can print out lists of the one touch keys group keys pro...

Страница 227: ...o enter or edit characters in setting screens such as auto dial key programming screens follow the steps below Characters that can be entered are alphabetical characters special characters numbers and symbols 5 Touch the ÃÄÂ ãäâ key Sharp 6 Touch the ä key Sharp To switch between upper case and lower case touch the ÃÄÂ ãäâ key When ãäâ is highlighted lower case letters are entered 7 Touch the ÃÄÂ ...

Страница 228: ...can continue touching keys to enter characters You can also touch another character type selection key ÃÄÂ ãäâ key or AB ab 12 key to enter characters other than numbers and symbols 3 When you have finished entering characters touch the OK key 1 1 You will exit the character entry screen and return to the programming screen If you touch the CANCEL key you will return to the programming screen with...

Страница 229: ...ou make efficient use of the fax features of the machine including solutions to common problems Page WHEN A TRANSACTION REPORT IS PRINTED 7 2 VIEWING THE COMMUNICATION ACTIVITY REPORT 7 3 WHEN AN ALARM SOUNDS AND A WARNING MESSAGE IS DISPLAYED 7 3 PROBLEMS AND SOLUTIONS 7 4 ...

Страница 230: ...A power failure occurred during the transaction MEMORY OVER The memory became full during quick on line transmission MEM FULL The memory became full during reception LENGTH OVER The transmitted document was over 59 long and therefore could not be received ORIGINAL ERROR Manual transmission was not successful because a jam occurred PASS NG The connection was broken because the polling passcode was ...

Страница 231: ...s have been completed Close the indicated cover Turn off the power and then turn it back on If the same message still appears contact your dealer Page Printer manual 1 16 Printer manual 1 25 1 7 2 4 2 4 1 5 7 2 7 2 7 3 and 7 4 Message screen Alarm OPEN TRAY x AND ADD xxxxxxxx PAPER THE LINE WAS BUSY FAX TRANSMISSION WAS SUSPENDED PLEASE RETURN xx ORIGINALS TO THE DOCUMENT TRAY THEN PRESS START THE...

Страница 232: ...ons Turn the main switch on Press the IMAGE SEND key to set the machine to fax mode Check with the operator of the receiving machine Check the transmittable sizes Make sure the original is placed so that the correct side is scanned Check with the operator of the other machine Try the transmission again Check the resolution and exposure settings Set the clock to the correct time Restore printing ca...

Страница 233: ... operator programs used by key operators Key operators should read this chapter well to ensure correct use of the programs Page KEY OPERATOR PROGRAMS 8 2 KEY OPERATOR PROGRAM LIST 8 2 USING THE KEY OPERATOR PROGRAMS 8 2 SETTING PROGRAMS 8 3 PRINTING OUT SETTINGS 8 10 ...

Страница 234: ... Must input next address key at broadcast setting 8 3 Initial resolution setting 8 3 Default verification stamp 8 3 Fax default settings Own number and name set 8 4 Dial mode setting 8 4 Auto wake up print 8 4 Pause time setting 8 4 Speaker volume setting 8 4 Original print on send error report 8 5 Remote reception number setting 8 5 Transaction report print select setting 8 5 Activity report prin...

Страница 235: ... is set to 12 Must input next address key at broadcast setting YoucanselectwhethertheNEXTADDRESSkeymust be pressed before entering the next destination when performing a broadcast transmission page 3 2 Normally the machine is set so that touching the NEXT ADDRESS key can be omitted except when the numeric keys are used to enter one full fax number after another full fax number Example Normal setti...

Страница 236: ... using the numeric keys To enter a press the key To enter a space press the SPACE key If you make a mistake press the C key and re enter the correct digit 3 Touch the OK key YouwillreturntotheOWNNUMBERANDNAMESETscreen The number you entered appears Make sure it is correct Dial mode setting Setting your line type Select the appropriate setting for your line type Tone is normally selected It is also...

Страница 237: ...INT OUT ERROR REPORT ONLY NOT PRINT OUT NOTICE PAGE NOPRINTEDREPORT The normal settings are indicated by shading above Activity report print select setting You can select whether to have the activity report automatically printed out after 50 transactions both transmissions and receptions have been recorded or specify a time that the report is to be automatically printed out once a day only Both se...

Страница 238: ...horizontal orientation 8 1 2 x11 R or rotate a 5 1 2 x8 1 2R document to 5 1 2 x8 1 2 The setting is normally turned on and documents are rotated counterclockwise 8 1 2 x11 R documents are not rotated KEY OPERATOR PROGRAMS ROTATION SENDING SETTING ORIGINAL SET SENDING DIRECTION OK 8 X11R 1 2 5 X8 R 1 2 1 2 5 X8 1 2 1 2 8 X11 1 2 Rotation settings can be separately established for different documen...

Страница 239: ...ed to select whether your machine will re attempt the call if the transmission fails due to a line error Normally your machine is set to not automatically re attempt the call To set the machine to automatically re attempt the call touch the box so a checkmark appears and then adjust the interval of recall setting below Note that only one re attempt is made the number of re attempts cannot be selec...

Страница 240: ...arator paper to be drawn Output tray setting This setting is used to select the output tray for received faxes The trays that can be selected will vary depending on what peripheral devices have been installed KEY OPERATOR PROGRAMS Fax receive settings The fax reception settings allow you to adjust certain parameters for receiving faxes to better suit your needs Settings that can be adjusted depend...

Страница 241: ...ling memory this setting is used to select whether any machine will be allowed to poll your machine or only machines that have been programmed in your machine Polling security is normally turned on a checkmark appears in the box To allow any machine to poll your machine touch the box to remove the checkmark Passcode number setting When the polling security setting is turned on use this setting to ...

Страница 242: ...CTIVITY REPORT SENDER LIST ALL KEY OPERATOR PROGRAMS LIST PROCESSING PRINT DATA appears in the message screen and printing begins To cancel printing touch the CANCEL key NOTES The list is printed before other jobs waiting to be printed In the screen of Step 4 you can touch the SENDER LIST key to print the Sender List This allows you to check the name and fax number you programmed in Own number and...

Страница 243: ...9 1 CHAPTER 9 APPENDIX This chapter contains reference information regarding the fax features of the machine Page SPECIFICATIONS 9 2 ...

Страница 244: ...5 1 2 x8 1 2 Vertically oriented feeding Maximum length 31 1 2 using DSPF Refer to pages 2 4 for transmission of 5 1 2 x8 1 2 size documents Effective scanning width 11 7 maximum Halftone transmission Yes 256 levels Contrast adjustment Automatic dark and light by manual adjustment Extension telephone connection Possible 1 telephone Auto dialing Combined total of 500 one touch and group keys redial...

Страница 245: ...9 3 9 NOTE ...

Страница 246: ...9 4 NOTE ...

Страница 247: ......

Страница 248: ...ctions of the Operation manual for printer operation and general information Be sure to keep all operation manuals handy for reference including this manual the Operation manual for printer operation and general information and operation manuals for any optional equipment which has been installed 350LP 450LP 350M 450M 3500 3501 3551 4500 4501 4551 Operation manual for facsimile SHARP CORPORATION P...

Страница 249: ...ctions of the Operation manual for printer operation and general information Be sure to keep all operation manuals handy for reference including this manual the Operation manual for printer operation and general information and operation manuals for any optional equipment which has been installed 350LP 450LP 350M 450M 3500 3501 3551 4500 4501 4551 Operation manual for network scanner SHARP CORPORA...

Страница 250: ......

Страница 251: ...r Such settings must be effected by the system administrator who has the special network related backgrounds This manual assumes that several options have been installed TABLE OF CONTENTS Page INTRODUCTION 1 SETTINGS AND PROGRAMMING REQUIRED FOR THE NETWORK SCANNER FEATURE 2 ABOUT THE WEB PAGE 2 SETTING PASSWORDS 2 BASIC SETTINGS FOR NETWORK SCANNING 3 SETTING UP DESTINATION INFORMATION 4 STORING ...

Страница 252: ...G PASSWORDS Passwords can be set to restrict Web page access and protect settings Note that it is not necessary to set passwords the network scanner functionality can also be used without passwords A password can be set for the administrator and passwords can be set for each user If you use a user password to access theWeb page you will be able to establish edit and delete destinations in the Scan...

Страница 253: ...for Scan to E mail Enter a subject when using Scan to E mail Only one subject can be entered If nothing is entered Scanned image from Device Name will appear The name that appears in Device Name is the name stored in Name in the screen that appears when you click Status Alert E mail in the menu frame If a name has not been stored the product name will appear E mail Server and DNS Server Settings E...

Страница 254: ...ink you must also enter the settings under E mail Setup for the e mail server Refer to page 3 Storing destinations for Scan to Desktop Scan to Desktop can only be used if Network Scanner Tool is installed in your computer Network Scanner Tool is included on the CD ROM that accompanies the AR NS2 Network Scanner Expansion Kit You can store a Scan to Desktop destination in the Web page or in Network...

Страница 255: ...de so you only need to make a selection if the initial settings are not satisfactory For an explanation of the initial settings of each of the transmission methods click Help in the menu frame NOTE Internet Fax only has one file format TIFF F and thus there is no selection MH G3 or MMR G4 can be selected for the compression mode STORING SENDER INFORMATION To store the sender information Sender Nam...

Страница 256: ...xt page Touch this key when you want to use an auto dial number one touch dialing or group dialing ADDRESS REVIEW key page 10 When performing Scan to E mail or Internet Fax broadcast transmission touch this key to check your selected destinations Your selected destinations will appear as a list and the list can be edited SENDER LIST key page 8 Touch this key to select the sender when sending an im...

Страница 257: ... the screens NOTE The screen showed above is the alphabetical address directory If desired the initial screen can be set to the group address directory refer to page 26 CONDITION SETTINGS key This displays the condition setting screen previous page which is used to set various conditions ABC GROUP key Touch this key to switch between the alphabetical index and the group index Index keys One touch ...

Страница 258: ...ed original or use the verification stamp function if the optional verification stamp unit is installed refer to pages 11 and 12 4 If needed adjust the resolution setting Refer to page 14 AUTO 8 X11 1 2 ORIGINAL STANDARD RESOLUTION The initial factory setting is STANDARD 5 If needed adjust the exposure setting Refer to page 15 AUTO 8 X11 ORIGINAL STANDARD RESOLUTION AUTO EXPOSURE 1 2 The initial f...

Страница 259: ... READ END The machine makes a beep sound to inform you that the transmission job is stored and JOB STORED appears in the message display The destination is automatically called and the document transmitted after previously stored jobs are completed Open the document glass cover and remove the document NOTES Canceling transmission To cancel transmission while SCANNING ORIGINAL appears in the displa...

Страница 260: ...ey RESSION MODE CANCEL OK OK You will return to the initial screen If you are not performing a broadcast transmission go directly to step 9 7 If you wish to enter another e mail address repeat steps 2 through 6 NOTES If the key operator program has been set so that the NEXT ADDRESS key must always be pressed page 26 and you wish to enter another address press the NEXT ADDRESS key and then repeat s...

Страница 261: ...hen load the document in the auto document feeder 2 Touch the ORIGINAL key AUTO 8 X11 1 2 ORIGINAL STANDARD RESOLUTION When you touch the ORIGINAL key check the original size displayed in the key 3 Touch the 2 SIDED BOOKLET key or the 2 SIDED TABLET key as appropriate for the original you loaded AUTO MANUAL 2 SIDED BOOKLET 2 SIDED TABLET ORIGINAL SIZE If necessary touch the MANUAL key and set the ...

Страница 262: ...11 1 2 ORIGINAL STANDARD RESOLUTION When this icon appears the edge of each original will be stamped as it is scanned If you have selected two sided scanning the verification stamp icon will appear to the right of the two sided scanning icon 6 Begin scanning The verification stamp function automatically turns off when all originals have been scanned Note that the function will also automatically t...

Страница 263: ...the MANUAL key ROTATE THE IMAGE 90 DEGREE MANUAL ST UTO 2 SIDED TABLET 2 SIDED BOOKLET ORIGINAL SIZE The sizes that can be selected are displayed NOTE If you wish to rotate the original 90 when creating an image file click the Load the original so that the image is oriented horizontally checkbox a checkmark should appear in the box 3 Touch the desired original size key OK OK INCH AB ORIGINAL SIZE ...

Страница 264: ... a different setting using the key operator program Refer to page 26 When using the automatic document feeder the resolution setting cannot be changed once scanning has begun Resolution settings Standard Touch this key if your original consists of normal sized characters like those in this manual Fine Touch this key if your original has small characters or diagrams The original will be scanned at ...

Страница 265: ...key 2 Touch the desired exposure key AUTO DARK ORIGINAL LIGHT ORIGINAL The selected key is highlighted 3 Touch the OK key OK LIGHT You will return to the initial screen NOTE When using the document glass to scan pages an original the exposure setting can be changed each time you change pages When using the automatic document feeder the exposure setting cannot be changed once scanning has begun Dar...

Страница 266: ...ON OF A STORED JOB If you have an urgent transmission job and multiple transmission jobs have already been stored you can give priority to the urgent job so that it will be transmitted immediately after the job currently being executed This is done from the job status screen For details on using the job status screen refer to page 1 14 of Operation manual for printer operation and general informat...

Страница 267: ...X E MAIL INTER The No that automatically appears is the lowest number from 001 to 500 that has not yet been programmed When NAME is touched the letter entryscreenappears Enterup to 36 characters for the name NOTE If you are going to use the Web page to edit or delete the stored name at a later time do not use the characters or These characters cannot be displayed in the Web page 7 Touch the INITIA...

Страница 268: ... the key Only the first 18 characters of the name entered in step 6 will be displayed If you need to change the name that will be displayed in the key touch the KEY NAME key NAME SHARP CORPORATION E MAIL INTERNET REGISTRATION IS COMPLETED INDEX USER 3 ADDRES KEY NAME SHARP CORPORATION If you do not wish to change the name this step is not necessary 17Check the file format and the compression mode ...

Страница 269: ...PDF MMR G4 FILE FORMAT INTERNET FAX 5 Make sure that your changes are correct and then touch the EXIT key S INITIAL DELETE EXIT If you wish to change another one touch key repeat steps 3 through 5 6 Touch the DELETE key S INITIAL DELETE EXIT 7 Touch theYES key DELETE THE ADDRESS SHARP CORPORATION NO YES SHARP CORPORATION PDF FILE FORMAT If you wish to delete another one touch key repeat steps 3 6 ...

Страница 270: ...t of your selected destinations is displayed You can delete a displayed destination by touching it When a message appears asking if you want to delete the destination touch the YES key 7 Touch the outer OK key DIRECT ADDRESS GROUP SELECT ADDRESS TO DELETE GROUP NAME SHARP GROUP OK OK SHARP CORPORATION TPS The number of destinations in the group appears to the right of the ADDRESS key 8 Check the n...

Страница 271: ...P A B C GROUP SHARP CORPORATION TPS The one touch keys stored in the group are highlighted To add another one touch key to the group touch the key to highlight it To delete a one touch key from the group touch the key so that it is no longer highlighted 5 Make sure the edited information is correct and then touch the EXIT key S INITIAL DELETE EXIT ES If you wish to change another group key repeat ...

Страница 272: ...E ADDRESS SENDER NAME 1 GROUP The display changes to the address entry screen when you touch the RE ADDRESS key Up to 64 characters can be entered for the sender s e mail address When finished press the OK key to return to the original screen 6 If you have finished storing senders touch the EXIT key If you wish to store another sender touch the NEXT key EDITING AND DELETING SENDER INFORMATION Use ...

Страница 273: ...dex key USER 1 to USER 6 You can enter a name for the selected index CUSTOM SETTINGS CUSTOM INDEX SELECT THE KEY TO BE CUSTOM NAMED OK USER 1 USER 2 USER 3 USER 4 USER 5 USER 6 When touched the letter entry screen appears 4 Enter a maximum of 6 characters for the index name Use the key to clear the displayed name and then enter the desired name When finished touch the OK key The new name appears i...

Страница 274: ...ou send a scanned image a message informing you of the error and an error code will appear in the touch panel on the machine Error Code Table Error Code Description of the Error CE 01 The optional network interface card Print Server Card is not installed or is out of order CE 02 Cannot find the specified mail server or FTP server CE 03 The server was down during the scanning of the original CE 04 ...

Страница 275: ...M LIST Program name Page Image send settings Operation settings Default display setting 26 Thenumberofdirectaddresskeysdisplayedsetting 26 Mustinputnextaddresskeyatbroadcastsetting 26 Initial resolution setting 26 Default verification stamp 26 Scan to E mail initial status settings Default sender set 27 Initial file format setting 27 Compression mode at broadcasting 27 USING THE KEY OPERATOR PROGR...

Страница 276: ...hen the number of one touch keys displayed is set to 12 Must input next address key at broadcast setting You can select whether the NEXT ADDRESS key must be pressed before entering the next destination when performing a broadcast transmission only for Scan to E mail Usually this is set so that the NEXT ADDRESS key can be omitted Example Normal setting factory setting XXXX NEXT ADDRESS One touch NE...

Страница 277: ...ing Compression mode at broadcasting Default sender set If you do not select a sender when performing a Scan to E mail operation the sender information stored with this setting is automatically used You can check the stored sender information by printing the SENDER list 1 Touch the SENDER NAME key and then enter the sender name The sender name entry screen appears Up to 20 characters can be entere...

Страница 278: ... 10Base T 100Base TX Supported mail system Mail servers supporting SMTP Number of destinations 500 maximum 2 Number of senders 20 maximum Output resolution Destination type E mail FTP Broadcast transmission Broadcast transmission Resolution E mail Internet Fax Fax E mail Internet Fax STANDARD 200x200dpi 200x100dpi 203 2x97 8dpi 8x3 85line mm FINE 300x300dpi 200x200dpi 203 2x195 6dpi 8x7 7line mm S...

Страница 279: ......

Страница 280: ...0LP 350M 450M 3500 3501 3551 4500 4501 4551 Operation manual for network scanner PRINTED IN CHINA 2001D KS1 TINSE2119FCZZ SHARP CORPORATION SHARP ELECTRONICS CORPORATION Sharp Plaza Mahwah New Jersey 07430 2135 ...

Отзывы: